I love yarn and I love working with yarn. I especially love crochet and Tunisian crochet.
Sometimes I test crochet patterns, sometimes I design something myself and sometimes I just make something nice for myself.
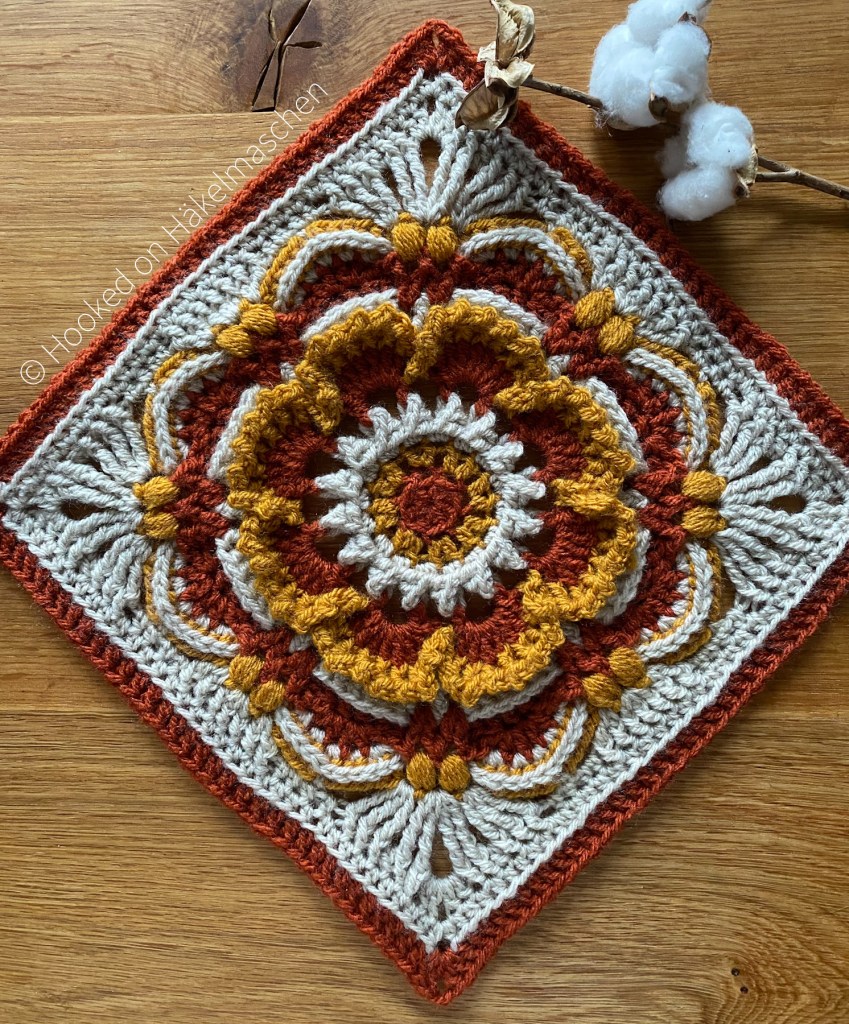
While revising my Pattern Tests page I noticed that I still haven‘t shown my Fancy Nancy square. Shame! So I thought I would write a quick post to catch up!
Fancy Nancy is a design by Pam Knighton-Haener from a Yarn of Serendipity. I tested this pattern already in October last year.
Normally her squares are designed to use an Aran cotton yarn. I must confess not exactly my favorite yarn. At least I haven‘t found one I like to work with yet. So this time I decided to try my standard acrylic DK yarn. Just to see how it works.
I used Stylecraft Special DK in Copper, Parchment and Gold, my favorite autumn colours. I followed her colour scheme 2 and only switched the colour for the last round.
With Aran the squares should be 28 cm (11 inch) or about 30 cm (12 inch) depending on the hook size. With DK yarn my Fancy Nancy became 25 x 25 cm (about 10 inch) tall.
I am very pleased with my result although I assume a cotton yarn would work better. Pat uses a lot of trebles and double trebles in her patterns. These stitches just look better when they are blocked. Unfortunately I still have problems to block acrylic yarn properly.
Fancy Nancy Square
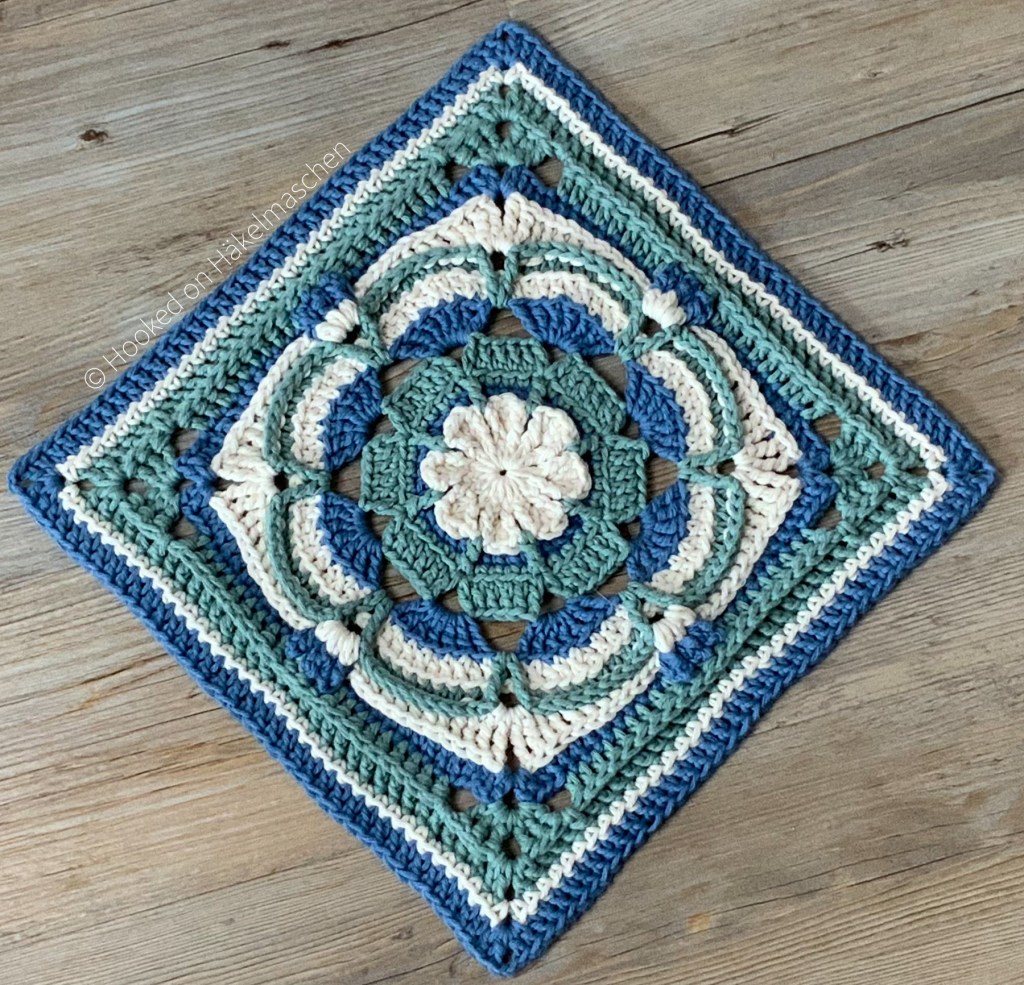
I started testing for Pam in September 2020 and since then had the opportunity to test four of her lovely squares. Well, five, to be correct! I just finished testing her latest design. The pattern has not been published yet, so I cannot show it. But what I can show again are the squares I have made so far.
Carter Jude SquareMargaret SquareBrood of Angels
Maybe I should get some suitable cotton yarn and make some more? One day it would make a beautiful blanket.
All of Pam’s designs are so rich in texture, they would even look great in a solid colour.
If you would like to try one of Pam’s designs just visit her Ravelry store. She also offers some of her patterns for free, have a look!
Finally I was able to start this pattern. I fell in love with it when Ana published the pattern about one year ago. Since then I have promised hubby to make him a blanket with it. When Ana lately announced her MAL I thought it was a good time to start with it.
The colours
It is always hard to choose the right colours for a blanket. At least it is for me. It is very rare that I see a pattern and immediately know which colours I want to make it in. For Midnight Snowflakes I instantly had white combined with a grey tone in mind. White for the background with grey snowflakes! But something made me hesitate. I probably knew instinctively that hubby wouldn’t like it. And so it was!
After he told me that this is much too bright (???) my idea was to switch the colours and do the snowflakes in classic white and the background in a dark grey. Looking for a yarn that might be a bit more special than my standard acrylic yarn I came across Cookie from Järbo. The colour Cloudy was exactly what I was looking for, off white changing to a soft, light grey – and on sale! From what I saw in the photos this would go great with Rotterdam from Scheepjes Colour Crafter. (Rotterdam is a dark grey, very similar to Graphite from Stylecraft Special DK.) So I placed my order.
My disappointment could not have been greater when the yarn arrived. Rotterdam was what I expected, but … You can already see it in my photos. Instead of white with a little bit of grey my Cookie is grey with a little bit of white. Much too dark in combination with Rotterdam – even hubby agreed.
I have to say, the yarn itself is great. Nice and soft with a great stitch definition. I didn’t send it back. It will be used in another project. It would certainly look good in a Winter Wonderland.
Since I did not want to order online again on suspicion I had to find another match with colours I had. Combinations with Stylecraft Special DK in A Hint of Silver or Parma Violet looked nice but were not what I had in mind. I liked the contrast with white, hubby didn’t. I even tried to create a gradient myself but either the contrast between my colours was too low or there was no gradation in between.
Finally I found Duck Egg in my stash. I like the combination of Duck Egg and dark grey and hubby agreed. This is how my choice of colour came about. To be honest, I still don’t know if hubby really likes it or if he was just so annoyed that he said yes.
The MAL runs util 28. February 2022. The pattern is available via Ravelry. Until the end of February there is a 50% discount (code on Ana’s Facebook group).
Midnight Snowflakes pattern by One Skein of Love, hooked by ELeni
I am probably a bit late with my review of the past year, but better late than never, as we say. I have been working on a new test since the middle of December and hardly have time for anything else. Due to various circumstances the time frame to finish this test is more than sporty. It is a beautiful blanket but that’s all what I can tell you for now – it is a still a BIG secret.
Review 2021
Scrolling through my photos and thinking about the past year there were definitely some highlights. Like every year I was surprised how many there were and tried to capture them here.
One of the biggest highlights in 2021 was that I started my blog, otherwise I would not be sitting here writing this post right now. It all started last February on blogspot with “This and That – made by ELeni“. Later I decided to rework the blog completely and switch to WordPress. A decision I do not regret to this day.
Through the blog I got in touch with Ana from One Skein of Love. Now I test for her and am one of the admins of her Facebook group. As life goes!
From a crochet point of view 2021 had started with several tests for Dana from misssBerlin. It is always so much fun to create her little Dudes. In 2021 we had the The Succulent Dudes, The Suga’ Dudes, and The Carnival Treat Dude s. Unfortunately I did not manage to finish my Seashell Dudes, just as I did not finish my When Summer turns into Fall blanket.
And in between, apart from some tests for BebaBlanket, I also worked with Pam from A Yarn of Serendipity again: The Margaret Square, Brood of Angels and Fancy Nancy, which I haven‘t shown here yet.
And, oh yes, I wrote down my own pattern, my first one, published on Ravelry. That was also quite an experience!
Quite a busy year!
And of course not forgetting the short holiday that we were able to take despite the pandemic. Something very precious in times like these. And the first peach from our little peach tree. Unfortunately we could only harvest one, the others fell from the tree before they were rally ripe. But the one was so sweet and delicious!
And, after one and a half socks have been hiding in my knitting basket since the beginning of 2020, they were finally finished for Christmas. Hubby has new socks and loves them.
I am curious to see what 2022 will bring! I wish you all the best for this year!
256 rows, Pattern 1 – 14, following the Cal pattern
Border
Double border
Finished Size
114 x 148 cm
〰️〰️〰️〰️〰️〰️〰️〰️
And for those who are interested – my detailed yarn amounts
〰️〰️〰️〰️〰️〰️〰️〰️
Long overdue update, June 2024: I’ve finally redesigned the documents with my colour scheme. Please don’t be surprised that it looks a little different, the content is the same.
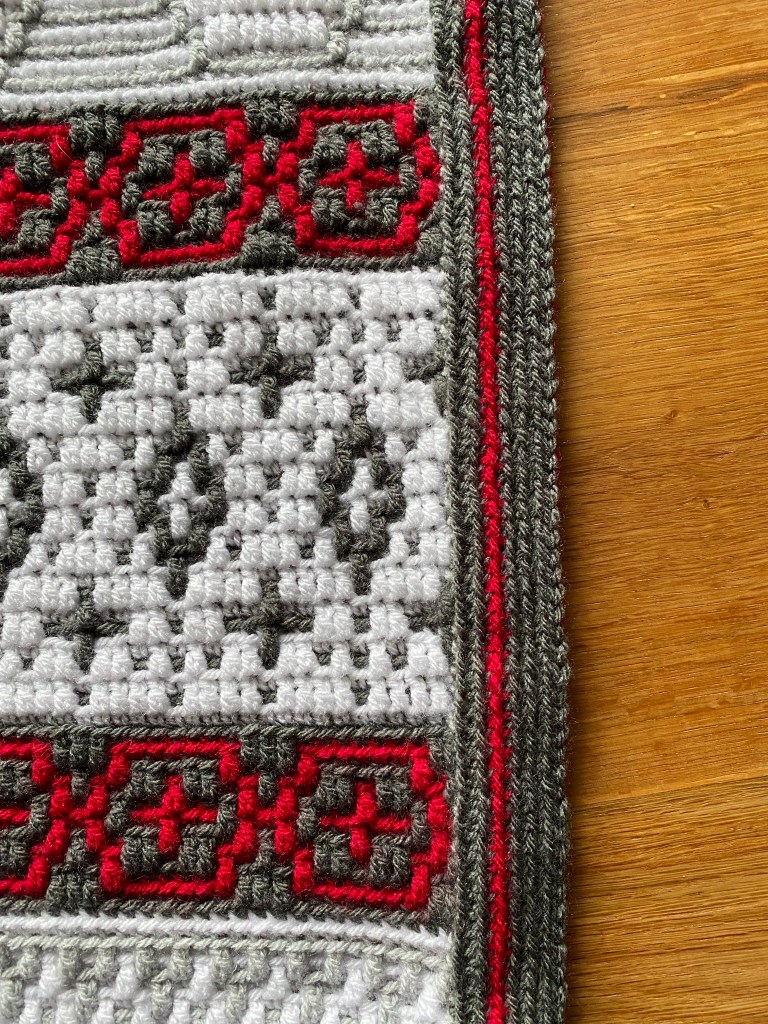
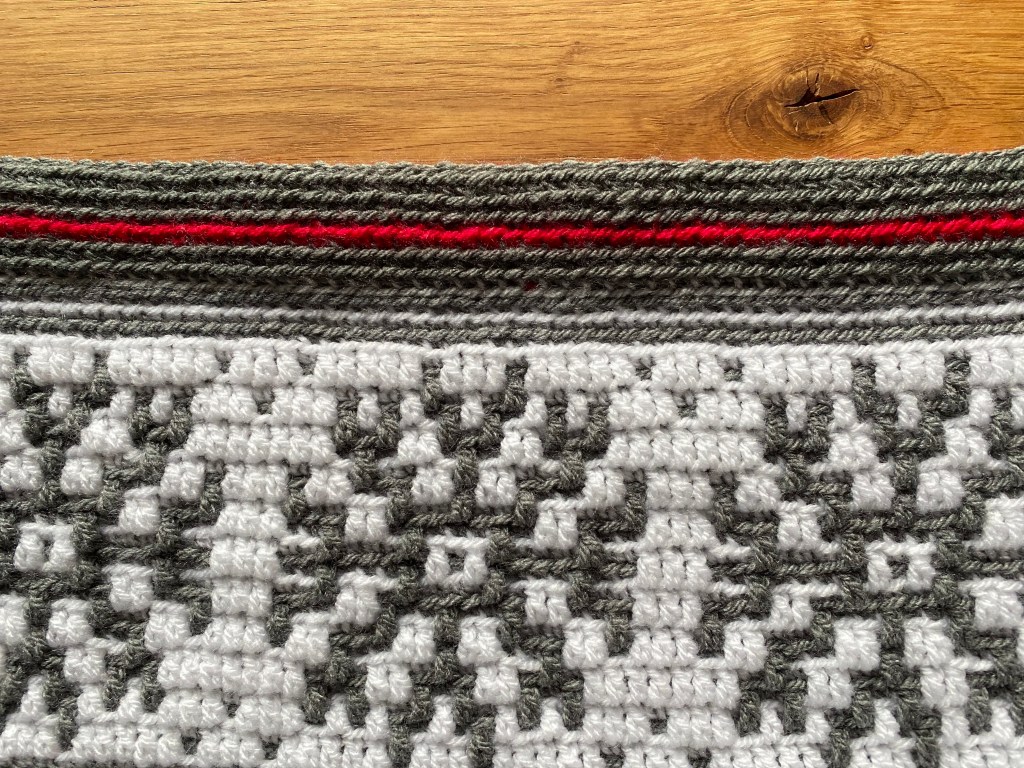
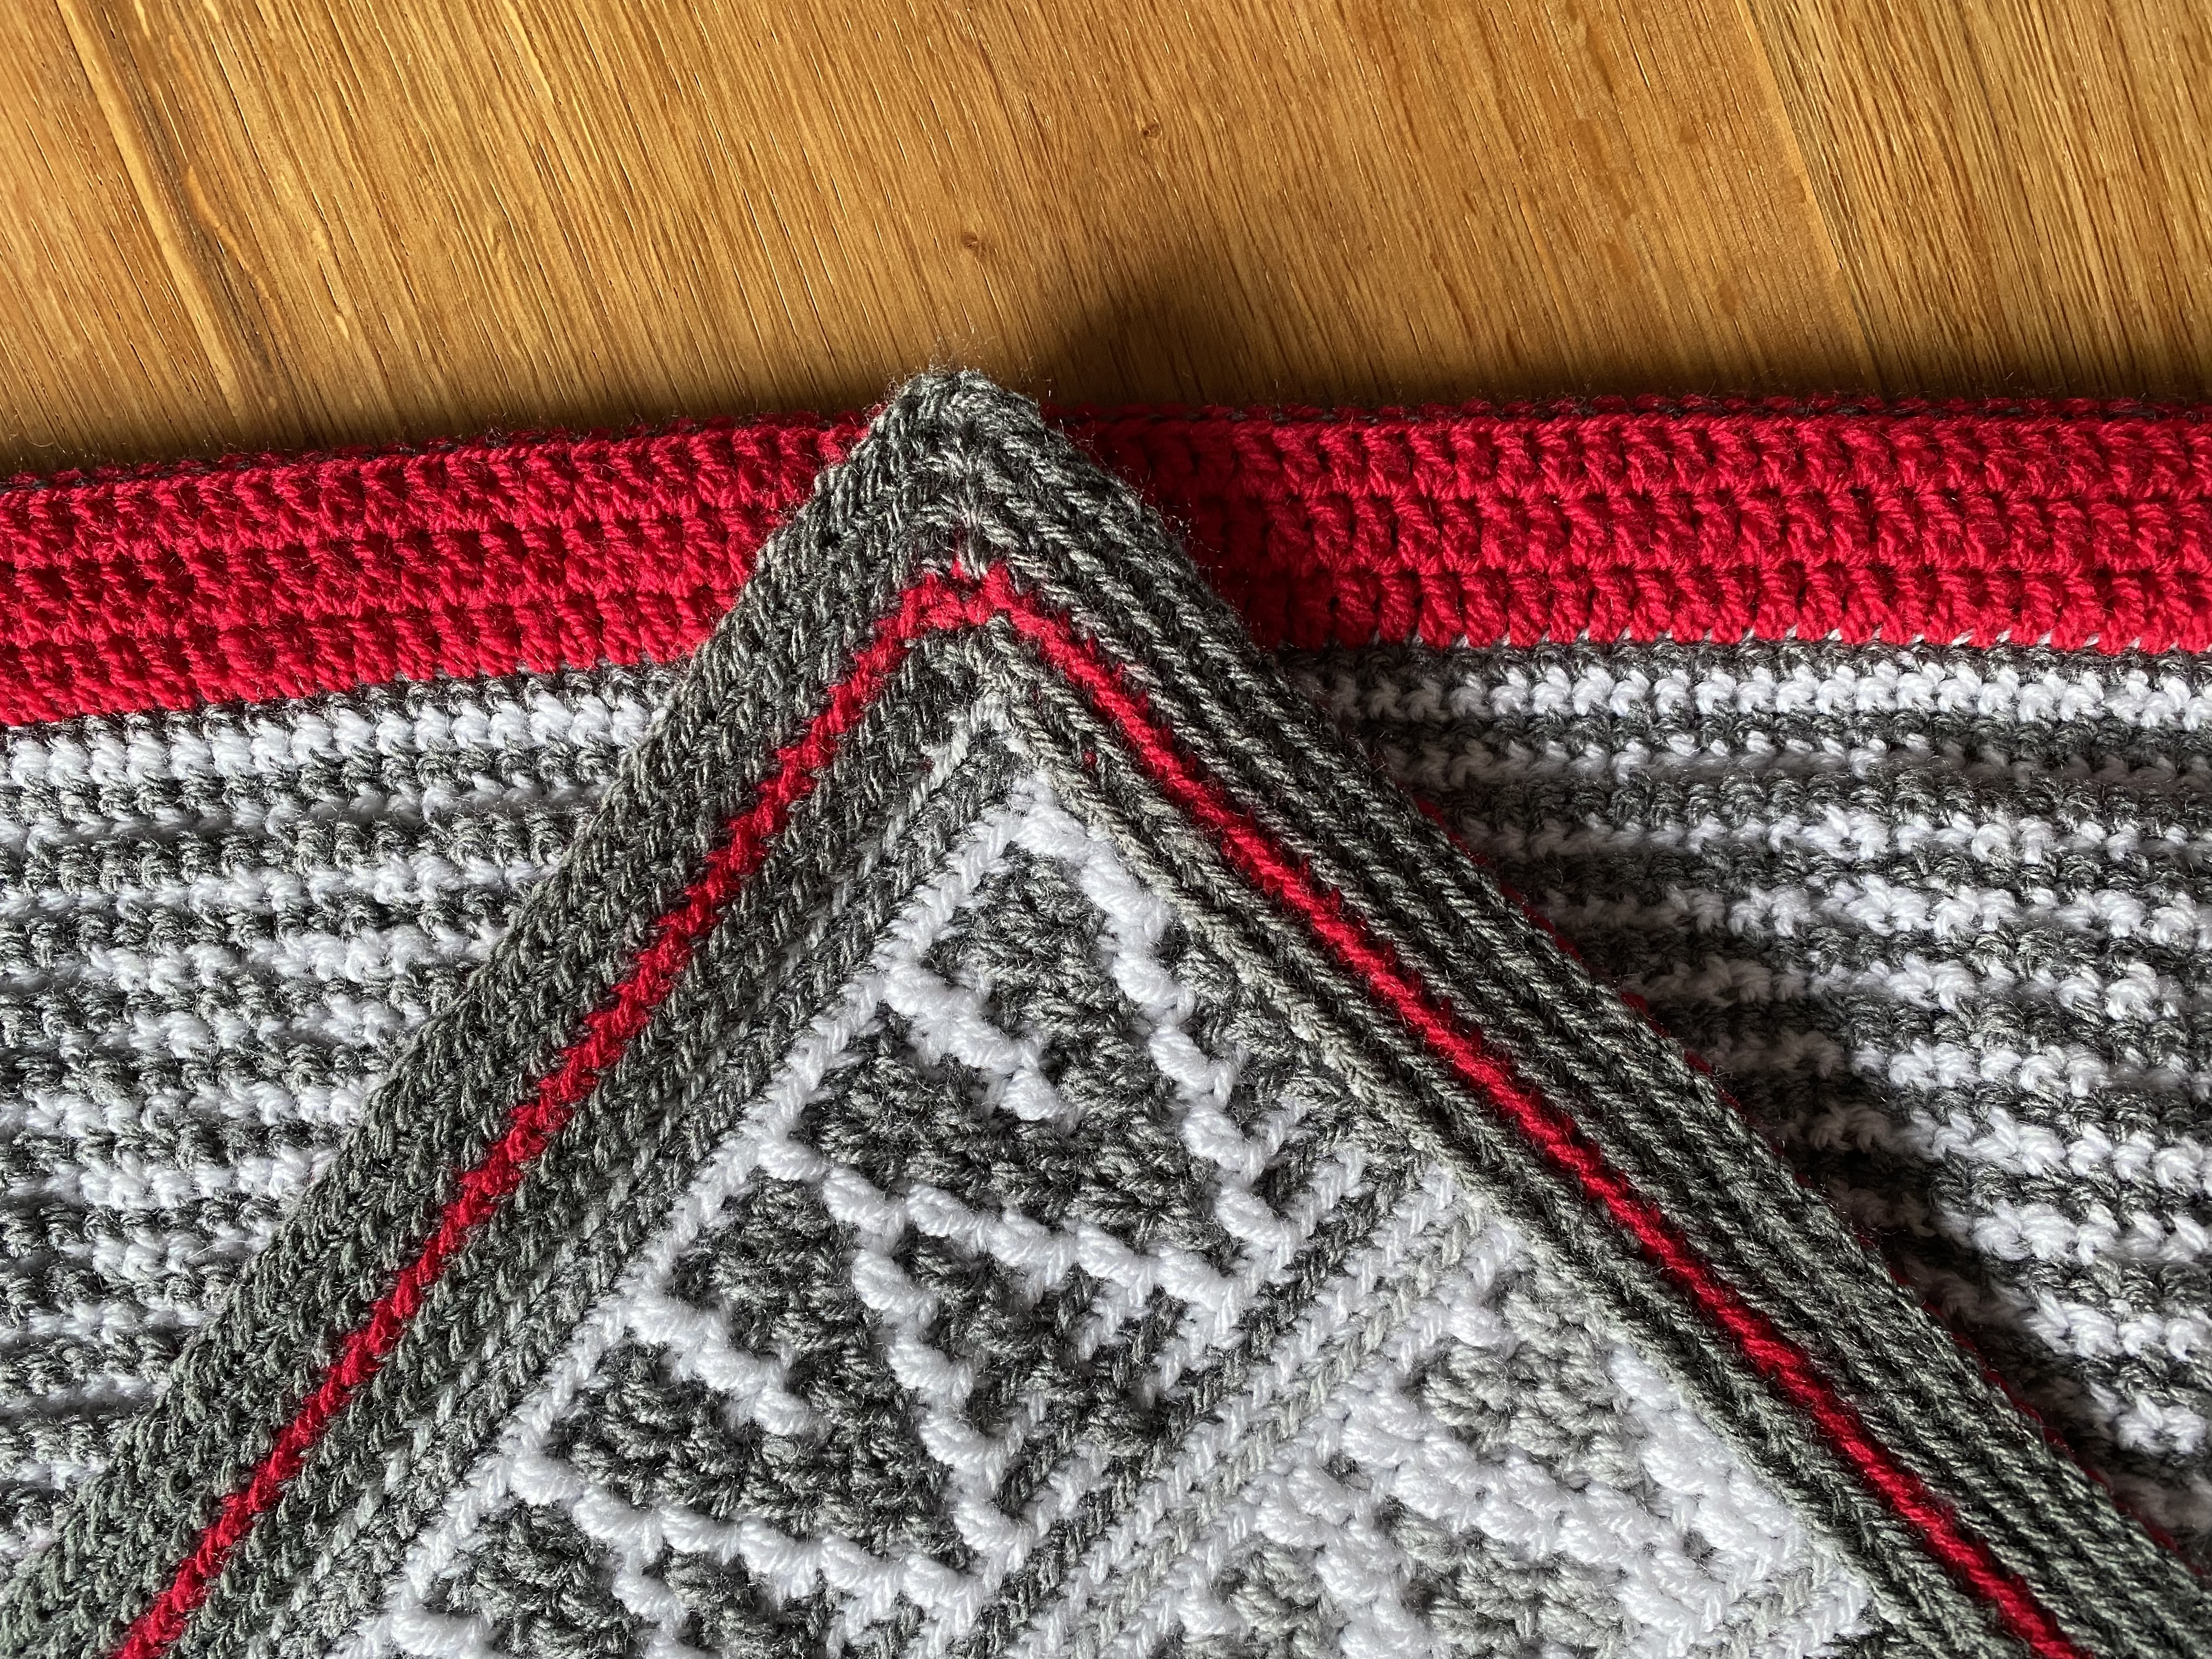
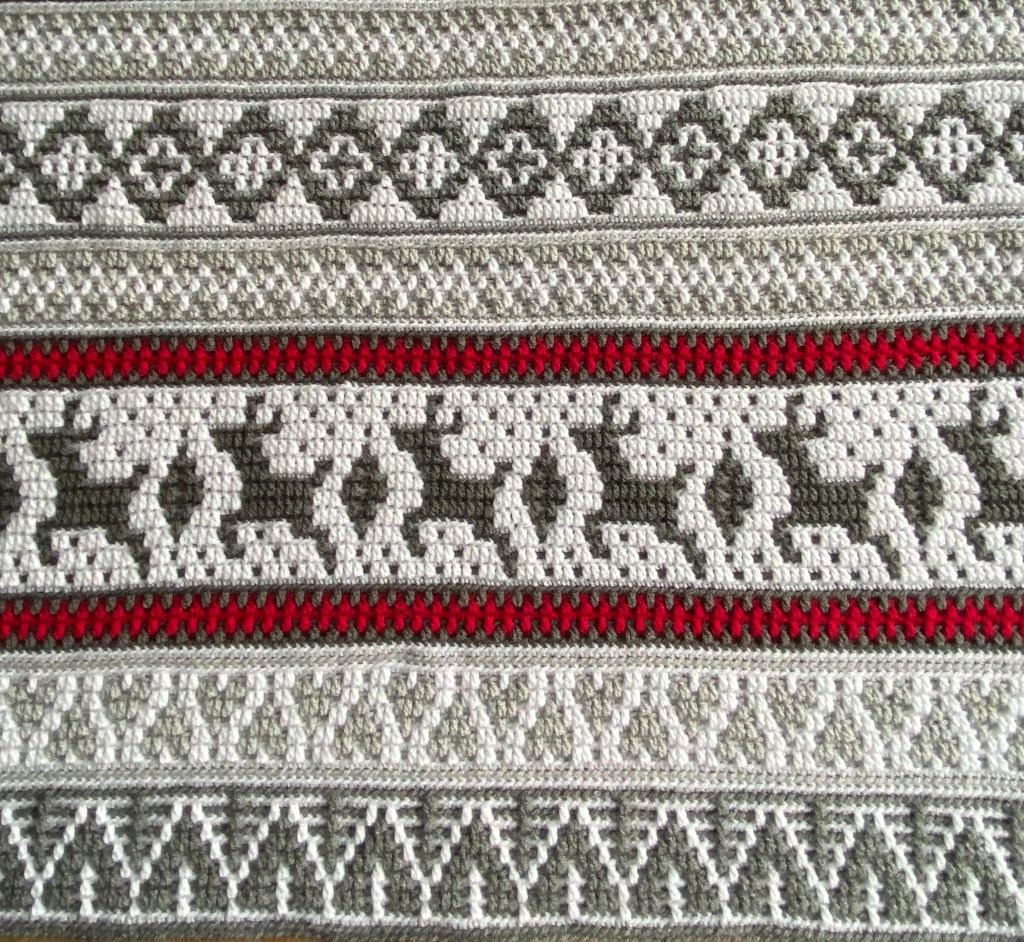
Part 6 is the final part of the Winter Wonderland Cal, the instructions for the border.
It is a double border that will hide all the yarn ends. If you don‘t like double borders you can of course chose another variant. In connection with the border of my Geometrics blanket, I recently wrote how I feel about it. I don’t want to repeat myself here now, only so much: I love double borders! They are a great finish for a blanket and absolutely worth the effort. At least in my opinion.
Unfortunately this time I had some difficulties with my slip stitch round. I had planned to make a two coloured border with a back layer in Lipstick and front layer in a mix of Graphite and Lipstick. So I thought a slip stitch round in red would look nice. I started my slip stitch round in Lipstick – and had to start over, and over, and over again but didn’t get it neat.
I have recently noticed that there are differences in the thickness of acrylic yarns, even within a brand. In any case, the thread of my Lipstick seemed to be thicker and this may have caused the problems. I don’t know. My solution was to switch to Silver, so that I at least had some contrast at the top and the bottom side. I need new glasses and this made it easier to identify the stitches when working the first round.
From then on, everything went smoothly. Until I finished the first round of the front layer. Ana’s way of working a double border leaves a narrow line of the slip stitch round visible right next to the border. The Silver looked good combined with the grey parts on top and bottom of the blanket but I didn’t like the look in the darker parts of the sides at all. So I started over again and simply worked through both loops on the long sides.
If you follow my colour way I would advise that you use red for the slip stitch round! If you have the same problems as I had, I’d suggest that you use Grey or Graphite but not Silver or White. But keep in mind that Grey and Graphite will be hardly visible on the top and bottom sides.
Long overdue update, June 2024: I’ve finally redesigned the documents with my colour scheme and combined the download into one document. There you will also find the total amount of yarn required. Details on the yarn consumption are listed in this post. Please don’t be surprised that the files look a little different, the content is the same.
Now it is already week 5 of the Winter Wonderland Cal. It is the last part before the border.
As I already mentioned in my post on part 2 of the Cal, I ran into some timing issues during testing. Sometimes life gets pretty busy and we had urgent work to do on the house that couldn’t be postponed.
To get the test finished in time I had to stop working on my blanket and checked the pattern by doing a swatch over 2 repeats. Starting with pattern 11 in part 4 of the Cal …
I just used some leftover yarns that I had lying in my basket. I didn’t really care about the colours, but I like the colours I have picked up. Completely different to my blanket and a more rustic look which I also really like. What do you think?
Stylecraft Special DK in Parchment and Mocha combined with King Cole Comfort DK in the colour Stonewash.
After that I could finally finish my blanket in peace. And this is how part 5 looks in my „regular” colours.
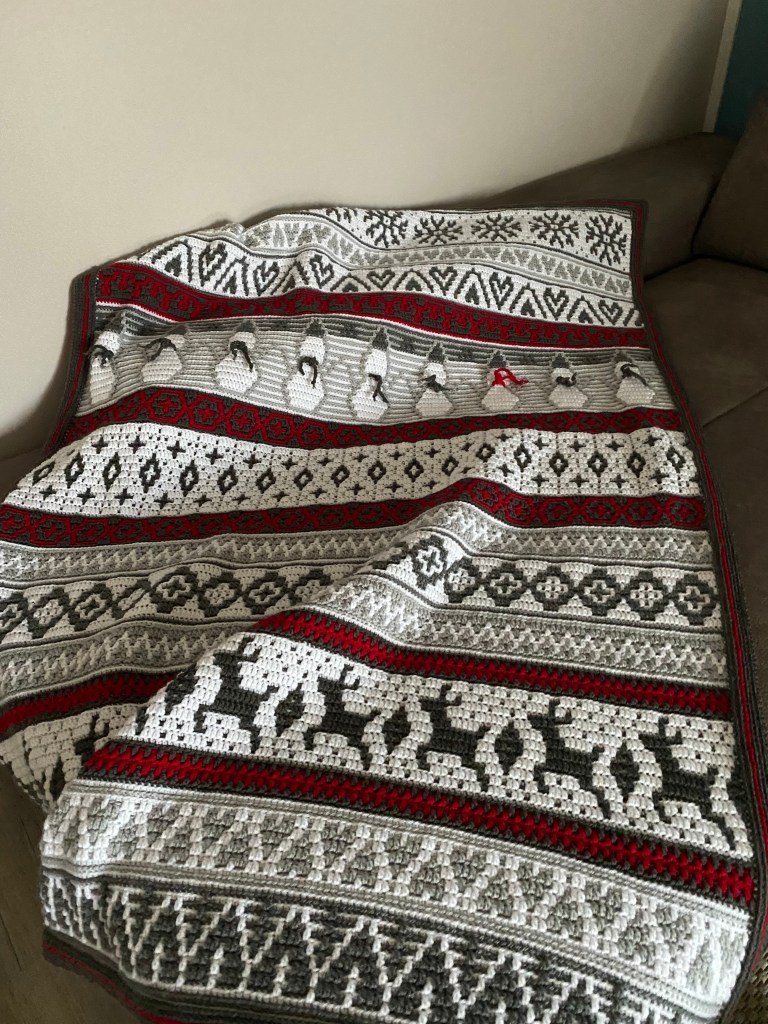
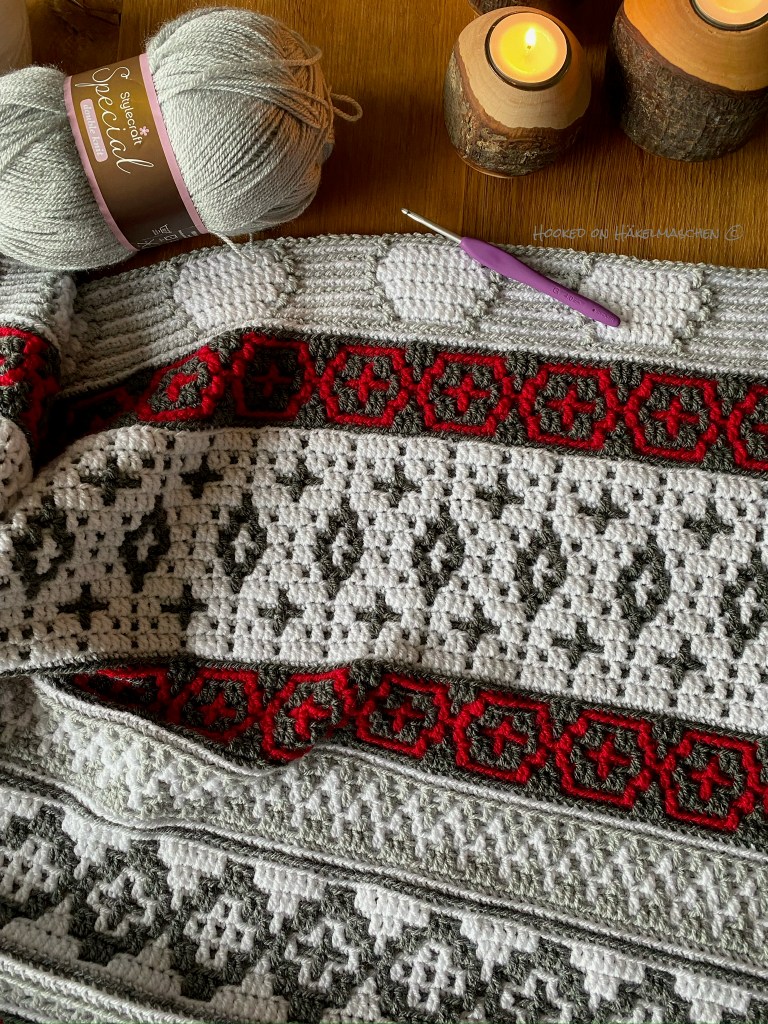
Winter Wonderland Cal – Part 5
My entire blanket, just before adding the border.
My colour scheme.
Long overdue update, June 2024: I’ve finally redesigned the documents with my colour scheme and combined the download into one document. There you will also find the total amount of yarn required. Details on the yarn consumption are listed in this post. Please don’t be surprised that the files look a little different, the content is the same.
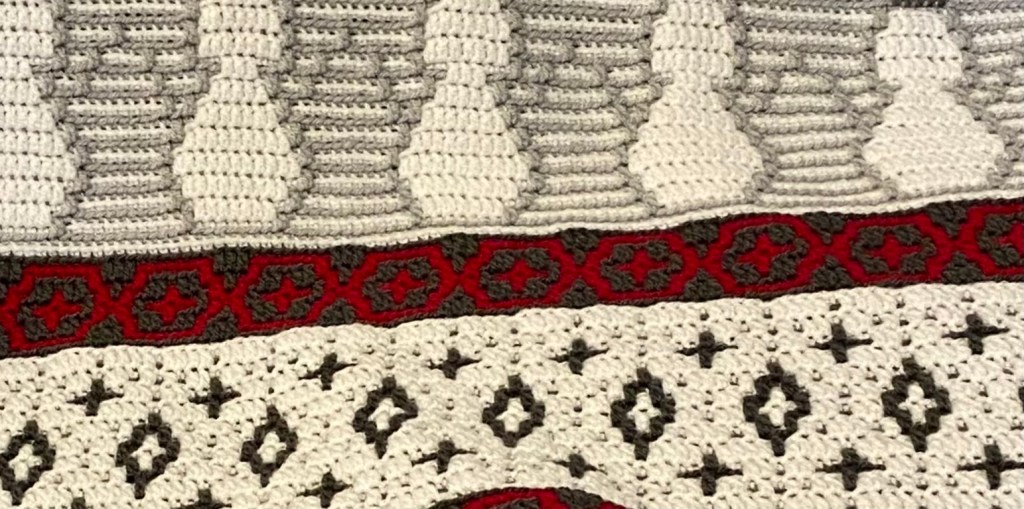
Week 4 of the Winter Wonderland has come. Time for the snowmen!
But before I show you the colours I used for part 4 here my
My final yarn amounts
I already listed the rough yarn amounts last week when I was still working on the border. Now here some more details, including the leftovers.
I needed a total of 13 balls Stylecraft Special DK and used 1.044 g / 3.080 m of them . This is nearly the same amount that Ana used for her blanket.
My colours Part 4
To be honest I was struggling a bit with my colour choices for this part.
Since Graphite and Lipstick that I used for pattern 8 is relatively dark, I thought that the blanket could do with something lighter again. That’s why I chose White and Silver for the part with the snowmen.
But, after I had finished their bodies and started on the heads, I wasn’t sure if this was really such a good choice. They looked kind of plump and pale.
Do you see what I mean?
But unfortunately, time usually plays a major role when testing a pattern. You have to think twice wether you rip back 15 rows or not. And as long as there is no mistake that inevitably catches the eye, you probably let it be. And so I continued even if I wasn’t very happy about it.
I was all the more pleased when I noticed that Ana had created this little fun touch! Little shawls to dress the snowme.n. They really do wonders, don‘t they?
I made 8 little shawls in Graphite and 1 Lipstick. The red shawl is worn by snowman No. 3 (the third seen from the right). I used 40 chains and I think they are exactly the right length.
.
And here my colours for part 4
Long overdue update, June 2024: I’ve finally redesigned the documents with my colour scheme and combined the download into one document. You can find a summary of the entire Cal in this post. Please don’t be surprised that the files look a little different, the content is the same.
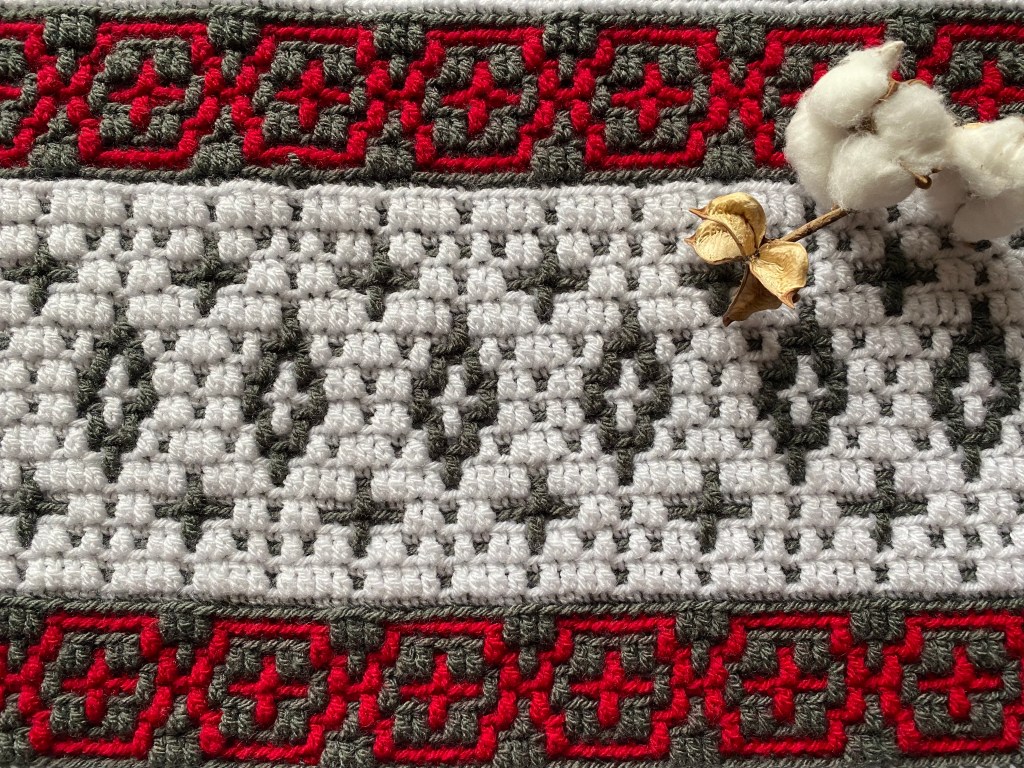
Oh wow, it is already week 3 of the Winter Wonderland Cal!
I am currently working on the border. So next week I will be able to tell you how much yarn I used in total, how much is left, etc.
I was really a bit sad when – after these weeks – had worked the last stitch of the blanket section and cut the last thread! Such a beautiful pattern – I enjoyed testing it so much. Ok, I know I often say that! But this time it is the first time that I am 100 % happy with my colour placement. Somehow that makes it very special for me!
So, here my part 3.
My colour placement
Overdue update, June 2024: I’ve finally redesigned the documents with my colour scheme and combined the download into one document. There you will also find the total amount of yarn required. Details on the yarn consumption are listed in this post. Please don’t be surprised that the files look a little different, the content is the same.
I really hoped that the weather would get better here, but it is a typical November this year. Cold, grey, rainy and foggy. Unfortunately, I had forgotten to take some nice pictures after I had finished part 2. I actually wanted to catch up on this now. … Well … – now these will have to serve.
I’m currently working on the last twenty rows. Phew! I don’t think this has ever happened to me before. That a pattern has already been published, but I haven’t finished my test project yet. But sometimes, unfortunately, life gets in the way! I am very happy that I could at least finish the test beforehand by only doing a small swatch over 2 repeats for the last part. I used some yarn that I had on hand but actually I like the colours very much. I will have to take a picture to show you – it looks completely different.
Yarn Update
Now that I am almost finished with the blanket, I can better estimate how much yarn I will need. At the moment they are, for the blanket
4 balls White
2 balls Silver
2 balls Grey
2 balls Graphite
1 ball Lipstick
For the border I will need an extra ball Lipstick and probably one more Graphite.
My colour placement
And here the colours I used for part 2
Long overdue update, June 2024: I’ve finally redesigned the documents with my colour scheme and combined the download into one document. There you will also find the total amount of yarn required. Details on the yarn consumption are listed in this post. Please don’t be surprised that the files look a little different, the content is the same.
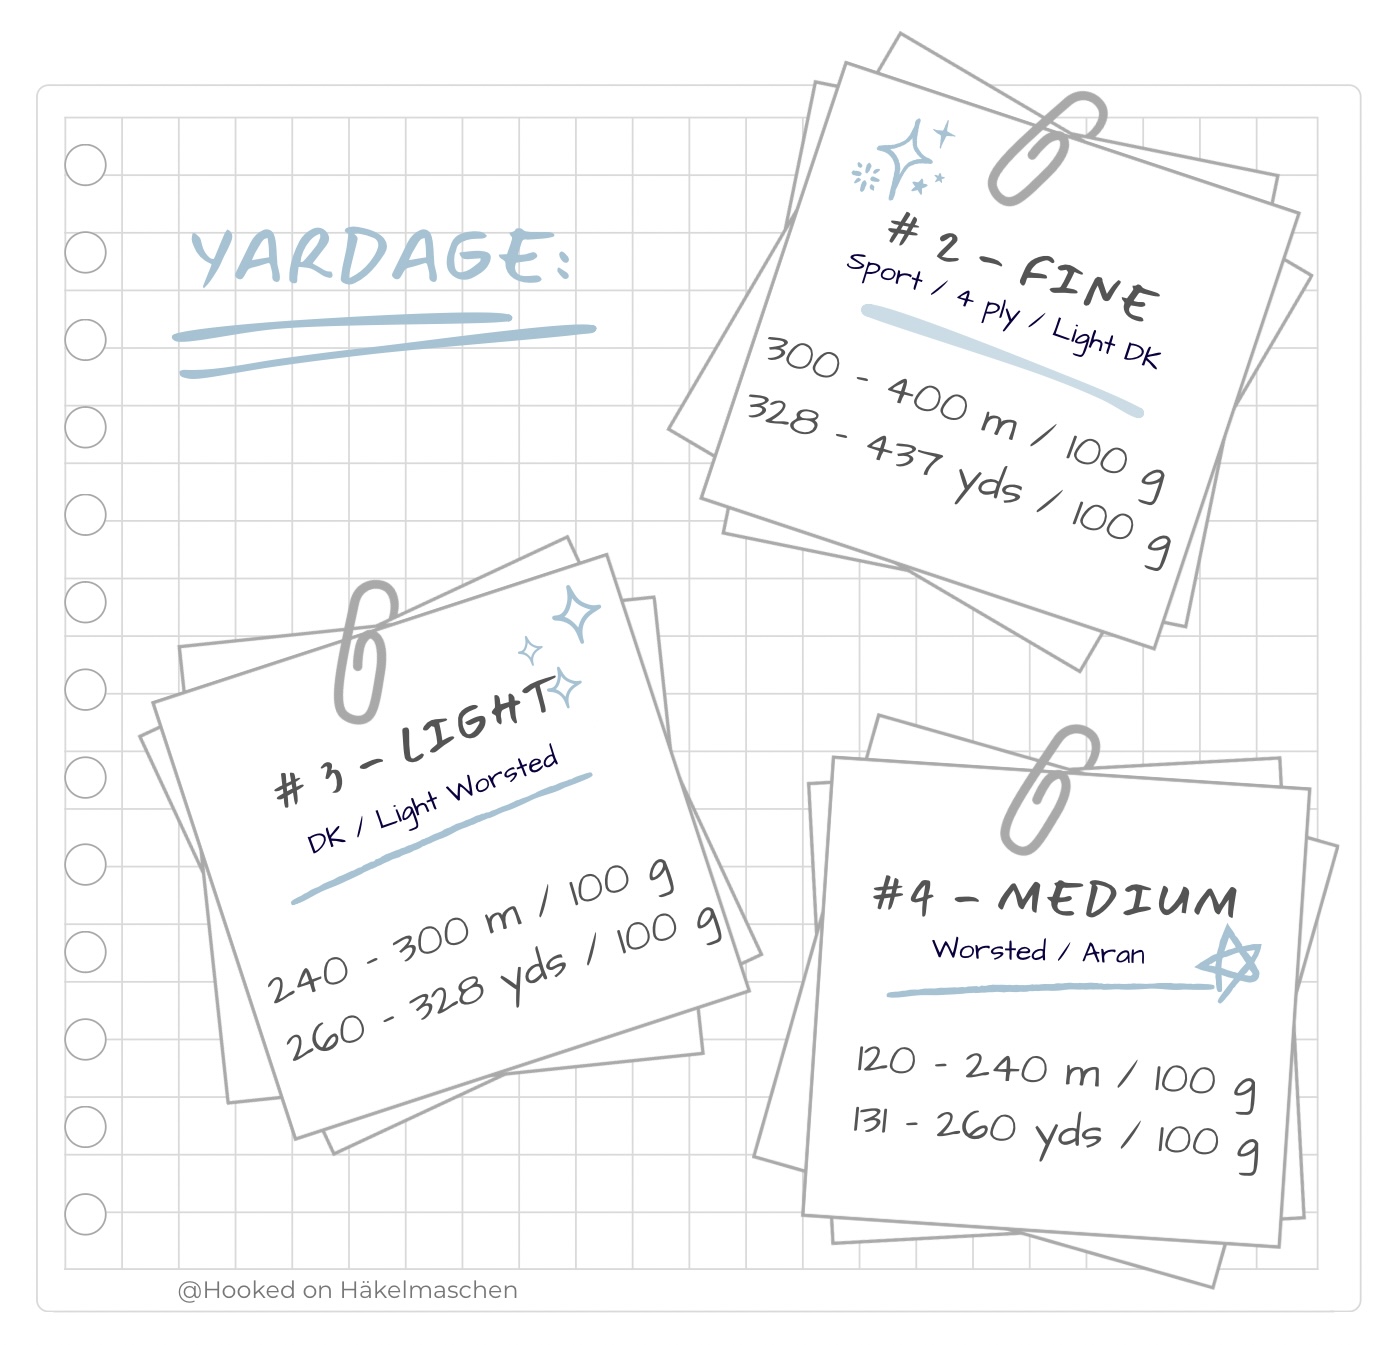
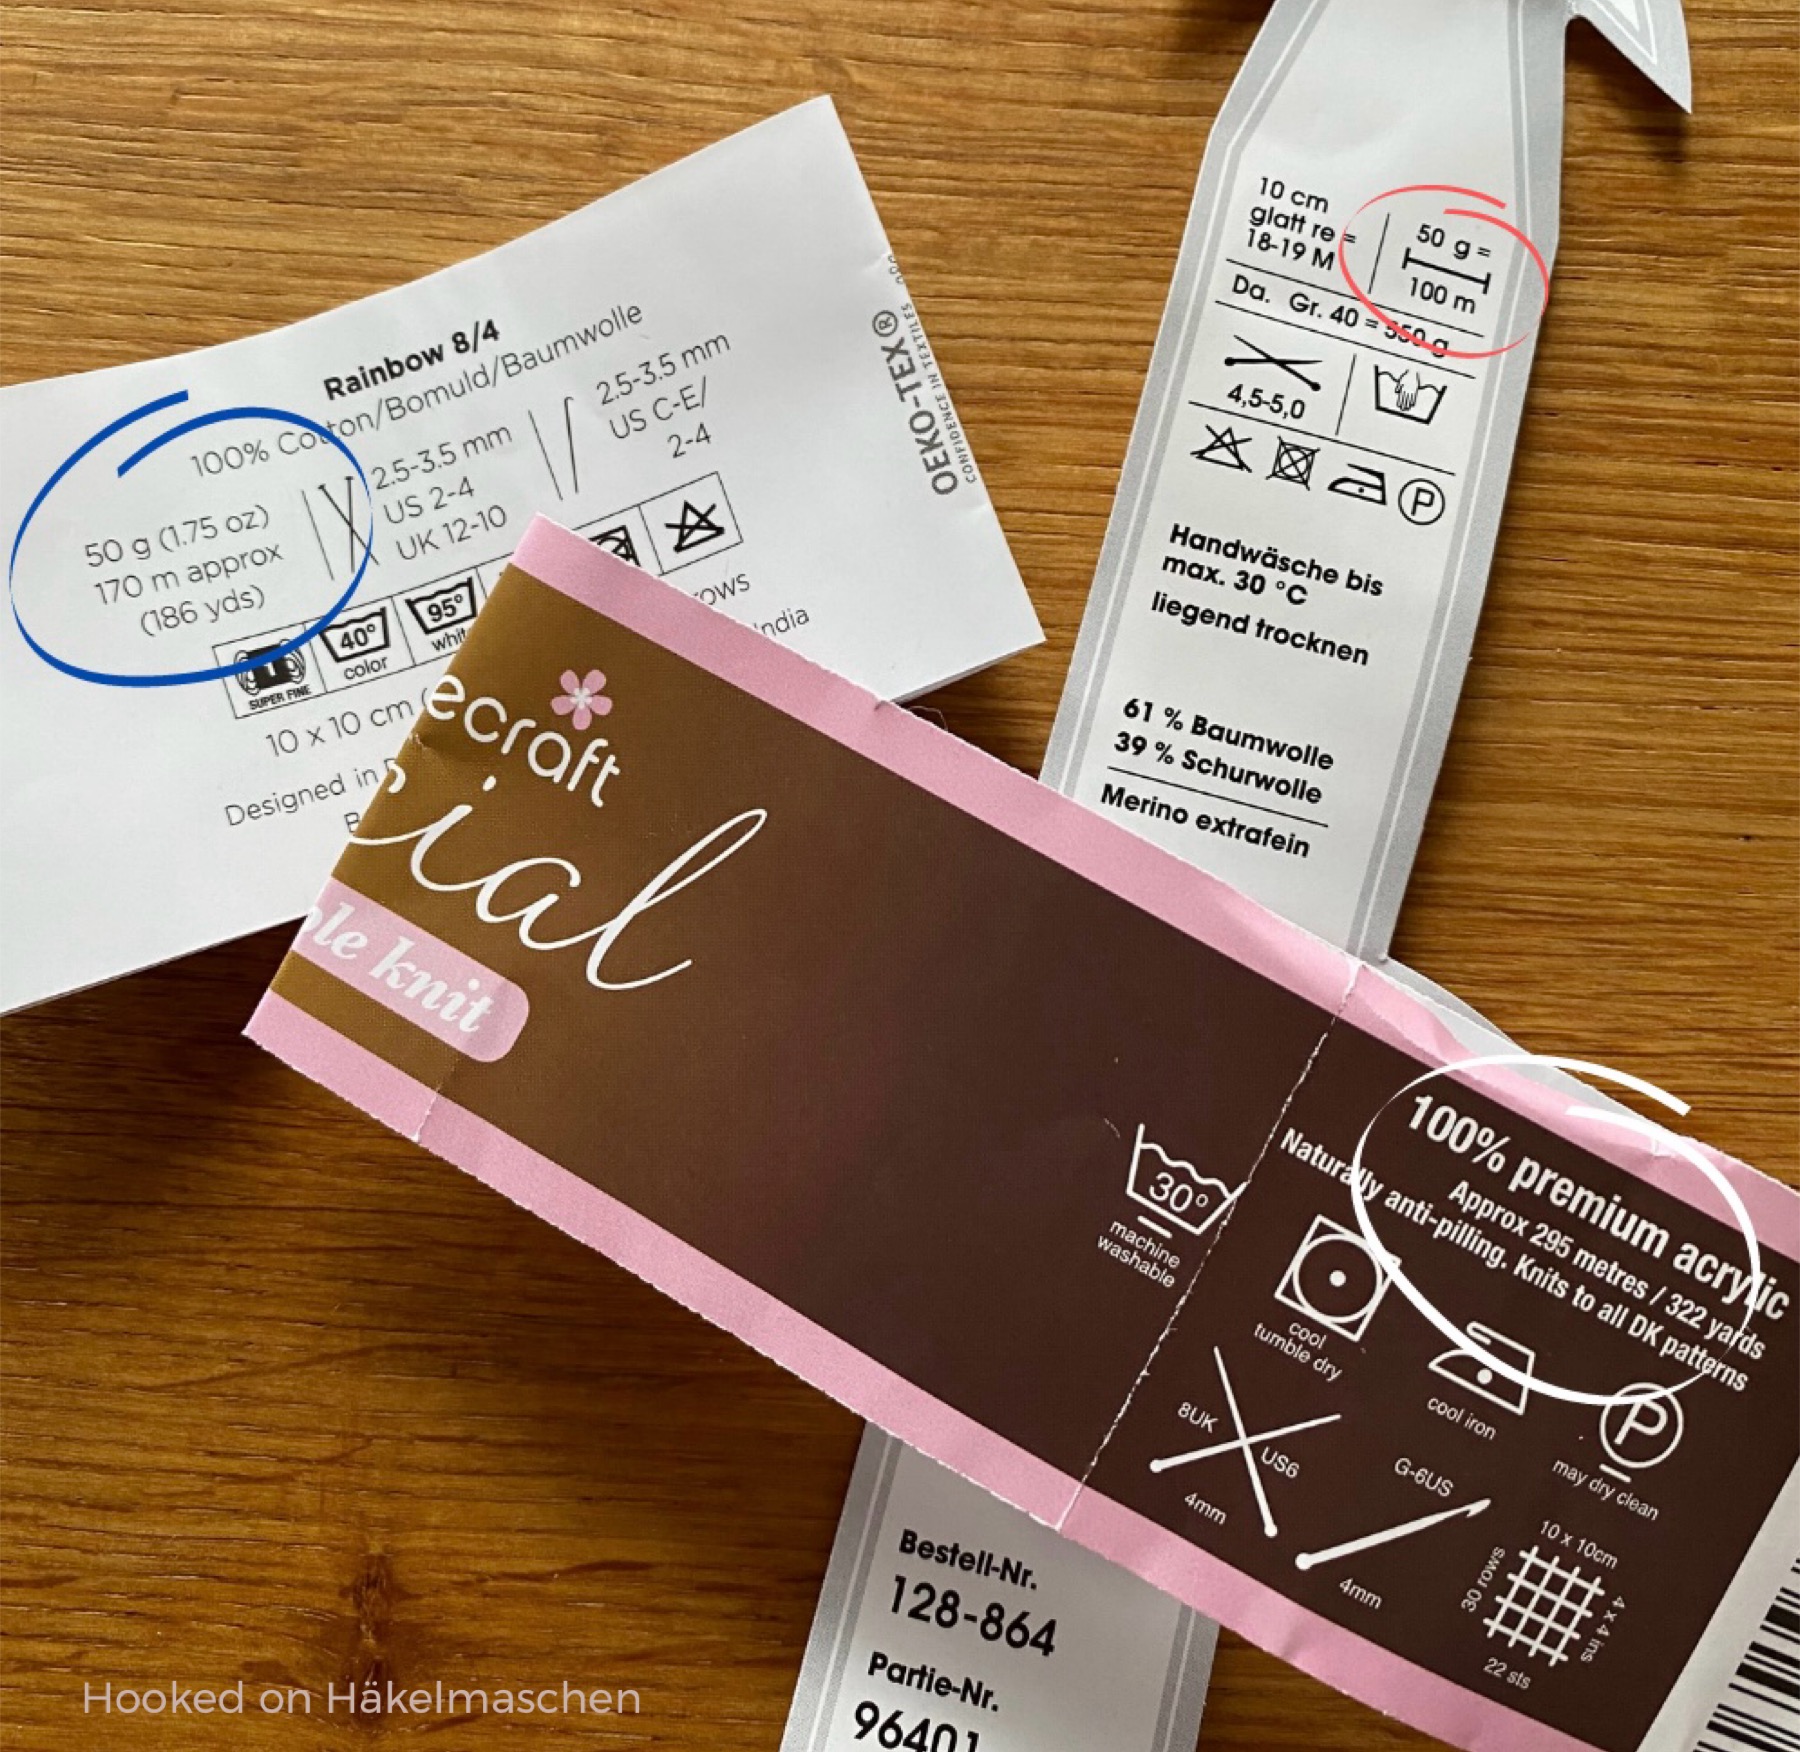
Recently I have often had to answer the question of how much yarn you need if you want to replace the yarn used in the instructions for a pattern with a different one. I would therefore like to tell you what problems I had with it at the beginning and how I now calculate my individual yarn needs.
Usually, the yarn used and the amount required are included in the pattern. So far so good. The problem often starts when you want to use a different brand or – even worse – a different weight of yarn for your project.
Different yarn weights – my nightmare
All the different yarn types, weights and yardages can be very confusing. I still remember well when I started crocheting again about 10 years ago, I was helpless when it came to choosing the right yarn. That was the time when I started working according to English patterns and most of them called for foreign yarns. Brands like Stylecraft, Scheepjes and Caron, to name only a few, were not available in our German retail stores. So I had to replace them with other brands. In Germany, there is also no system that classifies the different yarn weights. Only in the last few years the American system has been adopted by some companies. So I was really lost as I had no idea what was meant by terms like DK, Aran, sport weight, fingering and so on.
At first I thought that the needle size indicated on the banderole was decisive. Believe me, it isn’t. Picking a yarn based on this often meant that I had too much or too little yarn and/or that my crochet piece was not the size I wanted because my yarn was too thick or too thin.
After getting it wrong several times, I started ordering my yarn from foreign online stores to get the exact yarn that was called for in the pattern. This is how I discovered that there is a system abroad that categorises yarns into different groups. It was only after I had done a little research into the different yarn weights that I realised that the thickness of the yarn also affects the length of the thread.. This is actually logical, a thinner thread must be longer to weigh the same as a thicker one. A thicker one will be shorter instead. I had just never thought about it.
An example:
DK yarn (#3) has a yardage of between 240 and 300 m per 100 g ball, while Aran yarn (#4) has only 120 to 240 metres for the same weight.
With this knowledge, I have changed my personal system for selecting a suitable yarn. If I shop in Germany and the yarn label doesn’t say what thickness / yarn weight it is, the yardage helps me. I just have to remember the running lengths of the different yarn groups and I will know that a ball with, say, 145 metres per 50 g is a DK weight because it will have 290 metres per 100 g.
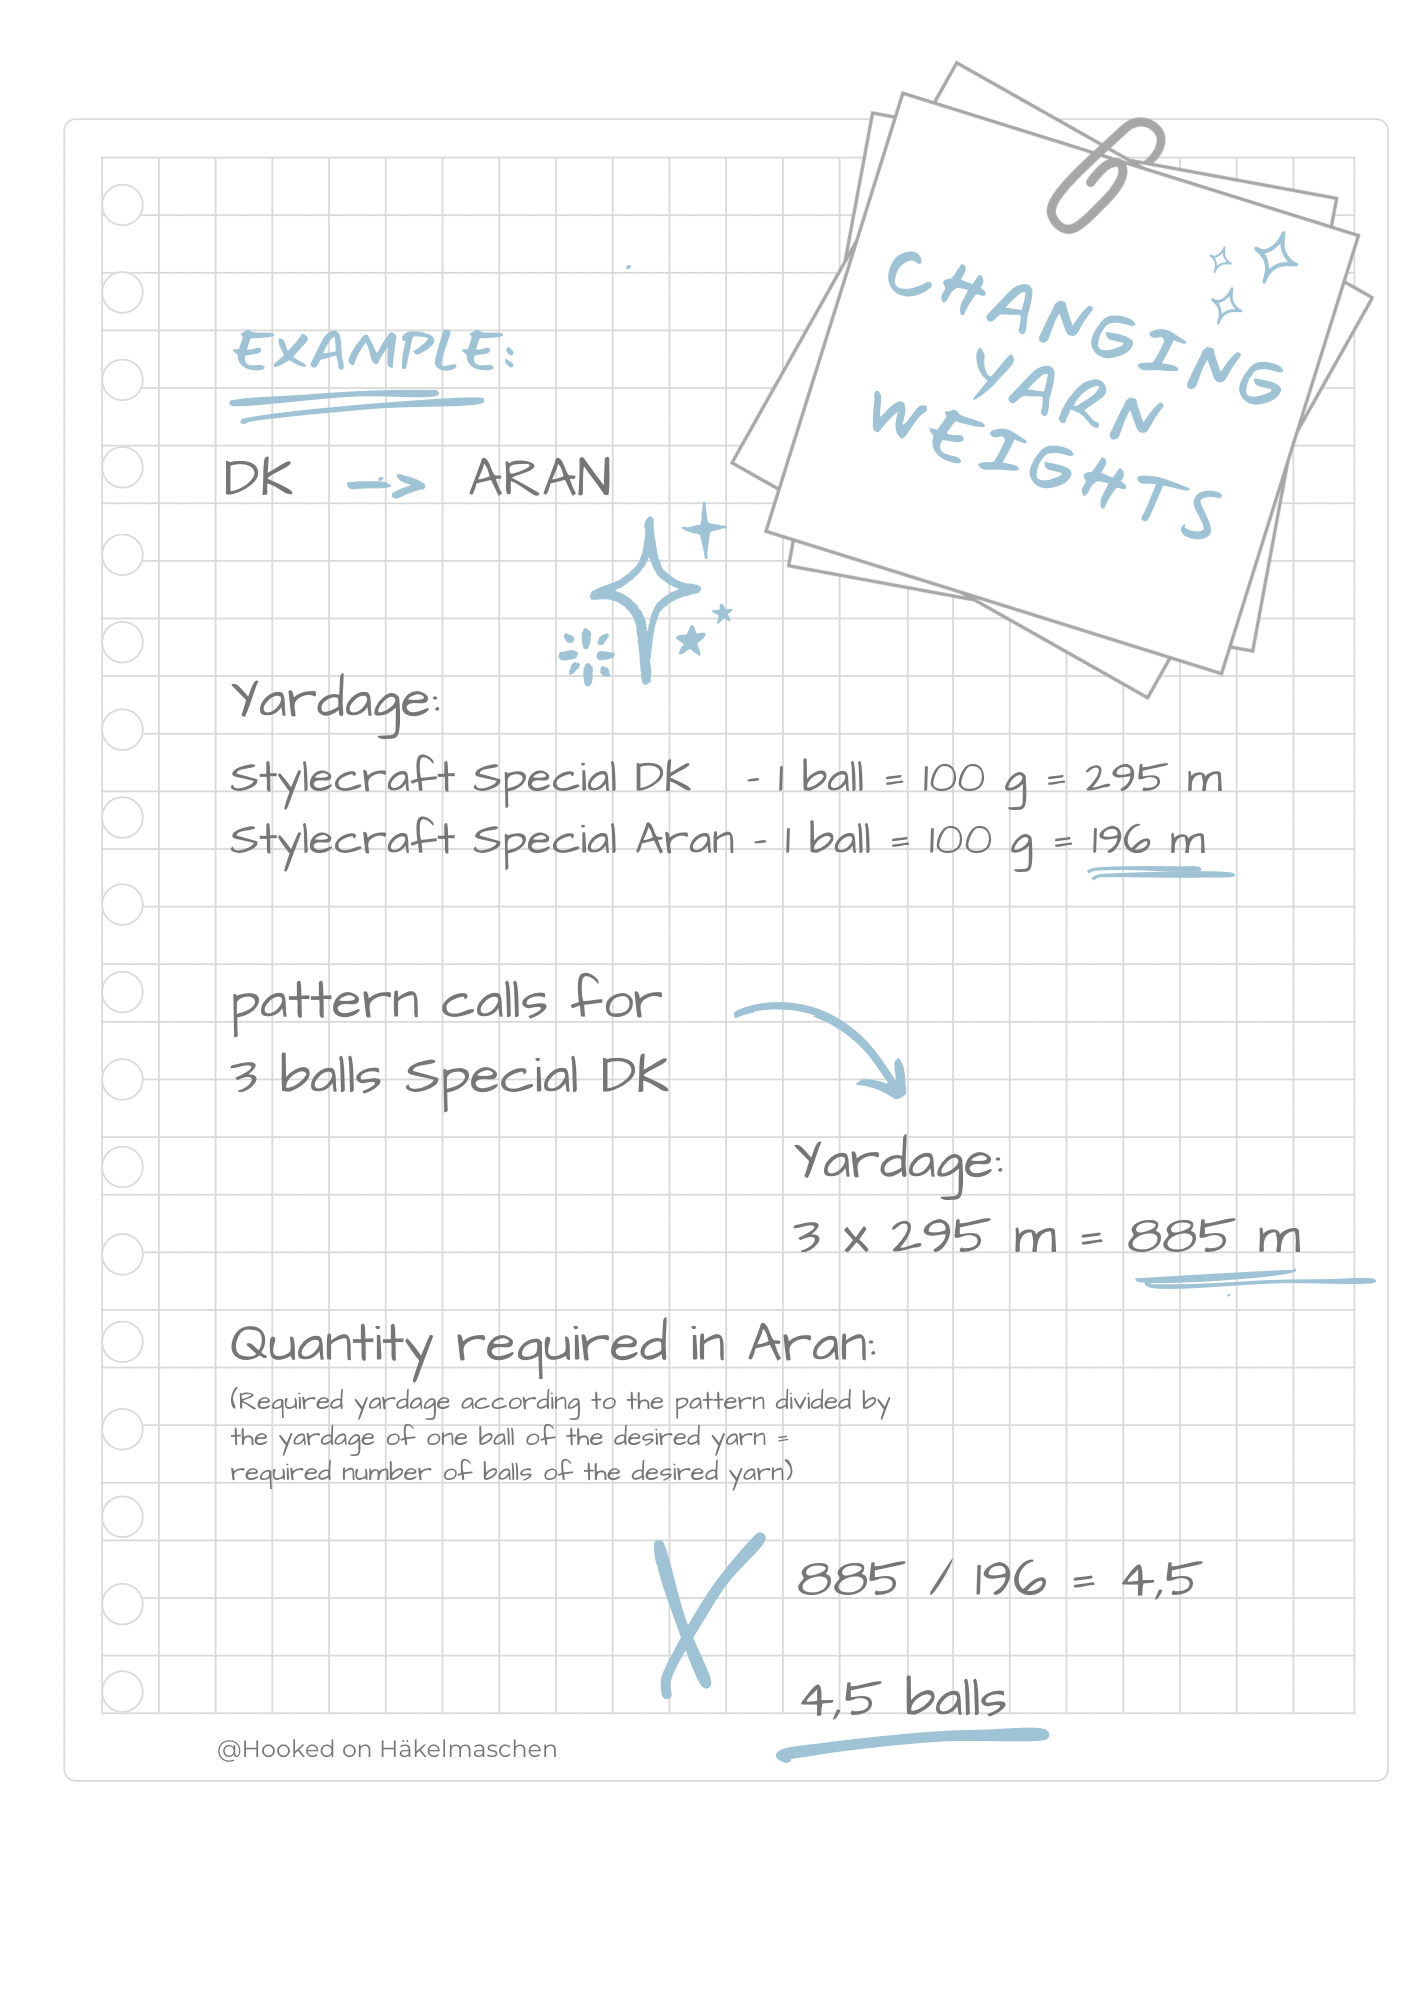
But I have learnt even more. The yardage is also helpful if I want to use a different yarn weight to the one given in the pattern. Here is an example:
Changing yarn weights
Let us say your pattern calls for 3 balls of Stylecraft Special DK but you would like to use Aran because you like your piece to be a little thicker. 3 balls Special DK are 300 g but if you buy 300 g Aran, you will definitely have too little yarn. How much do you need then? I calculate it using the yardage. Simply look at the amount of yarn needed for the pattern and calculate how many metres or yards it will be. To do this, multiply the number of balls by the length of one ball. This gives you the total yardage you need.
Now take a look at the yarn you want to use. What is the yardage of one ball? Divide the total yardage you calculated earlier by the yardage of one skein of the yarn you want to use and you will know how many balls you need to buy.
If you need more than one colour, repeat this for each colour.
To visualise this calculation, please just look at the picture below.
I never went wrong this way! At least it works for classically twisted yarns. Modern yarns with a completely different structure might be different.
The yardage of a yarn is always is indicated on the label. In many patterns, the length of the yarn is given together with the information on the yarn used. If this information is missing, simply search for the yarn in the internet, either in an online shop or directly at the manufacturer.
But please bear in mind that changing the yarn weight will affect the size of your project. For garments such as jumpers etc, I would advise against this unless you also know how to adjust the pattern.