Hello Spring Cal – Part 1

Today is the day, Hello Spring Cal starts!

Since some people have asked me about it, yes, I will post my progress, parts and colours here. So let us begin with my

Yarn and colours

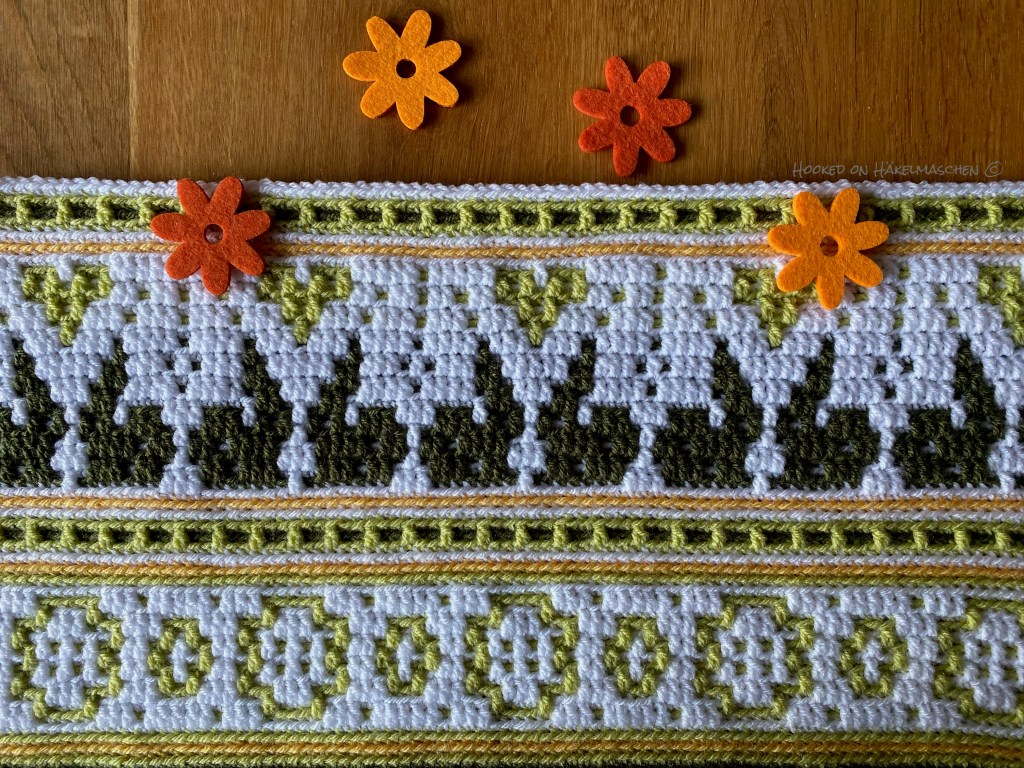
I used Stylecraft Special DK and a 4 mm hook. My colours are

  • 1001 White
  • 1822 Pistachio
  • 1027 Khaki
  • 1081 Saffron
  • 1723 Tomato

When I saw Ana‘s pattern I actually had a different colour scheme in mind and my first approach was slightly different.
But somehow it didn’t work, even thoughI tried two different colour placements. I had the feeling that it might be a bit dark for a spring theme. At the same time, I had no idea how to proceed with the colour placement. That’s why I discarded it.


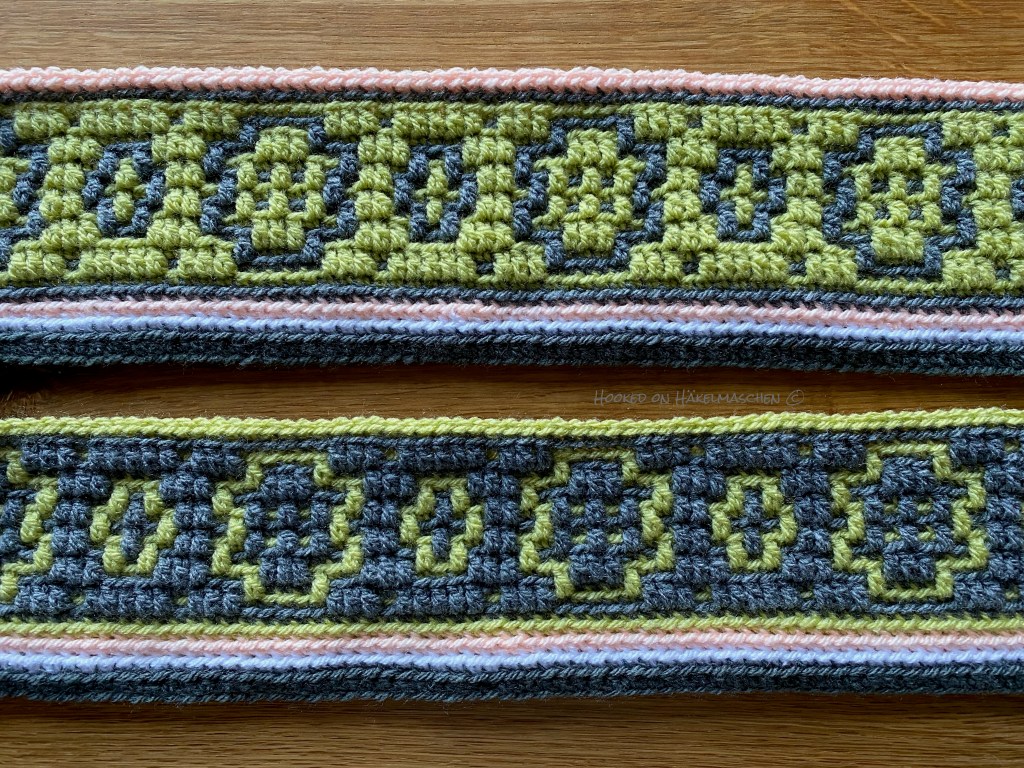
Nevertheless, I LOVE these swatches. I haven’t frogged them yet and will keep them as inspiration. I know for sure that I will use these colours some day!

While looking for other colour combinations, I came across a drawing with stylised flowers in two different shades of green on a white background. Somehow that said >Spring< to me. 
To achieve this look I choose White and Pistachio as main colours and added a little bit of Khaki. Spiced up with a few splashes of Saffron and Tomato.

And here are the colours I used for part 1

Long overdue update, July 2024:
I have finally redesigned the documents for my colour scheme and combined the download into one file. 
Please don’t be surprised that the files look a little different, the content is the same.

Oh, I almost forgot! The pattern is available here.

And last but not least, here is a photo showing all the test versions of the One Skein of Love test team.

See you next week!

Hello Spring Cal

The days are not only getting a bit longer but also a bit warmer. The first bushes and trees are sprouting and the sparrows are preparing their nests under our roof. Spring is coming in the northern hemisphere!

Ana from One Skein of Love is celebrating the season with her Hello Spring Cal.
Another project that has kept me busy in the last weeks, between Midnight Snowflakes, sock knitting, a short holiday and „normal” life.

I started testing the Hello Spring Cal in early February. The pattern is designed as a blanket and – similar to Winter Wonderland – consist of different designs that can be combined in various ways. Due to time constraints I only worked 5 repeats this time – it will be a beautiful wall decoration when I am finished.

My colours were inspired by a drawing I found on the internet: flowers in two or three different greens on a white ground. They looked so fresh and airy and reminded me immediately of spring. Unfortunately I cannot share it here due to copyrights but I tried to copy this look using Stylecraft Special DK from my stash.

I used mainly White and Pistachio combined with Khaki and a little bit of Saffron and Tomato.

The Cal will start next Monday, 21. March 2022 and runs for 6 weeks. More information and of course also the pattern are available in Ana’s Ravelry store.

Due to the lovely holiday we had last week I am still working on the border but I hope to show you more next week!

Midnight Snowflakes

Finally!

Finally I was able to start this pattern. I fell in love with it when Ana published the pattern about one year ago. Since then I have promised hubby to make him a blanket with it. When Ana lately announced her MAL I thought it was a good time to start with it.

The colours

It is always hard to choose the right colours for a blanket. At least it is for me. It is very rare that I see a pattern and immediately know which colours I want to make it in. For Midnight Snowflakes I instantly had white combined with a grey tone in mind. White for the background with grey snowflakes! But something made me hesitate. I probably knew instinctively that hubby wouldn’t like it. And so it was!

After he told me that this is much too bright (???) my idea was to switch the colours and do the snowflakes in classic white and the background in a dark grey. Looking for a yarn that might be a bit more special than my standard acrylic yarn I came across Cookie from Järbo. The colour Cloudy was exactly what I was looking for, off white changing to a soft, light grey – and on sale! From what I saw in the photos this would go great with Rotterdam from Scheepjes Colour Crafter. (Rotterdam is a dark grey, very similar to Graphite from Stylecraft Special DK.) So I placed my order.

My disappointment could not have been greater when the yarn arrived. Rotterdam was what I expected, but … You can already see it in my photos. Instead of white with a little bit of grey my Cookie is grey with a little bit of white. Much too dark in combination with Rotterdam – even hubby agreed.

I have to say, the yarn itself is great. Nice and soft with a great stitch definition. I didn’t send it back. It will be used in another project. It would certainly look good in a Winter Wonderland.

Since I did not want to order online again on suspicion I had to find another match with colours I had. Combinations with Stylecraft Special DK in A Hint of Silver or Parma Violet looked nice but were not what I had in mind. I liked the contrast with white, hubby didn’t. I even tried to create a gradient myself but either the contrast between my colours was too low or there was no gradation in between.

Finally I found Duck Egg in my stash. I like the combination of Duck Egg and dark grey and hubby agreed. This is how my choice of colour came about. To be honest, I still don’t know if hubby really likes it or if he was just so annoyed that he said yes.

The MAL runs util 28. February 2022. The pattern is available via Ravelry. Until the end of February there is a 50% discount (code on Ana’s Facebook group).

Midnight Snowflakes pattern by One Skein of Love, hooked by ELeni

Have a nice week!

Winter Wonderland – Round up

After the Winter Wonderland Cal is over now I thought it might be a good idea to collect all information about my blanket in one place.

Winter Wonderland Cal

Cal – timeframe

11. November – 16. December 2021

Pattern

Winter Wonderland Mosaic Cal
available on Ravelry
and Etsy

Designer

Ana Morais Soares from One Skein of Love

Technique

Overlay Mosaic crochet

Test phase

12. October – 14. November 2021

finished

26. November 2021

Colour inspiration

Mood board by Pippin Porppycock

Yarn and colours

Stylecraft Special DK (295 m / 100 g)

White
Silver
Grey
Graphite
Lipstick

4 balls
2 balls
2 balls
3 balls
2 balls

Hook

Clover Amour Hook, 4 mm

Gauge

23 stitches, 15 rows —> 13,5 x 8 cm

Repeats

9 repeats, 183 stitches

Rows / Patterns

256 rows, Pattern 1 – 14, following the Cal pattern

Border

Double border

Finished Size

114 x 148 cm

〰️〰️〰️〰️〰️〰️〰️〰️

And for those who are interested – my detailed yarn amounts

〰️〰️〰️〰️〰️〰️〰️〰️

Long overdue update, June 2024: I’ve finally redesigned the documents with my colour scheme. Please don’t be surprised that it looks a little different, the content is the same.

〰️〰️〰️〰️〰️〰️〰️〰️

I worked on this project for about 61/2 weeks. It was a stressful time but I enjoyed it a lot. It‘s definitely my most favorite project in 2021.

Please also have a look at my previous Winter Wonderland posts

Winter Wonderland
Winter Wonderland – My colours part 1
Winter Wonderland – My colours part 2
Winter Wonderland – My colours part 3
Winter Wonderland – My colours part 4
Winter Wonderland – My colours part 5
Winter Wonderland – My colours part 6

Winter Wonderland – My colours part 6

Part 6 is the final part of the Winter Wonderland Cal, the instructions for the border.

It is a double border that will hide all the yarn ends.
If you don‘t like double borders you can of course chose another variant. In connection with the border of my Geometrics blanket, I recently wrote how I feel about it. I don’t want to repeat myself here now, only so much: I love double borders! They are a great finish for a blanket and absolutely worth the effort. At least in my opinion.

Unfortunately this time I had some difficulties with my slip stitch round. I had planned to make a two coloured border with a back layer in Lipstick and front layer in a mix of Graphite and Lipstick. So I thought a slip stitch round in red would look nice. I started my slip stitch round in Lipstick – and had to start over, and over, and over again but didn’t get it neat.

I have recently noticed that there are differences in the thickness of acrylic yarns, even within a brand. In any case, the thread of my Lipstick seemed to be thicker and this may have caused the problems. I don’t know. My solution was to switch to Silver, so that I at least had some contrast at the top and the bottom side. I need new glasses and this made it easier to identify the stitches when working the first round.

From then on, everything went smoothly. Until I finished the first round of the front layer. Ana’s way of working a double border leaves a narrow line of the slip stitch round visible right next to the border. The Silver looked good combined with the grey parts on top and bottom of the blanket but I didn’t like the look in the darker parts of the sides at all. So I started over again and simply worked through both loops on the long sides.

If you follow my colour way I would advise that you use red for the slip stitch round! If you have the same problems as I had, I’d suggest that you use Grey or Graphite but not Silver or White. But keep in mind that Grey and Graphite will be hardly visible on the top and bottom sides.

Long overdue update, June 2024: I’ve finally redesigned the documents with my colour scheme and combined the download into one document. There you will also find the total amount of yarn required. Details on the yarn consumption are listed in this post.
Please don’t be surprised that the files look a little different, the content is the same.

Have fun with this last section of this beautiful pattern 💕

More Winter Wonderland posts:

Winter Wonderland
Winter Wonderland – My colours part 1
Winter Wonderland – My colours part 2
Winter Wonderland – My colours part 3
Winter Wonderland – My colours part 4
Winter Wonderland – My colours part 5
Winter Wonderland Round up

Winter Wonderland – My colours Part 5

Now it is already week 5 of the Winter Wonderland Cal. It is the last part before the border.

As I already mentioned in my post on part 2 of the Cal, I ran into some timing issues during testing. Sometimes life gets pretty busy and we had urgent work to do on the house that couldn’t be postponed.

To get the test finished in time I had to stop working on my blanket and checked the pattern by doing a swatch over 2 repeats. Starting with pattern 11 in part 4 of the Cal …

I just used some leftover yarns that I had lying in my basket. I didn’t really care about the colours, but I like the colours I have picked up. Completely different to my blanket and a more rustic look which I also really like. What do you think?

Stylecraft Special DK in Parchment and Mocha combined with King Cole Comfort DK in the colour Stonewash.

After that I could finally finish my blanket in peace. And this is how part 5 looks in my „regular” colours.

Winter Wonderland Cal – Part 5

My entire blanket, just before adding the border.

My colour scheme.

Long overdue update, June 2024: I’ve finally redesigned the documents with my colour scheme and combined the download into one document. There you will also find the total amount of yarn required. Details on the yarn consumption are listed in this post.
Please don’t be surprised that the files look a little different, the content is the same.

Have fun 💕

Winter Wonderland Pattern

More Winter Wonderland posts:

Winter Wonderland
Winter Wonderland – My colours part 1
Winter Wonderland – My colours part 2
Winter Wonderland – My colours part 3
Winter Wonderland – My colours part 4
Winter Wonderland – My colours part 6
Winter Wonderland Round up

Winter Wonderland – My colours Part 4

Week 4 of the Winter Wonderland has come. Time for the snowmen!

But before I show you the colours I used for part 4 here my

My final yarn amounts

I already listed the rough yarn amounts last week when I was still working on the border. Now here some more details, including the leftovers.

I needed a total of 13 balls Stylecraft Special DK and used 1.044 g / 3.080 m of them . This is nearly the same amount that Ana used for her blanket.

My colours Part 4

To be honest I was struggling a bit with my colour choices for this part.

Since Graphite and Lipstick that I used for pattern 8 is relatively dark, I thought that the blanket could do with something lighter again. That’s why I chose White and Silver for the part with the snowmen.

But, after I had finished their bodies and started on the heads, I wasn’t sure if this was really such a good choice. They looked kind of plump and pale.

Do you see what I mean?

But unfortunately, time usually plays a major role when testing a pattern. You have to think twice wether you rip back 15 rows or not. And as long as there is no mistake that inevitably catches the eye, you probably let it be. And so I continued even if I wasn’t very happy about it.

I was all the more pleased when I noticed that Ana had created this little fun touch! Little shawls to dress the snowme.n. They really do wonders, don‘t they?

I made 8 little shawls in Graphite and 1 Lipstick. The red shawl is worn by snowman No. 3 (the third seen from the right). I used 40 chains and I think they are exactly the right length.

.

And here my colours for part 4

Long overdue update, June 2024: I’ve finally redesigned the documents with my colour scheme and combined the download into one document. You can find a summary of the entire Cal in this post.
Please don’t be surprised that the files look a little different, the content is the same.

Happy hooking 💕

Winter Wonderland Pattern

More posts about Winter Wonderland:

Winter Wonderland
Winter Wonderland – My colours part 1
Winter Wonderland – My colours part 2
Winter Wonderland – My colours part 3
Winter Wonderland – My colours part 5
Winter Wonderland – My colours part 6
Winter Wonderland Round up

Winter Wonderland – My colours Part 3

Oh wow, it is already week 3 of the Winter Wonderland Cal!

I am currently working on the border. So next week I will be able to tell you how much yarn I used in total, how much is left, etc.

I was really a bit sad when – after these weeks – had worked the last stitch of the blanket section and cut the last thread!
Such a beautiful pattern – I enjoyed testing it so much. Ok, I know I often say that! But this time it is the first time that I am 100 % happy with my colour placement. Somehow that makes it very special for me!

So, here my part 3.

My colour placement

Overdue update, June 2024: I’ve finally redesigned the documents with my colour scheme and combined the download into one document. There you will also find the total amount of yarn required. Details on the yarn consumption are listed in this post.
Please don’t be surprised that the files look a little different, the content is the same.

In case you are looking for the Winter Wonderland pattern, you can find it here.


And a few more impressions of what my blanket looked like after part 3..

Have a good time 💕

More about Winter Wonderland:

Winter Wonderland
Winter Wonderland – My colours part 1
Winter Wonderland – My colours part 2
Winter Wonderland – My colours part 4
Winter Wonderland – My colours part 5
Winter Wonderland – My colours part 6
Winter Wonderland Round up

Winter Wonderland – My colours Part 2

I really hoped that the weather would get better here, but it is a typical November this year. Cold, grey, rainy and foggy.
Unfortunately, I had forgotten to take some nice pictures after I had finished part 2. I actually wanted to catch up on this now. … Well … – now these will have to serve.

I’m currently working on the last twenty rows. Phew!
I don’t think this has ever happened to me before. That a pattern has already been published, but I haven’t finished my test project yet. But sometimes, unfortunately, life gets in the way!
I am very happy that I could at least finish the test beforehand by only doing a small swatch over 2 repeats for the last part. I used some yarn that I had on hand but actually I like the colours very much. I will have to take a picture to show you – it looks completely different.

Yarn Update

Now that I am almost finished with the blanket, I can better estimate how much yarn I will need. 
At the moment they are, for the blanket

  • 4 balls White
  • 2 balls Silver
  • 2 balls Grey
  • 2 balls Graphite
  • 1 ball Lipstick

For the border I will need an extra ball Lipstick and probably one more Graphite.

My colour placement

And here the colours I used for part 2

Long overdue update, June 2024:
I’ve finally redesigned the documents with my colour scheme and combined the download into one document. There you will also find the total amount of yarn required. Details on the yarn consumption are listed in this post.
Please don’t be surprised that the files look a little different, the content is the same.

In case you are looking for the Winter Wonderland pattern, you can find it here.

I hope you have fun 💕

Some more about Winter Wonderland

Winter Wonderland
Winter Wonderland – My colours part 1
Winter Wonderland – My colours part 3
Winter Wonderland – My colours part 4
Winter Wonderland – My colours part 5
Winter Wonderland – My colours part 6
Winter Wonderland Round up

Winter Wonderland – My colours Part 1

Winter Wonderland, the new Cal by Ana Morais Soares / One Skein of Love started today. Are you ready?

As promised, I will list the colours I used row by row here At the end of this post you will find a document to download.

I used Stylecraft Special DK in White, Silver, Grey, Graphite and Lipstick. Although the pattern has now been fully tested, I am unfortunately still working on my blanket. Therefore, I am not yet able to give any details about my total yarn consumption. I will keep you updated as soon as possible.

Here a photo of „my Part 1”. Aren‘t these reindeers cute?

And here my colour placement

Update June 2024:

It’s long overdue: I’ve finally redesigned the documents with my colour scheme and combined the download into one document. There you will also find the total amount of yarn required. Details on the yarn consumption are listed in this post.
Please don’t be surprised that the files look a little different, the content is the same.

In case you are looking for Ana‘s pattern, you will find it here.

I hope you will enjoy this pattern as much as I did. My colours for part 2 and 3 will follow in a few days.

Happy crocheting!

More posts about Winter Wonderland:

Winter Wonderland

Winter Wonderland – My colours part 2

Winter Wonderland – My colours part 3

Winter Wonderland – My colours part 4

Winter Wonderland – My colours part 5

Winter Wonderland – My colours part 6

Winter Wonderland Round up