Geometrics Cal – Part 7, Border

Part 7 of the Geometrics Cal is out. It‘s the final part, the border.

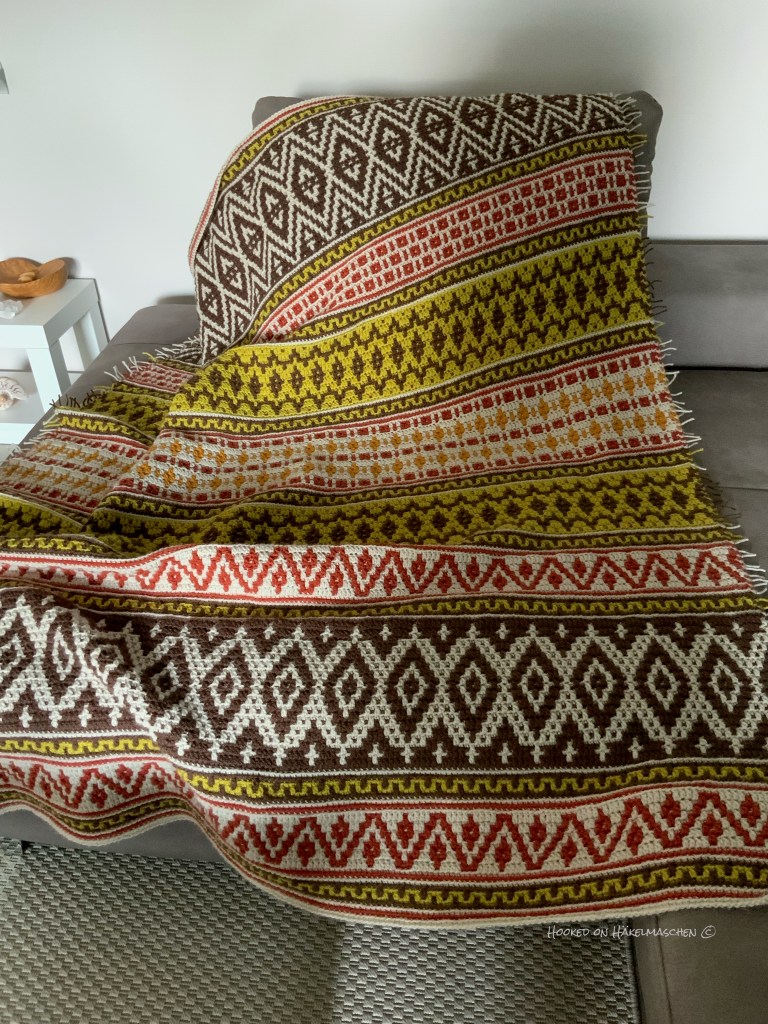
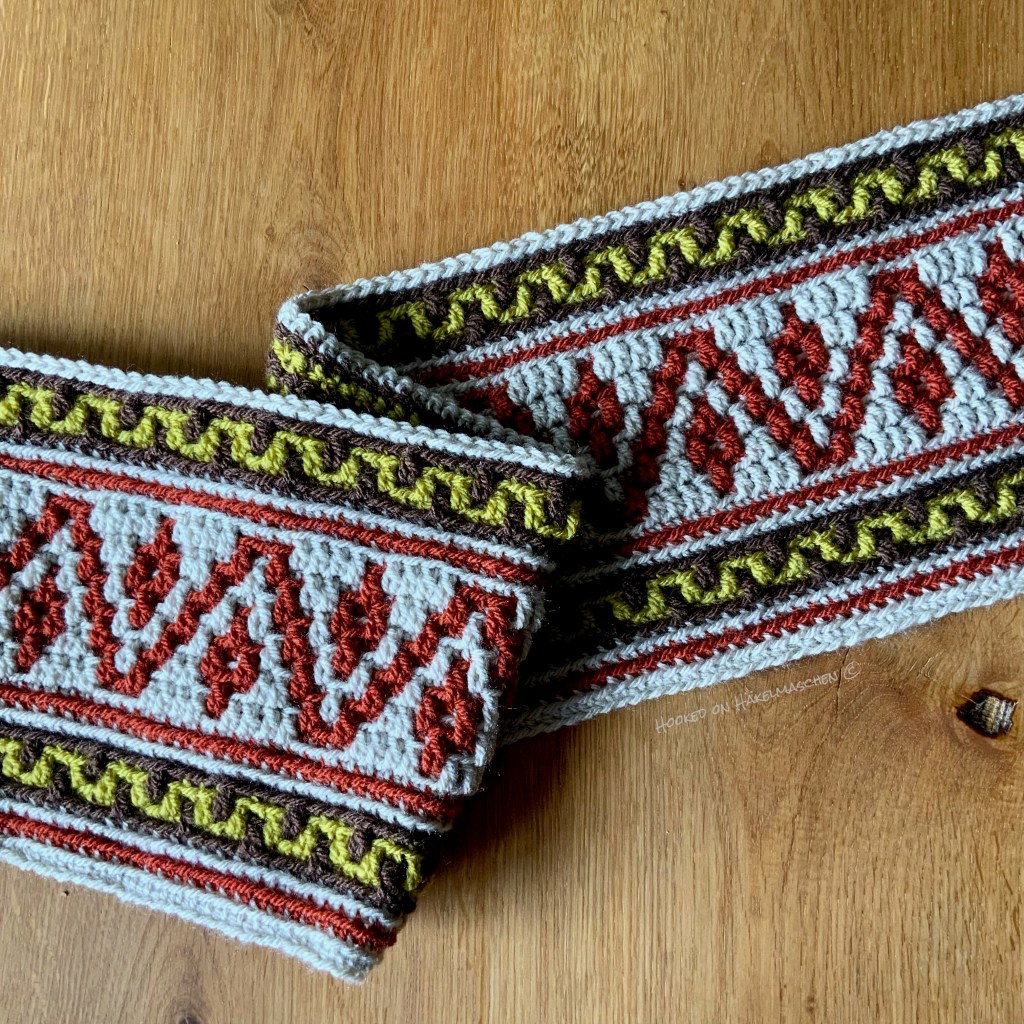
The blanket is finished with a nice, plain double border. I did mine in two colours and used Walnut for the back layer and Copper for the front.

Do you like double borders?

Apparently many people don’t like double borders. There are always complaints about the slip stitch round on crochet forums. I remember quite well: after reading all that, I was really scared of it when I started crocheting overlay mosaic. I was so scared that I left my first piece – a little table mat – with a fringe.
This also was the reason that I switched to the so-called inset mosaic. You don’t have to handle all the yarn ends there.  But of course you also need a border for inset mosaic. The first pattern I worked on didn’t suggest a border, and I had no idea what I could do myself. In my search for inspiration, I came across a double border that works without slip stitches and is based solely on front post double crochet. I just gave it a try and the result was quite nice. The border gave the blanket a nice drape. It is probably an acceptable alternative to the classic double border. But I don’t think the front post dc do go with every pattern.

At some point, the time had come for me too.I did my first double border with a slip stitch start when I was testing Gretchen. As a tester you have no chance to escape, lol.

First I had to experiment a little with the tension for my slip stitches and tried out different hook sizes. But then: Wow! … Since then I’ve been a fan of double borders with slip stitch rounds!!
A double border is such a nice finish. And the slip stitches ensure that the border looks neat and lies flat. I just love it! And I love doing a slip stitch round.
In my opinion, it is a fairy tale that it is complicated and takes forever. After all the work you put into your blanket it is absolutely worth the effort!

Two advices though: either keep your slip stitches a bit relaxed (but not too loose) or go up a hook size AND count your stitches!

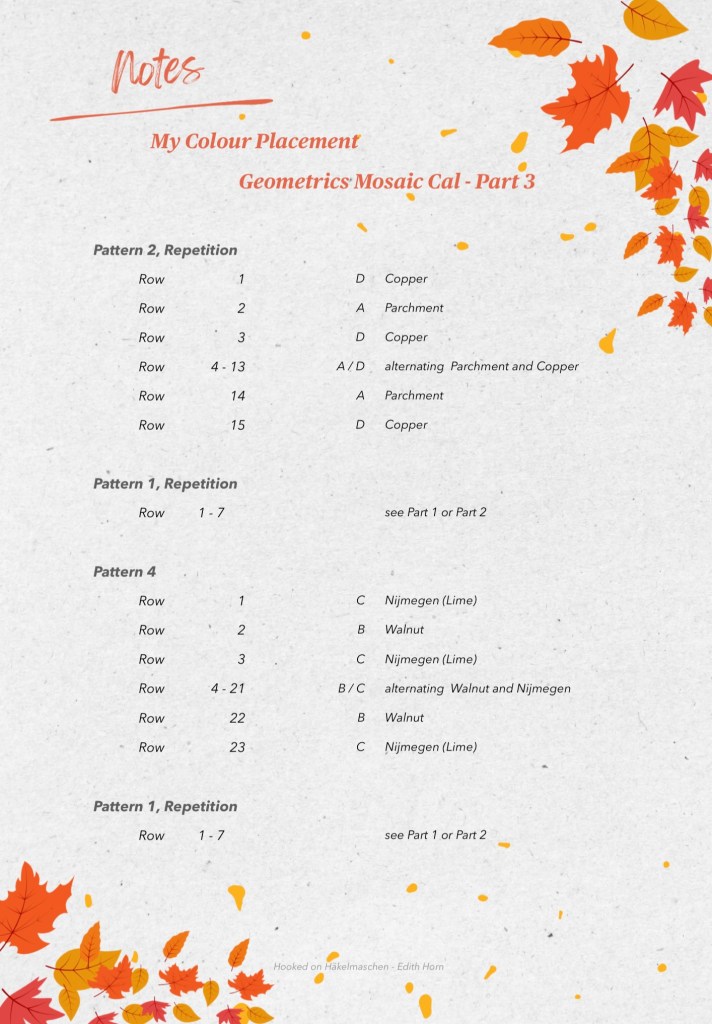
The colours for my border

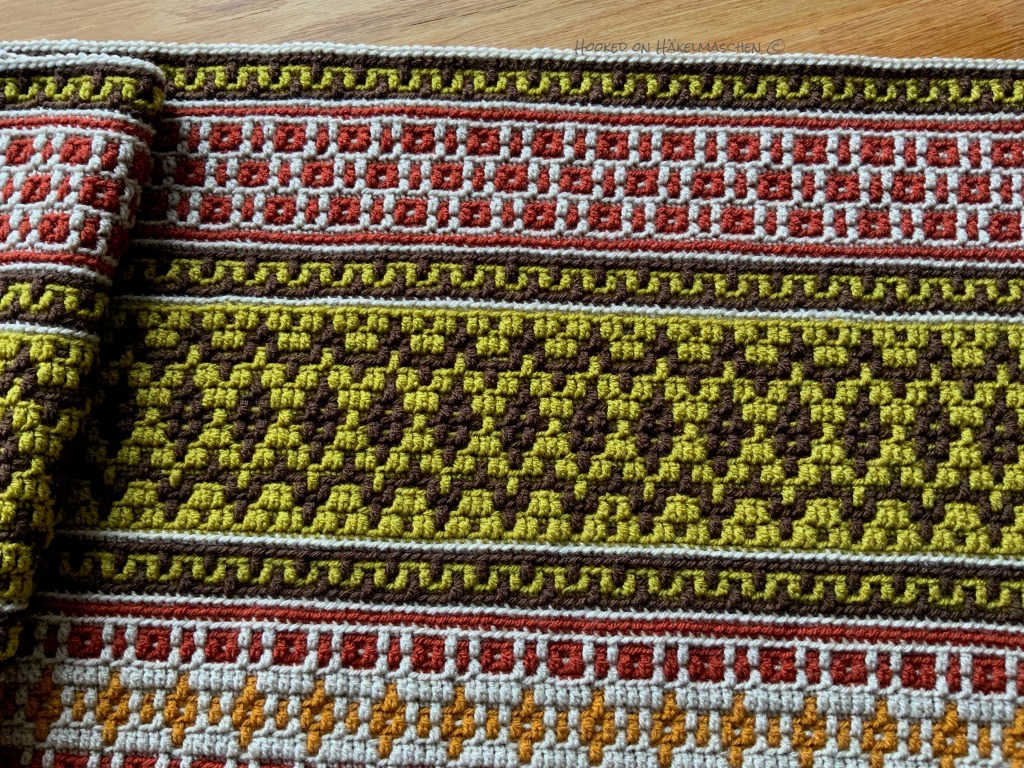
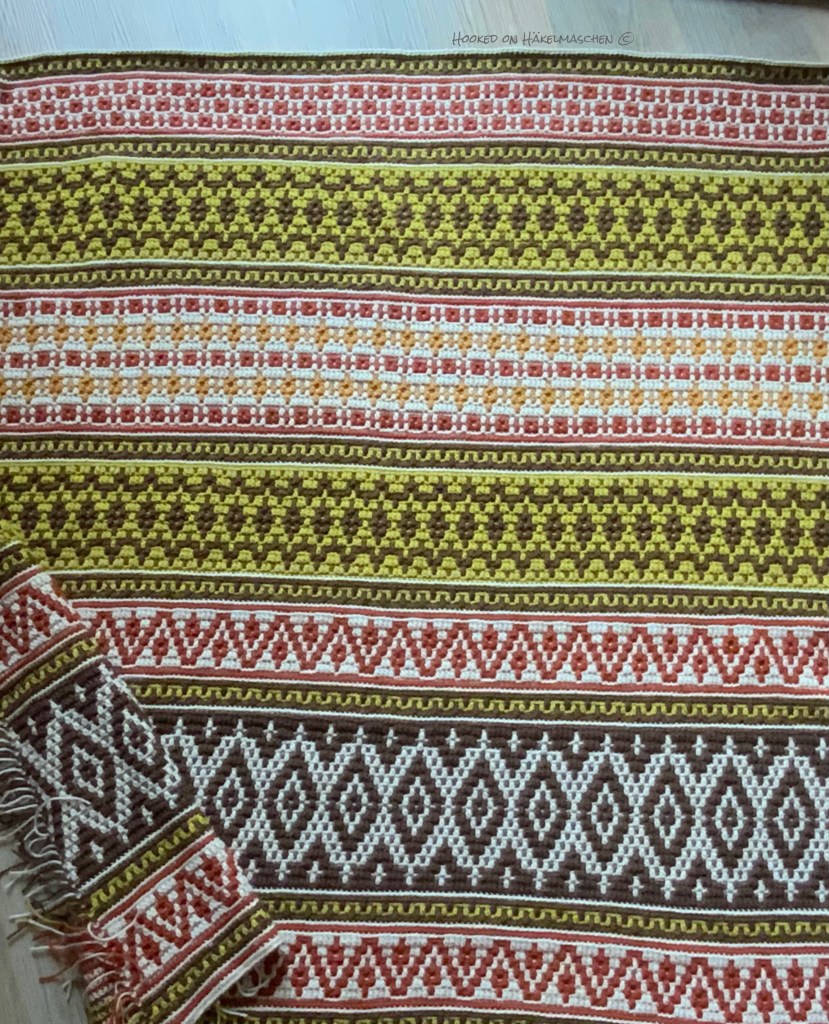
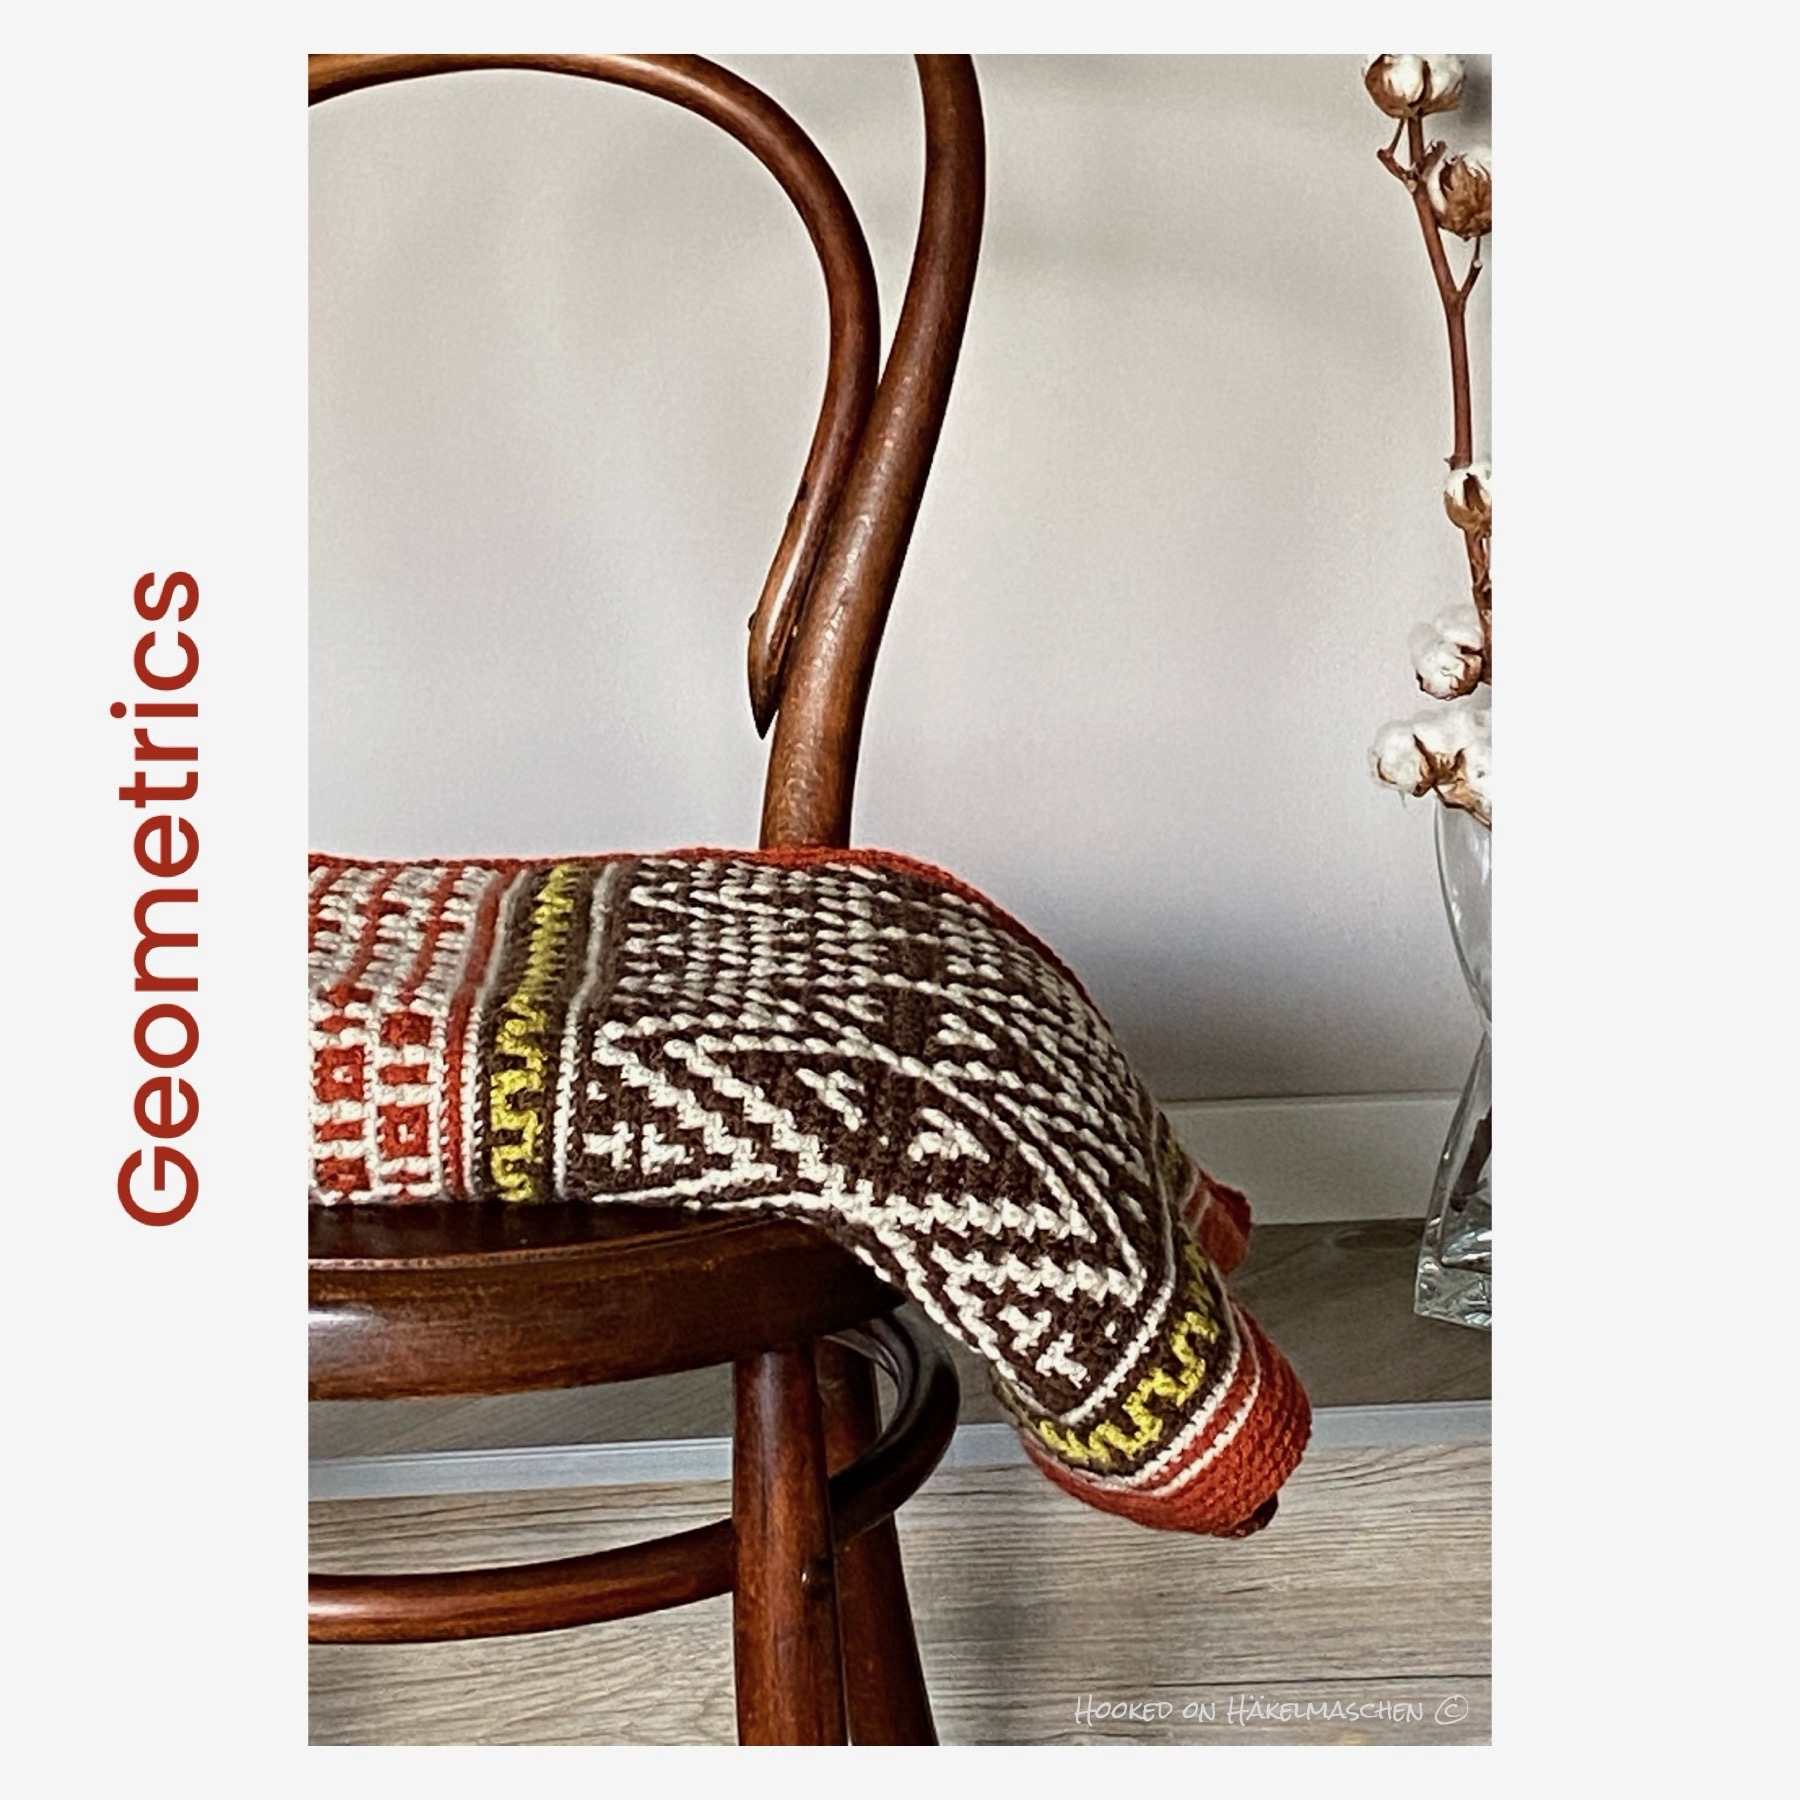
Here some more impressions of my finished blanket.
Hubby grabbed it and loves it. And I am very pleased of how it turned out myself!

Happy hooking!

Edit, January 2024:
Over the last few days I have revised my posts on the Geometrics Cal and the associated documents. As a supplement, you can now also download my complete colour scheme in one pdf-document here:

Geometrics Cal – Part 6

The Geometrics Cal is slowly coming to an end!
Today the pattern for the last 48 rows was published. Next week the instructions for the border will follow. So there is not much more to say.

This is my part 6 …

Here my colour placement for the last part.

See you next week 💕.

Geometrics Cal – Part 5

Time flies!
Now it is already week 5 of the Geometrics Cal.
More than half of the blanket is finished. Part 6 will follow next week and part 7 will be all about the border.

If you followed the pattern so far, you have already worked 163 rows. YAY!

Part 5 is again a longer part with 52 rows. Firstly, pattern 4, which we already know from part 3, is repeated. This is followed by a repetition of pattern 1, then the new pattern 6 and another repetition of pattern 1.

And here is my colour placement.
For pattern 4, as in part 3, I used Walnut and Lime. Pattern 6 is done in Copper and Parchment.

If you are looking for the earlier parts, you can find them here

Part 1

Part 2

Part 3

Part 4

See you next week!

Geometrics Cal – Part 4

Now it is already week 4 of the Geometrics Cal. The new part was released today.

Part 3 was a relatively big part with 52 rows, wasn’t it? But half of the blanket is almost there. Part 4 will add another 37 rows, so not so much to crochet this week.

This is my part 4. It is the only part where I used some Gold. I absolutely love the combination of Parchment, Copper and Gold.

And here my colour placement:

My growing blanket …

See you next week 💕

Geometrics Cal – Part 3

Today part 3 of the Geometrics Cal was released in Ana’s Ravelry shop. If you follow the Cal and finished part 2 you have already hooked 73 rows, only 190 rows to go until the border starts.

I have seen a lot of beautiful color ways in Ana’s Facebook group or on Instagram. And I have to say I am a bit jealous. They all are very beautiful! I often struggle with my colour choices and choosing colours for a new project is usually not the most fun part for me.

This time colour choice was easy. My plan was to make a blanket for hubby that matches my When Summer turns into Fall blanket. It therefore just made sense to use the same colours. Colours that go perfectly together and have an autumnal look. Well …

As I said, I didn’t have a finished colour scheme in mind beforehand, just a rough idea. I wanted to use Parchment as main colour. Copper, Gold and Walnut as accompanying colours and a bit of Lime as an accent. Hm … Things turned out differently …

To save time, we tested the pattern immediately after Ana had finished a part of her blanket. So when I started, I didn’t know how the entire blanket would look like, I knew only part 1 and part 2 of the pattern.
This way, it was not possible to plan any colours in advance. But I should have paid attention to how Ana arranged her colours. I did not! When we got to part 3, I realised that I had somehow started off wrong.

I suddenly noticed that I shouldn’t have started the small separating border (pattern 1) with Parchment, the colour I wanted to use as main colour. As for Overlay Mosaic you have to change colours every row, it made it impossible to use Parchment as background colour for pattern 4! Small mistake, big effect …

At this point, however, I didn’t want to suddenly change the colour sequence for pattern 1 – I had already used it a few times and it would have looked strange for me to suddenly change it. Normally I would have started again and redone the whole  blanket. But when you are testing a pattern, time is limited. I had already been working on my blanket for 9 days and was afraid that I would not be able to make up the time when I start again. I had to improvise …

And so it happened that my blanket suddenly got a slightly retro look with the combination of Lime and Walnut. I struggled with this look for a long time, but meanwhile I love it and my Gemetrics has a good chance of becoming the best-loved blanket in the house.

But enough of my look behind the scenes – here my “improvised colour scheme”

See you next week!

Geometrics Cal – Part 2

The first week of the Cal has already passed and Part 2 was released today.

If you are taking part in the Cal I hope you had a good start! Meanwhile I have seen a lot of lovely Geometrics versions in Ana’s Facebook group.

This is mine so far …

For pattern 3, I used Walnut and Parchment.

And I decided to keep the colour combination – Parchment, Lime and Walnut – that I had already used in the first part for pattern 1..

So, here my colours in detail.

And the pdf to download

See you next week 💕

Please also see

Geometrics Cal – Part 1

Finally the Geometrics Cal started

I wish you lots of fun!

This is what my first part looks like.

As I wrote in my previous post, I use the same colours for the Geometrics blanket as my When Summer turns into Fall blanket has.
When Summer turns into Fall is also one of Ana’s designs.

Ana’s original design is more in shades of blue, with a little yellow. Quite different from my colours.
I couldn’t imagine replacing each of Ana’s 5 colours with one of mine. So I didn’t follow the colour scheme of the pattern. I spontaneously decided how to place the colours and that’s how my own colour scheme came about. I’ll tell you a bit more about it in week 3 .

If you are interested in my color scheme, I will provide the colours I used for each part of the Cal here for download. I think this is much easier than listing them in the Ravelry notes.

My yarn and colours

I used Stylecraft Special DK in the colours Parchment, Walnut, Copper and Gold. I had to replace Lime with the colour Nijmegen from Scheepjes Colour Crafter. Lime was not available at that time but Nijmegen should be the same tone.

  • A / Parchment
  • B / Walnut
  • C / Nijmegen (Lime)
  • D / Copper
  • E / Gold

My blanket is worked with a 4,0 mm hook throughout.

So here we go with my colours for the first part.

You also can download a pdf, have fun!

The pattern for the Geometrics Mosaic Cal is available in Ana’s Ravelry shop.

Geometrics Cal – Sneak Peek

The last few weeks have been very busy.
In July, Ana from One Skein of Love asked me if I could help with another test: a blanket in Overlay Mosaic crochet that she designed for a CAL (crochet along).

Of course, I said yes!

But the timeframe was pretty tight. I started the test on July 27 and finished my blanket on September 10. So only a little over 6 weeks to crochet

  • 207 chains for the foundation
  • 54.441 stitches for the blanket
  • 940 slip stitches and 8 chains to start the border
  • 1.928 stitches plus 16 chains for the back layer of the border
  • 3.840 stitches plus 32 chains for the front layer of the border
  • and 972 slip stitches and 12 single crochet for the final round

That makes a total of 62.396 stitches – if I haven’t miscounted. PHEW!

Not included are the stitches I had to rework because my tension was off due to some yarn problems!

But never mind, it was worth it! And I am happy to show the first sneak peeks.

I wanted to make my Geometrics to match my When Summer turns into Fall blanket (I‘m still working on) so I chose the same colours and used

  • Parchment, 4 balls
  • Walnut, 4 balls
  • Copper, 2 balls
  • Lime, 2 balls
  • Gold, 1 ball

(At least that is what I have noted, hope it is correct.)

Since I didn’t follow Ana’s colour scheme, I’ll list my colour placement for each part of the Cal in the following posts.

The Cal will start on September 23 and I hope many, many people will join!
You will find more information on Anas Ravelry page.