

As you may know, I’ve been experimenting a bit with Tunisian crochet lately.
I have mastered the basic stitches in Tunisian crochet for a long time and years ago I have also crocheted several patterns. But I never worked Tunisian crochet using two different colours or tried Tunisian mosaic crochet. I have also never looked into the possibilities of decorating a finished piece with cross stitch or weaving. And, besides a kind of ‚join as you go‘-method, I‘ve never joined pieces made with Tunisian crochet. So really time for me to experiment a bit!
The results are 4 different mobile phone covers for my iPhone that I would like to show you here. I will write down the patterns one by one, so that you can make one for yourself if you like.
In case you have never done Tunisian crochet before (or need a refresher), you can find the basics of this technique here.

Tunisian Mobile Cozy I
The first one is a really simple one and absolutely beginner friendly. It is more or less just made from a rectangle made with Tunisian Simple Stitch. No changing colors, no decreases, just some basics. So it’s a great starter piece!
My cozy – made for an iPhone 14 Pro – measures about 9,5 x 16 cm. If you need a different size, the pattern is easy to adjust.

If you are new to Tunisian crochet, please take a look at the detailed explanations first:
- Working a Foundation Row in Tunisian crochet
- Anatomy of stitches
- Tunisian Simple Stitch
- Binding off
Materials
- Small amount of Stylecraft Special DK, colour 1005 Cream
- some leftover yarns in different colours
- 4,5 mm Tunisian crochet hook
- scissors
- yarn needle
If you decide to use a different yarn or if you want your phone cover to be a different size, you will have to make a few adjustments:
- you will probably have to adjust the number of chains you cast on.
My phone is 7, 2 cm wide and 0,8 cm heigh. I made my chain about 9,5 cm long which is equal to: 1 times the width of my phone plus 2 times the height plus 0,5 cm (7,2 + 1,6 + 0,5 cm). The 0,5 cm are just to give it a bit ‚room‘ for joining. - you will probably also have to adjust the number of rows you work. You can easily measure this while working, your crochet piece should have twice the length of your phone. Just wrap it around your phone from time to time and you will know when you have to stop.
Stitches / Abbreviations
| FwP | Forward Pass |
| RtP | Return Pass |
| TSS | Tunisian Simple Stitch Insert hook from right to left under front vertical bar of the next stitch, pull up a loop and keep it on the hook |
| yo | yarn over |
Pattern
- Foundation / Row 1
- Cast on 16 chains loosely
- FwP: Start in the 2nd chain from hook and pick up a loop from the back bar of every chain – 16 loops on hook
- RtP: don’t turn your work, just work from left to right now
yo and pull through the 1st loop on the hook, *yo and pull through the next 2 loops on hook, repeat from * until there is only 1 loop on hook
- Row 2
- FwP: working from right to left, skip first vertical bar, 14 TSS, work end stitch (16 loops on hook)
- RtP: work Standard Return Pass like explained above
- Row 3 – 43
- repeat row 2
- Bind off

My rectangle measured about 9,5 cm in width and 32 cm in length.
Decorating
Now you can start decorating your cozy by „weaving“ different yarns under the vertical bars of the Tunisian Simple Stitches.
If you like to do it similar to mine, here is what I’ve done:
I used some left over yarns from King Cole Comfort DK in the colour 1729, Glacier and Stylecraft Special DK in 1390, Clematis and 1064, Mocha.
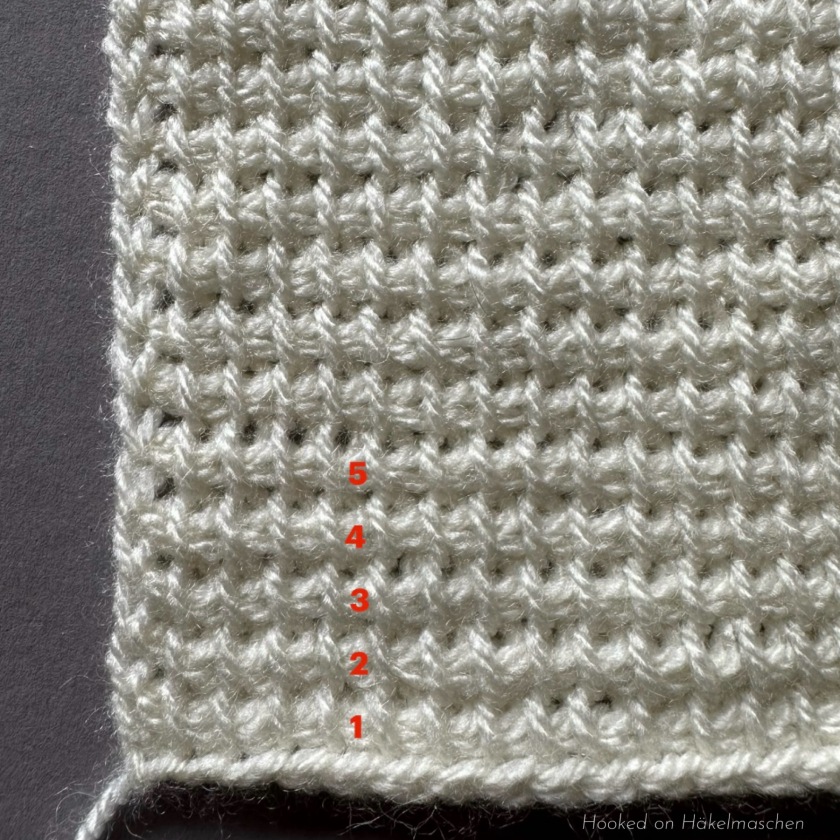
I started in row 23, counted bottom up. (If you are unsure how to count the rows, this picture will help.)
Thread a needle and bring the yarn up under the horizontal bar of the last stitch (end stitch) on the left side (pic 1). Weave the yarn under the front vertical bar of the next stitch in the same row. Then go up a diagonal line, always going one stitch to the right and one row to the top (pic 2) until you reach the right edge (pic 3).
Continue doing the same with the next thread, starting in the same row but one stitch to the right (pic 4).
Gently sew away the loose yarn ends on the back.

Finishing
I simply joined the edges with a row of slip stitches. I used my main colour, so my stitches are nearly invisible. But it also can be a nice effect to use a contrasting colour.
Just fold the rectangle to the half. If you did 43 rows the middle will be row 22. Grab both loops of the first / last stitch of rows 21 and 23 and start with your first slip stitch. (Row 22 stays unworked.) . Go up the edge until the last stitches are joined. Finish off and work away the tails. Do the same on the other side. Finished!


I hope you enjoyed it 💗


