

Last updated on February 01, 2026
When I rediscovered my love for Tunisian crochet back in 2024, I also became curious about its history.
While researching it, I quickly realised that there is no single, clear answer. The origins of Tunisian crochet are still debated and described differently depending on the source.
It is also known as Afghan crochet or Tunisian knit, which has led to various theories about where the technique comes from. Some sources point to regions such as the Middle East and North Africa, while others place its development in 19th-century Europe. Rather than having one clearly defined origin, Tunisian crochet seems to be shaped by several influences and traditions.
Regardless of where it started, Tunisian crochet has developed into a unique and fascinating technique with its own distinct structure.
If you are interested in learning Tunisian crochet or if you need a quick refresher, here is a brief overview.
Equipment
Yarn
As for traditional crochet and knitting, you can use nearly any yarn for Tunisian crochet. If you’re just starting out, I’d suggest starting with your favourite yarn or at least your favourite yarn weight. As with traditional crochet, working with finer yarn can be difficult if you are not used to it. It can also be difficult with a yarn that tends to split. However, both can be mastered with a bit of practice.
Just a quick note: I have some variegated yarns in my stash that I bought simply because I liked them. However, I later realised they were better suited for knitting. Crocheting them resulted in colourful patches disrupting the stitch pattern. Now I’ve discovered they’re perfect for Tunisian crochet. If you’re familiar with this yarn issue, give Tunisian stitches a try – it’s worth it!
Hooks and hook sizes
Tunisian crochet hooks

Some projects can be made using a standard crochet hook, which is also used for traditional crochet. Others require a special Tunisian crochet hook.
Tunisian crochet hooks are available in many different styles. Some are simply longer than standard crochet hooks and often have a stopper at the end to prevent stitches from slipping down. Others have a long cable that is either fixed or attachable. They are perfect for wider projects. In addition, there are also double-ended Tunisian crochet hooks, with a hook on both ends. These are used for crocheting in rounds or for creating certain colour effects.
I started out using some Knit Pro Symfonie hooks with attachable cables in different lengths. I also recently bought some Addi hooks that can be used with either a stopper or a cable. I don’t have the stopper yet, but I use a small stopper for double-pointed knitting needles instead. Alternatively, a simple rubber band serves the same purpose.
Hook sizes
As Tunisian crochet creates a dense fabric, the hook size should be larger than normal. As a general rule, go up at least one size. However, this will also depend on your project. For example, a light shawl will need a larger hook to drape nicely than a dishcloth would. Usually, the pattern will specify the required hook size. Nevertheless, I would advise making a small swatch to see what size hook works best for the desired look.
Basic techniques
Tunisian crochet offers a wide variety of stitches and patterns. The basic stitches can be used on their own or combined to create many different patterns. Although each stitch has a unique appearance, they have a few things in common:
Unlike with crochet or knitting, the stitches in Tunisian crochet are not formed in one step, but in two. First, all the stitches in a row are picked up and kept on the hook. This is known as the forward pass. In the subsequent return pass, the stitches are finished and worked off the hook.
The forward pass is always worked from right to left (unless you are left-handed), and the return pass is worked from left to right. The work is never turned, and you should always work with the right side of the fabric facing you, unless the pattern says otherwise.
After completing a forward pass, there will always be as many loops on your hook as there are stitches in this row according to your pattern. Therefore, if you want to count your stitches, it is easiest to do so directly after a forward pass, before starting the return pass.
In Tunisian crochet, each pattern starts with a Foundation or Base Row.
Foundation Row
The standard Tunisian foundation row begins with a
Starting Chain
Just like in traditional crochet,
- work the desired number of chains
The length of the foundation chain will determine the width of your Tunisian crochet piece.
The number of chains should also match the number of stitches needed for the pattern. Unlike in traditional crochet, no turning chains are required.
Forward Pass
- Skip the first chain (its loop is already on your hook) and start in the second chain from the hook. To identify the second chain, refer to the position of the needle in the image below.
- Insert the hook under the back bar of the chain, yarn over and pull up a loop.
- Keep this loop on the hook and repeat across the row, making sure all loops remain on the hook (see picture 1 of the return pass below).
At the end of the row, the number of loops on the hook should match the number of chain stitches you previously worked.
Note: I prefer to pick up the loops from the back bars of the chains. This ensures that the bottom edge of the project looks similar to the top. However, it is also possible to pick them up from the front or back loop of the chains. Do whatever you prefer and whatever looks best for your project.

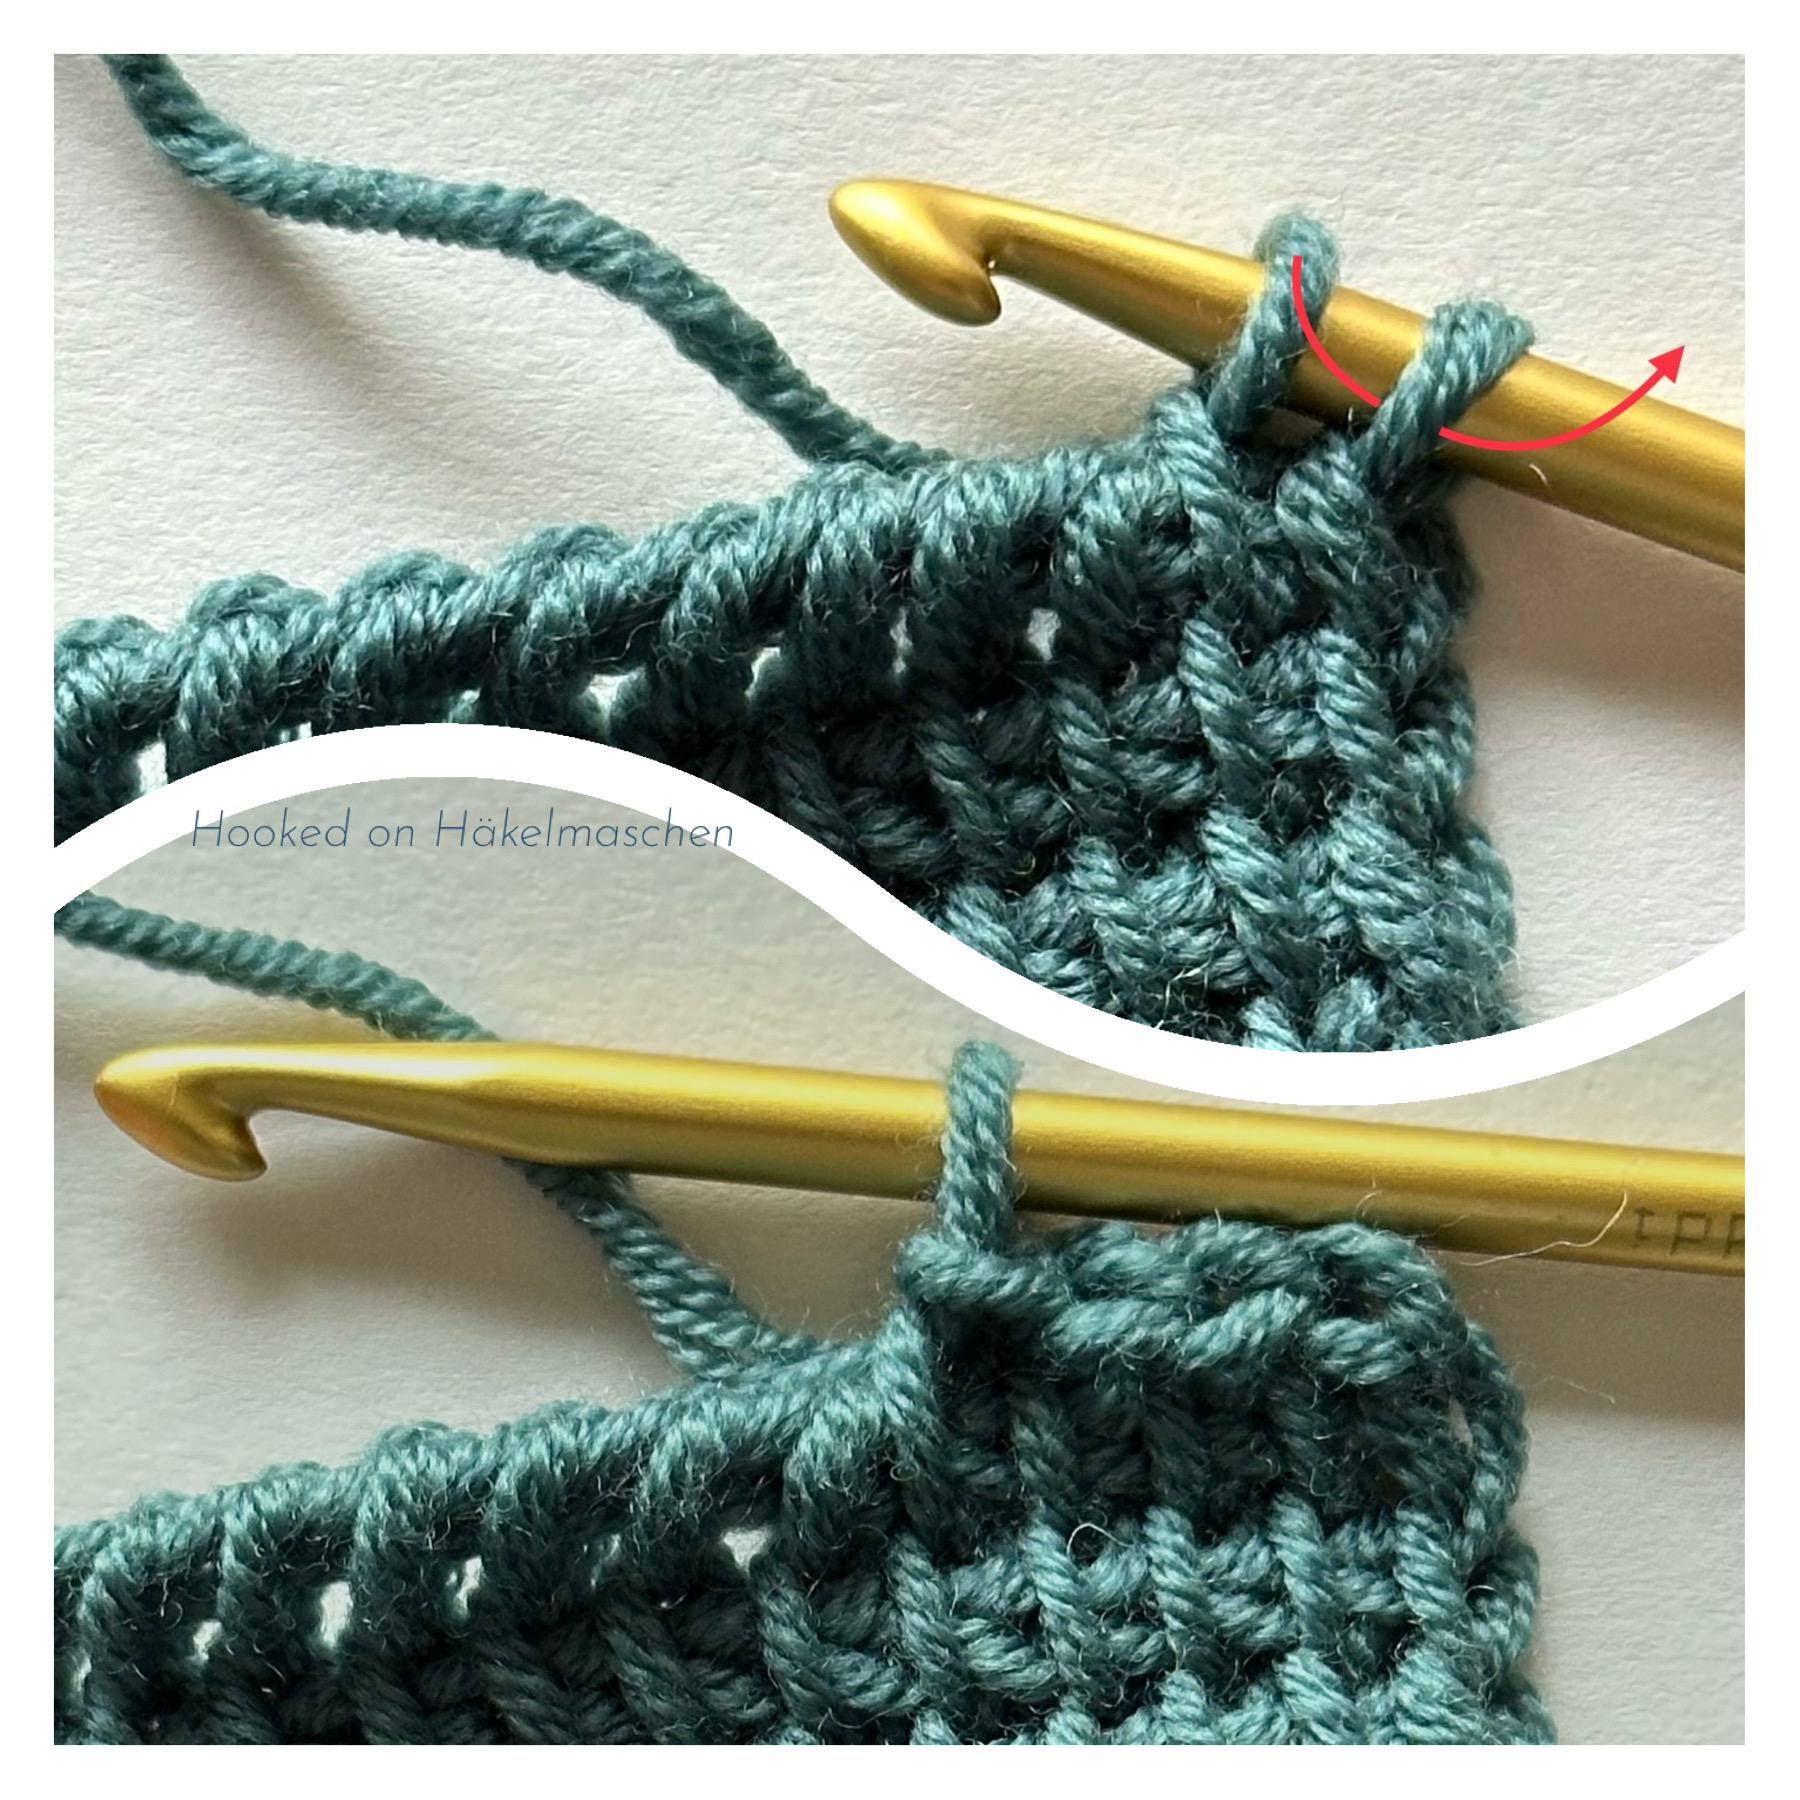
Standard Return Pass
The return pass is worked from left to right without turning the work.
- Yarn over and pull through the first loop on the hook (see arrow in picture 2). This creates a chain stitch (see picture 3).
- Yarn over and pull through two loops. These are the chain stitch just made and the next loop on the hook (see arrows in picture 3).
- Yarn over and pull through the next two loops on the hook.
- Continue yarning over and pulling through two loops (see arrows in picture 4) until only one loop remains on the hook.
- This last loop stays on the hook. It is also the first stitch of the next row.

The foundation row is now completed.

In most Tunisian crochet projects, this foundation is the same, regardless of which stitches or patterns are worked in the following rows.
Anatomy of Stitches
Before looking at the individual parts of a stitch, it’s helpful to know that different designers and sources often use different terms for the same elements.
Let us now look at the structure of a stitch and the associated terminology. This will help you better understand how a stitch is worked.
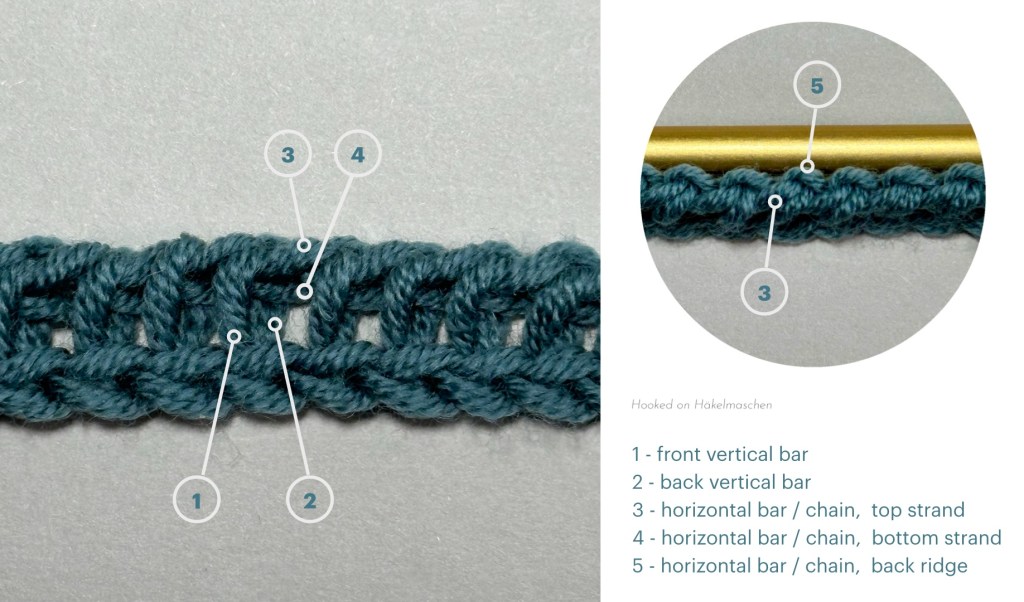
Each Tunisian stitch has two vertical and three horizontal bars. These bars are usually referred to when explaining how a stitch is worked in detail.
Vertical bars
- The front vertical bar is the vertical strand of yarn that is visible on the front side of the fabric.
- The back vertical bar lies directly behind it.
Both are created when the loops are picked up during the forward pass and are simply the front and back of the same loop.
Horizontal bars
The horizontal bars are created during the return pass. They are referred to as either horizontal chains or horizontal bars.
They include:
- the top strand of the horizontal chain, also called top horizontal bar
- the bottom strand of the horizontal chain, or bottom horizontal bar
- the back ridge (or back bump) of the horizontal chain, or back horizontal bar
Please refer to the images below for the exact location of the vertical and horizontal bars.
The first and last stitch of a row
First stitch / start of a row
As explained earlier, the first stitch of a Tunisian crochet row is the loop that remains on the hook after completing the return pass of the previous row.
This means you don’t need to pick up a loop here. You always skip the first vertical bar when starting a row.

Last stitch / End stitch
The final stitch of the forward pass is worked into the stitch that corresponds to the first stitch of the return pass of the previous row. This is the stitch created by pulling the yarn through one loop (the chain 1) at the beginning of the return pass. Consequently, it appears slightly different and there are various methods for working it.
In some projects, you might want to work the stitch in the same way as all the others in the row. This can create a lovely effect for a shawl or similar project, but it might also give your edge a slightly ‘loopy’ appearance.
My favourite method is to insert the hook under both loops of the last stitch and pull up a loop. This works regardless of which stitches were previously worked and creates a nice sturdy edge. However, as always, try it out and see what you prefer.

Tunisian Stitches
Tunisian crochet uses various basic stitches as well as many special stitches. However, beautiful and varied patterns can also be created using only the basic stitches.
The basic stitches include the Tunisian Simple Stitch (TSS), Tunisian Knit Stitch (TKS), Tunisian Purl Stitch (TPS), Tunisian Full Stitch (TFS), and the Tunisian Reverse Stitch (TRS).
Detailed instructions for these basic Tunisian stitches are available here.
Binding Off
While your work won’t unravel if you simply stop crocheting after the last row, binding off the stitches will create a neater edge.
To bind off a stitch, simply work it the same way as you did in your pattern. However, instead of keeping the loop on your hook, slip it through the loop on the hook, just as you would for a slip stitch.
Some Common Abbreviations
| Forward Pass | FwP / FowP / /FW |
| Return Pass | RetP / RtnP / RP |
| Tunisian Double Crochet | Tdc / tdc |
| Tunisian Full Stitch | TFS / tfs |
| Tunisian Half Double Crochet | Thdc / thdc |
| Tunisian Knit Stitch | TKS / Tks / tks |
| Tunisian Purl Stitch | TPS / Tps / tps |
| Tunisian Reverse Stitch | TRS / Trs / trs |
| Tunisian Simple Stitch | TSS / Tss / tss |
| Tunisian Slip-stitch | TSLST / Tslst / tslst |
I hope this helps you get started with Tunisian crochet — and that you’ll enjoy discovering it as much as I do.


