Looking back on my creative year 2025: new crochet patterns, colourful experiments, first collages, a detour into knitting, and hopeful plans for creative projects in 2026.
I hope you all had a great start in 2026!
I just took a moment to reflect on the past year. I felt like last year was dominated by the problems with my eye, frequent visits to the doctor and many treatments. So, I was surprised when I saw everything I had done. They were mostly small things, but seeing them all together still amazed me.
I also managed to publish three crochet patterns on my own.
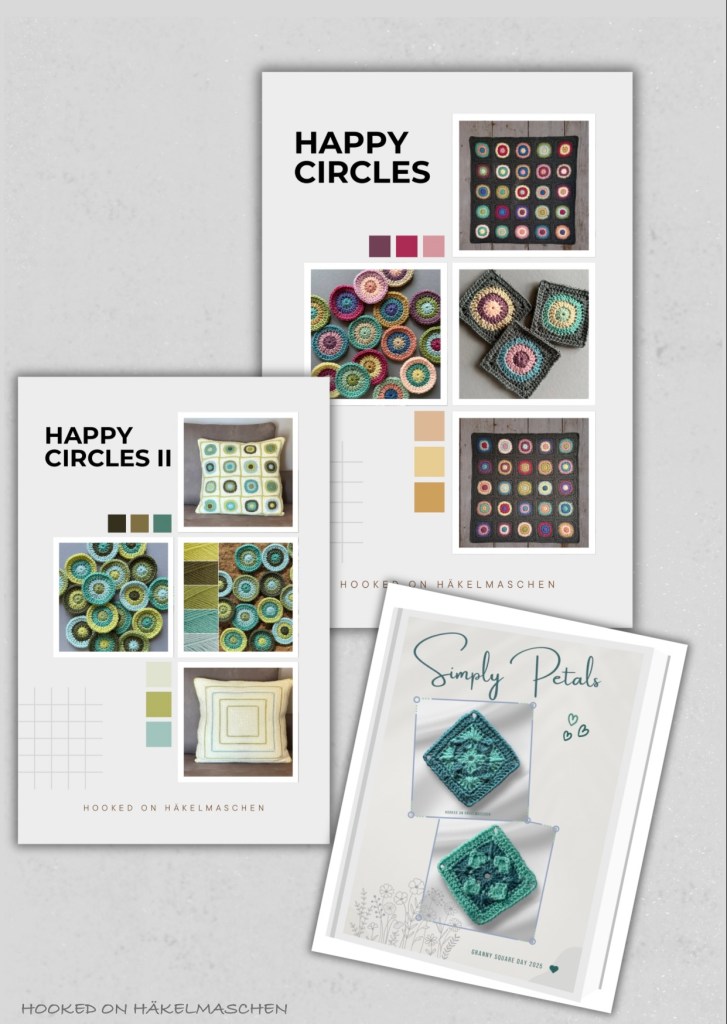
Right at the beginning of 2025 I published my Happy Circles pattern. It is primarily a guide for colourful circles that are transformed into squares. For me, it was mainly an experiment with random colour placement, using a random generator.
I assembled the squares into a wall hanging. But of course they can be used for other items as well.
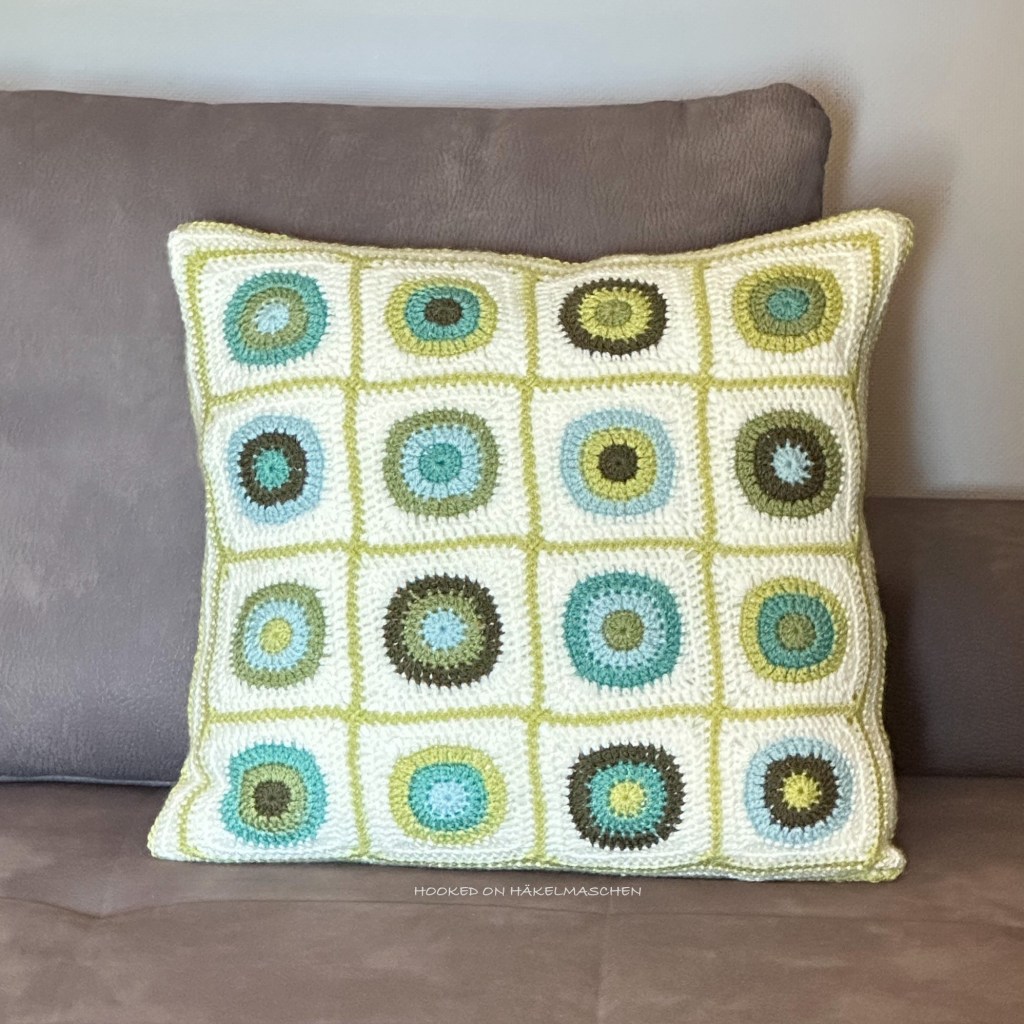
It was followed by Happy Circles II, which is based on the same simple pattern and was also a trial in random colour placement. This time, however, the squares are assembled to form a cushion cover. I also used a different joining method to make the individual squares stand out more. Plus, the pattern includes instructions for the back. However, the biggest challenge for me was using far fewer colours. The result I got using a randomizer was astonishingly different. You can read about this effect and my solution in this post.
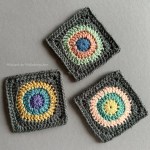
Last but not least I published the Simply Petals pattern. This little square was my contribution to the Granny Square Day 2025. There are certainly many different ways in which it can be used. Last year, I started making a cushion out of it. Regrettably, the project was never completed. Having finished all the squares for the front, I wasn’t satisfied with the colour choices at all. Now they are gathering dust in my craft basket, waiting for a new use.
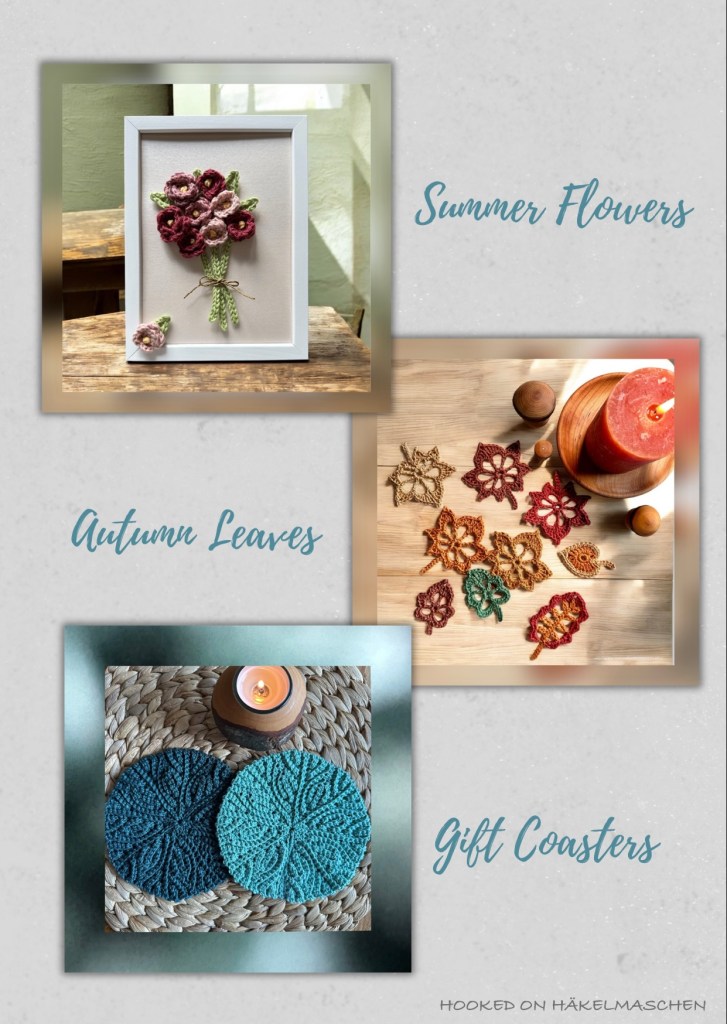
I also finally made something that I had been planning to do for a long time: a flowery collage. It was just a small one to start with, but it was tremendous fun. The pattern I used was Summer Flowers by Bomuldskys.
Tatsiana from Lilla Björn crochet also inspired me to try something completely new: short rows in crochet. It resulted in two beautiful coasters.
And I finally managed to try out some patterns from a book that I had on my shelf – äh, Kindle – for quite a while: Crochet Collage Garden by Chris Norrington. As the name suggests, the book features a lot of beautiful collages made with flowers and leaves. You can read all about the autumnal leaves I made in this post.
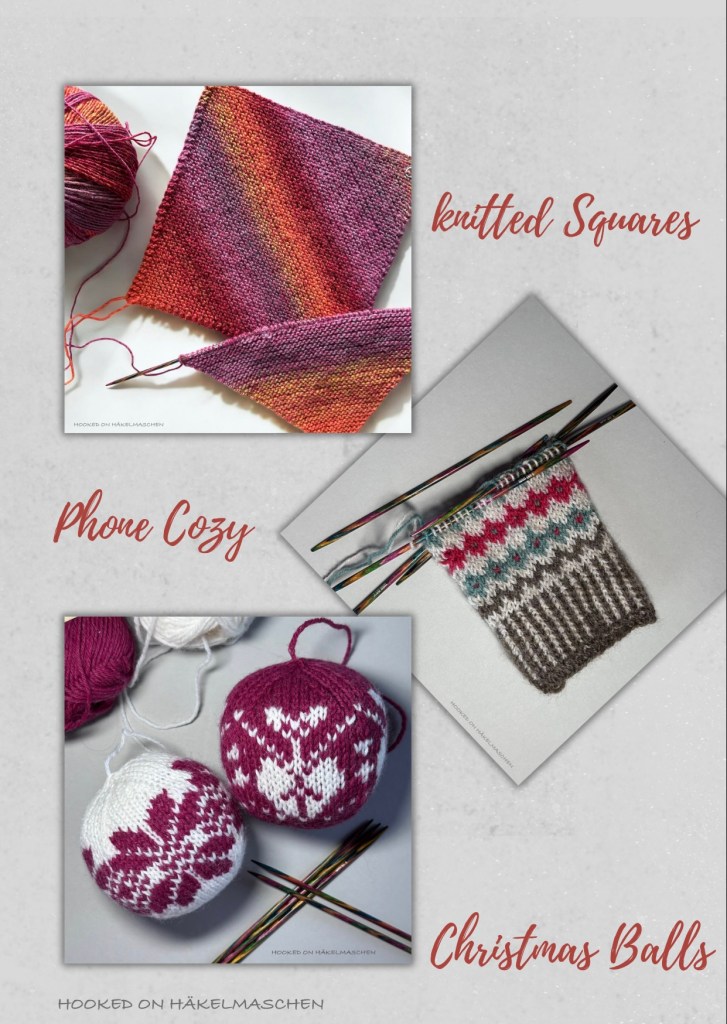
My detour in knitting
At the end of the year I made an adventurous excursion into knitting. I took it up after my eye surgery, as knitting is less tiring for my eyes than crocheting.
I tried out and learned a lot of new things in this field too: different ways to increase and decrease stitches, different ways to knit squares and I took my first steps in stranded knitting …
Last but not least I published a crochet journal that I developed over the years. It is free for download. In case you are interested you can find it here.
Looking forward to 2026
I’m excited to see what 2026 will bring! While my eye will never fully recover, I’m grateful that it’s stable for now. As for my crafting plans, I hope to create more crochet flower collages and finally turn my little Simply Petals squares into something beautiful. Or perhaps something completely new will catch my interest – who knows? Whatever happens, I’m looking forward to the creative journey ahead.
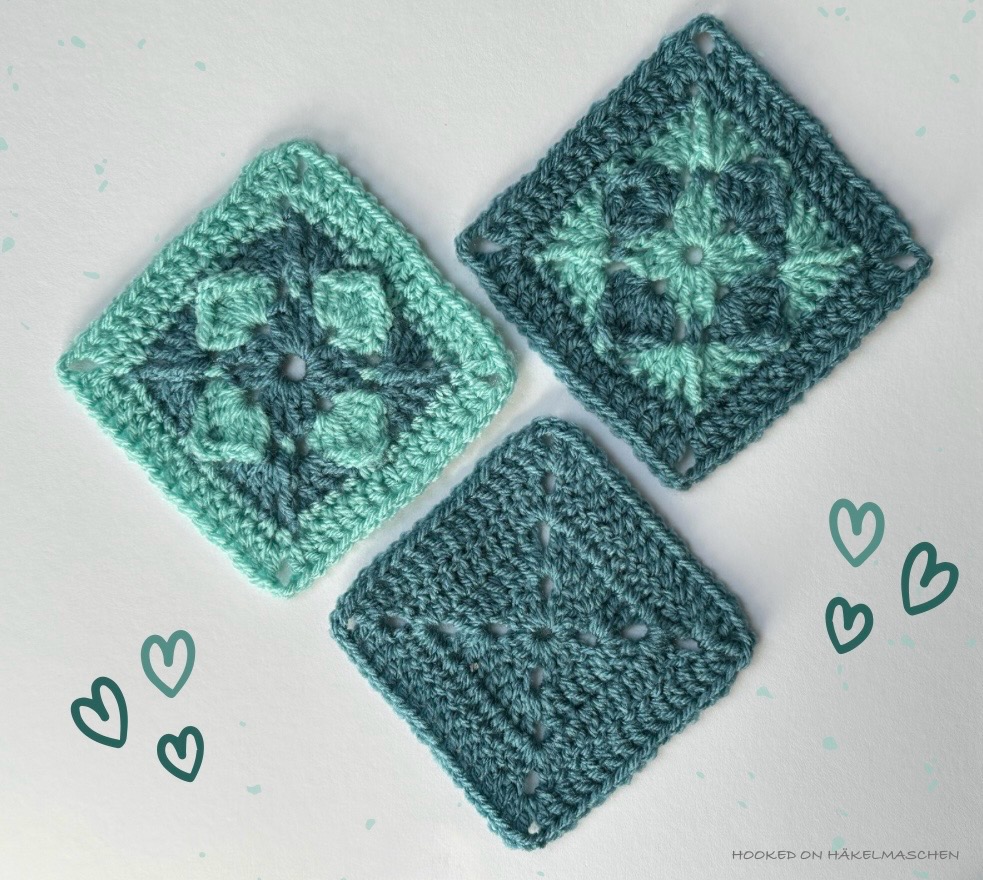
Today is Granny Square Day! And, this year I thought about it in time!
I am a little proud! Normally it seems that I tend to completely forget about Granny Square Day, only remembering it when I see all the lovely posts on social media.
But this year I designed another small square especially for this day – just in time!
If you’re not familiar with the Granny Square Day— what it is, what it means, and its history, I made a quick Google search about it. Here is an extract from the Google AI summary:
„Granny Square Day is an annual, global celebration of the crochet granny square, held on August 15th. It’s a day where crocheters worldwide share their granny square creations online, particularly on Instagram, to form a virtual blanket. The event was started by Susan Regalia in 2014 and later taken over by Simply Crochet Magazine. It’s a chance to showcase creativity, connect with other crocheters, and contribute to a larger, collaboration.“ (copied from Google).
I’m excited to see what beautiful creations there are this year!
My contribution is
Simply Petals
a reminiscent of stylised flower petals. It is easy to crochet and perfect for a quick, fun project.
My samples are made with DK / light worsted yarn (#3) and a 4.0 mm hook. The finished squares measure about 10 cm (4 in).
I chose just two colours, but you can, of course, use as many as you like!
My colour combination:
# 1722 – Storm Blue and # 1842 Spearmint (both Stylecraft Special DK)
The pattern is written in US terms and uses mainly basic stitches: chain, single crochet, double crochet and treble crochet. In addition, it incorporates back post single crochet and front post treble crochet. This makes it perfect for those who enjoy crocheting but prefer patterns without too much complexity. I also think it’s ideal for adventurous beginners with a little experience.
Each square is worked in 5 rounds and has 15 stitches per side, making it easy to combine with a simple, plain square in double crochet.
I hope you like it as much as I do! You can download the free pattern here
And, since it is not included in the pattern, here a few tips for beginners:
Some of the chain spaces can be difficult to identify in the following round. So it can be helpful to mark at least some of them with a stitch marker. Here my tips
Round 2 – place a stitch marker in at least one of the chain spaces that is crocheted before a single crochet. This makes it easier to identify the starting point of round 3 and the placement of the first group of double crochet. (There is no need to mark the chain spaces besides the trebles as you won’t work in these later)
Round 3 – put at least a marker in a chain space worked directly after a front post treble. This will mark the start of round 4. Note: in round 4 you will be working in all chain spaces
Round 4 – I would suggest placing a stitch marker at least in the chain spaces before and after the single crochet that is worked into the front post treble. As in round 4, all chain spaces are worked in round 5
Depending on the yarn used and your personal tension the square might look a bit wonky at the end of round 3. Just smooth it a little with your fingers, the problem should be solved after round 4
You can find explanations of how to work all the stitches used here.
I am curious about all your creations with Simply Petals! Please use #SimplyPetals if you share them on social media.
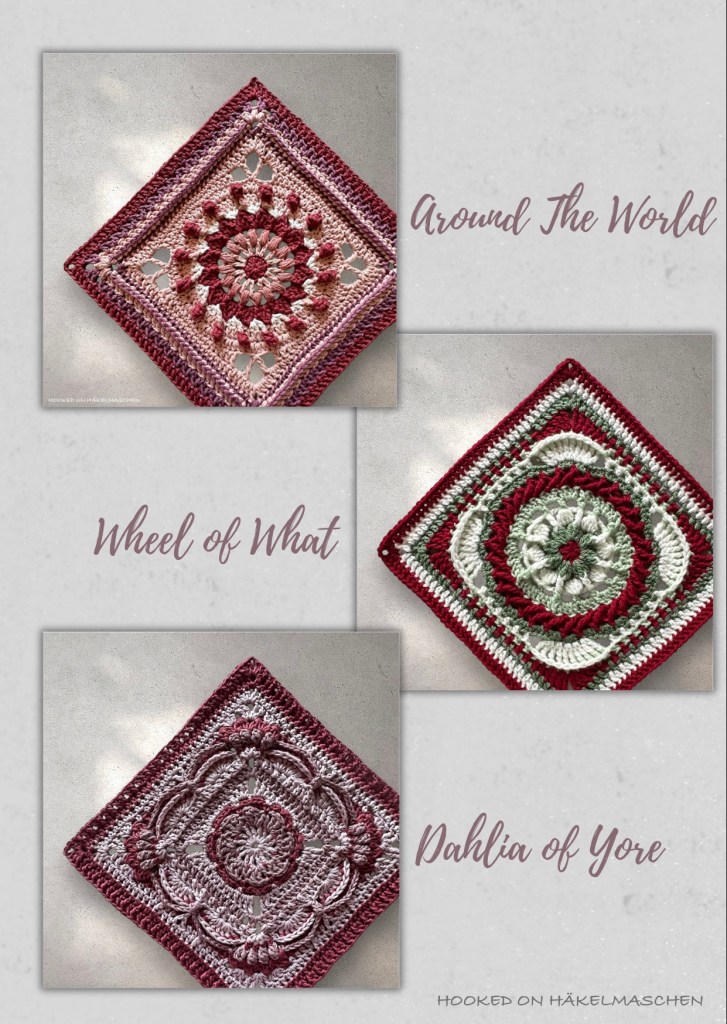
Some weeks ago I had the pleasure of testing another design by Pam Knighton-Haener from AYarnof Serendipity:
The Around the World Square – The Pattern
With the Around the World Square Pam designed another lovely Afghan square. The pattern offers two colour schemes, one with 5 colours and one with 7. It is designed with worsted weight / Aran (#4) yarn and will have a finished size of about 28 cm (11 in) or 30 cm (12 in) depending on wether you work with a 4.5 or 5 mm crochet hook. The size and the number of stitches per side, of course, fit perfectly with all her other 11 / 12 inch squares.
The pattern is rated with an intermediate skill level. As almost always in Pam’s patterns, there are also a few special stitches here. But – also as always – everything is well explained. Besides, there are plenty of detailed pictures to help. Therefore, I think that even an ambitious beginner can crochet this square. The pattern is available on Ravelry, and if you hurry, you can still get a 30% discount until the end of July 2025. The discount also applies to all other patterns by Pam. It’s worth a look!
Around the World Square – My Version
Yarn and colours I used
For my test-version I used Hobbii Rainbow Cotton 8/6 from my stash. Rainbow Cotton 8/6 is a 100 % cotton yarns and has 105 m / 50 g (115 yards / 1.76 ounces). Hobbii classifies it as a fine/sport weight yarn. Personally, I find that it is one of the thicker types, almost a DK weight. I therefore mostly use a 3.75 or 4.0 mm hook to work with it. For the Around the World Square I decided on my 4.0 mm Clover Amour hook. And, looking at the result, this was the correct choice.
Here my colour choice…
Unfortunately, by now, some of them are discontinued in the 8/6 quality.
My colour placement
I decided on a version with 5 colours. At first, however, I wasn’t sure whether my colours would really go together. That’s why I didn’t simply replace the colours of the five-colour version with my own. Instead, I once again created my individual colour placement. Even though I had doubts at first, I think the colours match quite well.
I have listed my colour placement here.
My square came out with about 26 cm (10.5 in) and I’m absolutely happy with the result!
YAY – my Happy Circles cushion cover is finally finished! – Okay, to be honest, it has been for over a week now. Unfortunately, it took me a very long time to write the pattern. Like other countries in Europe, we had a terrible heatwave here. The temperatures climbed up to 40 degrees Celsius. And this was definitely too hot for my brain. I found it hard to concentrate on anything.
But now the time has come. Everything is written down and hopefully well explained!
If you have any questions about the pattern (or spot any mistakes), simply email me. You can either use the contact form or email me directly under hookedonhakelmaschen@gmail.com
The Design
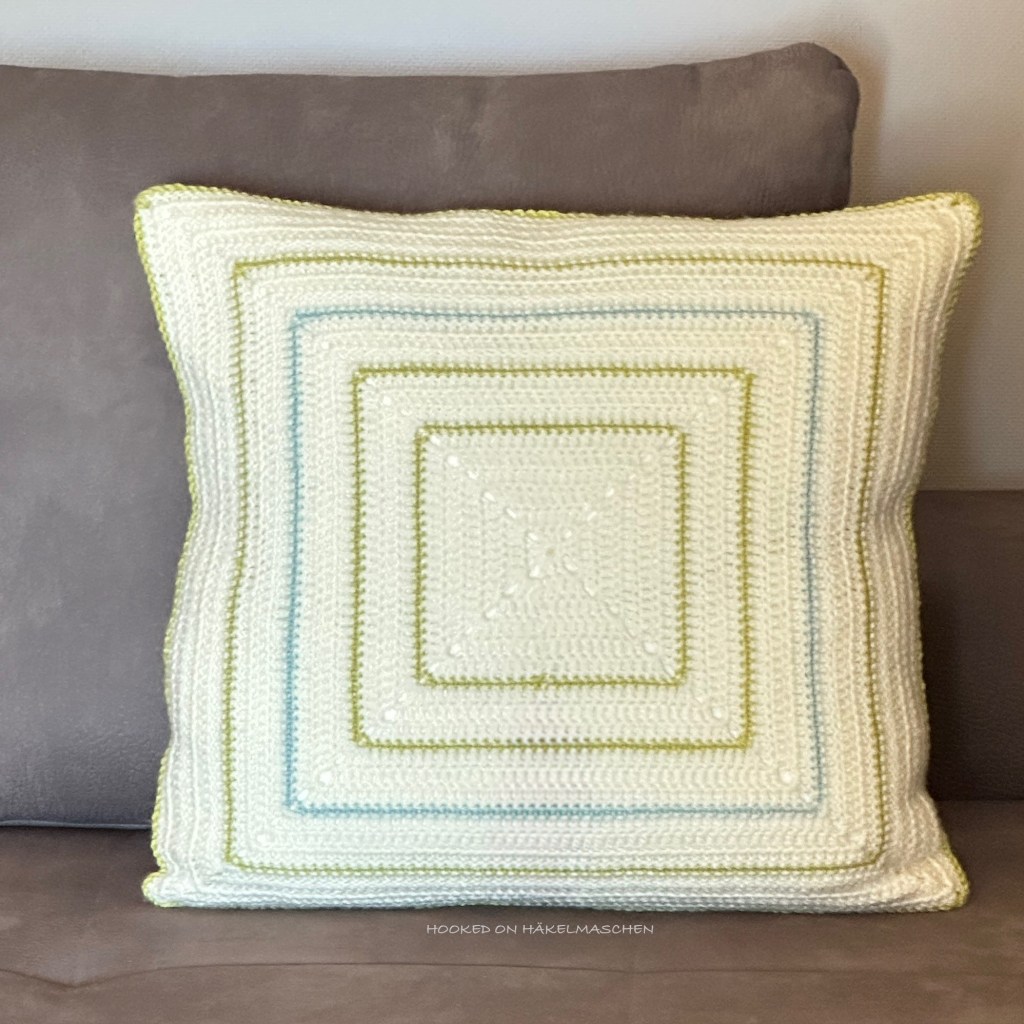
The cushion cover is designed for a 50 x 50 cm (20 x 20 inch) cushion. The finished size is about 46 x 46 cm (18 x 18 in). With the size I followed an advice I found on the internet. It said that to make a square cushion look nice and plump, the cover should be about 5 cm (2 in) smaller than the cushion. At first I was unsure whether this would really work. And when I finally put the cushion into the cover to close the last seam, I was pretty sure at first that it had become too small. But everything turned out well in the end. I am totally happy with the result!
The front part of the cover is made up of 16 squares, arranged in a 4 x 4 layout. Each square measures about 10 x 10 cm (4 x 4 in). For the back, I opted for a simple square. Mainly single-coloured, with a few small contrasts.
The size is easy to adjust by enlarging or reducing the border of the front piece. The rounds for the back must then of course be adjusted accordingly.
My Colours and Colour Placement
My colour choice was inspired by a cushion cover I got from IKEA some years ago.
I selected five colours from my Stylecraft Special DK stash focusing on yellow-green and blue-green tones.
Originally, I wanted to create a random colour scheme for the design again. This time, however, I failed with the use of the random generator. I didn’t like the results, so I worked out something of my own. The outcome is not really random, but has a similar effect. You can read all about it in one of my earlier posts.
Of course, you can also use different yarns and/or different colours. But please bear in mind that using a different yarn may affect the size of the finished cushion. It may also change the quantity of yarn required.
I am totally happy with the result! And I hope you like it just as much!
I was just going through my emails and came across a slightly older email from Pam. It was from September last year and she was telling me that the book 60 Quick Granny Squares would be available on Amazon from the beginning of November 2024. Ugh, I had completely forgotten! Time to catch up!
60 Quick Granny Squares – The Book
I don’t normally write book reviews and I don’t want this to be one either. Actually it is more about some desings by Pam Knighton-Haener from A Yarn of Serendipity – a designer for whom I sometimes test.
Back in 2023 she was asked by a book publisher if she could design some 6 inch squares. She said yes and five of her designs are now presented in this book. I would like to introduce them – or rather my test versions of them. But first a word about the book
Unfortunately I don’t own it yet, so I can’t say too much about it. But I took a look at the extensive reading sample on Amazon. So I can at least give a brief summary:
In the preview I especially love the fact that all 60 designs – created by different designers – are shown there at the beginning! (A lot of books don’t offer this.) All designs feature Cascade 220 Superwash yarn. It is a DK (#3) yarn, 100 % wool, with a yardage of 200 m / 100g. AND all designs look very beautiful!
The patterns are both, written and charted. Some of the squares are more beginner friendly, others a little more challenging. In addition to the patterns, the book also describes various techniques and gives helpful tips. E.g. how to start a square, how to change colours, how to join the squares, and so on. And there are some projects at the end for which the squares can be used. A book that is definitely worth a second look!
Pam’s Designs and my test versions
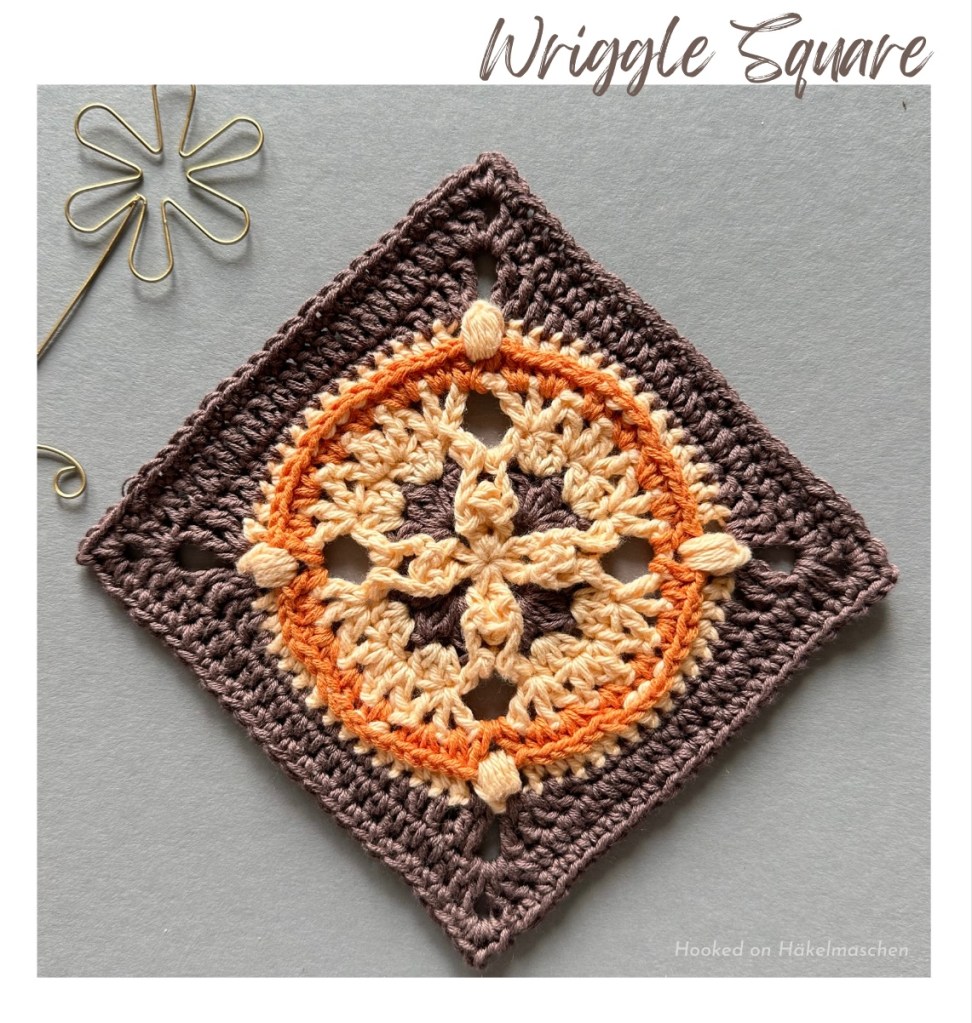
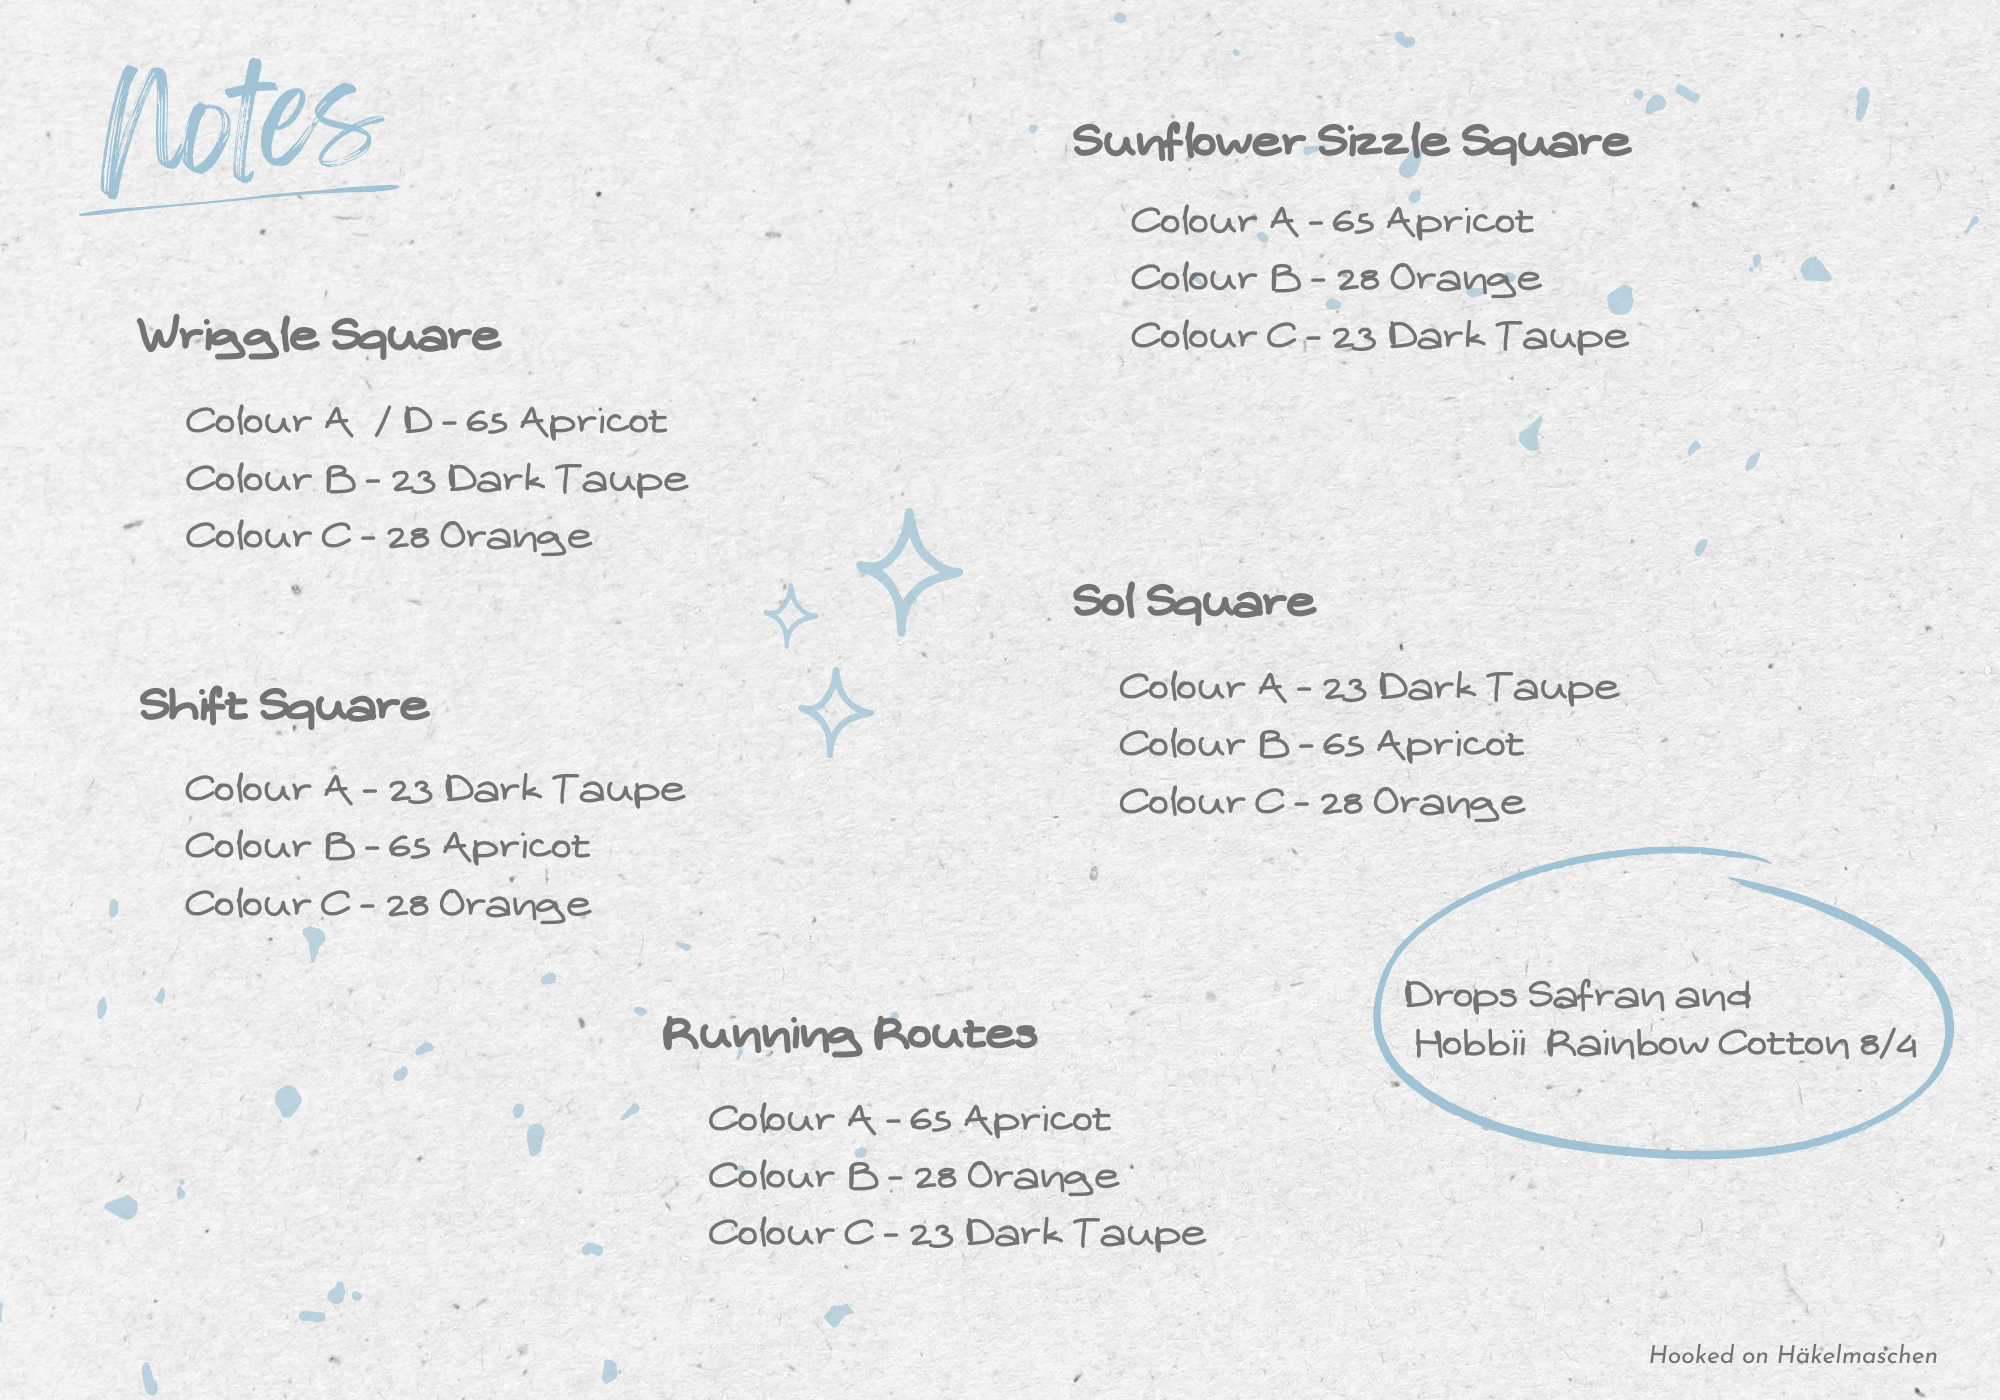
As said before Pam designed five squares for this book: Shift, Sunflower Sizzle, Wriggle, Running Routes and Sol. I had the opportunity to test these designs back in 2023.
Even though the squares are actually designed for a Double Knit yarn, I used a different yarn for my tests. Two to be precise: Drops Safran and Hobbii Rainbow Cotton 8/4. Both are sport weight (#2) yarns in 100 % Cotton and have a yardage of 160 m / 50 g. Unfortunately I had not noted the hook size I was using. I assume it was a 2.75 mm hook, I’m not sure though. Due to the thinner yarn my squares turned out about 4.5 inches, which is about 11.5 cm.
For all 5 designs I used the same three colours: Dark Taupe and Orange from Drops Safran and Apricot from Hobbii Rainbow Cotton. A bit 70s style but I still like them!
And here the colour details …
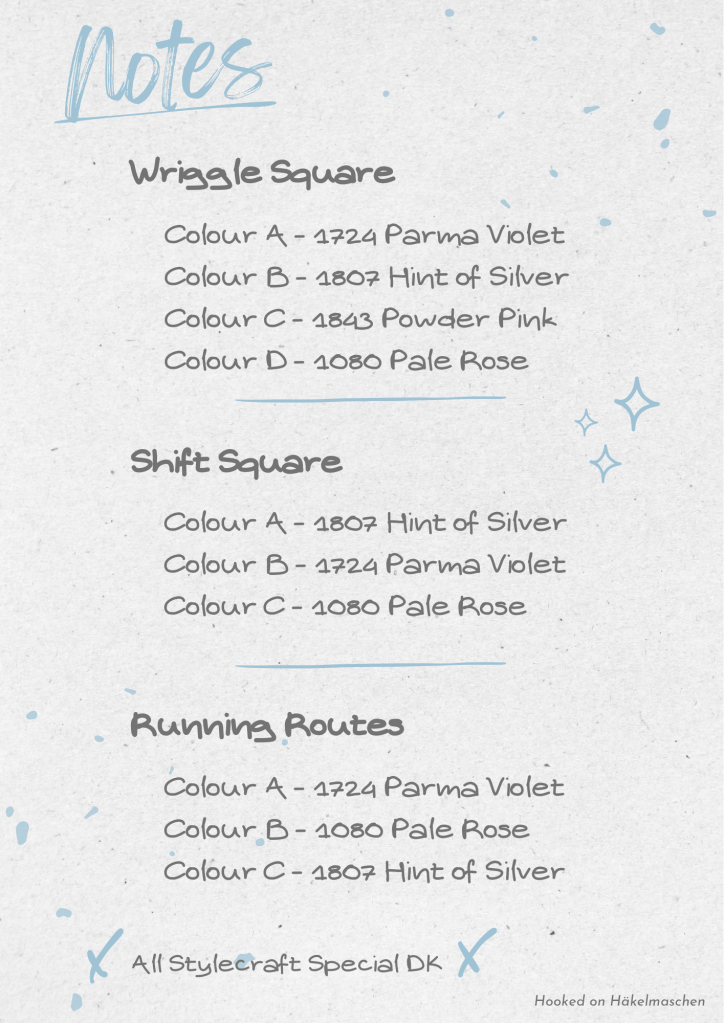
My new versions of Running Routes, Wriggle and Shift
I lately reworked three of the squares with a different yarn. Just to see how the squares will look in 6 inch / 15 cm and – to be honest – first of all to try a new colour combination.
I used Stylecraft Special DK and a 3.75 mm hook for the new versions. They became pretty much exactly 6 inch / 15 cm tall. The colours are completely different though – using pink and grey tones instead of brown and orange.
Here my new colour combo in Hint of Silver, Pale Rose, Parma Violet and Powder Pink:
Lovely aren’t they? I especially love the combination of Pale Rose and Parma Violet. What do you think?
To catch up completely I will now hop over to Ravelry to add my versions to the projects. I just saw that the book is also presented there. Some designers have already added their designs.
By the way Ravelry: if you take a look at Pam’s designs there you will probably notice that these 6 inch squares combine really well with her 12 inch squares. Perhaps this will lead to ideas for a new project? I’ve had something in mind for a while, but unfortunately haven’t found the time to realise it yet. Hope to manage it soon! I will let you know!
It is already mid January and I hope you had a great start in the new year! Hubby and I got off to a very cosy start. However, right at the beginning of January, we started renovating another room in our house – very much in keeping with the theme of “new beginnings”. And a never ending story …
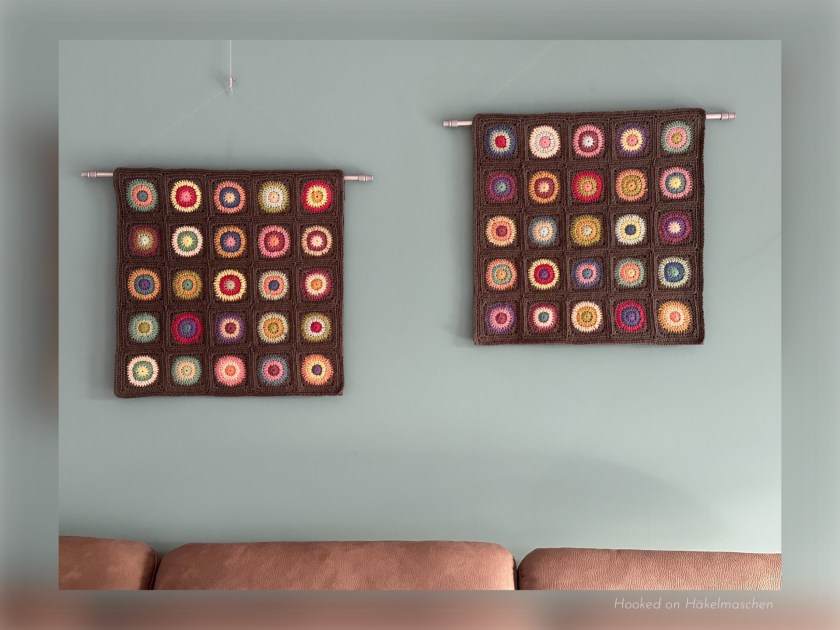
Yet, within all the renovation stuff, we have a new wall decoration in our living room! But these are not the result of our renovation work but of my colour experiments last year.
My colour experiment in 2024
You may remember that last year I experimented a little with random colour placement. This project really opened my eyes to new ways of combining colours.
I started by selecting yarn in 15 different shades from my Stylecraft Special DK stash. Mostly leftovers from other projects.
But instead of manually compiling all possible colour combinations in a table, I tried an online random generator, Random.org . They offer a lot of free services, including a list randomizer. It works wonderfully for generating random colour combinations. I described in detail how this works in an earlier post. You can read all about it here
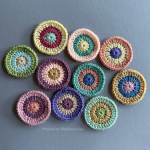
To try out the random colour combinations, I started crocheting little circles. Each with 3 rounds. In doing so, I have strictly adhered to the results that the random colour generator had given me. I only replaced a colour if it would otherwise have appeared twice in a circle. In the end, this resulted in 25 colourful circles, which I then turned into small squares. I joined them in a 5 x 5 layout. The arrangement of the squares was also generated by using the random generator.
Details on my colour placement and layout can be found in this post
After adding a small border my finished panel was about 52 x 52 cm.
At first I had thought of making a cushion cover out of it. But then I decided to use it as a wall decoration.
My second Panel
Overall, I was so thrilled with the result that I have since made a second panel.
I used the same colours and the same process as with the first panel. The colour combinations are completely different, but it looks just as great.
Here the results:
The table below shows the colour combinations that I have used for my second panel. The colours are listed for each circle in the order of rounds 1, 2 and 3. As for my first panel each circle was squared with two more rounds in the colour Graphite. At the same time, the table shows the layout in which I have arranged the squares.
I had already listed the pattern for the squares, joining, and border in a separate post. If you are interested you can find it here
But in addition, I have now written down the pattern again and summarised it in a pdf file. Besides the actual pattern, this document contains the colour combinations and layouts for both panels. So you can also download the complete file here.
Please note: Some left over yarns and 1 ball of Stylecraft Special DK for squaring and joining are sufficient for one panel.
Now it’s that very special time of the year again! In the northern hemisphere, winter is lurking just around the corner. Christmas is just over 5 weeks away. And Ana from One Skein of Love has just introduced her new Winter CAL (crochet along): Winter’s Love!
The Winter’s Love Cal will start on Friday, 22. November 2024.
It is divided into four parts. Part 1 will be released on Friday, 22. November 2024. Parts 2 – 4 follow at intervals of one week each. So the dates are
Part 1 – 22. November 2024
Part 2 – 29. November 2024
Part 3 – 06. December 2024
Part 4 – 13. December 2024
All information about the CAL is already available on Ravelry. After you purchased the pattern you can download an introduction file with all relevant notes. Yarn amounts, size and gauge, pattern notes, abbreviations, tutorials and so on.
My version of Winter’s Love
I promised Ana in October that I would test the pattern. I’m sorry to say that I am not finished yet. Life and, unfortunately, my health got in the way a bit.
Luckily I’ve already done a good bit that I can show. And of course I’m hurrying to finish as quickly as possible.
Yarnsmiths is a relatively new yarn and an own brand from Wool Warehouse. (My favorite online yarn shop. Unfortunately located in Great Britain.)
Create DK is a 100 % Acrylic yarn. At the moment it comes in 120 different shades. I guess many of them are similar to the colours from Stylecraft Special DK. But there are also some special ones. It’s definitely worth a look! The yardage is 290 m per 100 g ball. Recommended hook size is 4 mm.
It works up nicely! I like it and will definitely try some more colours.
My colours and colour placement
When I saw Ana’s new design for the first time I instantly thought of classic colours. So I had originally planned to use white, red and grey to give it kind of a Nordic look. I ordered some Off-White, Claret Red ans Storm Grey. I primarily wanted to use the off-white as a background colour and make the motifs in red. A little grey in between.
After my yarn arrived, I initially followed Ana’s pattern just replacing her cream coloured yarn with Off-White.
After the first few rows, however, I changed my mind. The claret-red fascinated me and I considered swapping the colours.
The picture below shows both versions. The sample on top is my first one, using Off-White as background. The other one (with the little blue stitch marker) is the one with swapped colours.
What shall I say? I didn’t have to think for long! The one with the swapped colours was my favourite and became my final version. Without the grey though. Throughout the pattern I use Off White as colour C1 and Claret Red as colour C2.
My progress so far
This is what I have so far. I just reached the end of part 2. 150 rows are done.
Now on to part 3. Another 75 rows to go.
I’ll keep you updated on my progress
And just a side note on my yarn order:
Yep, after years of abstinence, I finally dared to order from Wool Warehouse in the UK again. I hadn’t ordered there since the Brexit (the UK’s exit from the European Economic Union). I knew that I would have to pay extra taxes. Ok, but unfortunately, I had read a lot about people from Europe who had to pay horrendous amounts. So I really wasn’t sure how everything would work. I am happy that I finally tried it! It is nothing to be scared of!
My order was delivered by DHL. The parcel was not tracked. That was a bit of a pity because you never know when you can expect delivery. But it arrived within a week or so. I got a note from DHL and had to pick the parcel up in the post office. There I paid the import sales tax. This corresponds to the usual 19% VAT here. And I also had to pay a small handling fee to DHL. But in total the price was still reasonable.
The only thing I have to make sure of is that my order does not exceed € 150. Then there are no customs duties and I only have to pay the import VAT. I really wish I had tried it earlier!
I’m happy to finally be able to show you my version of the Mystified Square. It is the new design from Pam Knighton-Haener / A Yarn of Serendipity. The pattern has just been published. AND: it has been chosen by the Ravelry BAMCAL group as their block of the month for November.
Ravelry BAMCAL
Have you heard of BAMCAL on Ravelry? If not, BAMCAL stands for Block-A-Month Crochet-A-Long. This is a Crochet-Along organised every year by a special group on Ravelry.
The CAL runs throughout the year. Each month 3 different Afghan squares are featured. Two squares, a 6 inch and a 12 inch, are chosen by the mods. A third is chosen by the group members in a poll. All patterns are free – at least for the month they are chosen for. You can choose to do one or all of them – it’s up to you. At the end of the year you can combine all your squares into a blanket. Or make anything else you can think of.
I absolutely love this idea! Maybe I should join in next year?
Mystified Square – The Pattern
The Mystified Square is designed for Aran / worsted weight yarn (#4). But it will also work very well with other yarn weights. Of course, using a different yarn weight will affect the final size.
With worsted weight yarn, the finished square will be 11 or 12 inches (28 or 30,5 cm). This depends on whether a 4.5 or 5 mm crochet hook is used.
The pattern is classified as mid-intermediate. It uses various stitches, including some special ones. But no worries, they are all very well explained. And a picture tutorial helps with each round.
The design comes in two colourways, each with 5 different colours. Of course, you can also create your own colour scheme. I bet it would also look great in just one colour!
I already tested this pattern for Pam some weeks, or rather months, ago. I think it was in early August. Of course, everything had to be kept secret until the pattern was finally published. Hard time :-)
As always, I did not use the suggested Aran yarn. I still don’t like working with it and feel a bit uncomfortable using a 5 mm hook. So, this time I decided to use up some Hobbii Rainbow Cotton 8/6 (a #3 yarn) from my stash.
I used colourway 2, but replaced the colours as follows
Hobbi Rainbow Cotton 8/6 (50 g / 105 m)
A – 065, Apricot (discontinued?)
B – 73, Pearl Gray
C – 047, Dark Old Rose
D – 049, Peach (discontinued?)
E – 012, Volcano Gray
Unfortunately it looks like two of my colours are already discontinued. At least I couldn’t find them in the actual Hobbii shop.
I like the way the colours come together. I just noticed that they are a bit difficult to capture in a photograph. The Dark Old Rose in particular is a little reluctant to show its true beauty…
Using a 3,75 mm hook my square turned out to be about 25 cm / 10 inch.
I really enjoyed working on this pattern and am happy with the result!
Are you going to try the pattern? If so, have fun 💕
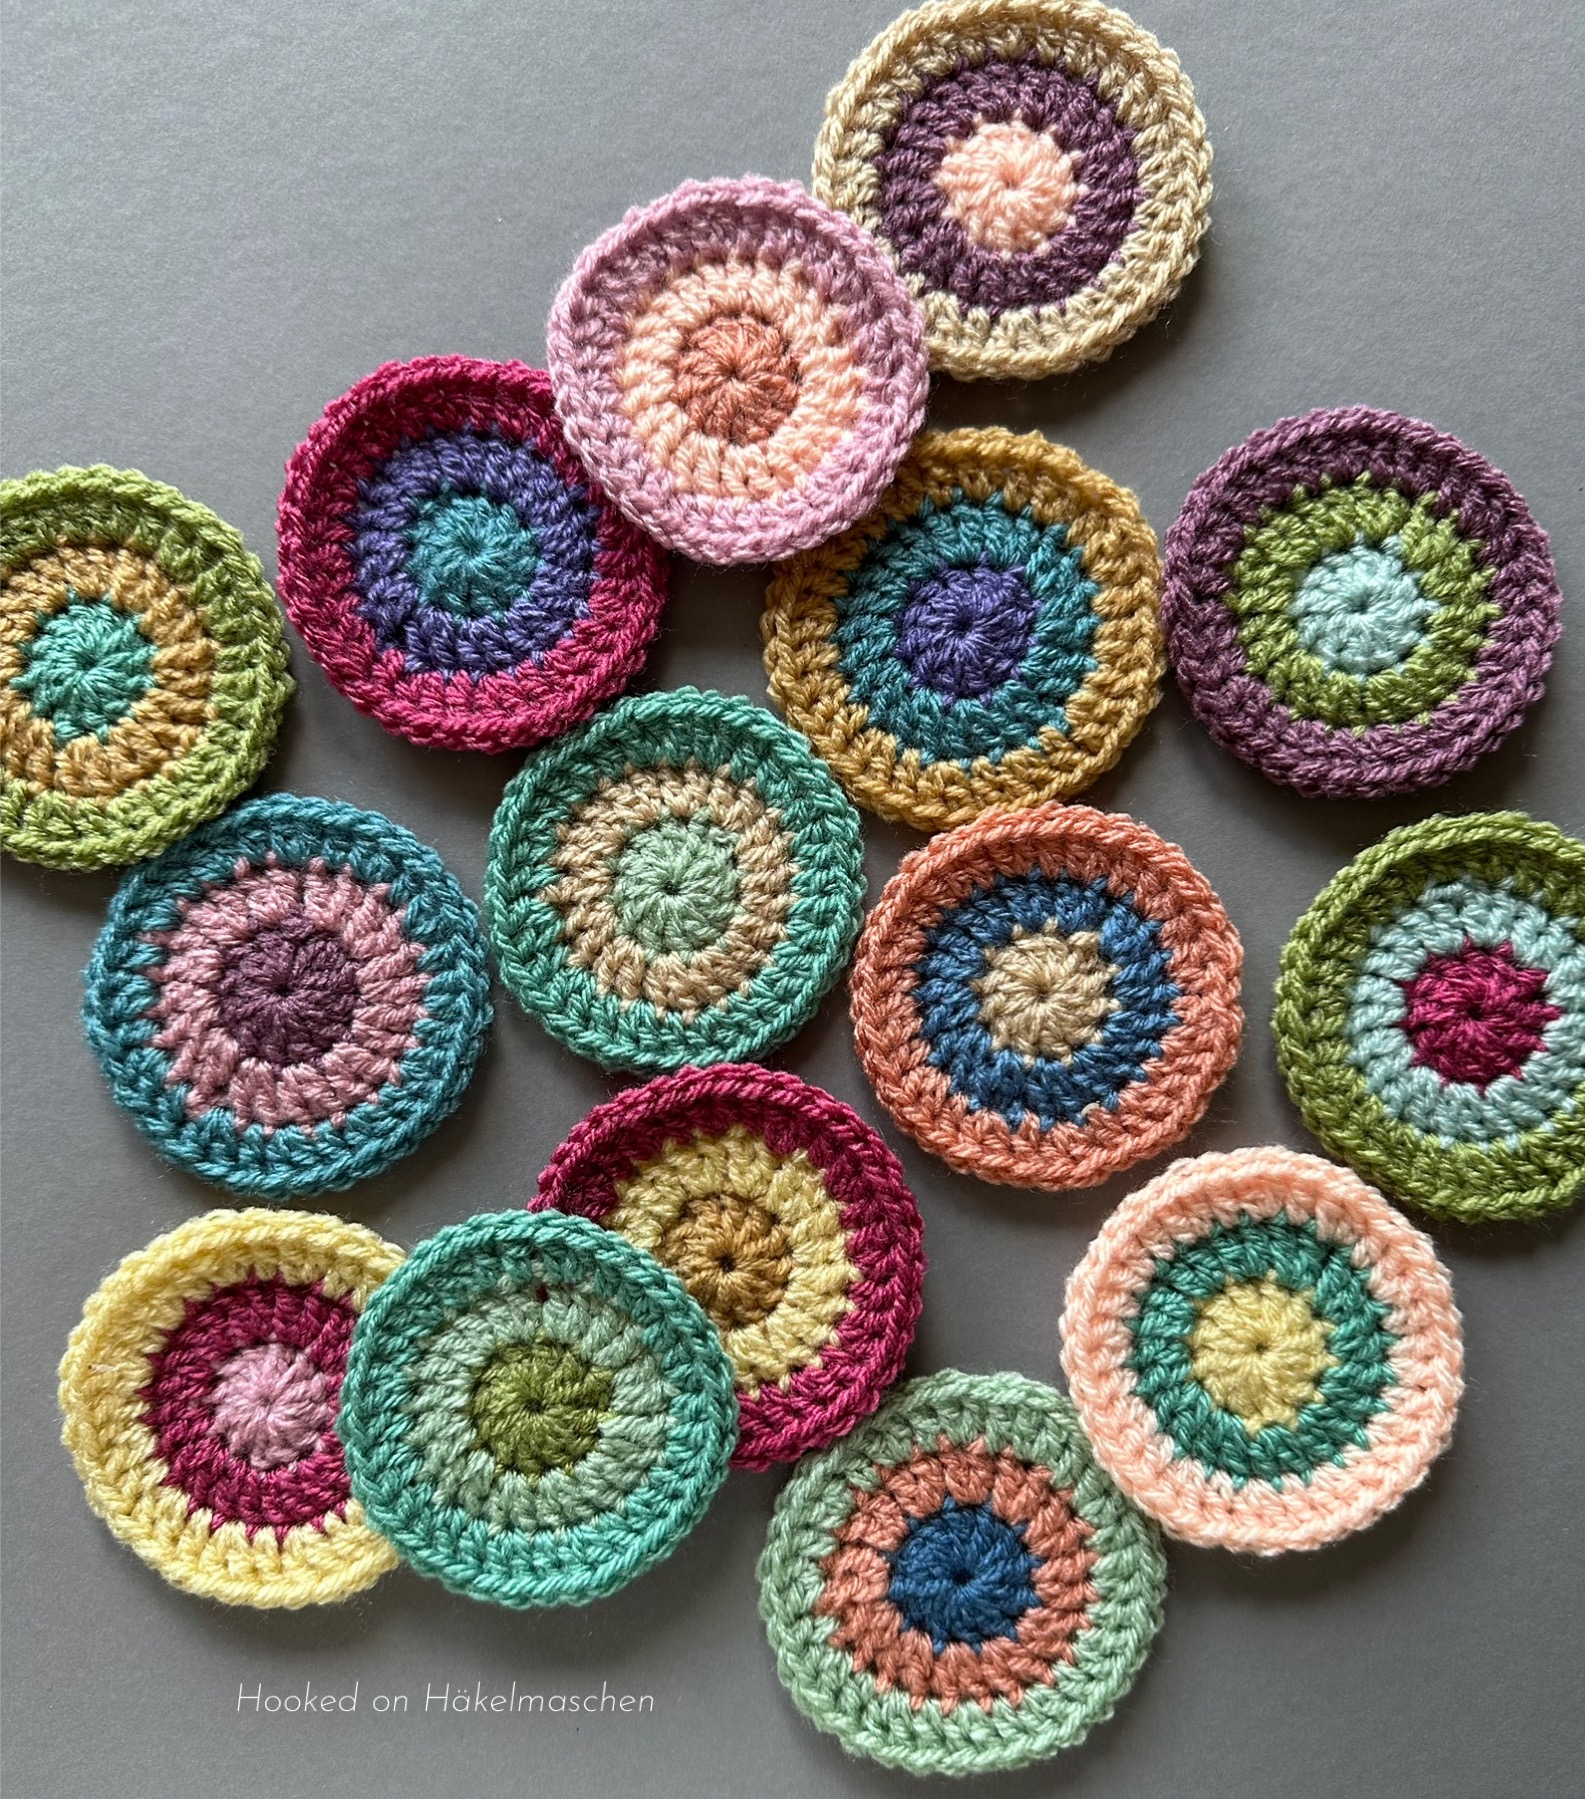
The result of my experiment with random colour placement
In the last few weeks I have been experimenting a bit with random colour placement.
I wanted to try if a random colour placement, generated by a list randomizer from the internet, really would work. And I was curious to see whether the result would look really good in the end.
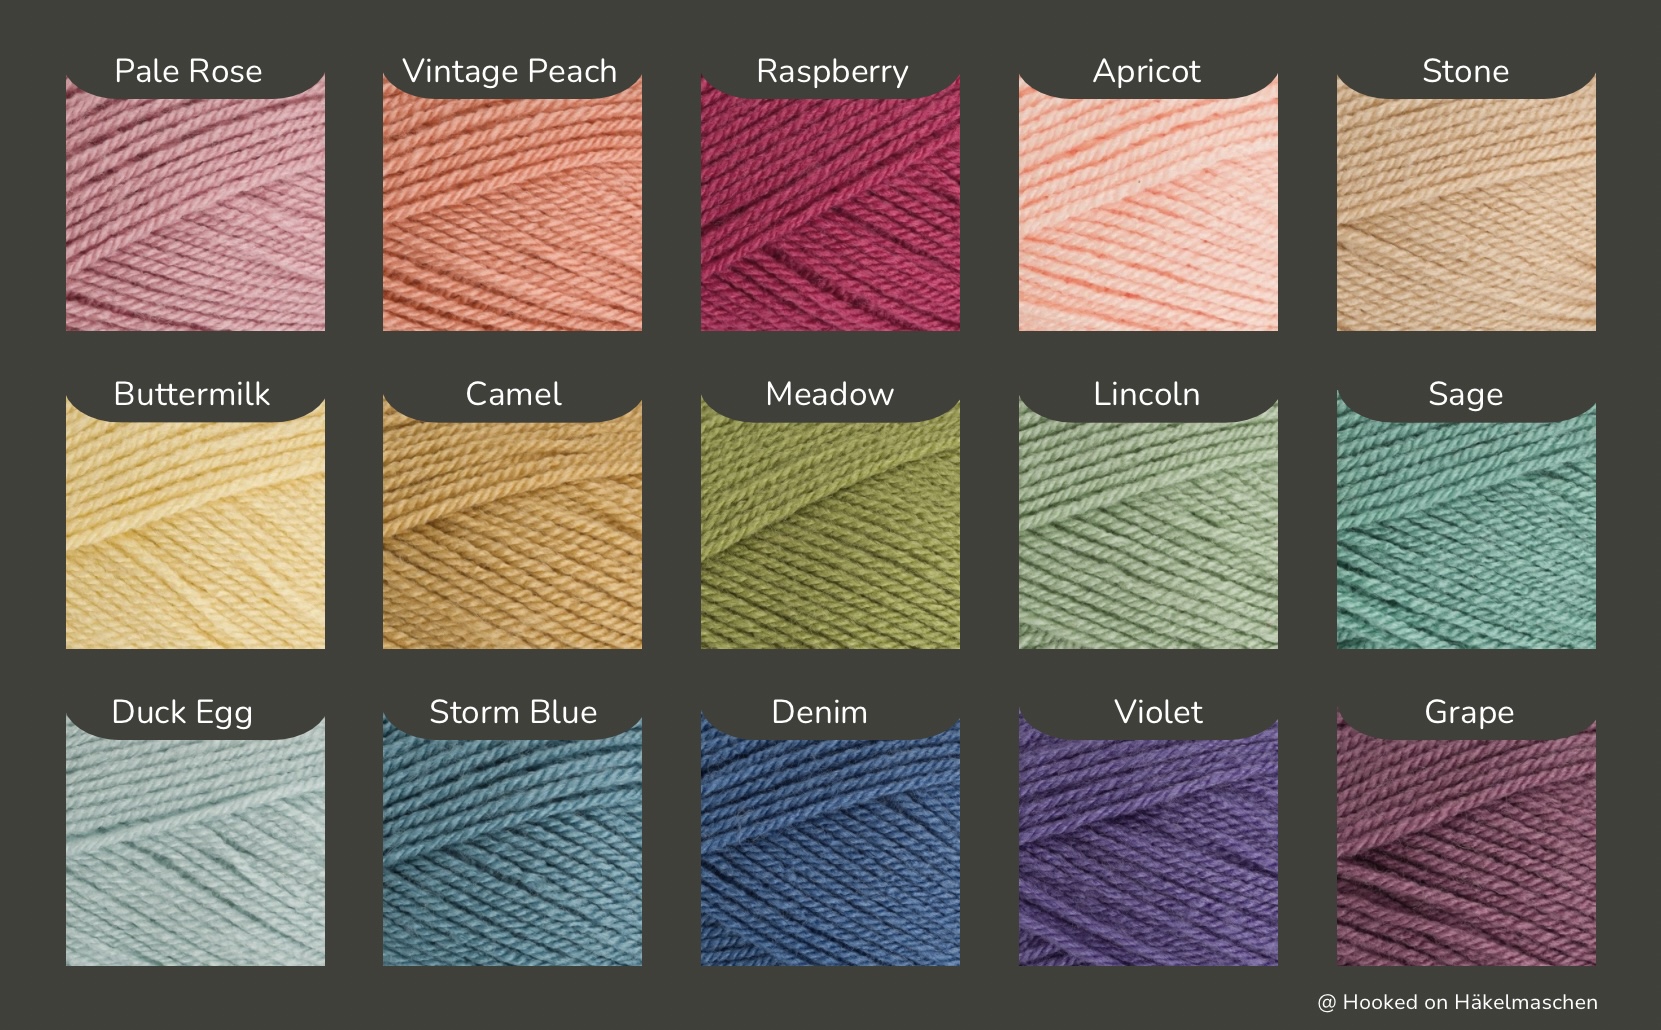
I started my „experiment” by putting together 15 different colours – mostly leftovers. All 15 looked good together. However, I personally wouldn’t place some colours right next to each other. For example, Camel and Vintage Peach or Sage and Meadow.
For a first try, I crocheted some circles. Each one with 3 rounds and each of the three rounds in a different colour. To generate the random colour placement, I used the list randomizer on Random.org.
What can I say, I was absolutely happy with the first results!
In the end I had 25 colorful circles that I wanted to keep using. So I decided to turn them into squares and combine these into a wall decoration.
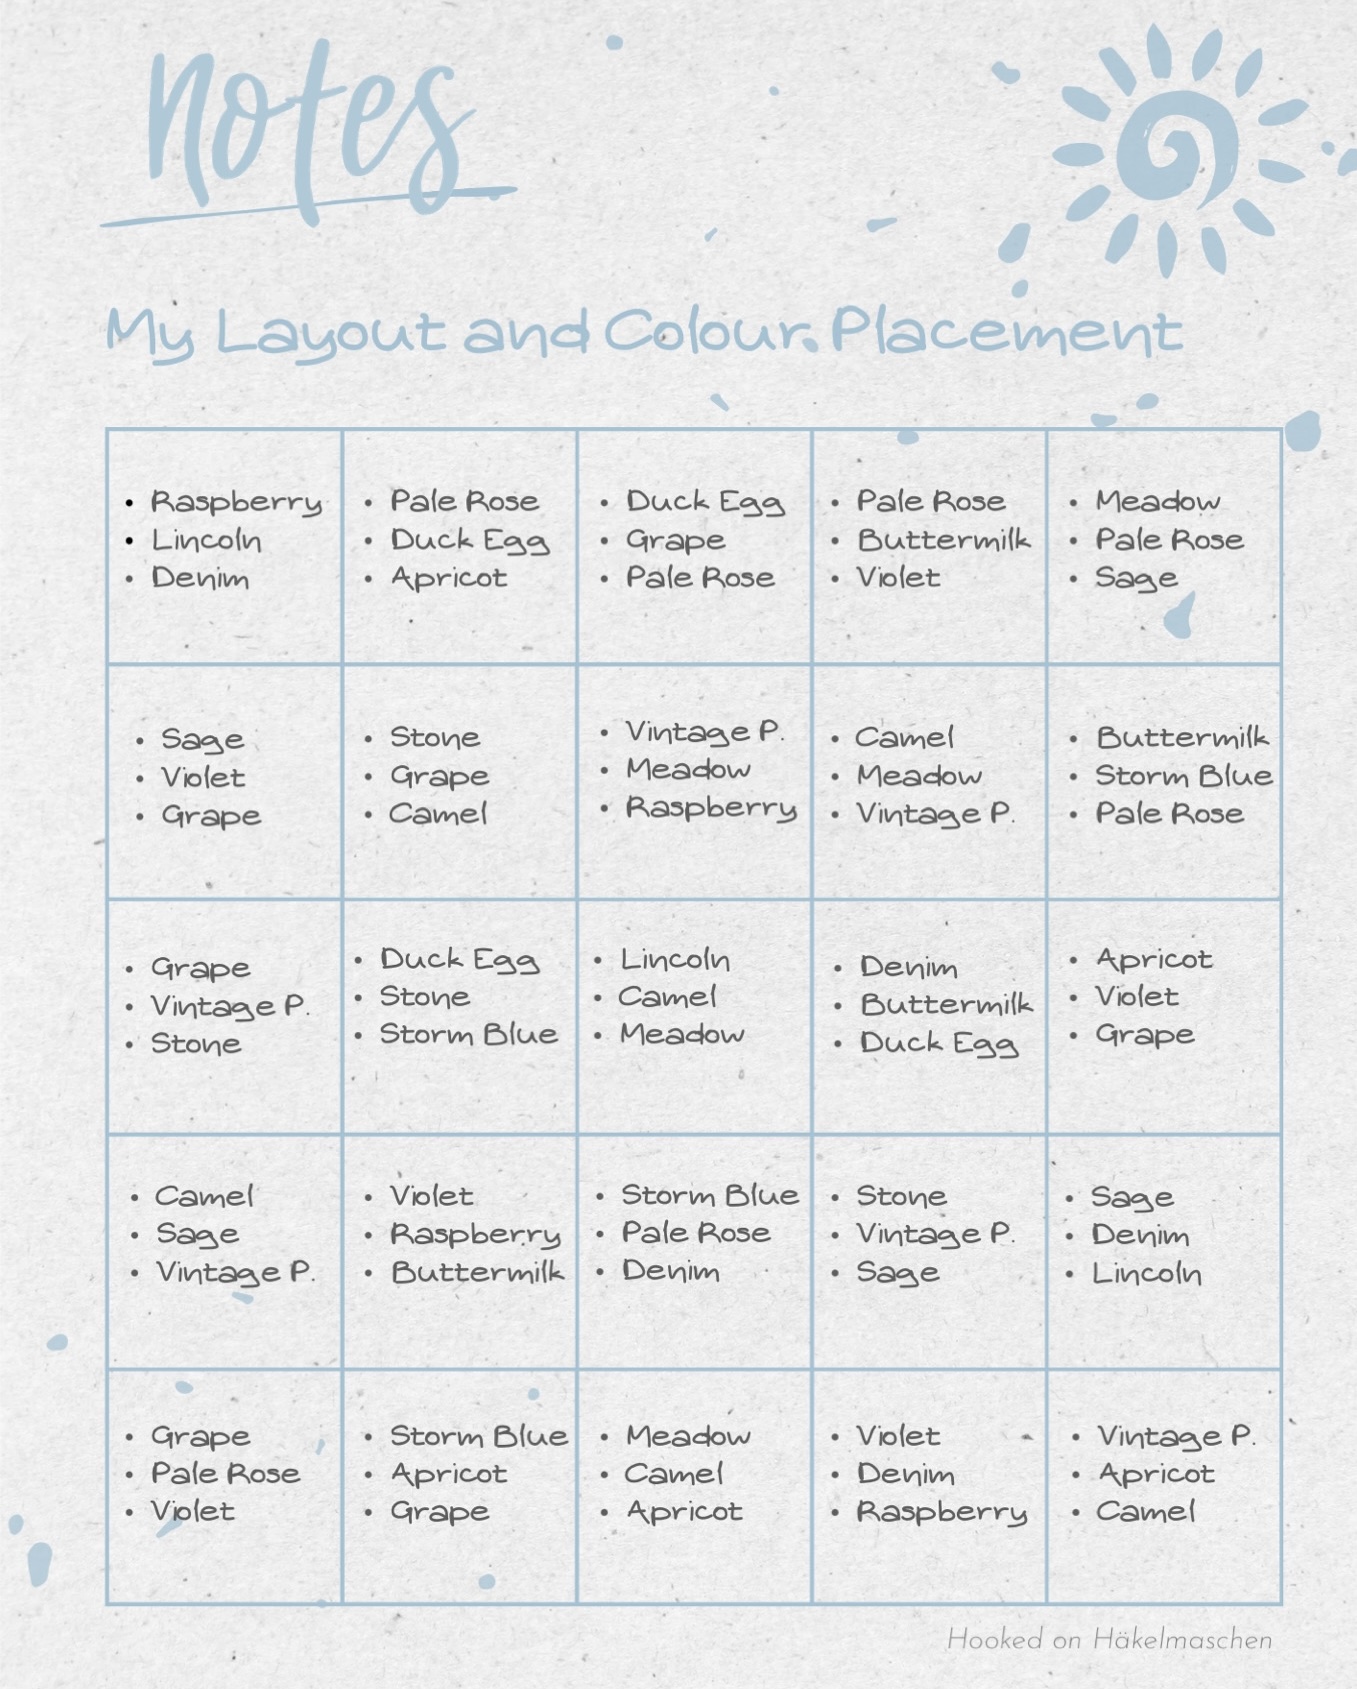
Colours, Colour Placement and Layout
The colours for the circles were picked from these 15 colours, all from Stylecraft Special DK. To square the circles I used Stylecraft Special DK in the colour 1063 Graphite.
This graph shows the colours I used for each circle. They are listed in the order for rounds 1, 2 and 3.
The chart also shows the layout I have chosen for my wall hanging.
The layout is also based on the random generator.
If you want to know how this works and what exactly I did, you can read about it here:
There are a couple of different ways to crochet circles and turn them into squares. I have tried several of them while I made my circles / squares. The way described below is what worked best for me. It is adopted from a method for crocheting circles that Polly Plum describes on her site. This gives the circles a very neat look. Another advantage is that you can easily crochet over most of the yarn ends. Simply start a new round at a position opposite the end of the previous round. You can crochet over the starting tail for half a round. Then, crochet over the tail from the previous round.
I started by making all 25 circles first. Each circle consists of 3 rounds in the colours A, B and C. A, B and C change for each circle, as shown in the layout chart above. Colour D – the colour to square the circles – stays the same throughout.
Round 1, Colour A Start with a Magic Ring, ch2 (counts as first dc) , 11 dc in the ring ; close the ring and slst loosely to the first dc; cut yarn [12 dc]
Round 2, Colour B attach yarn in any stitch, ch 2 (counts as first dc), dc in same st; *2 dc in next st **; repeat from * to ** around; slst loosely to the first dc; cut yarn [24 dc]
Round 3, Colour C attach yarn in any stitch, ch2 (counts as first dc), 1 dc in same st, 1 dc in next st; *2 dc in next st, 1 dc in next st**; repeat from * to ** around ; slst loosely to the first dc; cut yarn [36 dc]
Round 4, Colour D attach yarn in any st , ch 2, (1 dc, ch1, 2 dc) in same stitch; *1 dc, 2 hdc, 2 sc, 2 hdc, 1 dc in the following 8 sts; (2 dc, ch1, 2 dc) in next st **; repeat from * to ** 3 times omitting the last corner sts; slst to first dc [per side: 6 dc, 4 hdc, 2 sc, 1 ch1-corner sp / 48 sts, 4 ch1-corner sps in total]
Round 5, Colour D Ch1 loosely (doesn’t count as a stitch) and hdc in same stitch (the one you slipped stitched in at the end of round 4); *(2 hdc, ch2, 2 hdc) in ch1-sp, hdc in next 12 sts **; repeat from * to ** 2 times; (2 hdc, ch2, 2 hdc) in next corner sp; hdc in next 11 sts; invisible join to the second hdc [per side: 16 hdc, 1 ch2-corner sp / 64 sts, 4 ch2-corner sps in total]
Using a 3,75 mm hook my squares are about 10 cm / 4 inch each.
Joining
Joining, em, yes … If you follow my blog, you know that I haven’t joined many squares so far. So I first had to find out what options are available, and tried several different joining techniques. In the end, I decided on a kind of slip stitch join. I’m not sure if there is a special name for it. I have seen this join in various places with sc, hdc, or even dc. I finally opted for a simple slip stitch. This produces a really nice flat ridge.
With this join, the actual stitch is only crocheted in one of the two squares to be connected. The opposite square is joined by pulling the loop through the corresponding opposite stitch. It may look a little complicated at first, but I’m sure you’ll find the rhythm after a few stitches.
I first worked the horizontal joins, afterwards the vertical joins. If you like to follow my joining method, here is what to do:
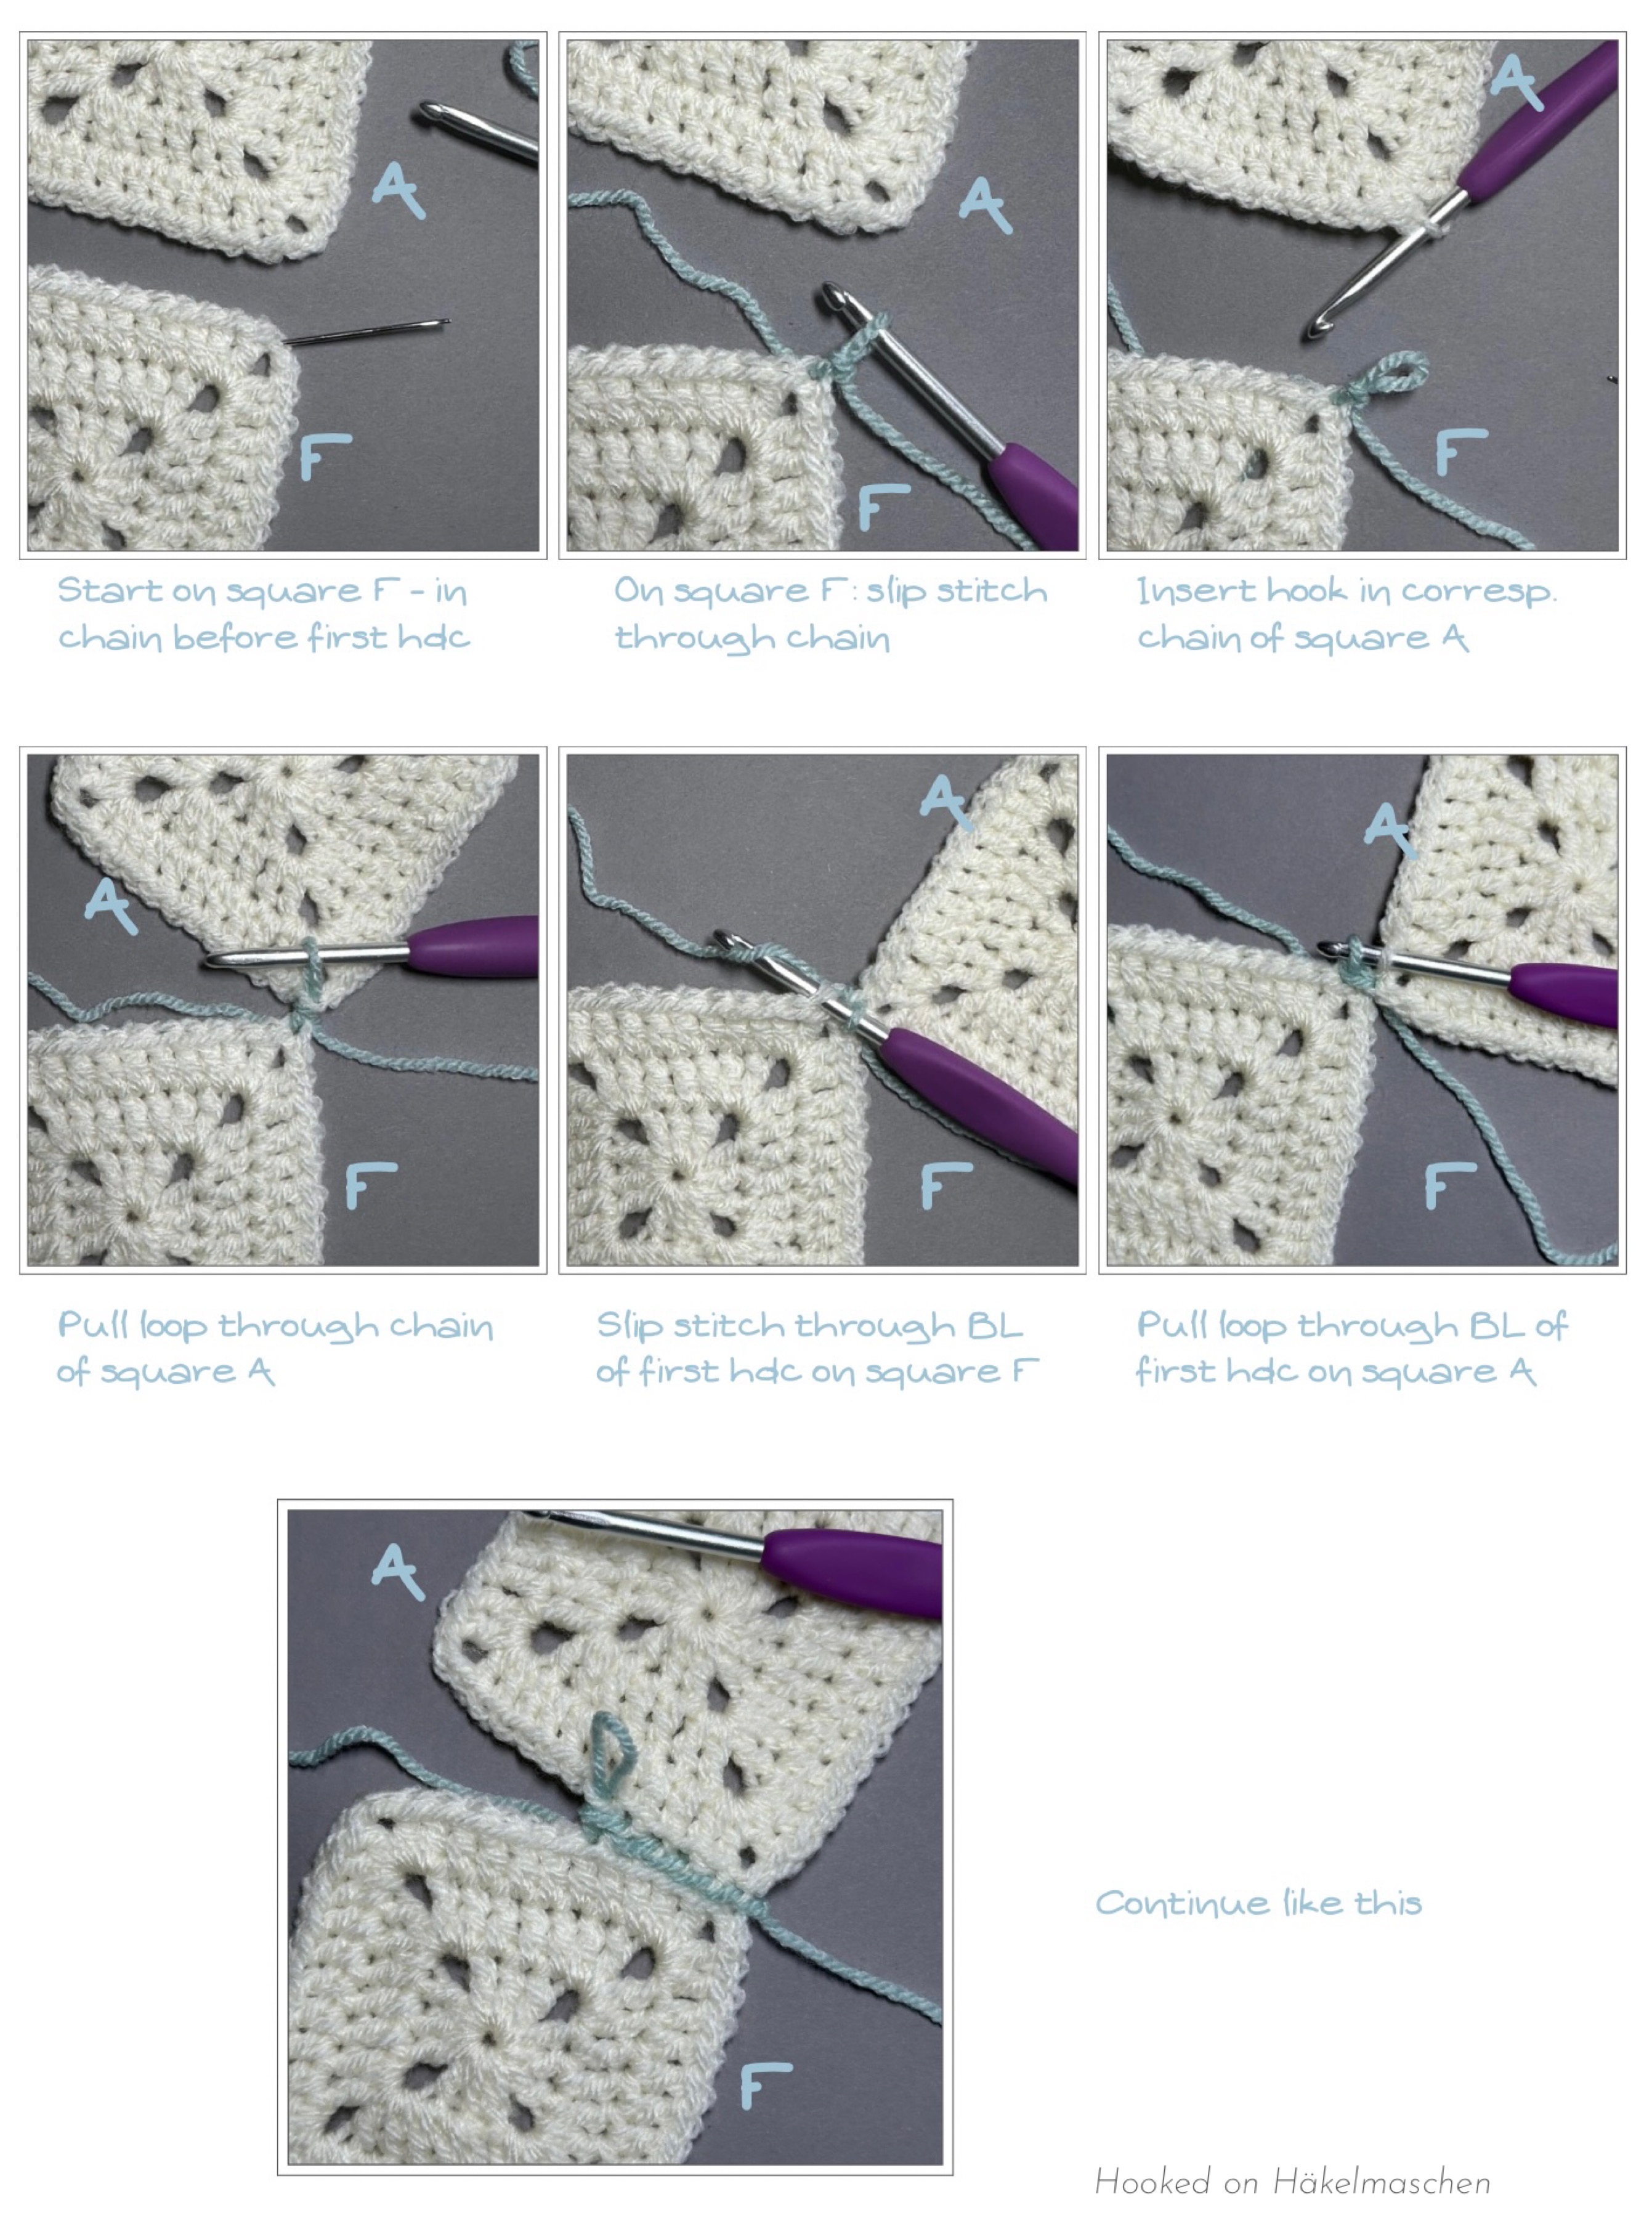
My joining method
First arrange the first two rows of squares according to your planned layout. The right sides of the squares should be facing you. The join is only worked through the back loops (the inner loops). The hook is always inserted from top to bottom (from the right side of the square to the wrong side).
This graph helps to visualize what square I am talking about in the next.
Tip: Make sure not to twist the squares while connecting them. It is helpful to use a locking stitch marker especially when joining the first two rows of squares. This helps to hold them together. And take care to work the join not too tight. Best is to go up a hook size. I used a 4.5 mm crochet hook for mine.
Horizontal join
Referring to the graph above: Work from right to left (provided you are right-handed, like me). Start with joining square F to square A, square G to square B and so on.
First joining row
Begin with square F. Start with a slip knot on the hook. Insert the hook in the chain next to the first hdc of square F. Work the first slip stitch on square F. Remove the hook from the loop. Insert the hook in the corresponding chain of square A, grab the loop and pull it through.
Leave the loop on the hook and work a slip stitch through the first hdc of square F. Connect to square A by pulling the loop through the corresponding stitch of square A, like described above.
Continue until you reach the corner spaces of squares F and A. Work a slip stitch / „pull through“ in the first chain of the ch2-corner spaces.
Move on to squares G and B. Start in the second chain of the corner space. Work the same steps as above.
Repeat these steps until all squares of this row are joined, fasten off.
Second, third and fourth joining row
For the second horizontal join start with connecting square K to square F, square L to square G and so on – work the same steps as above
repeat the same steps for the third and fourth horizontal join
Vertical join
For the vertical join repeat the same steps as before, also working from right to left. I started with joining square V to square U. At the transition from two squares to the next two squares, simply work over the existing horizontal join.
Work away all tails.
Border
Round 1, Colour D Start with a standing stitch in any corner sp *(Sc, ch2, sc) in corner sp; BLsc in next 16 sts; 1 hdc in corner sp, skip join; [1 hdc in corner sp; BLsc in next 16 sts; 1 hdc in corner sp, skip join] 3 times; BLsc in next 16 sts **; repeat from* to ** 3 more times, slst to the first sc [per side: 82 sc, 8 hdc, 1 ch2-corner sp / 360 sts, 4 ch2-corner sps in total]
Round 2, Colour D ch 1, *3 sc in corner-sp, BLsc across to next corner sp **; repeat from * 3 more times, slst in BL of first sc [per side: 93 sc / 372 sts in total]
Round 3, Colour D Slip stitch in back loop of each stitch around [372 sts in total] fasten off and work away the tails
Abbreviations (US terms)
slst – slip stitch
ch – chain
sc – single crochet
hdc – half double crochet
dc – double crochet
BL – back loop
BLsc – back loop single crochet
sp(s) – space(s)
st(s) – stitch(es)
* … ** – marks a repeat
[… ] – repeat instructions as many times as specified
For an explanation on how to work these stitches have a look here
Finishing
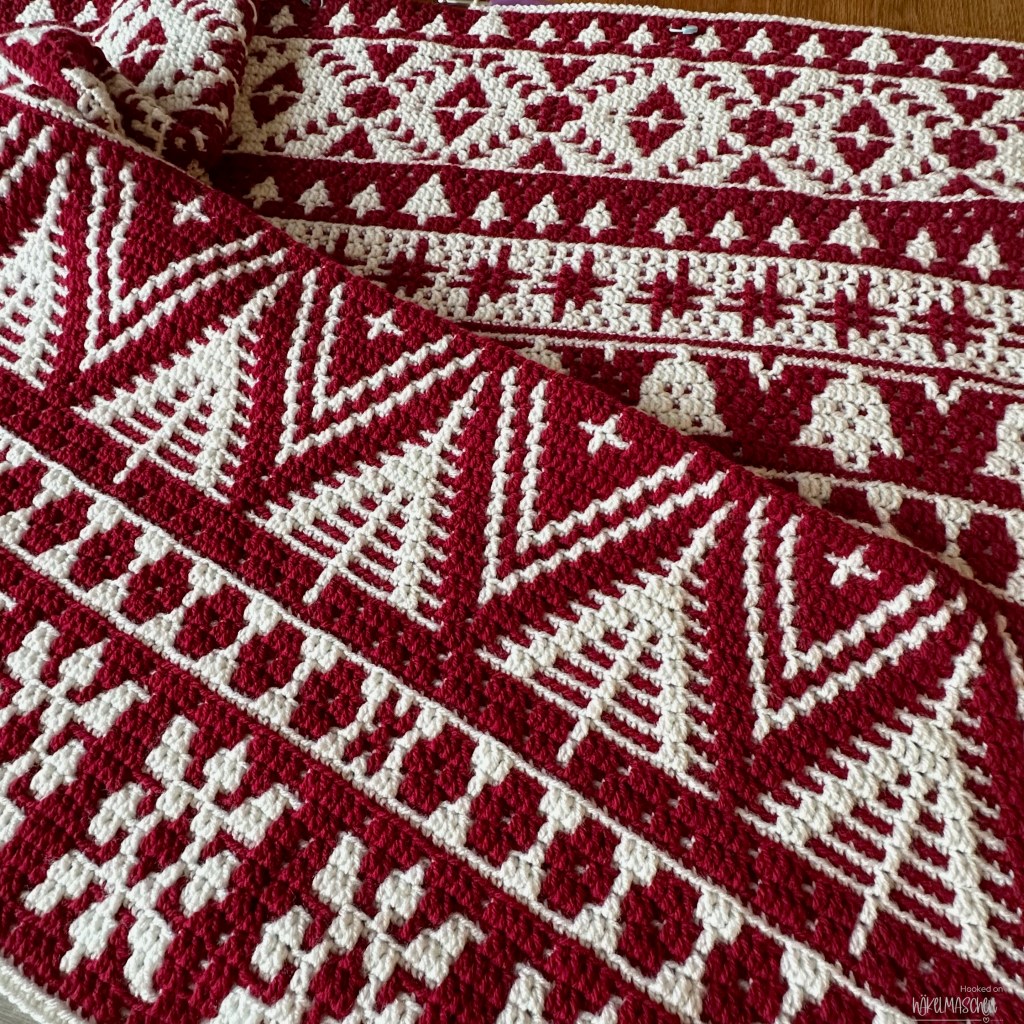
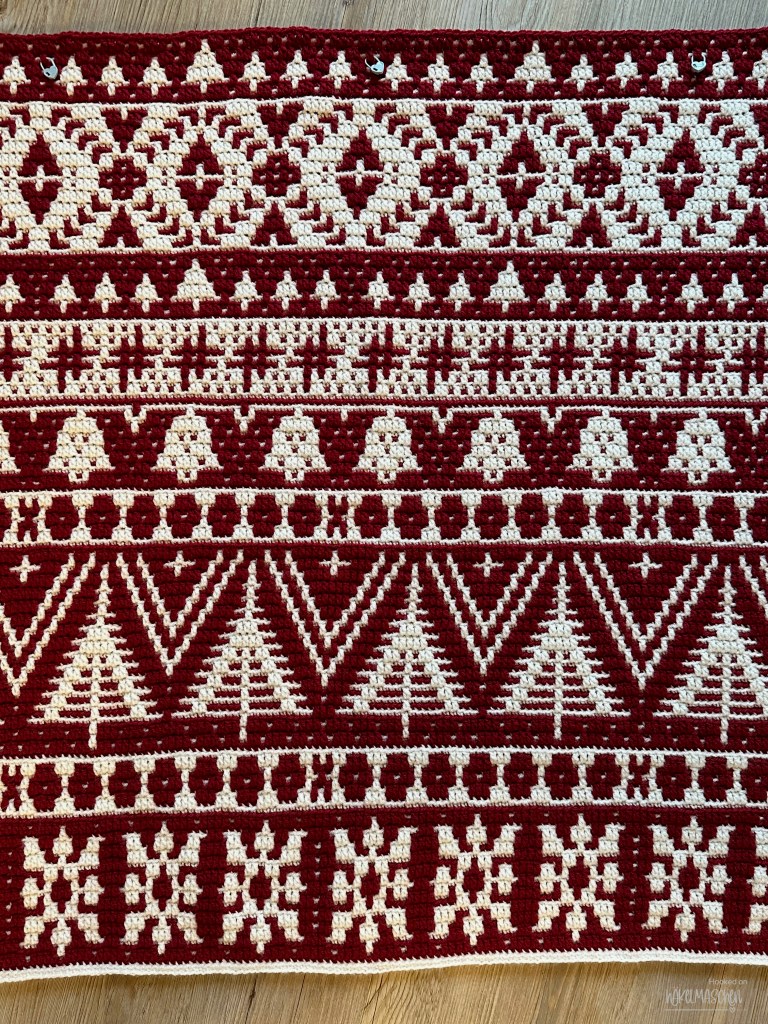
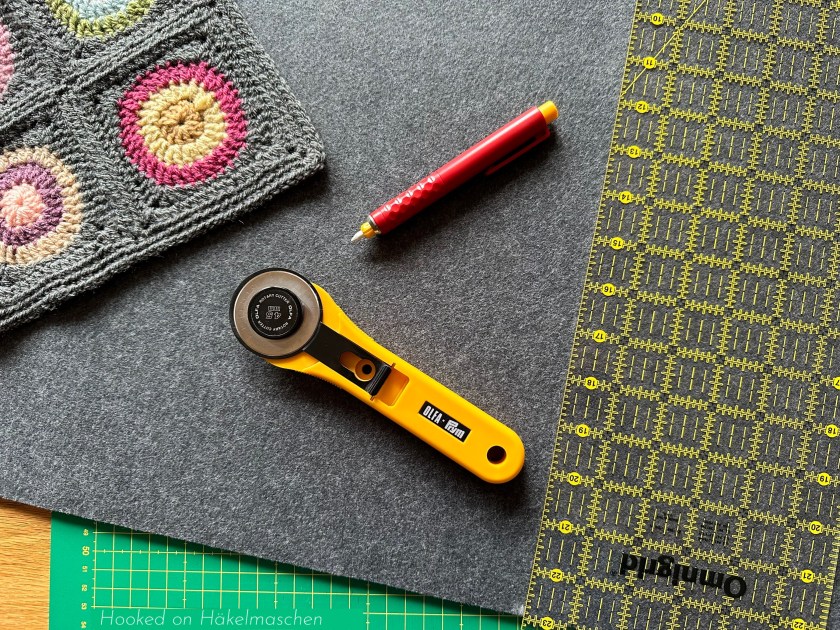
So far all my crocheted wall hangings a made from patterns using Overlay Mosaic. This technique gives the panel a bit of weight. The dropped down dc practically double every row. Additionally, the double border adds some weight and you can also easily stabilise the panel with rods. So it’s no problem to hang it up nice and straight.
That’s exactly what I missed when I was thinking about mounting my new panel! Using an Acrylic yarn made it very light weight and I was afraid that it might not hang straight.
So, I got myself some felt – 4 mm thick and anthracite-coloured. I cut this to size and pinned my panel in place. I let the felt overlap a few cm at the top edge. This was later used to create a tunnel for the mounting. I sewed the panel in place along the edges using a running stitch.
Now that I’ve finished, I think the panel could also have been sewn on with a sewing machine. But, I hadn’t worked with felt of this thickness before, so I just didn’t dare. Especially as I was so short on felt that I didn’t have a test piece. Lessons learnt!
After sewing, I folded the upper overhang of the felt back at the edge. I fixed it on the backside with some suitable glue. This created a tunnel through which I can push the rod for hanging. Finished!
My panel measures about 52 x 52 cm / 20 1/2 inch.
In my living room
I think I will make another one. Same colours, different placement. And of course I will use the randomizer again for the placement of the colours and for the layout. I am already curious how it will look like!
Finally I can show you a square that I made some weeks ago.
In August I had the pleasure to test another one of Pam’s lovely designs: Tied Up with a Bow. She now released the pattern and it’s available on Ravelry and in all her other shops.
In case you don‘t know Pam yet: Pam Knighton-Haener is an American designer and the person behind A Yarn of Serendipity. Most of the beautiful Afghan squares you can find here on my blog are designed by here.
The original pattern is made with Aran / worsted weight yarn. The final size will be 11 or 12 inch, depending on the hook size you use. The skill level is mid intermediate.
As with all of Pam’s designs, many different stitches are used. Of course everything is explained in detail and there are clear pictures for each round! And of course the final size and the final number of stitches per side match all the other squares Pam has designed.
Talking about the pictures: Especially for the modified star stitch I found them very helpful! For this special stitch, it was much easier for me to work from the pictures than from the written instructions. However, that may be just personal.
My test version
During the test I made a version with Drops Safran, a sport weight yarn that has a yardage of 160 m / 50 g. Usually I use a 2,75 mm hook when working with this yarn, but this time I didn’t feel comfortable and switched to a 3 mm hook.
I had actually chosen 5 colours for this design. For some reason I couldn’t find a matching spot for two shades of green I had chosen, so in the end I only used 3 of my colours
71 – Marzipan 22 – Light Brown 28 – Orange
Can you see the little bows?
My colour placement
My finished square measures about 22 cm / 8 1/2 inch. I have to admit that using a 3 mm hook made it a bit loose.
My second version
After testing, I just had to make a second version. I lately fell in love with the colour Lincoln from Stylecraft Special DK. I have had two balls in my stash for ages but have never used them. Inspired by Pam’s single coloured version, I thought that the Tied Up with a Bow square would certainly look nice in this colour too. I didn‘t get disappointed …
For this version I used Stylecraft Special DK in the colour 1834 – Lincoln. Only round 11 is made with colour 1822 – Pistachio.
I used a 4 mm hook and the final square is about 26 cm / 10 inch. I am absolutely happy with the result!