I love yarn and I love working with yarn. I especially love crochet and Tunisian crochet.
Sometimes I test crochet patterns, sometimes I design something myself and sometimes I just make something nice for myself.
Progress with my Legacy Blanket. The joining comes closer, 11 of 12 squares are finished now. All tails worked away and most of them already blocked! I also revised some of my colour placements and am happy with the result!
I was happy to help testing the border pattern. Even though my blanket isn’t finished yet, I can already give you a little sneak peek at the border.
For testing purposes I used two of my ›old‹ squares which I made right at the beginning of this journey: Drops Merino Extra Fine #50, Light Beige as main colour, #06 Brown Mix and #07 Light Brown for contrast. I discarded this colour scheme after I had worked the first two squares – somehow I didn’t like it. But – advantage – it gave me some ›leftovers‹ for testing the border.
And here some of my finished squares
Madux James
Brixton Carter-Lee
Marley Mae
Jalen Miles
Carter Jude
Olivia Grace
So far so good! Lauren Rose (one of the revised ones) and Brood of Angels are still on the blocking board. The last one to finish is Macey Ann. Actually, Macey Ann was the very first Legacy Square I made. So it still has the ›old ‹ colour scheme and – besides now being part of my border patch – needs to be redone.
All patterns for the Legacy Blanket are available in Pam‘s Ravelry store.
I don’t want to miss the chance to show you my Em Cabal Square. I tested this pattern – designed by Pam Knighton-Haener from A Yarn of Serendipity – a few weeks ago. The Em Cabal Square is a special design for the Ravelry BAMCAL2023 – Block-A-Month Crochet-A-Long, a group on Ravelry. Every month, three different Afghan crochet squares are featured in this group. The designs are chosen by the moderators and/or group members, and you can decide whether you’d like to crochet one (or all) of them. By the end of the year, you’ll have a beautiful blanket. What a brilliant idea!
Em Cabal one of the squares for the month of October. It is a 12 inch square with 39 stitches per side. The skill level is beginning advanced. Like all of Pam’s patterns, this one also includes detailed stitch descriptions and helpful pictures for each round.
For my test version I used Drops Safran (160 m / 50 g) and Cotton Kings 8/4 (170 m / 50 g) and a 2,75 mm hook. Both yarns are 100 % cotton – soft and nice to work with.
I followed Pam’s colourway and used
A – Drops Safran, # 60, Moss Green
B – Cotton Kings, # 41, Spring Green
C – Drops Safran, # 71, Marzipan
D – Drops Safran, # 11, Strong Yellow
At first, I wasn’t sure whether the two shades of green would go together, but I’m really pleased with the result. That said, the square looks great in a single colour too!
Somehow, the pattern reminds me a bit of Florentine Tiles. What do you think?
The year flies by … – it‘s already October! Only a few more weeks until Halloween … But still time to make some decoration …
Ana from One Skein of Love just released a new pattern which is available on Ravelry (and of course all her other shops): BOO!!!Licious. It is a Halloween themed pattern and combines Overlay Mosaic with Tapestry crochet. The pattern is written to make a blanket but it is also suitable for many other things, such as cushion covers, table runners, bags, etc.
Photo credit Ana Morais Soares / One Skein of Love
I had the pleasure of testing (and translating) BOO!!!Licious. I created some wall hangings, similar to the ones I made with Wintry Forest.
I love the colours Ana used for her sample! The yarn is Durable Comfy, and the orange tone (Caramel) is just gorgeous. However, I wanted to showcase something different, with slightly more muted colors – foggy and spooky…
That’s why I decided to use very little orange and focused on different grey tones and a soft purple.
My Yarn
I used some yarn from my stash – a combination of Stylecraft Special DK and King Cole Baby Comfort DK – with a 4 mm hook.
Stylecraft Special DK (100 g – 295 m / 322 yds)
1063, Graphite – a little bit over 2 balls
1807, Hint of Silver – 1 ball
1836, Vintage Peach – some left overs
King Cole Baby Comfort DK (100 g – 310 m / 340 yds)
1731, Mulberry – 1 ball
My Panels
All of my panels are worked over 1 pattern repeat plus border stitches. Each one starts with a foundation row and ends with one final row of single crochet in the back loops. I followed the pattern layout of the BOO!!!Licious blanket, just splitting it into 3 parts. I have only omitted the last repetition of pattern 2 and 1 in panel 3. Otherwise, it would have become too long. The panels are framed with a double border, just like explained in the pattern. Their finished width is about 29 cm / 11,5 inches.
Panel 1 – The Ghosts
It is worked over 79 rows in total and measures app. 48 cm / 19 inches, including the border.
Panel 2 – The Pumpkins
The panel has a total of 56 rows and measures about 41 cm / 16 inches. Due to my different colour placement, I had to add an additional row of single crochet between patterns 1 and 4, respectively 4 and 1.
Panel 3 – The Spiders
Again, I had to add 2 rows of single crochet to make my colours match. This time they are a separation between patterns 1 and 6, respectively, 8 and 1. The whole panel has 73 rows in total and measures app. 45 cm / 18 inches.
If you are interested in the details of my colour placement, I have listed them in a separate file for you to download.
Do you love crocheting squares? I’ve only just discovered my great love for them! A square is usually finished in no time and – something that’s very important to me – you see results quickly. That also makes them great ‘in-between projects’. What’s more, they’re lovely to crochet when it’s still warm – you’re not stuck under a big, warm blanket. However, that’s not so important to me at the moment as it’s suddenly turned cold and autumnal here.
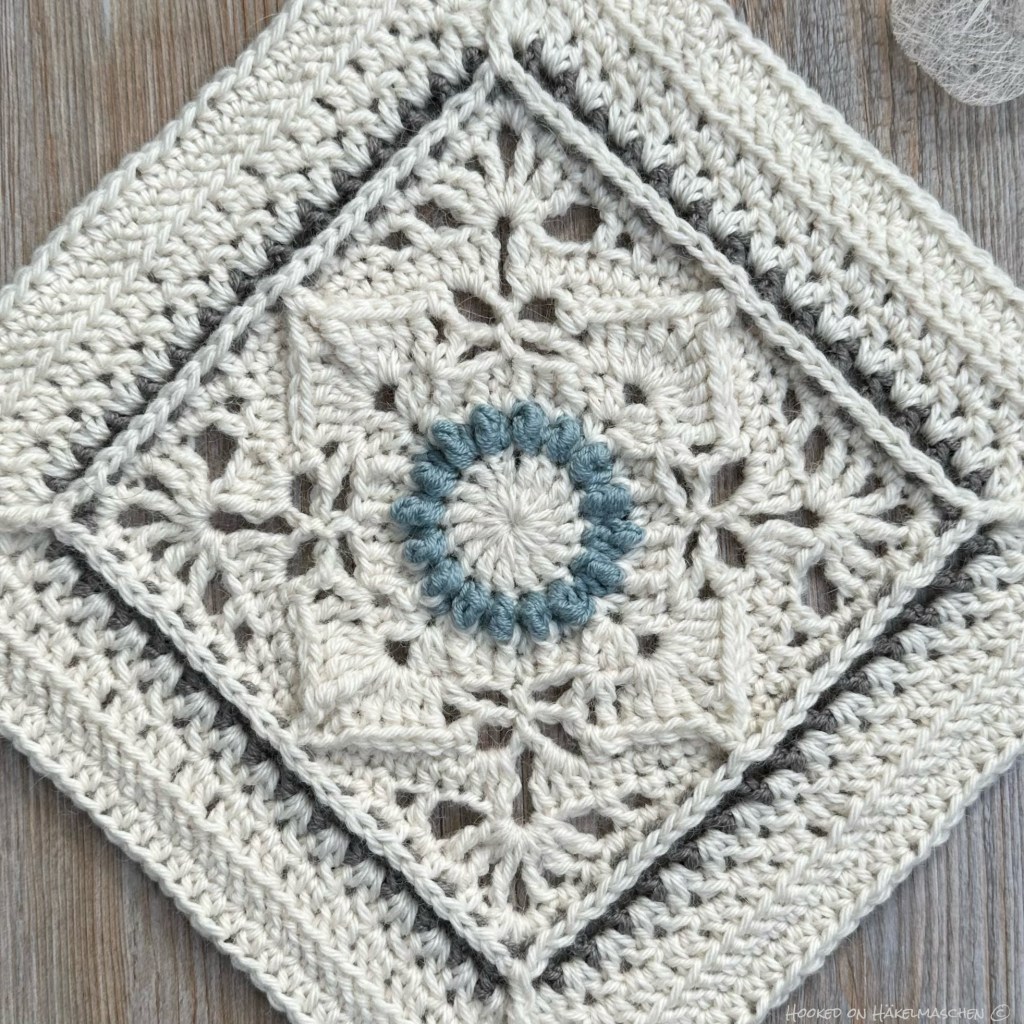
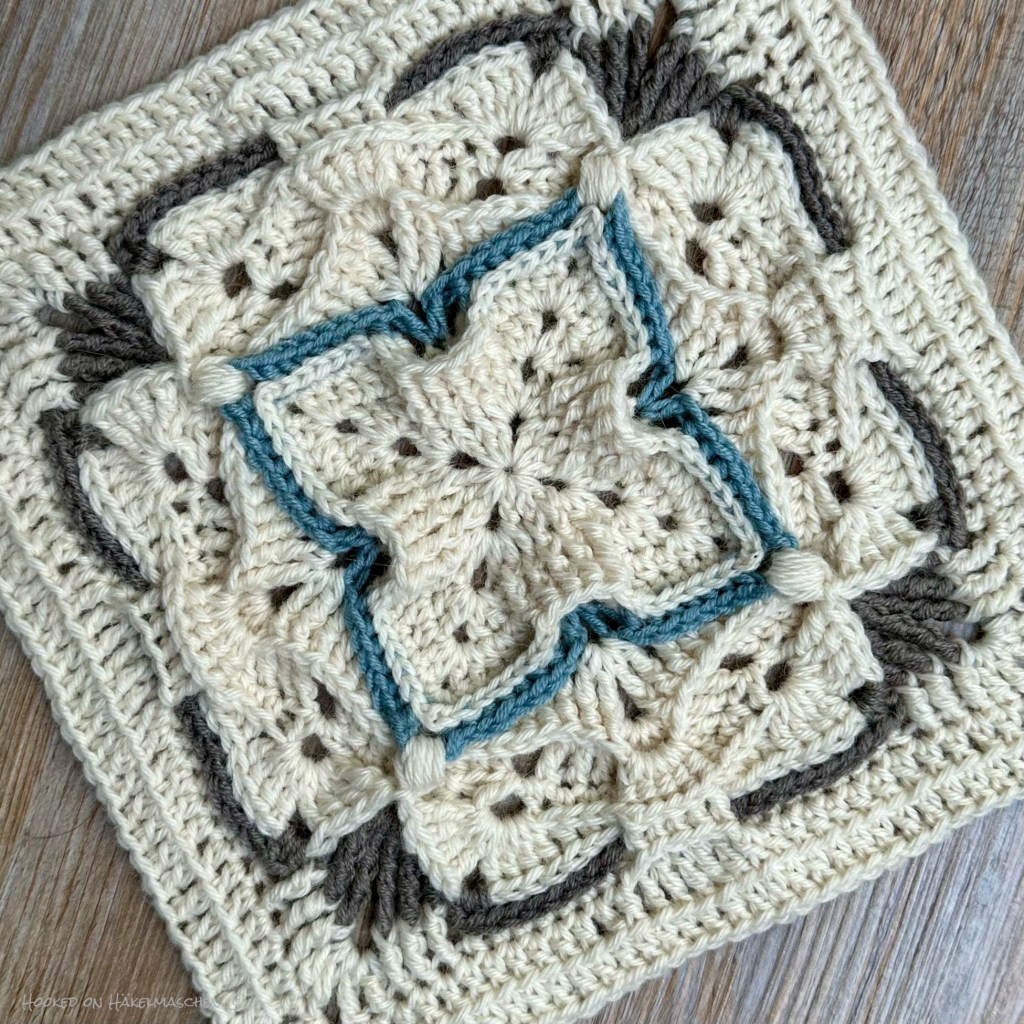
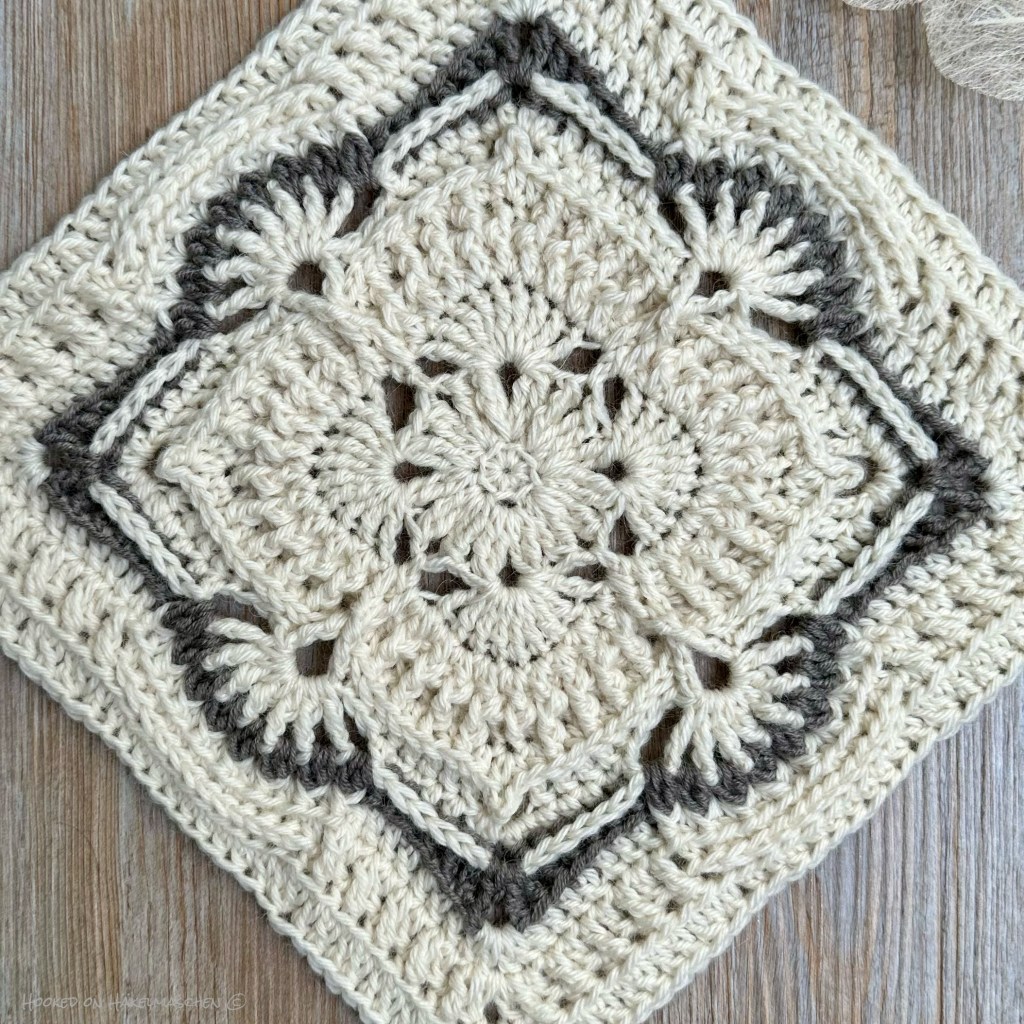
You may know that Pam Knighton-Haener from ‘A Yarn of Serendipity’ designed a very special blanket some time ago as a legacy for her grandchildren. It consists of 12 different squares, each symbolising her grandchildren and her family. The instructions for joining the squares and for the border are currently being tested. She has also revised the instructions for the squares, and I’ve had the chance to test a few of them. A great opportunity for a new blanket. It will only be the second one I’ve ever crocheted from assembled squares. Unbelievable!
So far I have already made 9 out of 12 squares. Unfortunately ›made‹ does not mean that they are actually finished. Only 3 of them are blocked with all the yarn ends worked away. For another 3 I am currently rethinking my colour placement and 3 squares still have a lot of loose ends that need to be done.
I’m afraid that’s one of my bad habits: I only weave in the loose ends once a square is finished. Yes, I’ve tried to change that! Yes, I know it’s much easier and less frustrating to do it straight away! The only problem is: if I weave in the loose ends straight away, I often spot a mistake afterwards (again, yes – of course I know I should check it beforehand – but still…). By now, I’m almost convinced that weaving in the loose ends straight away might bring bad luck – so I just let them live a little longer. Good things take time, as the saying goes.
Nevertheless, I love working on this blanket and I love my finished squares.
I am using a combination of Drops Lima and Drops Merino Extra Fine – both DK / Light worsted yarns – with a 4 mm hook. Drops Lima consists of 65 % Wool and 35 % Alpaca. It has 100 m per 50 g. Merino Extra Fine is 100 % Wool with 105 m / 50 g. My main colour is Lima #100, Off White. The accent colours are Merino Extra Fine #07, Light Taupe (Light Brown) and #15 Light Greyish Green.
I hope the blanket will wash well. Lima can only be hand-washed, but I really like the feel of the yarn. And I decided to combine the two yarns because of the colours. Colour 100, Off White, is identical in Lima and Merino Extra Fine, yet it still looks slightly different. Probably due to the structure of the yarn, the contrast with my accent colours looks softer in Lima. And I much preferred this look.
My finished squares are about 25 cm / nearly 10 inches.
Landyn Tahj
Kinnedy Nichelle
Jalen Stanley
All patterns for the Legacy Blanket -some paid, some free – are available in Pam’s Ravelry store.
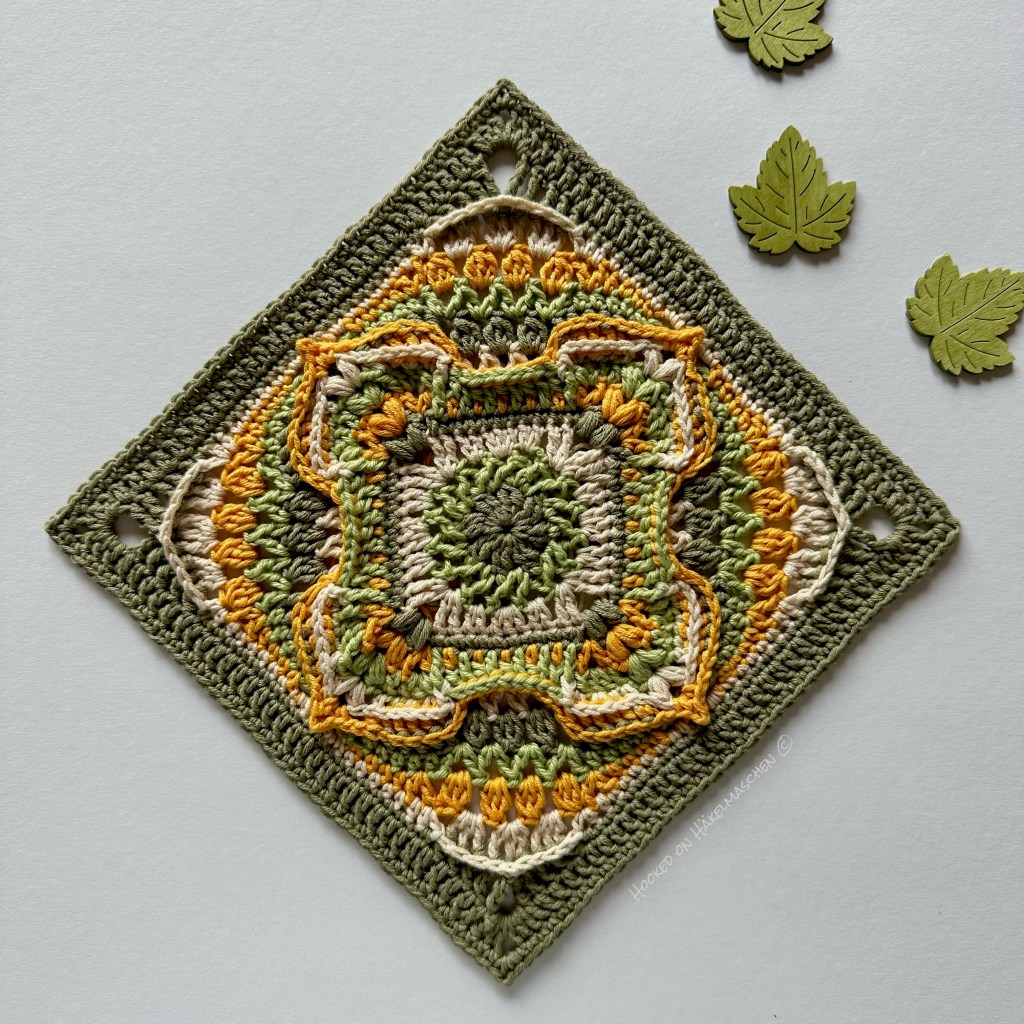
Unbelievable, the Aureole Mandala is the first mandala I have ever crocheted! I have wanted to do something like this for a very long time. At the back of my mind, there is an idea to decorate a wall in our living room with colorful mandalas… So I was happy when Pam came up with her pattern for testing.
My test version is made with Drops Safran. It is a sport weight yarn and has 160 m / 50 g. It is just a tiny Aureole Mandala. With my 2,75 mm hook it turned out about 17 cm in diameter, that is just under 7 inch. I will see if I can find a suitable ring to attach it. It will make a lovely wall decoration. I love the colours!
Colour A – # 23, Brown
Colour B – # 11, Strong Yellow
Colour C – # 71, Marzipan
Colour D – # 28, Orange
The pattern is rated as intermediate and available as a free pattern in Pam’s Ravelry store. As always there are explanations for all the stitches used and helpful and detailed pictures for each round.
My second Mandala
Quite a good result: shortly after the first Mandala was done, I made a second one – hehe. Pam had just hosted an Aureole Mandala CAL in her Facebook Group. The pattern was split into two rounds a day. So I joined in and made a second one.
This time I used a mixture of Drops Paris, Drops Love You 8, and Cotton Aran from Paintbox. All three are Aran or worsted weight yarns with 75m / 50g (Drops) and 85m / 50g (Paintbox). Those who know me know that I am not a fan of this yarn weight. I always have a hard time with it, and I always find that my stitches look a bit messy. Well…
By mistake, this time I used a 5.0mm instead of my 4.5 mm hook. When I realised that in round 7, I decided to continue with it. It actually worked out quite well. After blocking my Mandala measures about 27 cm / just under 11 inch.
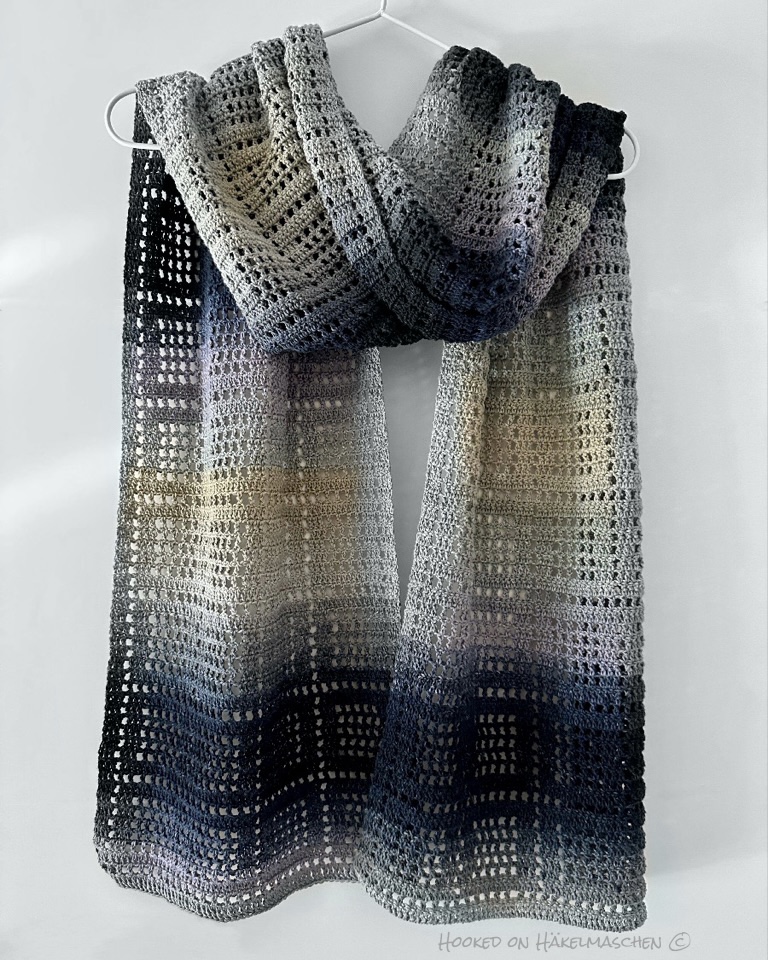
Love shawls? Try the Little Boxes Shawl – an easy filet crochet shawl pattern with a free chart, optional written instructions, and soft cotton yarn for a lightweight, beautiful finish.
Last updated on March 12, 2026
Unfortunately, I was unable to commit to any major test projects this year. The deadlines for these tests are often very tight. When there are a thousand other things to do, it’s very difficult for me to meet them. And it’s been a very busy year so far!
Fortunately, however, I found some private time to crochet, working on my own pace.
This is how a new shawl was created!
Strictly speaking, it was also the result of a “bad buy” of yarn. To be precise, it wasn’t a bad buy at all – the yarn is fantastic! However, it simply didn’t fit the project I had in mind. So I looked for something else to make with it and the Little Boxes Shawl was born!
I recently wrote down the pattern which has now been fully tested.
Little Boxes Shawl
The shawl is made using Filet crochet, a very old crochet technique. If you are not familiar with this technique, I’ve summarised the basics on this page.
My sample was made using Lang Yarns Baby Cotton Color. The colour is #0025, a mixture of navy, purple and sage.
Baby Cotton Color is a 100 % cotton yarn with a length of 180 m / 50 g. It is pleasantly soft and wonderful to work with.
I used nearly 250 g (5 balls) and a 2,5 mm hook.
My finished and blocked shawl measures about 31 x 180 cm (12,2 x 70,9 in).
Of course, you can also use a different yarn. However, this may affect the amount of yarn used and the size of the finished shawl.
The Pattern
I’ve decided to share the filet graph as a free version here. Written instructions are available on Ravelry for a small fee. As well as the row-by-row instructions and the chart shown below, they also include tips on how I made the boxes look square. The pattern is written in US terms.
My sample is made over 71 stitches and 22 repeats in height. The size of the shawl can be adjusted by adding or reducing repeats.
Little Boxes Filet Chart
Little Boxes Shawl – Filet chart
This pattern / chart is my intellectual property, so please respect my copyright and do not claim it as your own. You may print a copy for your own use but please don’t alter, distribute or sell it. You may sell items made from this pattern in small quantities but no permission is given for mass production. Thanks for understanding and respecting!
It looks like Granny Square Day has become a kind of tradition in the crochet world. Since 2014, every year on 15. August, people from all over the world post their (Granny) squares on social media, mainly on Instagram. The original idea was, that all the squares together on IG would look like a colourful Granny Square blanket. Just search for the hashtag #grannysquareday2023 and you will see what I mean.
Last year I posted Ana‘s Sweet Marigold Square. She designed it especially for the Granny Square Day and I had the pleasure to test the pattern. This year I decided to show one of my own designs.
One of my own designs sounds a bit like having a huge pool of designs to choose from – he, he. In fact, I don‘t! Sometimes it just comes over me and then I grab my yarn and hook and start combining stitches … I am still learning … Sometimes something emerges that I like and perhaps develop further. Sometimes I just discard everything …
This is how the small square here was “born”. Something I like and thought I could at least show on Granny Square Day. ( It is based on my very first square that I designed over a year ago, but never showed anywhere. )
So far it doesn’t have a name – and no finished pattern, only my notes. I do not yet know exactly what I will do with it. It’s a 6″ square, maybe I’ll develop it further into an 11″ or 12” square? And combine both, the small and the big one to … ??? We will see!
First I need to write down the pattern properly and maybe take some detailed photos. And think about a name! So there is still a lot to do.
My sample is made with Hobbii Rainbow Cotton 8/6, a DK or Light worsted yarn. Colours are Jeans Blue (#29), Light Jeans Blue (#28) and Pearl Gray (#73).
Unfortunately, I still don’t spend much time crocheting – most of the time I sit at the computer or tablet.
During the last weeks I have translated Ana’s Go with the Flow pattern, did some kind of tech editing on another pattern . Besides I wrote down a pattern for a shawl I made for myself some time ago. The pattern is currently in the testing phase and of course I will present it here as soon as it is ready.
And every spare minute – and I definitely have too little of that – I am sorting through my old photos and revising some of the older blog posts here.
When I started with this blog I didn’t think of putting a watermark on my photos. From a legal point of view, watermarks are not really necessary, because every photo I have taken belongs to me and I have all the rights to it. No one may publish it without my permission!
Unfortunately, some of my photos have already been found on other, sometimes dubious, websites where people try to earn money with patterns that are not theirs. This is so annoying, especially for the designers concerned!! I know that a watermark on the photos won’t save me from that in the future either. But it makes it easier to prove and I just feel safer doing it. Especially as some of my photos – mainly with blankets – are not so unique. I have seen photos from Winter Wonderland blankets, done in my colourway, where I first had to think about whether they were mine or not. So I just make the effort!
But I digress!
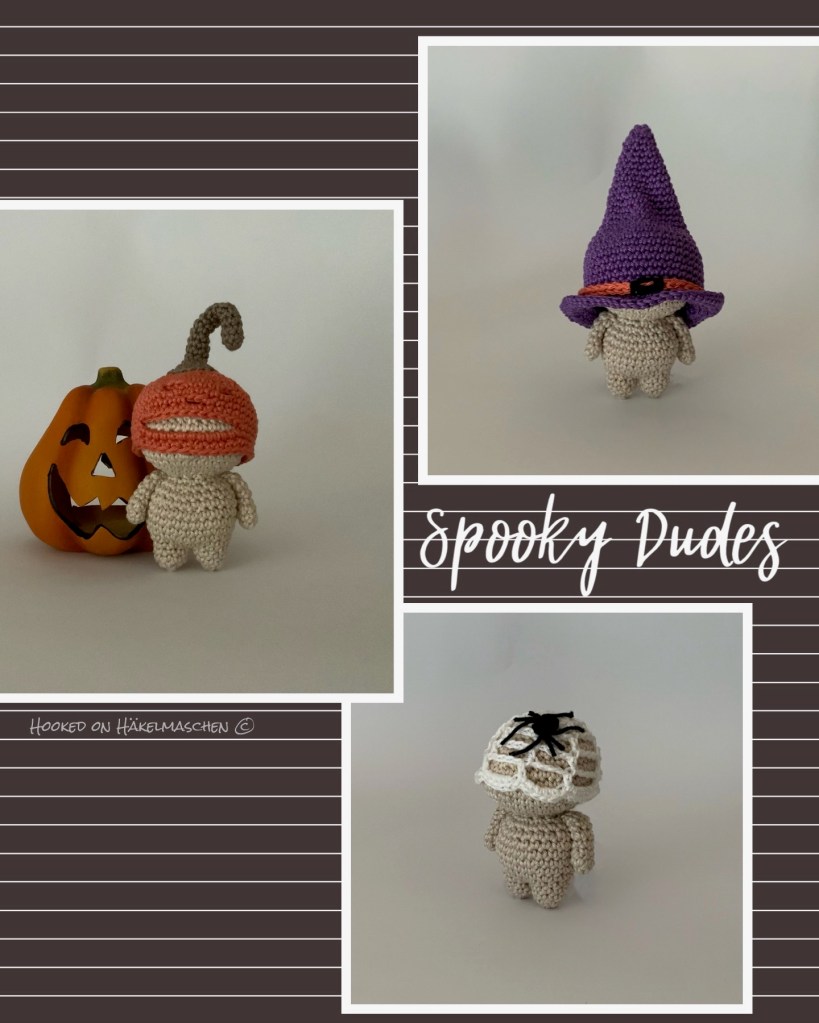
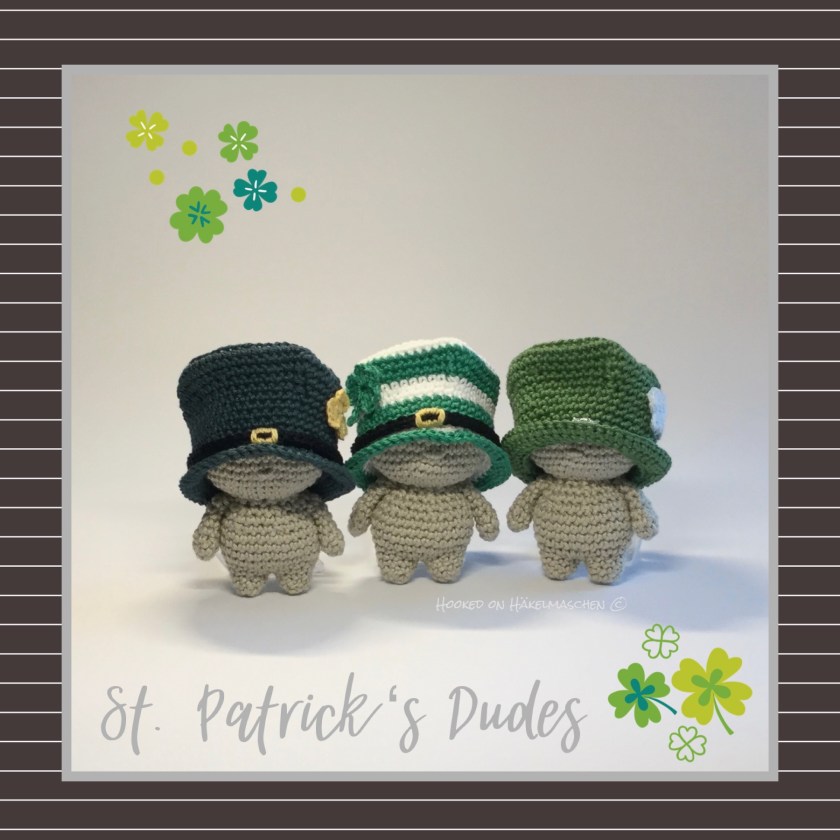
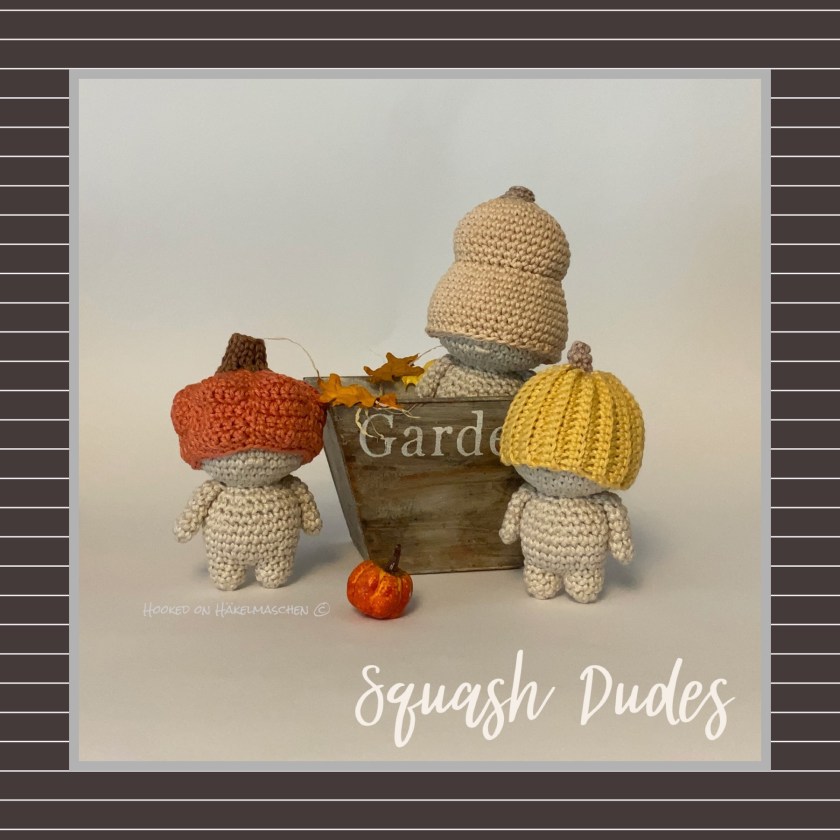
Dudes, Dudes, Dudes
While sorting my photos I realized how many of the Dudes patterns I tested during the last years. TheDudes are very, very cute Amigurumi designed by Dana from missBerlin.
She writes about these patterns:
The little Dudes live among us, but only a child at heart can truly see them. They are bald and shy, so they cover their heads and half of their faces with whatever they find in their surroundings. These endearing amigurumi/crochet dolls are faceless little fantasy creatures. They are educational dolls for learning and for play-therapy, as well as unique collectible decorative figurines. The Dudes’ minimalist features, inspired by the Waldorf approach, are designed to stimulate the imagination, and their pocket size is suitable for those little hands to make the perfect companions.
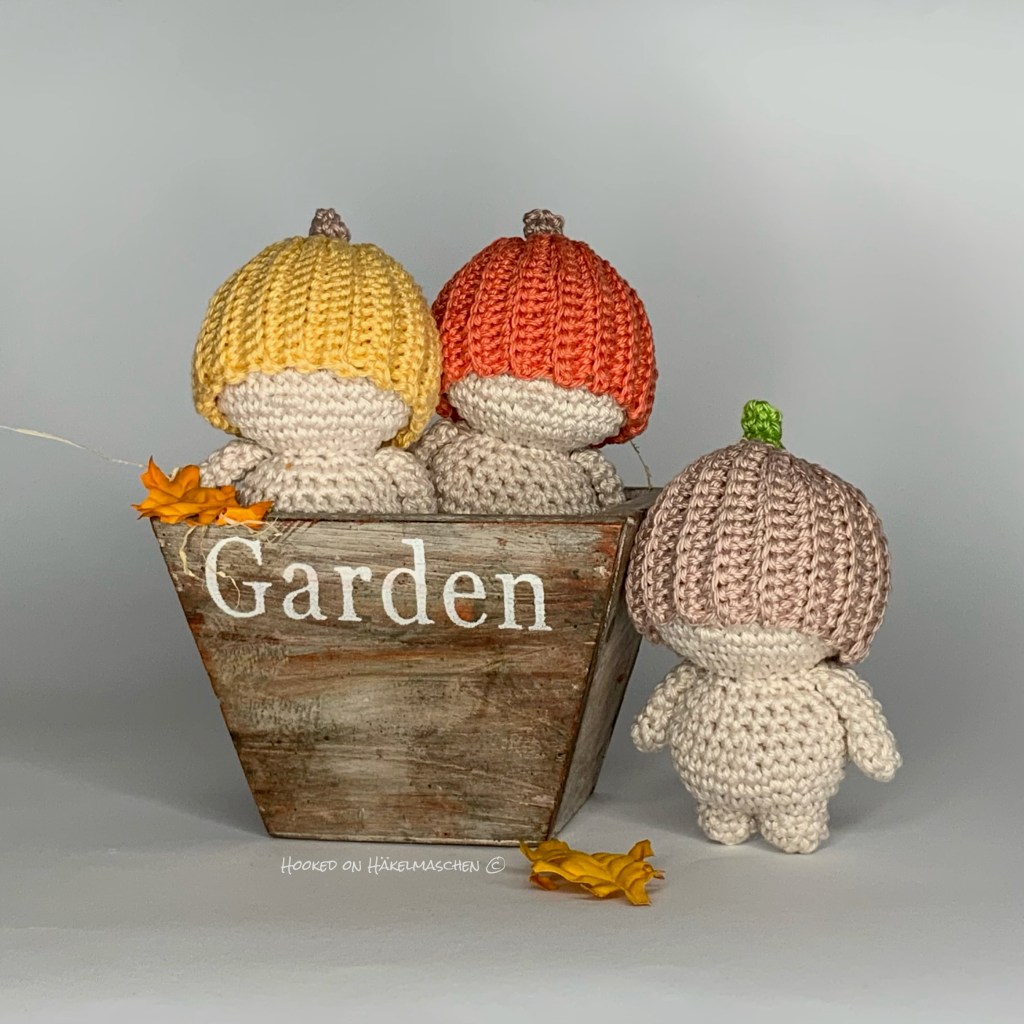
I think it was back in 2019 when I fell in love with her designs, discovering the Pumpkin Dudes.
All the others I never wrote about, because I tested them before I started this blog. It’ a shame! So I thought I could at least share some photos here.
Here my collection – so far …
Theses cuties are all made with #2, Sport weight yarn and around 10 cm tall. I mostly use a 2,5 mm hook, sometimes a 2,25. My favorite yarn for the Dudes themselves is Scheepjes Catona in the colour 505, Linen. For the caps I either use Scheepjes Catona or Schachenmayr Catania. But any other yarn works as well.
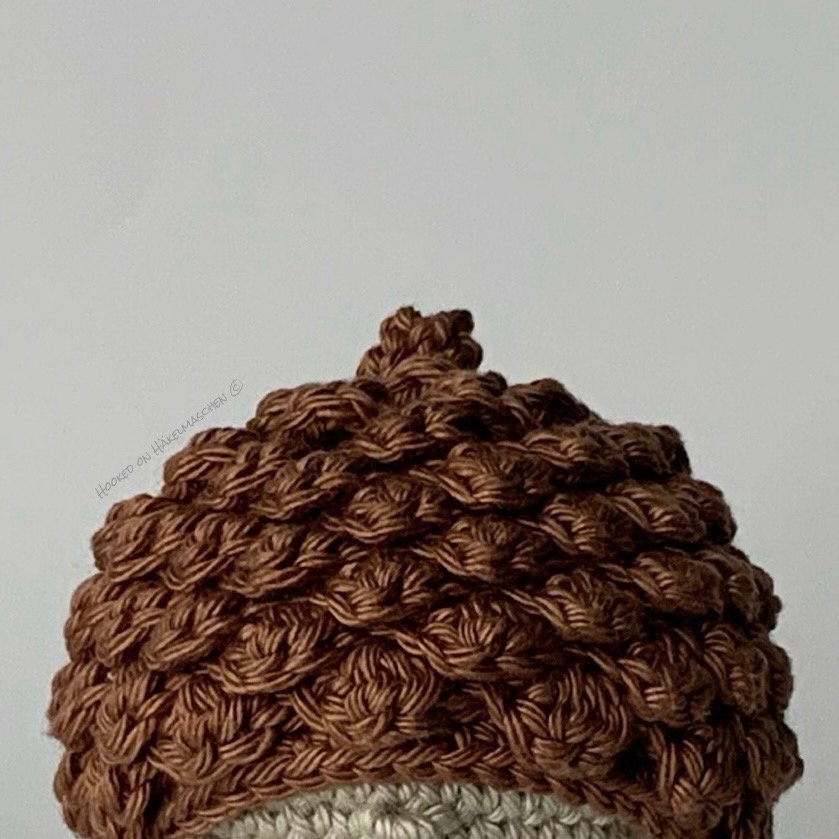
The first Dudes pattern I tested were the Woodland Dudes.
The Cap of the PineCone Dude is still one of my favorites.
But I also love the Cactus Dudes, the little Pumpkins, the Seashells (which I haven‘t made yet) and well … all the others. Each one of them was so fun to test!
Each pattern has instructions for the Dude and comes with 3 different, themed caps. Some of the caps are really easy to make, for others you will need a bit more concentration, but every step is explained very well.
In case I could inspire you: the patterns are available in Dana‘s Ravelry or Etsy shop . Or just have a look at my Ravelry projects where I have partially listed additional info.
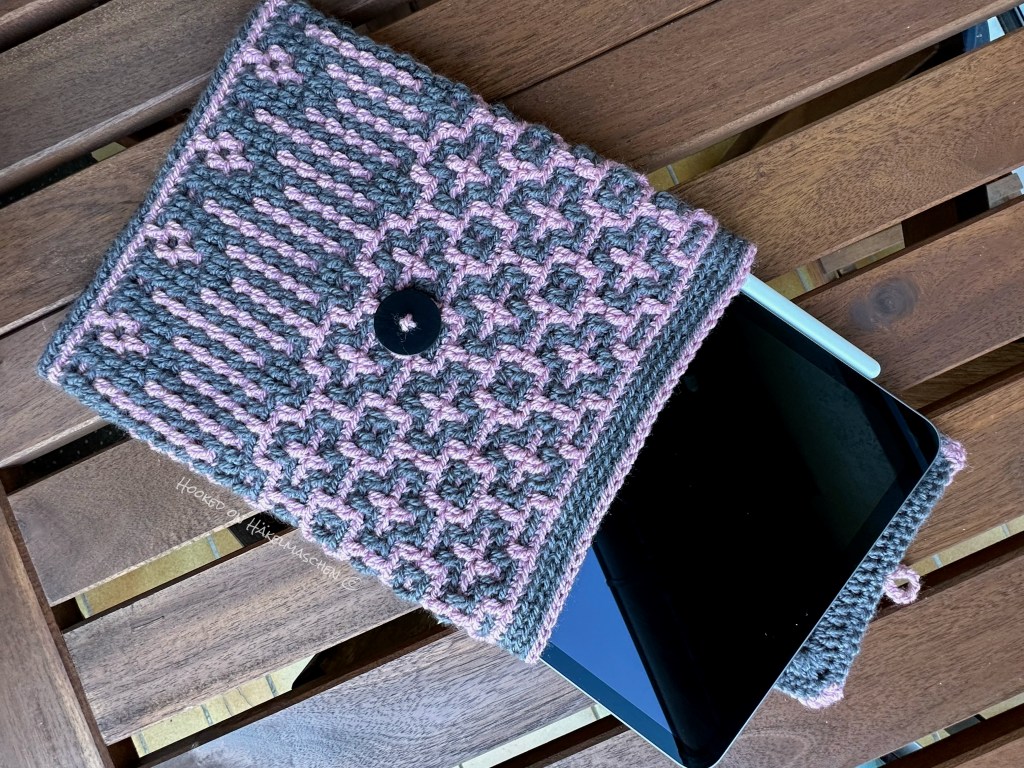
Ana from One Skein of Love just released the pattern for her latest design: Go with the Flow – a blanket made in Overlay Mosaic technique. The pattern is available in her shops.
Picture by Ana Morais Soares / One Skein of Love
Isn’t it lovely?
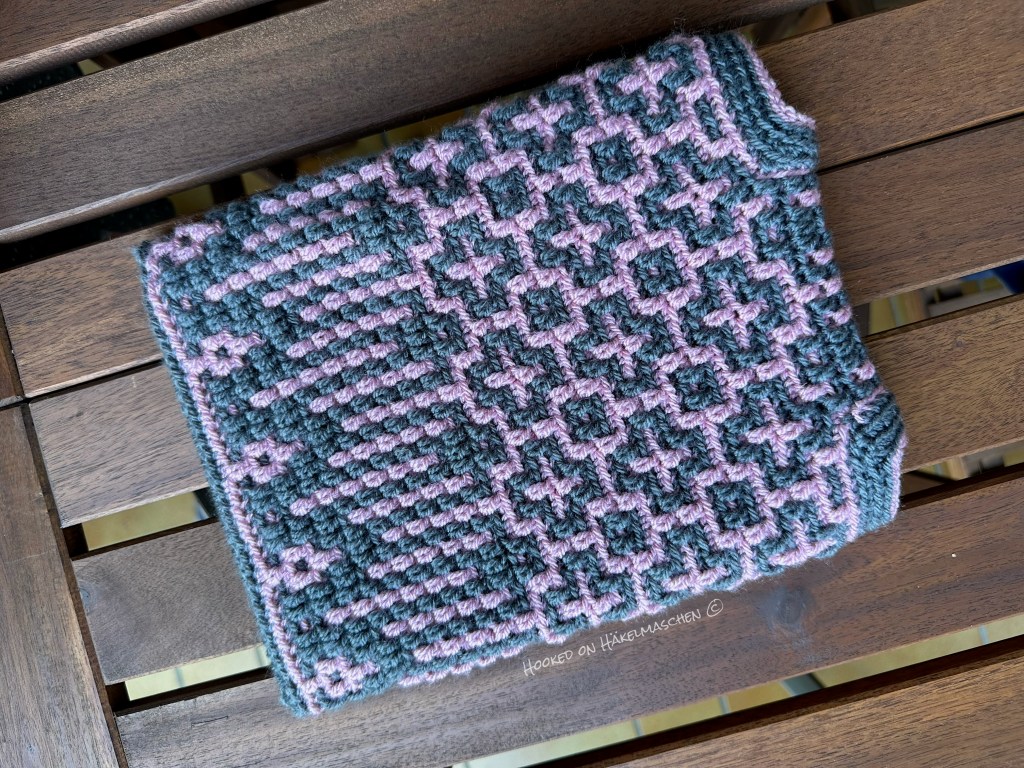
Actually, I didn’t want to test this pattern. After the death of my parents-in-law we are still sorting out and dissolving their household. They didn’t live nearby and it’s a longer drive every time – so I don’t have much time at the moment … But I couldn‘t resist …
The pattern has a small repeat and so I was able to make something I wanted to do for a long time: a cover for my iPad.
I used Stylecraft Special DK with my 4,0 mm Clover Amour hook. The colours are Graphite (1063) and Pale Rose (1080). Ok, perhaps a cotton yarn would have been better for this purpose. But I didn’t have any matching yarn on hand and I also think that the colour combination suits the pattern very well.
I used Graphite as colour C1 and Pale Rose as C2. To avoid the yarn tails on both sides I just worked the body of the cover in the round.
For me, 72 stitches made a perfect size in width. Especially as I wanted the cover to be a bit bigger so that my pencil would also fit in.
Unfortunately I have no ‘work in progress’-pictures, but here a short summary of what I did.
Body and flap of the cover
Width of the cover
72 stitches, worked in the round = 9 repeats (no border stitches, no extra stitches)
Height of the cover
rows 1 – 22 / 1 time
rows 23 – 30 / 3 times
46 rows in total
Flap
in continuation of the pattern but only worked over 17 stitches (1 repeat, plus extra stitches, plus border stitches) and worked in rows
rows 199 – 219 of the pattern / 1 time
Border
To attach a small border I prepared the edges of the flap in the same way as it is done for the blanket. My slip stitches (only around the edges of the flap) are made in Pale Rose. For back and front layer I used Graphite.
Back layer
The back layer was only worked on the sides and the top of the flap. Therefore it was worked in rows with turning the work in between. row 1: double crochet worked in the back of the slip stitches, (2 dc, ch 2, 2 dc) in each of the 2 corner spaces row 2: single crochet in both loops, (1 sc, ch 2, 1 sc) in the corner spaces
Front layer
The front layer was worked in rounds over the flap and the upper edge of of the cover. To get a rounded transition from the flap to the upper edge of the body, I skipped the first / last stitch of the upper edge (directly after / before the stitches of the flap) in each round. round 1: single crochet, over the flap worked in back loops of the slip stitches, in the corner spaces (1 sc, ch2, 1 sc) like explained for the border of the blanket. Over the body worked in back loops of the stitches of the last round. rounds 2 and 3: single crochet worked in back loops, (1 sc, ch2, 1 sc) in the corner spaces of the flap.
Joining
Back and front layer of the flap are joined with a row of slip stitches in Pale Rose. To get a consistent look I continued the slip stitches over the body. A small loop on the upper edge of the flap, made with some chains, serves as buttonhole.
Finishing
I closed the bottom of the cover with some whipstitches and a sewed on a button.
If you want to make one for your own
To get the measurements for a cover that fits your Tablet I would suggest that you make a little swatch first. For this, two or three pattern repeats should be enough. Then you can work out how many repeats you will need in width and also estimate how many rows / repeats you will need in height. Or – and that was my way :) – you just cast on some chains and put them around your tablet. (I suppose this method will even work better with foundation single crochet but FSC still is not MY thing.) Just keep in mind that your total number of stitches has to be a multiple of the stitches of a pattern repeat. After you have crocheted a couple of rows, put your tablet next to it and check now and then if you have already reached the required height. It doesn‘t sound very professional but it worked perfectly for me!
Two more points are important:
When starting the flap double check that the pattern is continued as it would be in a blanket. And, before closing the bottom of the body make sure that the flap is in the middle of the backside and take care that the pattern is centered. That‘s all – have fun!
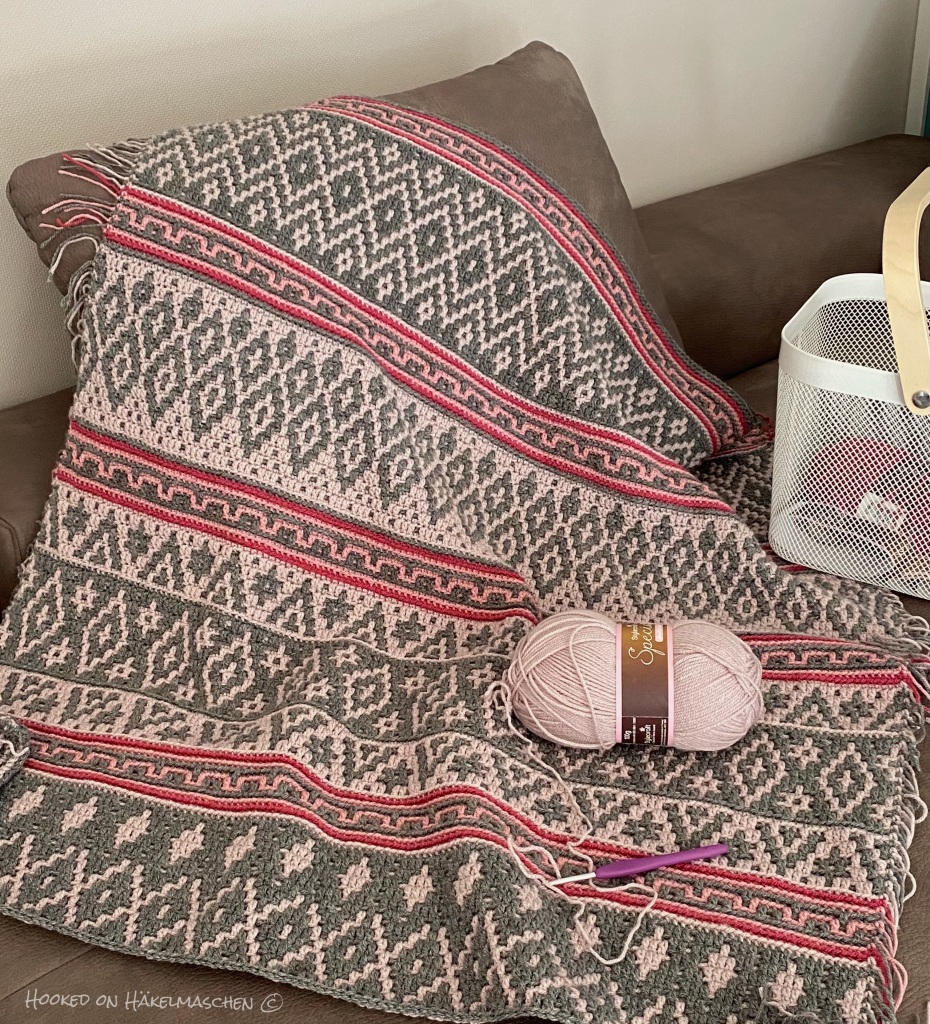
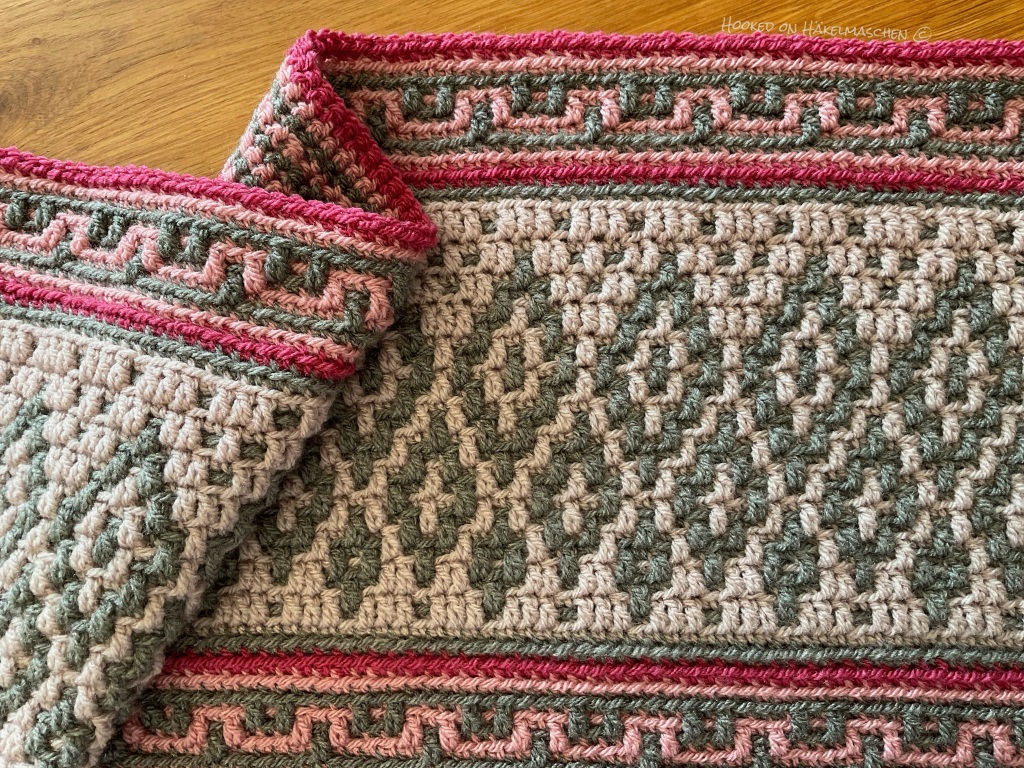
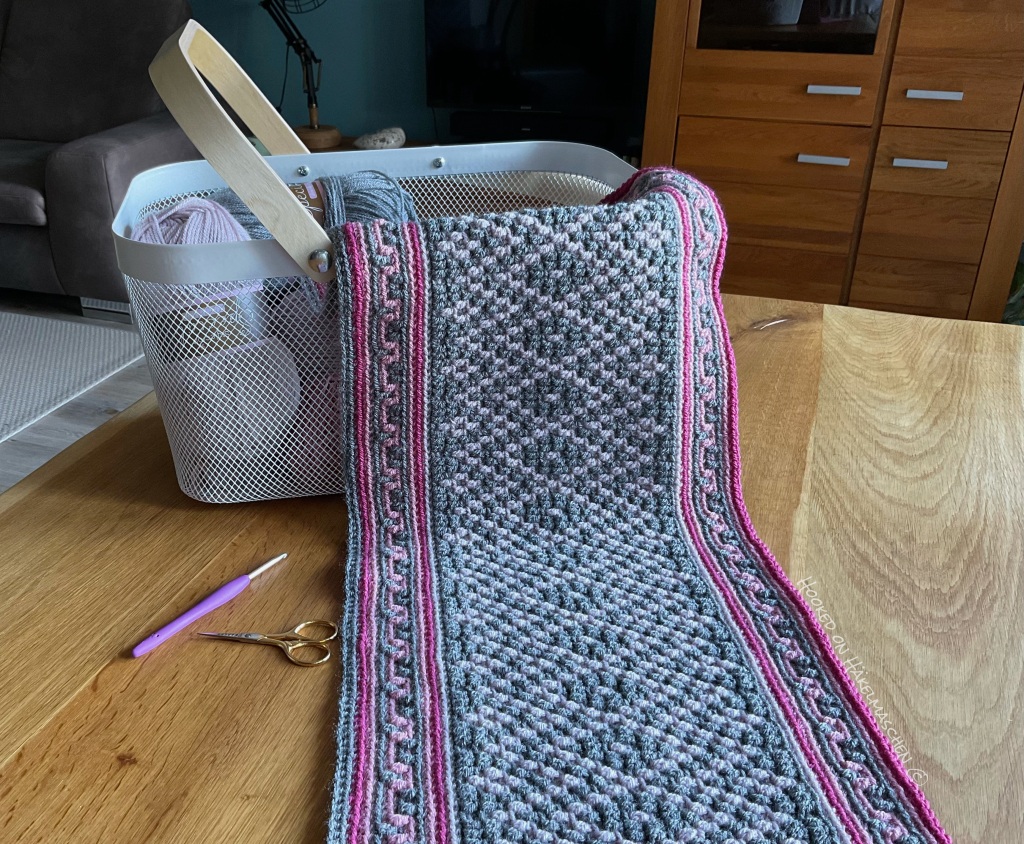
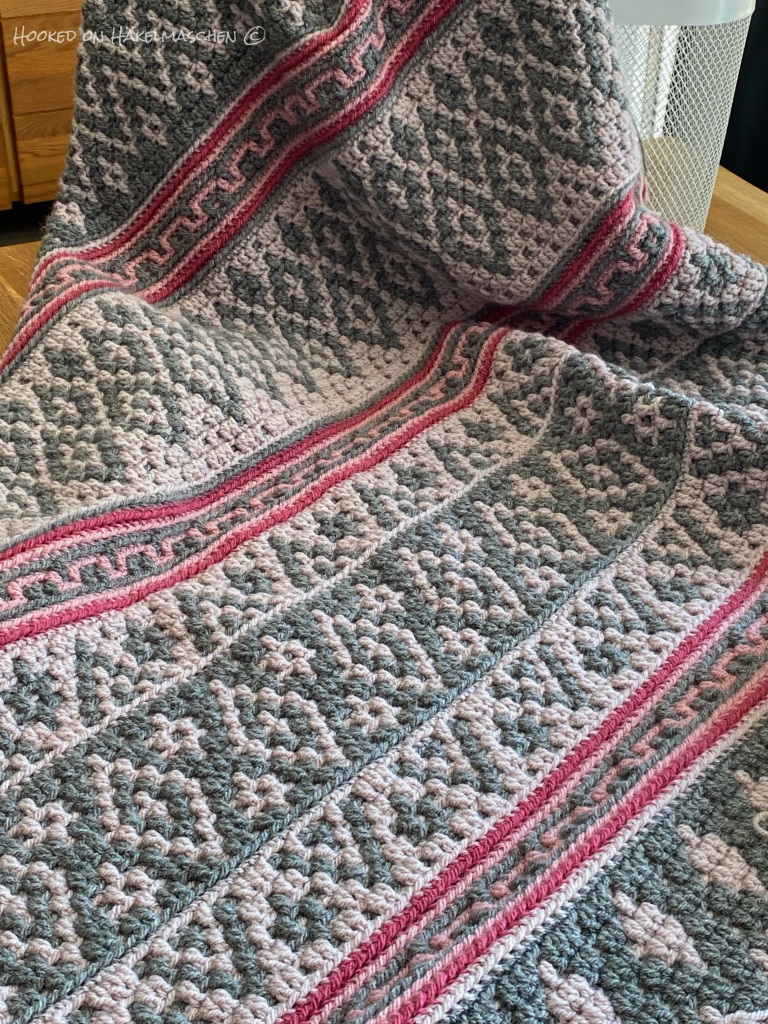
Oh dear! You may have read in my last post about the problems I was having with my hand. My wrist was obviously overstretched and a tendon was also causing me problems. A bandage helped me for the wrist, but unfortunately it didn’t work for the tendon. So it really took forever to finish the border on my Dancing Diamonds blanket. But it is done now! Sigh … I am in love …
For the border I deviated a little from Ana’s pattern. Since I used less colours overall I thought it would look better with just one stripe of Raspberry.
Here my details
For those who like to follow my colour placement and like to download a pdf – I updated the file in my previous post with all the information about the border. You can find it here