Now it is already week 4 of the Geometrics Cal. The new part was released today.
Part 3 was a relatively big part with 52 rows, wasn’t it? But half of the blanket is almost there. Part 4 will add another 37 rows, so not so much to crochet this week.
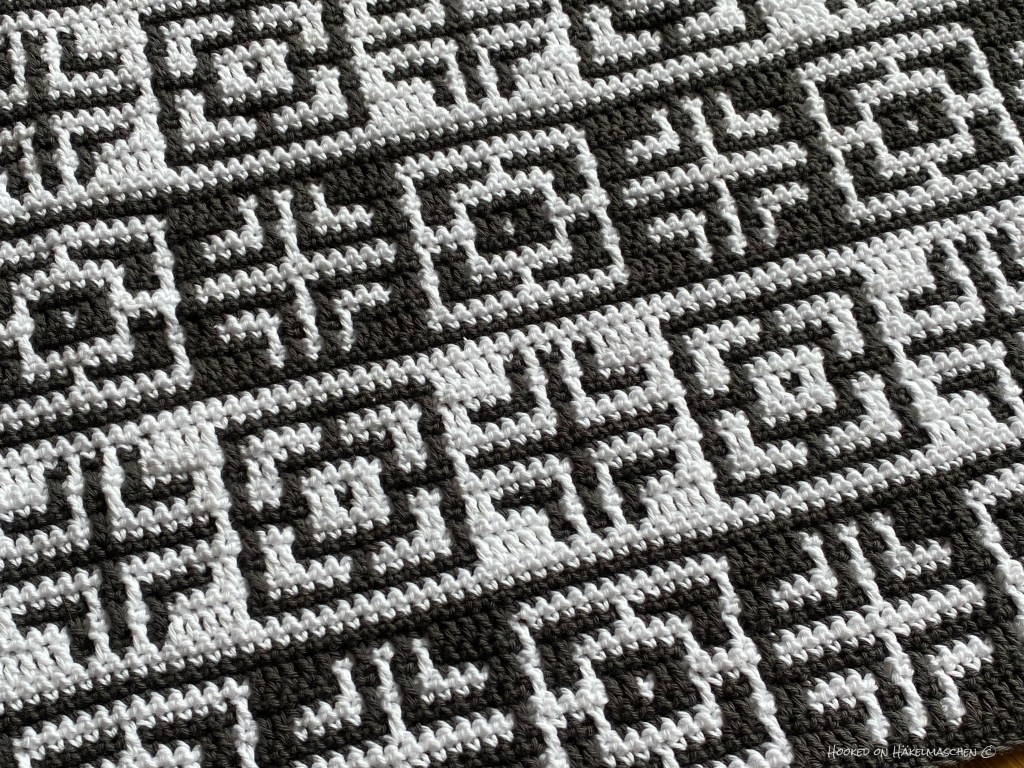
This is my part 4. It is the only part where I used some Gold. I absolutely love the combination of Parchment, Copper and Gold.
Today part 3 of the Geometrics Cal was released in Ana’s Ravelry shop. If you follow the Cal and finished part 2 you have already hooked 73 rows, only 190 rows to go until the border starts.
I have seen a lot of beautiful color ways in Ana’s Facebook group or on Instagram. And I have to say I am a bit jealous. They all are very beautiful! I often struggle with my colour choices and choosing colours for a new project is usually not the most fun part for me.
This time colour choice was easy. My plan was to make a blanket for hubby that matches my When Summer turns into Fall blanket. It therefore just made sense to use the same colours. Colours that go perfectly together and have an autumnal look. Well …
As I said, I didn’t have a finished colour scheme in mind beforehand, just a rough idea. I wanted to use Parchment as main colour. Copper, Gold and Walnut as accompanying colours and a bit of Lime as an accent. Hm … Things turned out differently …
To save time, we tested the pattern immediately after Ana had finished a part of her blanket. So when I started, I didn’t know how the entire blanket would look like, I knew only part 1 and part 2 of the pattern. This way, it was not possible to plan any colours in advance. But I should have paid attention to how Ana arranged her colours. I did not! When we got to part 3, I realised that I had somehow started off wrong.
I suddenly noticed that I shouldn’t have started the small separating border (pattern 1) with Parchment, the colour I wanted to use as main colour. As for Overlay Mosaic you have to change colours every row, it made it impossible to use Parchment as background colour for pattern 4! Small mistake, big effect …
At this point, however, I didn’t want to suddenly change the colour sequence for pattern 1 – I had already used it a few times and it would have looked strange for me to suddenly change it. Normally I would have started again and redone the whole blanket. But when you are testing a pattern, time is limited. I had already been working on my blanket for 9 days and was afraid that I would not be able to make up the time when I start again. I had to improvise …
And so it happened that my blanket suddenly got a slightly retro look with the combination of Lime and Walnut. I struggled with this look for a long time, but meanwhile I love it and my Gemetrics has a good chance of becoming the best-loved blanket in the house.
But enough of my look behind the scenes – here my “improvised colour scheme”
Bloom the Mood is a pattern from her BiS series. BiS means Beauty in Simplicity . A series of quick and easy patterns that are meant as relaxing in between projects that don’t need too much counting.
And indeed, the pattern was relaxing and fun to work on! It has charts for 4 different flower motifs and a chart for a separation section. You can combine them just the way you like.
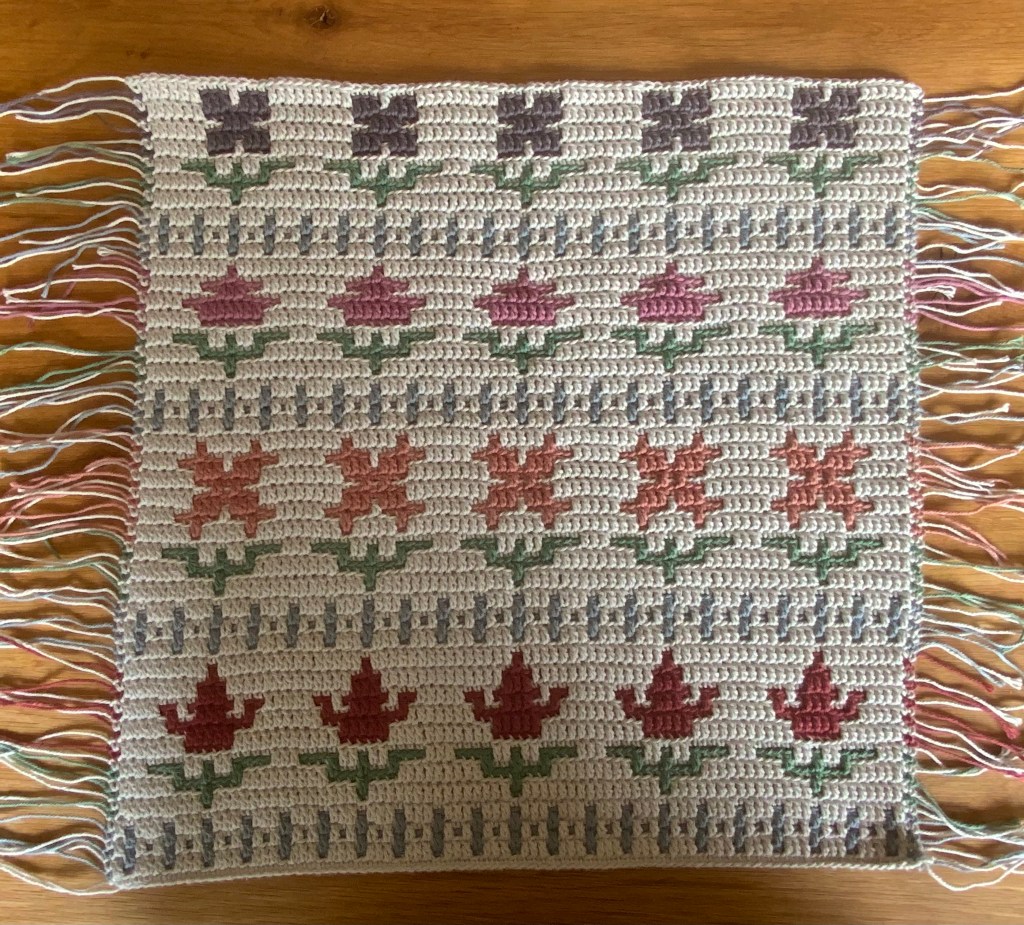
The flowers immediately reminded me of an old cross-stitch pattern. So I originally planned to make a small wallhanging. I decided to go with a cotton yarn to make it not too big and bulky. And I also was looking for some subdued colours to take into account the old cross-stitch pattern.
On my search I came across the 8/4 Rainbow Cotton from hobbii. They have a great colour range and I wanted to try this yarn for a very long time. The colours look a little different on the website but I am still happy with what I got.
I choose the colour Mist (the one in the middle) for the background, Light Jeansblue for the separations and Sage Green for the Leaves. Powder Rose, Dark Powder Rose, Apricot and Grayish Purple for the flowers.
Later on I replaced Apricot with Lilac which is not shown on the picture above. Apricot is a bit too bright for the subdued look I wanted to create. It is still a beautiful colour though and looks great in combination with the Grayish Purple. The yarn is smooth and soft and I love working with it! I am sure it will become one of my favorite cotton yarns for making light blankets, pillow cases and so on.
I started with a separation section and flower chart No. 1 in Dark Powder Rose.
Another separation and flower No. 2 in Powder Rose.
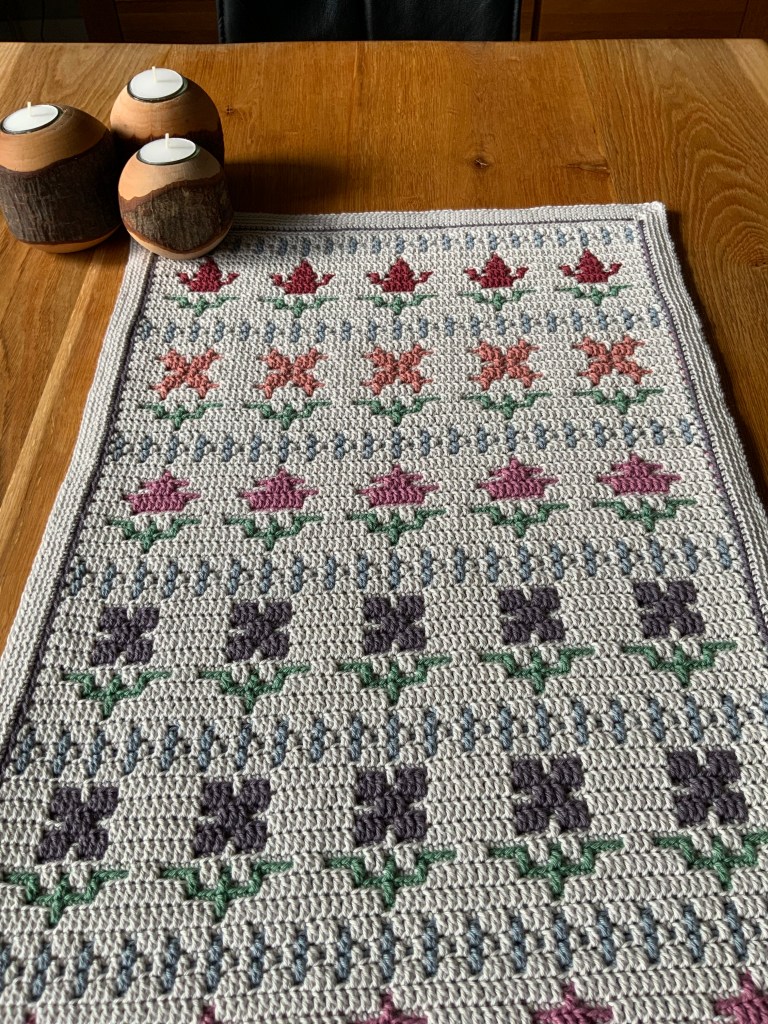
When I took the picture above and saw it lying on my table I decided spontaneously that it won’t be a wallhanging but a table runner for my dining table. And so I continued with flower No. 3 and No. 4.
No. 3 made in Lilac and No. 4 made in Grayish Purple.
I repeated the whole section once more but in the opposite order. And finally decided on a small double border.
I am very happy with the result. Doesn‘t it look gorgeous?
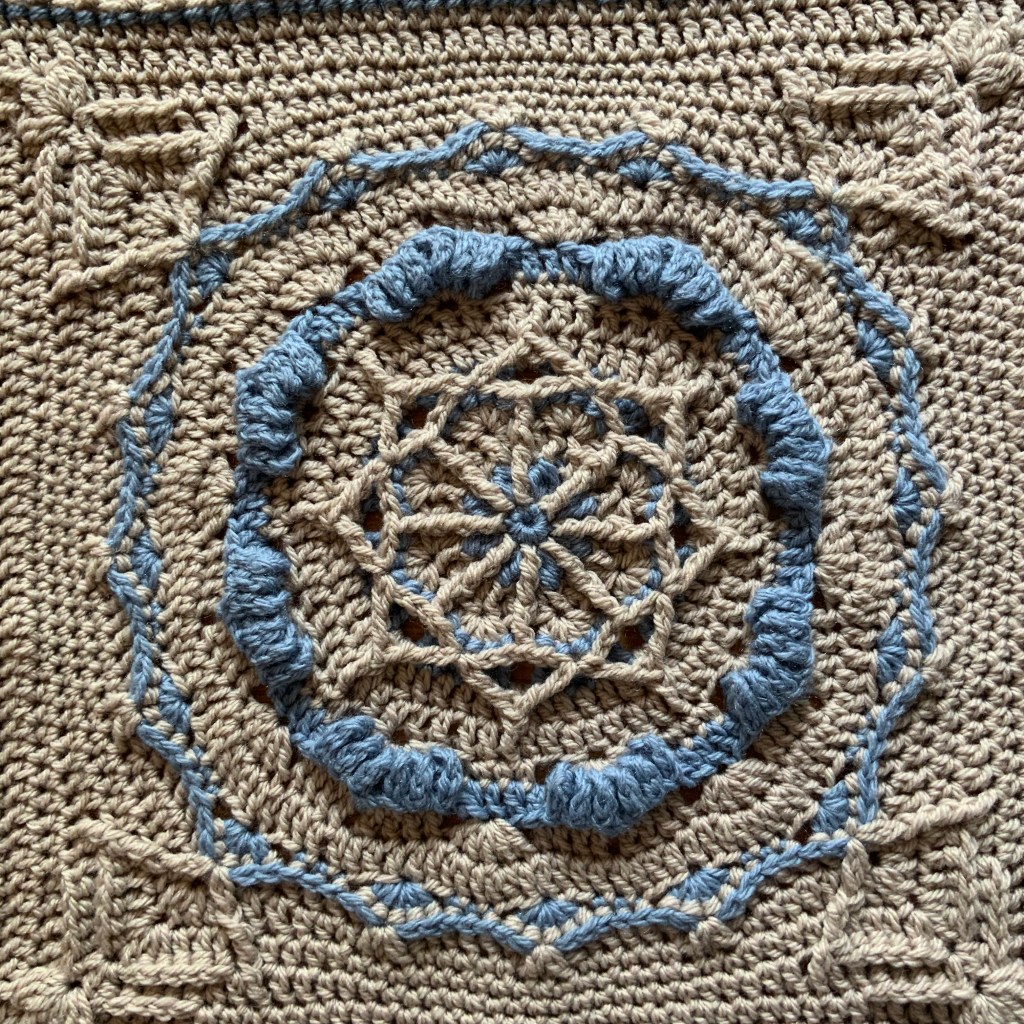
is the latest design from Pam Knighton-Haener / A Yarn of Serendipity. Another lovely design for an Afghan square.
As she writes in her pattern intro the Brood of Angels Square is an interpretation and expression of love for her diverse family. That’s so lovely!
The square is designed for Aran or Worsted weight yarn and is either 11 or 12 inches, depending on which hook size is used, 4,5 mm or 5,00 mm. Although it has round by round pictures It is definitely an advanced pattern.
I tested this pattern in July and it was quite a challenge as I checked not only the written pattern but also the videos Pam made for the more complicated rounds. It was the first time I tested a video and it is completely different from testing a written pattern. You have to make sure that the spoken words match what the hands are doing and that this also corresponds to what is written in the instructions. It needs a lot of concentration.! But it also was a lot of fun and lively discussions and exchange about how to best express the complicated stitch sequences.
The pattern suggests two different colour ways. I followed colour way 1 and only deviated from it in round 17. I used 6 different colours of Drops Paris.
Colour A / 66 Plum
Colour B / 17 Off White
Colour C / 62 Sage Green
Colour D / 60 Dark Old Pink
Colour E / 58 Powder Pink
Colour F / 59 Light Old Pink
I am not quite sure about colour E. It also could be no 32 Light Blue Purple, unfortunately I lost the banderole.
Using a 4,5 mm hook my square turned out to be 29,5 cm – nearly 12 inch – and thus slightly bigger than it should be. But it has the same size as the other squares I made from Pams patterns. My tension always is a bit loose when I am working with Drops Paris. The yarn slips a bit and I really struggle with tension. Going down a hook size doesn‘t help because it makes me fell very uncomfortable.
I would like to try her designs in a single colour DK yarn to see how it works and how it looks. Maybe one day … *sigh*
But now here my finished square
Brood of Angels Square / pattern by Pam Knighton-Haener, A Yarn of SerendipityAnother view of my Brood of Angels Square / pattern by Pam Knighton-Haener, A Yarn of Serendipity
It is my third test for Pam and also the third square I made of her designs.
My first one was the Carter Jude Square. I made it in September 2020.
Carter Jude Square / pattern by Pam Knighton-Haener, A Yarn of Serendipity
And the second was the Margaret Square which I tested this year at the end of April. I wrote about in this post.
Margaret Square / pattern by Pam Knighton-Haener, A yarn of Serendipity
Aren‘t they lovely?
And the best: my next test for Pam will start in October, YAY! Be curios!
And also be curios for the first part of Geometrics Cal and another pattern release by BebaBlanket. Both coming next week.
The last few weeks have been very busy. In July, Ana from One Skein of Love asked me if I could help with another test: a blanket in Overlay Mosaic crochet that she designed for a CAL (crochet along).
Of course, I said yes!
But the timeframe was pretty tight. I started the test on July 27 and finished my blanket on September 10. So only a little over 6 weeks to crochet
207 chains for the foundation
54.441 stitches for the blanket
940 slip stitches and 8 chains to start the border
1.928 stitches plus 16 chains for the back layer of the border
3.840 stitches plus 32 chains for the front layer of the border
and 972 slip stitches and 12 single crochet for the final round
That makes a total of 62.396 stitches – if I haven’t miscounted. PHEW!
Not included are the stitches I had to rework because my tension was off due to some yarn problems!
But never mind, it was worth it! And I am happy to show the first sneak peeks.
I wanted to make my Geometrics to match my When Summer turns into Fall blanket (I‘m still working on) so I chose the same colours and used
Parchment, 4 balls
Walnut, 4 balls
Copper, 2 balls
Lime, 2 balls
Gold, 1 ball
(At least that is what I have noted, hope it is correct.)
Since I didn’t follow Ana’s colour scheme, I’ll list my colour placement for each part of the Cal in the following posts.
The Cal will start on September 23 and I hope many, many people will join! You will find more information on Anas Ravelry page.
I just want to show you the new pattern by BebaBlanket that I was able to test earlier this year
Caramel Chocolate Cake
You have to look at the photos from BebaBlanket, her original blanket looks just YUMMY.
Mine is more a Blueberry Cream Cake but it was absolutely fun to test this pattern. The skill level for this pattern is upper intermediate. There are a lot of interesting stitches and stitch combinations.
I used King Cole Baby Comfort Dk in the colours Pebble and Jeans. Here some impressions of my test piece
Where has this year gone? Now it’s already August and I have the feeling that I can’t really finish any of my private projects. My Seashell Dudes, my When Summer turns into Fall blanket are still WIPs. My new blog is still not completely finished, let alone that I have already decided on a hosting provider.
But I have finished the test for Pam Knighton-Haener / A Yarn of Serendipity. It was quite a new experience because this time I checked the written instructions and also the videos she made for certain rounds. But more on that later when the pattern is published.
And I am working on a really big project: I am testing the pattern for a CAL that will probably start at the end of September! It will be a blanket in Overlay Mosaic technique but I can‘t reveal more yet …
I don‘t know how it is with you, but in Germany the summer 2021 is very changeable. It almost reminds me of the summers in my childhood when the climate crisis was not felt as clearly as it is now. We have quite a lot of rain and so far the heat waves that we had in the past few years have not materialized. Last year we had between 30 and 35 degrees Celsius around this time. I remember it so well because back then I tested Mosaic Christmas for BebaBlanket. That was a crazy feeling to test a Christmas pattern at 35 degrees!
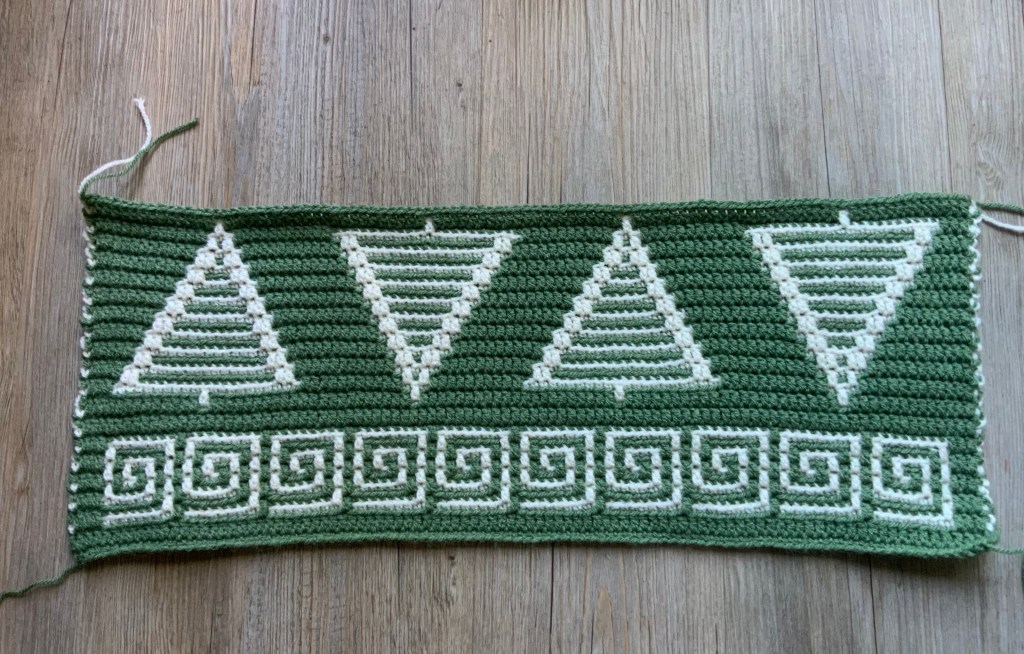
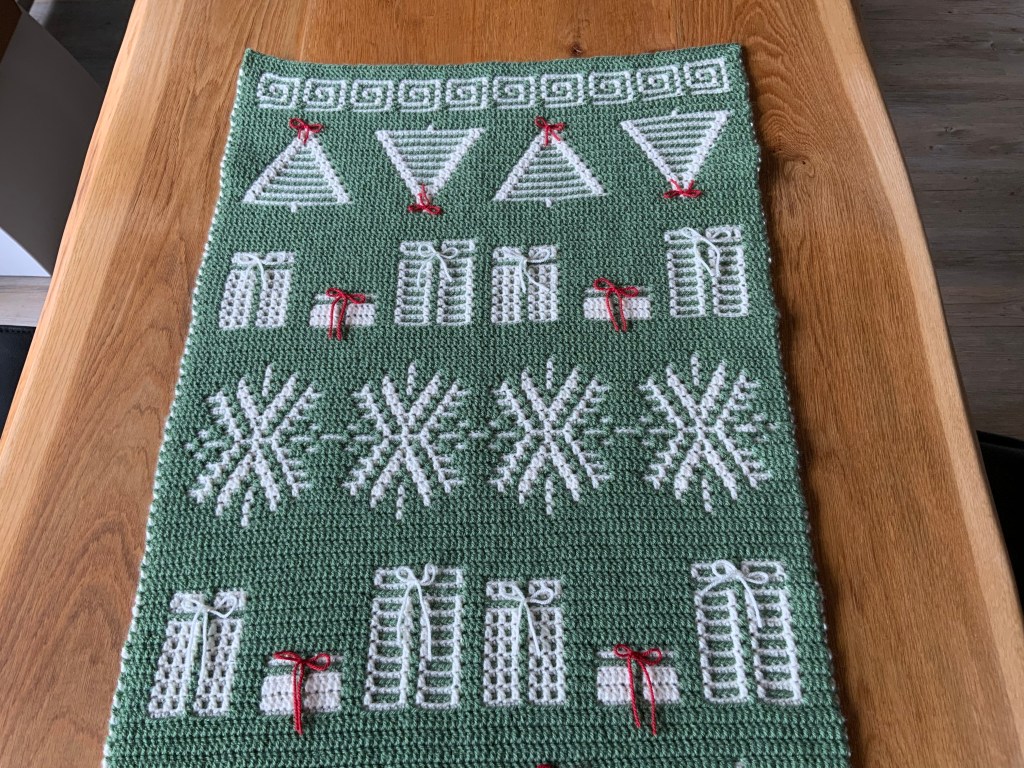
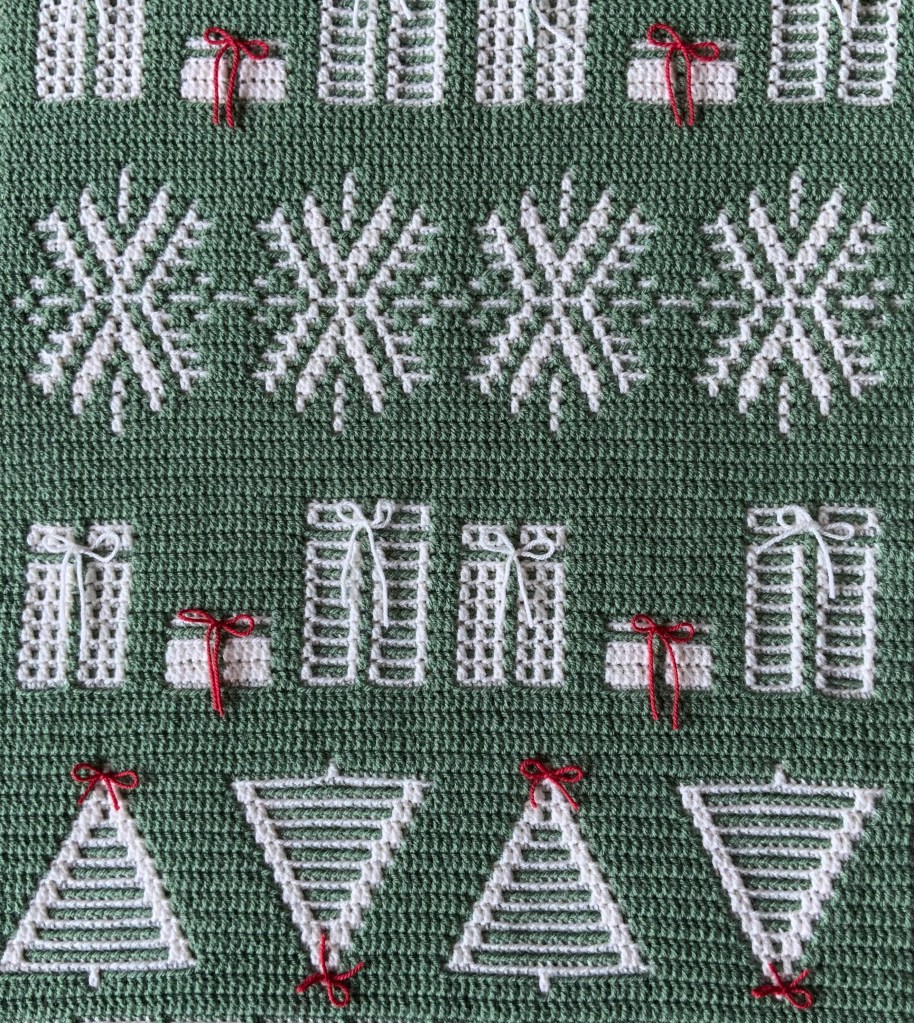
Mosaic Christmas
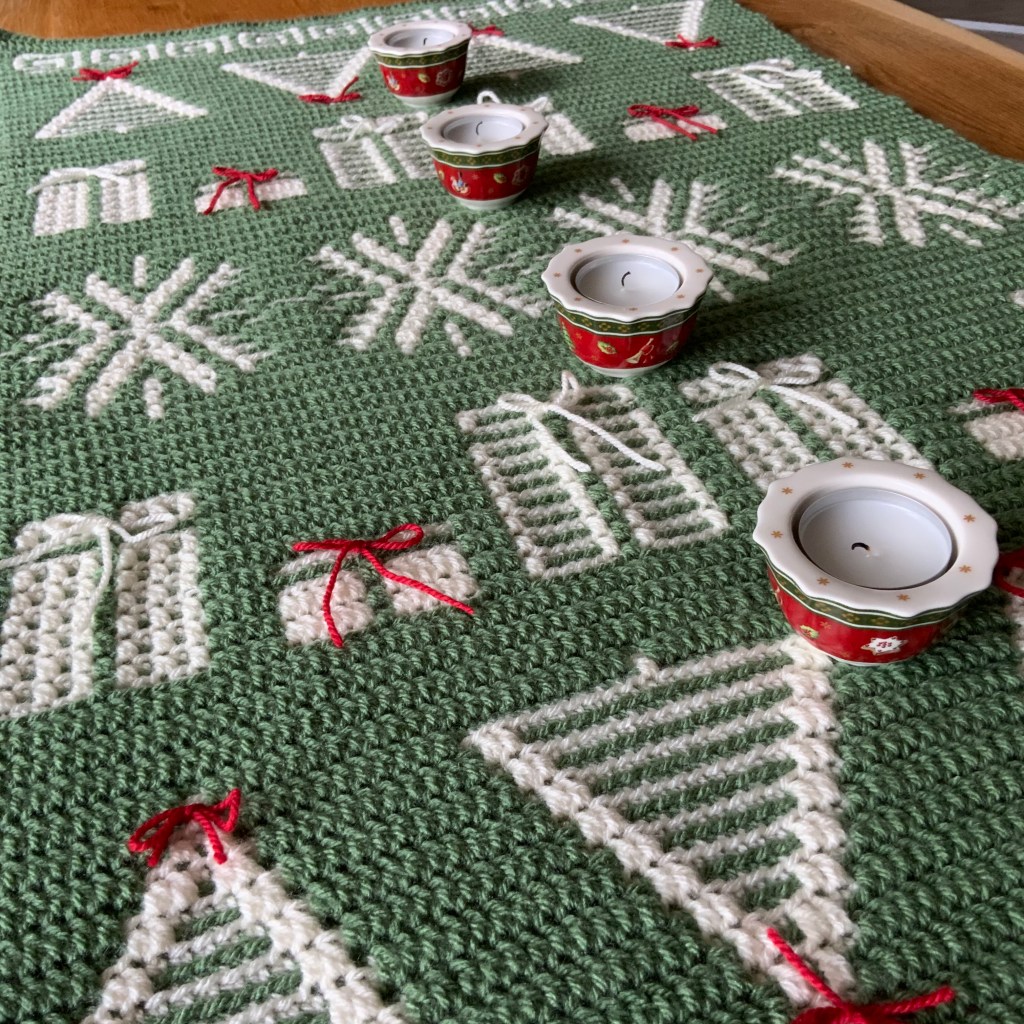
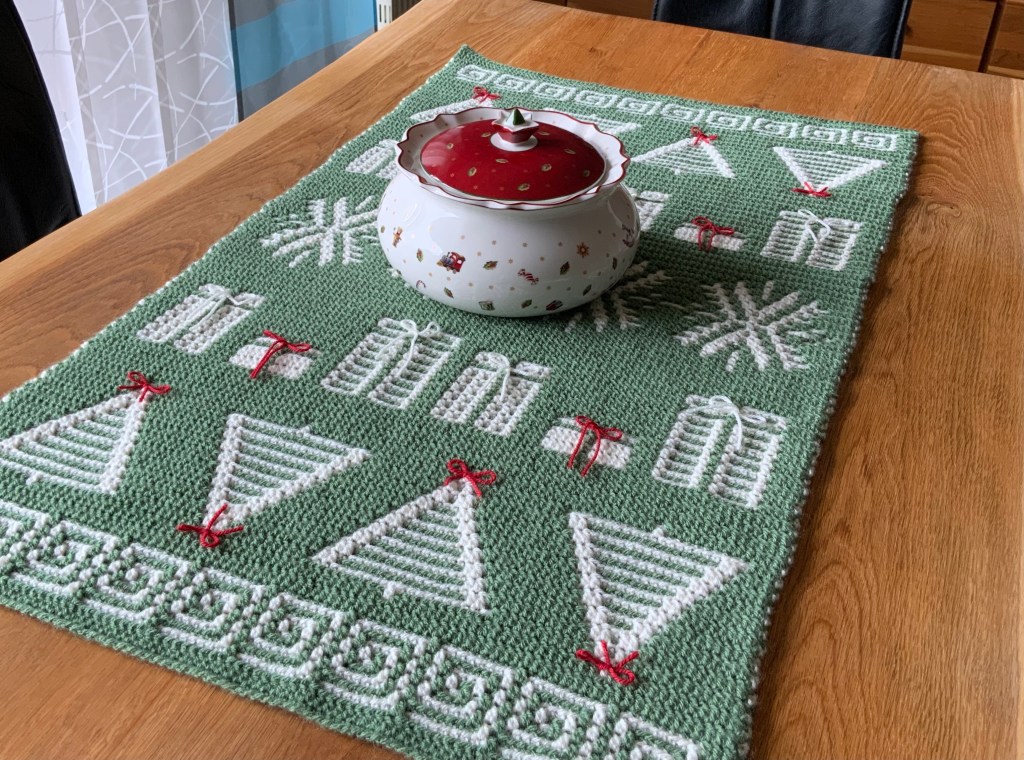
was my second pattern in Overlay Mosaic. My first one was a placemat made with Chevron Apache Waves.I already mentioned it in this post. Mosaic Christmas is a pattern designed by BebaBlanket. It has charts for 4 different motifs, Christmas Trees, Snowflakes, gifts and an ornament that can be used as a separation.The main repeat goes over 45 stitches so the size is easily adjustable and you can create a lot of different items.
Mine was meant to be either a wall hanging or a table runner, it became a table runner.
I used Stylecraft Special Dk in Cypress and Cream. My Christmas Decoration is mostly red, so Green and White/cream is always a perfect match.
I only worked two repeats in width using the following layout
Ornaments / Christmas Trees / Gifts Snowflakes Gifts / Christmas Trees / Ornaments
I didn‘t work a border but crocheted over the tails. Today I would just do a double border because I think it is a great finish but since it was only my second Overlay pattern I was just scared about all the tails. :D
So, as it is already August, if you are looking for a nice Christmas project, here some more pics
Phew, another pattern test is finished: No Limits, the new pattern by BebaBlanket.
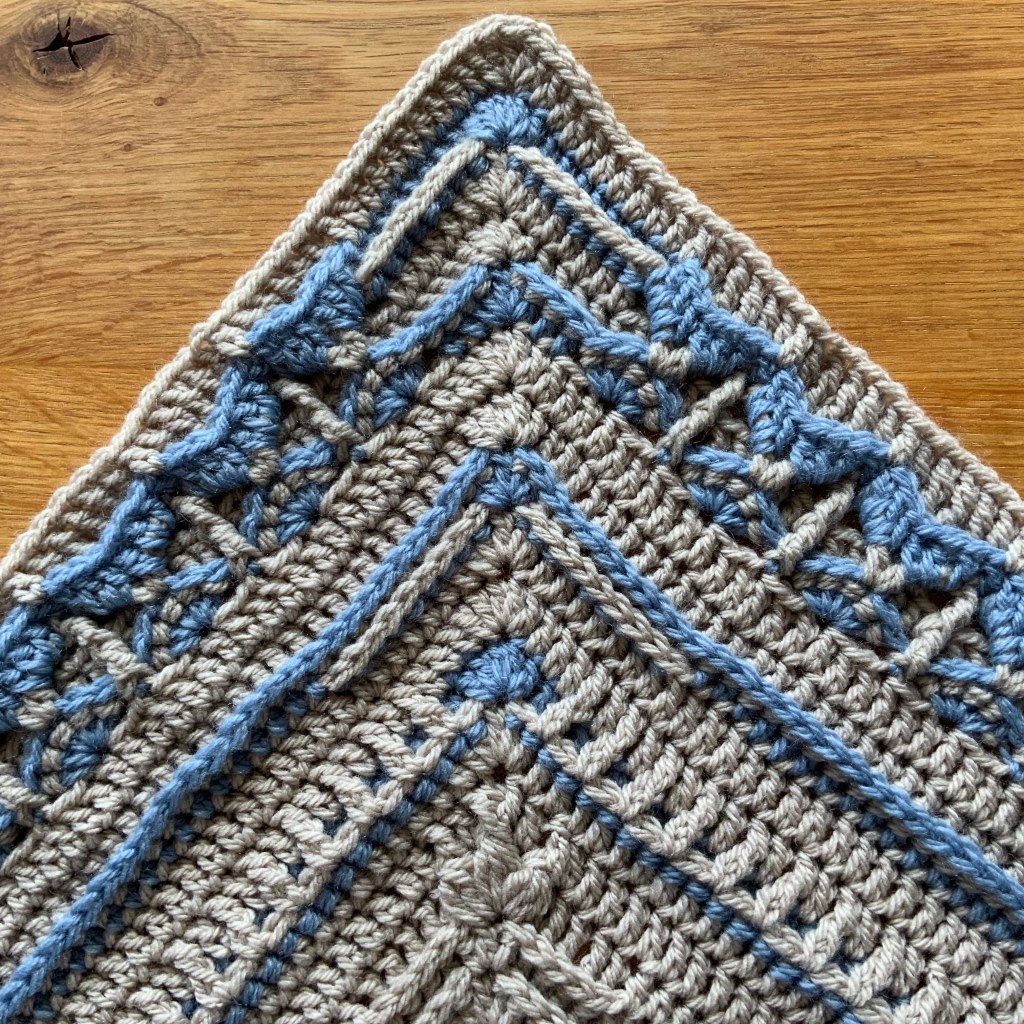
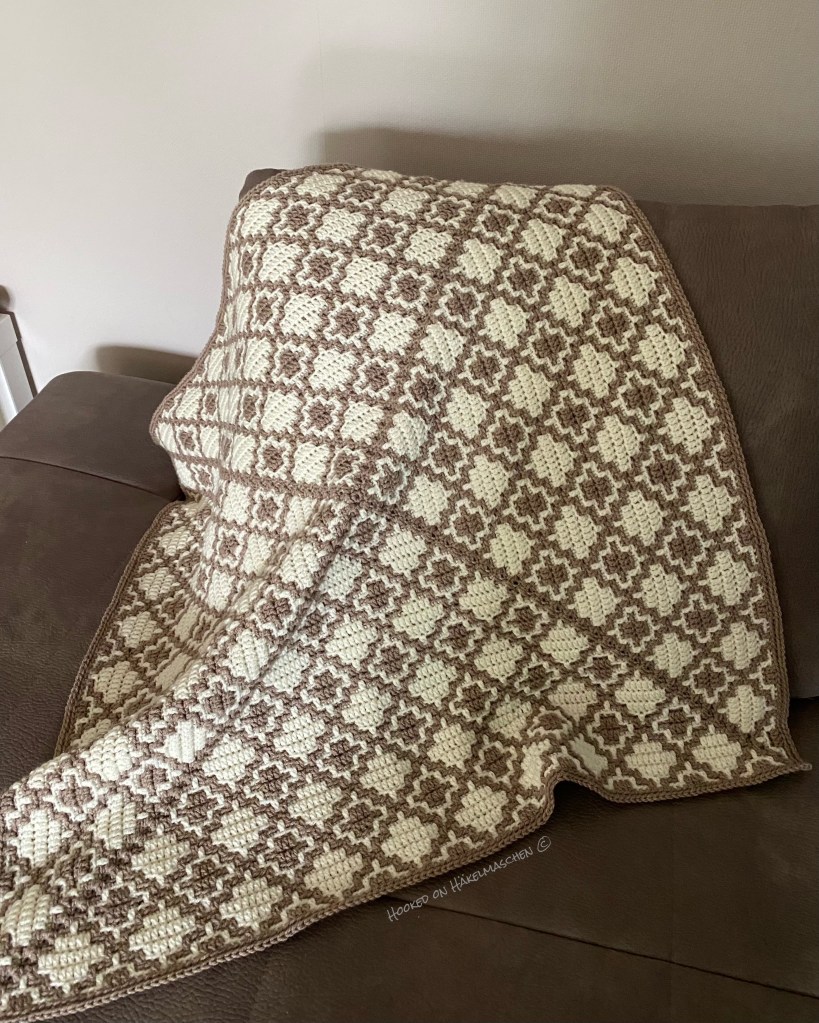
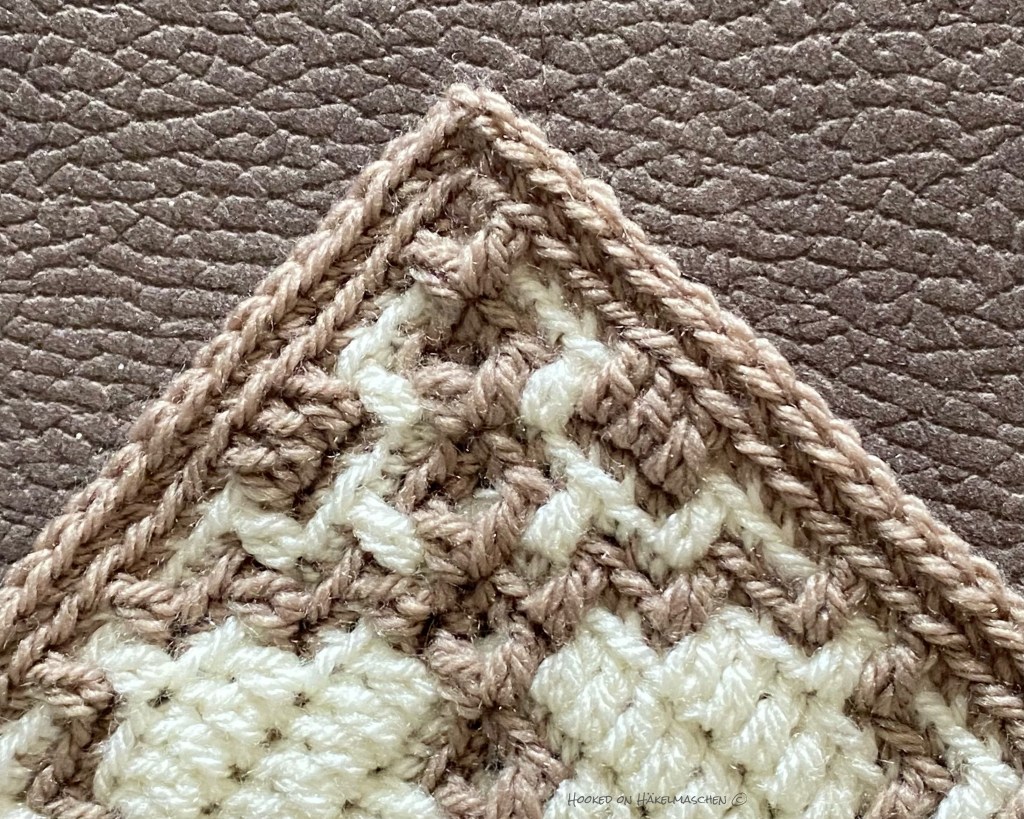
No Limits is an Overlay Mosaic pattern worked in rounds but the pattern has also an option to work in rows. There are different charts for pattern variations, 3 for working in the round and 1 for working side to side. The best is: all variations can be combined with each other. And, when working in the round you don‘t have to cut the yarn after each round. All colour changes are made in one corner and you just carry the yarn along.
My No Limits is based on pattern variation No 2. It is made with King Cole Comfort DK in the colour Truffle (colour A) and Stylecraft Special DK in Cream (colour B) with a 4,5 mm hook.
I worked according to the chart as it is drawn (up to round 30) and repeated the pattern starting with round 19. After 3 repeats I had to stop because I ran the risk that my Truffle would not be enough for another repeat. I finished the pattern with one more round 19 in colour A and a round of back loop single crochet, also in the colour A.
My finished No Limits measures 80 cm in a square, big enough to cover my knees and lap on a chilly day.
A lovely pattern that is also suitable to play with colors a bit. But I especially like the corners.
is the new pattern by Ana Morais Soares from One Skein Of Love. At the end of last month, Ana asked me if I could test this pattern. As she wanted to release the pattern in the middle of July I didn’t have enough time to make a complete blanket. So I first tested just one repeat by crocheting a small swatch with 45 stitches and 44 rows and started the blanket afterwards.
Oh So XOXO Pattern
Oh So XOXO is an Inset Mosaic crochet pattern. For Inset Mosaic two rows (front and backside) are worked with one color. The yarn is not cut at the end of a row, so no tails to deal with.
The pattern is a repetition of two stripes with two different motifs. One repeat comprises 28 stitches and 44 rows so the size is easily adjustable.It is Ana’s fist inset pattern and has written instructions with detailed row by row pictures and also a chart.
My Oh So XOXO journey
I mostly use DK yarn for blankets and I absolutely love to use It for Overlay Mosaic. So of course I used Stylecraft Special DK for my test swatch… And made a new experience! For my taste DK yarn might be a bit too thick for Inset mosaic, at least for my taste. My swatch didn‘t have the fluffiness that Overlay has and felt pretty stiff even when working with a bigger hook …
Although I actually wanted to use yarn from my stash I made up my mind and ordered some thinner yarn, Drops Love You 7. The same quality that Ana used for her design.
Drops Love You 7 is a 100 % cotton yarn. A sport weight with a yardage of 170 m per 50 g.
My swatch in Stylecraft Special DK was made in the colours Grey and Cream. I really liked this combination! To get something similar for my final blanket I choosed the Drops colours Dark Grey and White. Of course the white is brighter than the Cream was and the Dark Grey is darker than the Graphite. Nevertheless I think it’s a beautiful and strong combination!
Drops Love You 7 is smooth and soft and I enjoy working with it. I am using my 3,00 mm Clover Amour hook.
My blanket will have the full size over 185 stitches and 286 rows (6,5 repeats). Without border it measures about 93 cm / 36,5 inch in width. I am currently working on the second pattern repeat, so still some way to go. But I love it! The pattern is easy to follow and very relaxing.