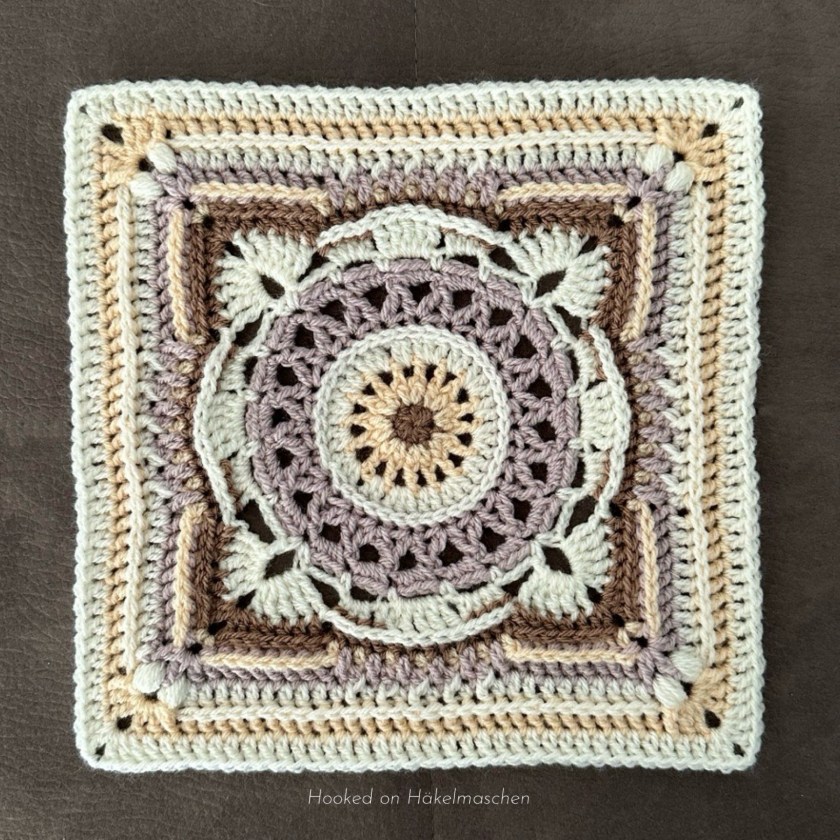
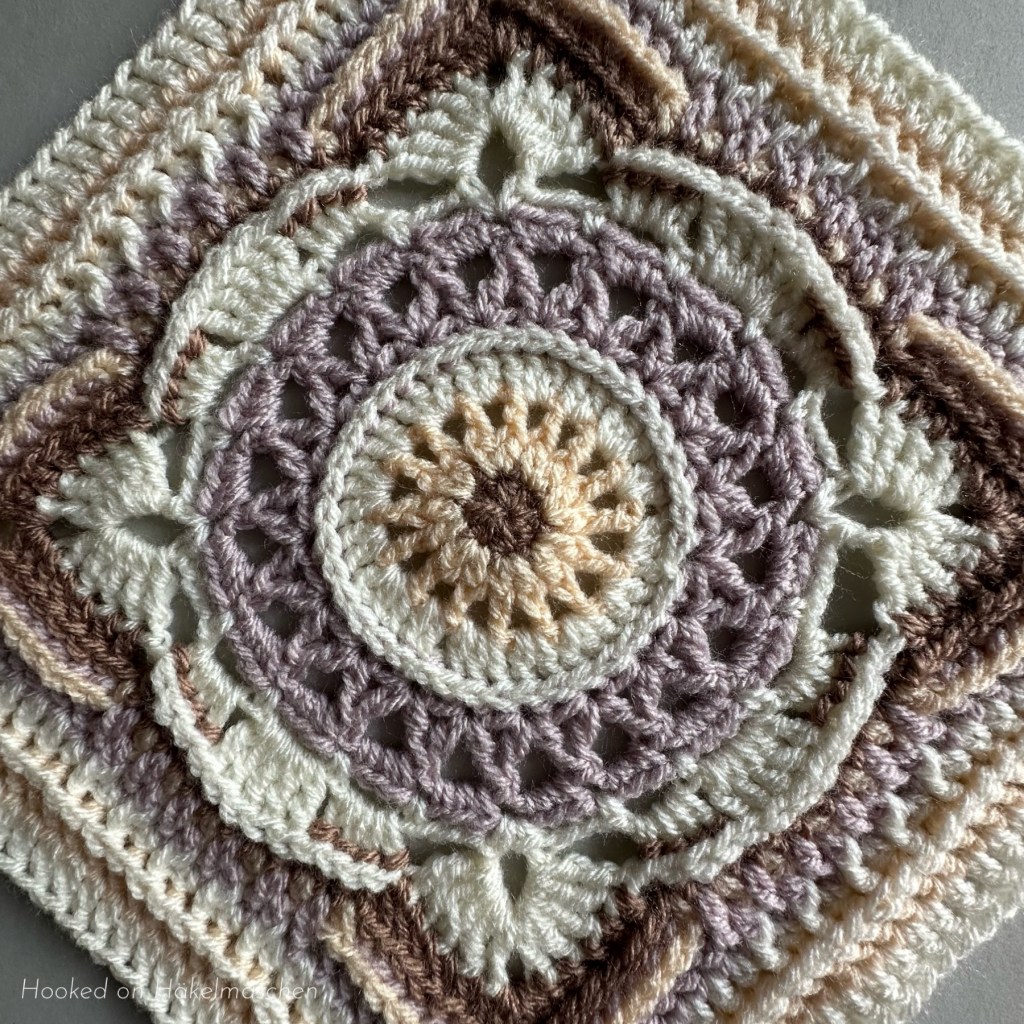
I recently had the opportunity to test a new design from Pam Knighton-Haener / A Yarn of Serendipity: The Pinwheel Square.
The pattern was just released and is available on Ravelry. The skill level of the pattern is categorised as mid-intermediate. As always, the written instructions are very clear and accompanied by detailed photos for each round. Made with Aran / Worsted Weight yarn (#4) the final size of the square will be 11 or 12 inch / 28 or 30,5 cm – depending on the size of the crochet hook used. And of course, the final stitch count matches all the others from Pam’s squares.
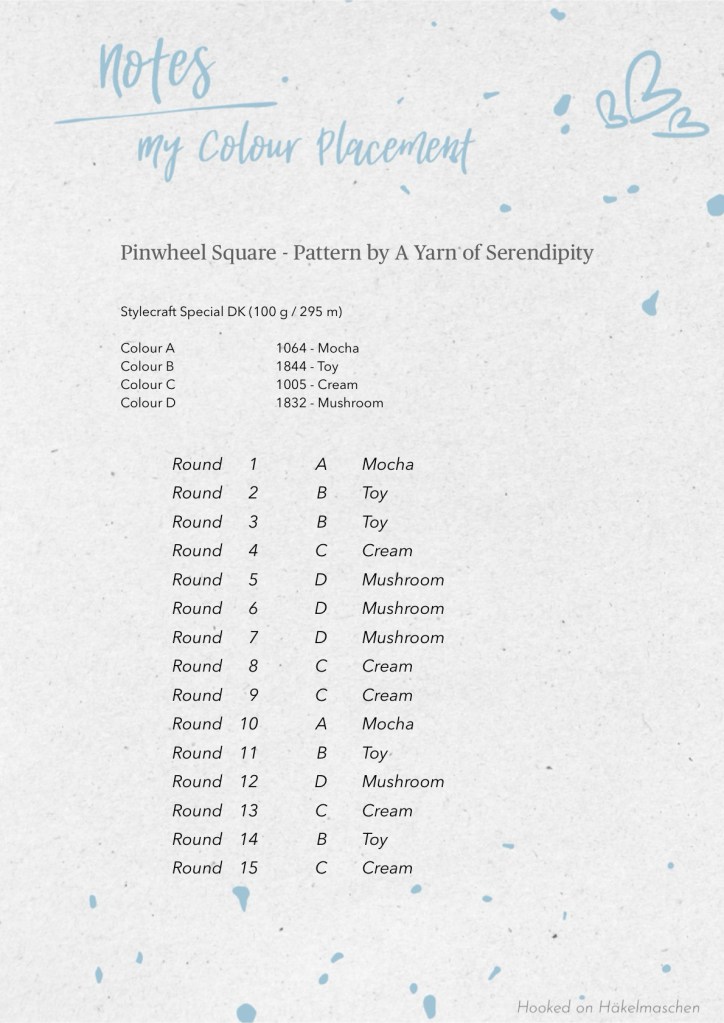
My yarn and colours
As you may know, I often use a light weight (#2) cotton yarn for these tests. Something like Schachenmayr Catania or Hobbii Rainbow Cotton 8/4. The reason is just that I have accumulated a lot of these yarns by crocheting amigurumi and can go with my stash. Besides they have a great colour range and a good stitch definition.
Somehow this time I decided to go with my stash of Stylecraft Special DK.
I have just used a similar colour combination for another test in overlay mosaic. Just all in neutrals. I loved the result and was curious how it would look in regular crochet.
Well, I am more than happy with the result!
I used a 4 mm hook and the final size of my square is 26 cm – about 10 1/4 inch. If you are interested in my colour way, here my notes.
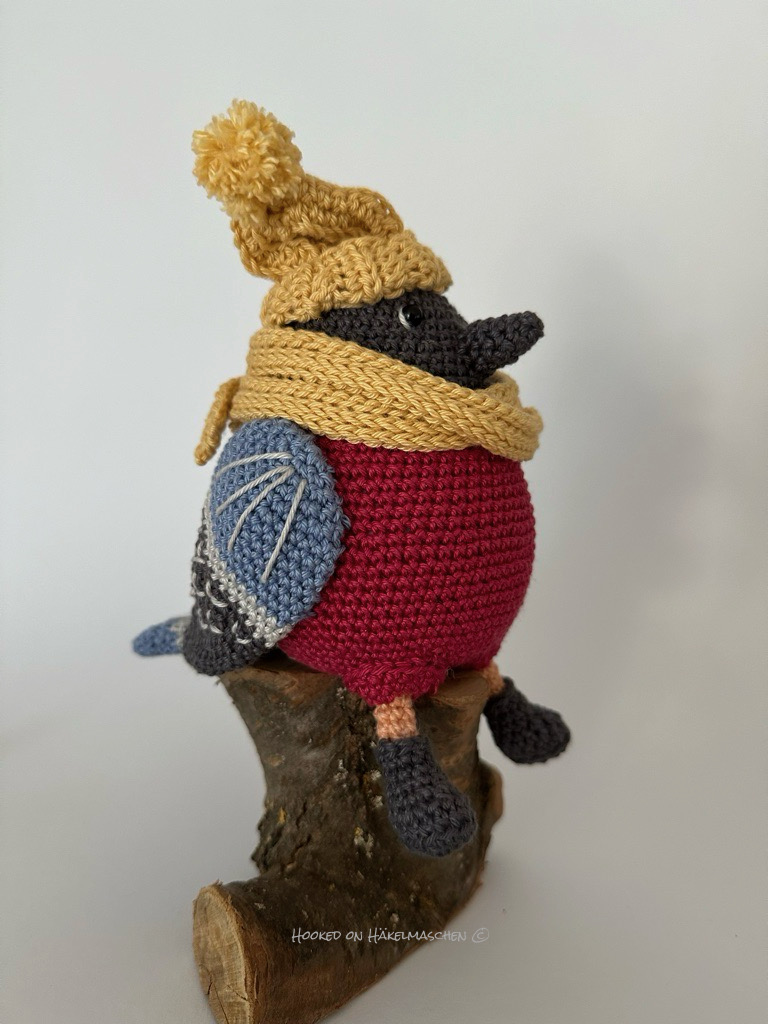
Em … to be honest, I had no idea what kind of bird a snowbird is as we don’t have them in Europe. I had to ask Google and the answer was that nowadays many different birds in Canada are called snowbirds and indeed, Google showed me a lot of different pictures. But originally “Snowbird” was the name for a Junko. Do you know them?
However, I would like to introduce you to my new flatmate: little Snowbird.
This cute snowbird is part of the pattern Winter Birds 2 from @natura_crochet. I spotted it on Instagram last year. It was sometime before Christmas, so I got it myself as a present. The pdf is more like a booklet than a single pattern. It is beautifully designed and contains patterns for three different birds: Kingfisher, Waxwing and a Chickadee – plus the Snowbird as a bonus pattern. All birds are very colourful and wintery styled with hat and scarf.
I used Schachenmayr Catania and Wenco DIY (a German brand) with a 2,25 mm hook. Both are 100% Cotton sport weight (#2) yarn with a yardage of 125 m / 50 g.
On my desk: ready to assemble
My colours are:
429 – Anthrazit / Catania
434 -Nebel / Catania
258 – Erdbeere / Catania
206 – Honig / Catania
51, blau / DIY
Head – Anthrazit
Body – Nebel, Erdbeere
Wings – Blau, Nebel, Anthrazit
Tail – Blau, Nebel, Anthrazit
Legs – Anthrazit, Honig, Erdbeere
Beak – Anthrazit
Hat / Scarf – Honig
I made some small adjustments to the hat and the scarf. I made the scarf a little shorter and narrower and the hat a little wider – it just worked better with my yarn.
I have to confess, I was a little hesitant about sewing the parts together. I don’t have much experience in assembling such small parts. So they So they have been lying in my basket for days (weeks?). But the placement etc. is well explained in the pattern and all went well!
I am absolutely happy with the result. Just started the Waxwing …
I hope you all had a great start in 2024 and are doing well!
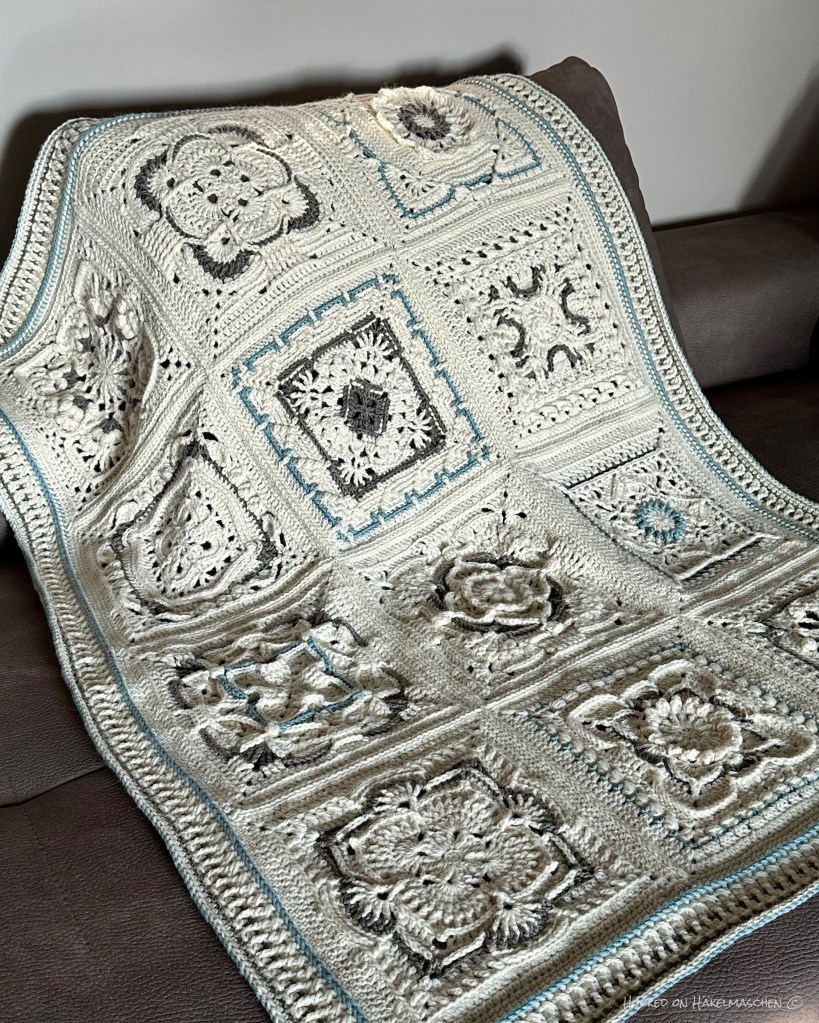
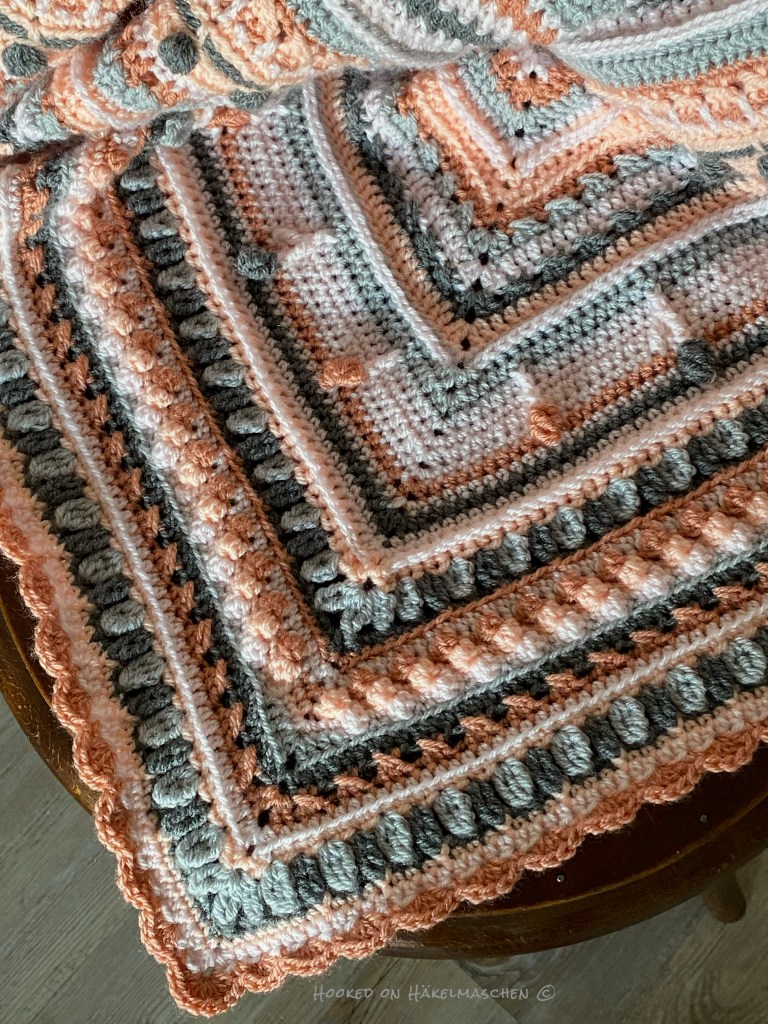
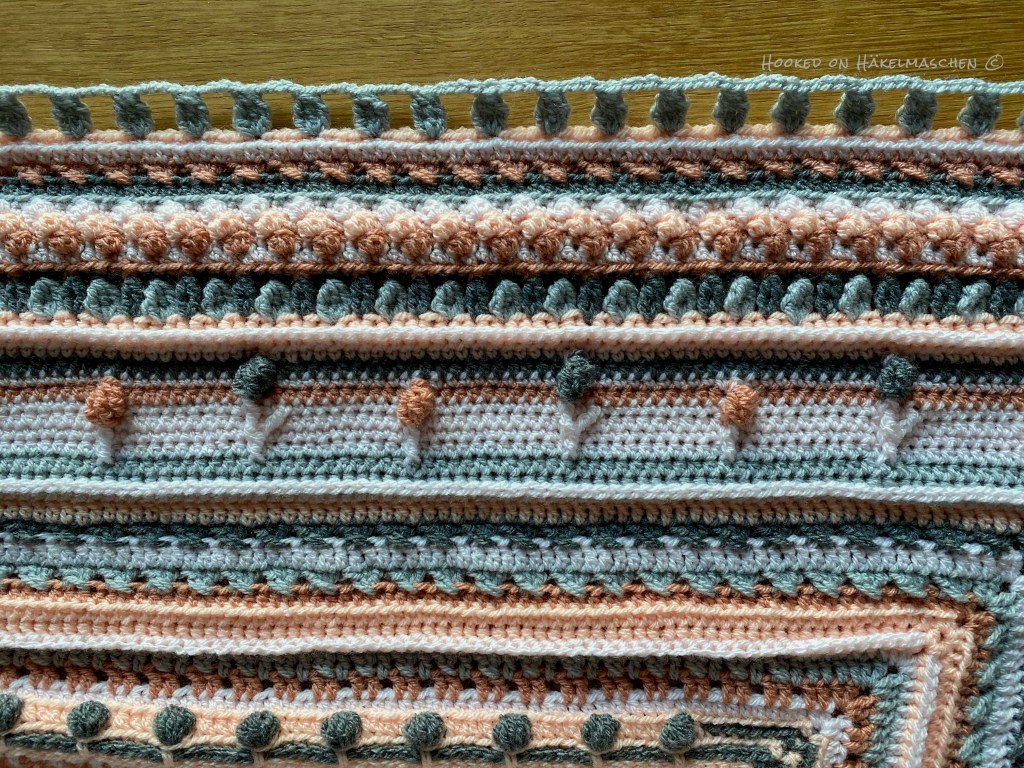
I’d like to start the new year by showing an ‘old’ project: My Legacy Blanket.
If you’ve read my posts about this last year, you’ll know that it is a design by Pam Knighton-Haener from A Yarn of Serendipity. She designed this blanket as a legacy for her grandchildren. You can read her story here.
The blanket is made up of 12 different squares and a wide border. When Pam completed the pattern for the border last year, she also revised the instructions for the 12 squares, and I had the opportunity to test some of them.
So I started this project somewhere in July or August last year. You might remember that I had a hard time choosing yarn and colours. And also some tries and errors with my colour placement. In the end I did more than one square twice as I was not happy with my colour arrangement. To be honest, I still had doubts when I joined the squares …
BUT – surprisingly- once it was finished, everything fitted perfectly. I think it turned out pretty well and I LOVE the result!
My blanket was finished by the middle of December, but unfortunately I had no chance to take some nice pictures. We had a VERY long period with lots of rain, dark clouds, a bit of snow, fog, lots of rain again, well, you get the picture …
But now, here’s a short summary and some pictures:
My Yarn and Colours
My final choice were
Drops Lima – 65% Wool, 35% Alpaca (100 m / 50 g)
colour 100 – Off White
Drops Merino Extra Fine – 100% Wool (105 m / 50g)
colour 07 – Light Taupe
colour 15 – Light Sea Green
Both are DK yarns (#3, Light Worsted). The fact that I mixed both qualities was simply a question of the colour shades. The colour 100 – Off White looks a little softer with Lima than with Merino, probably due to the structure of the yarn. And I liked that better!
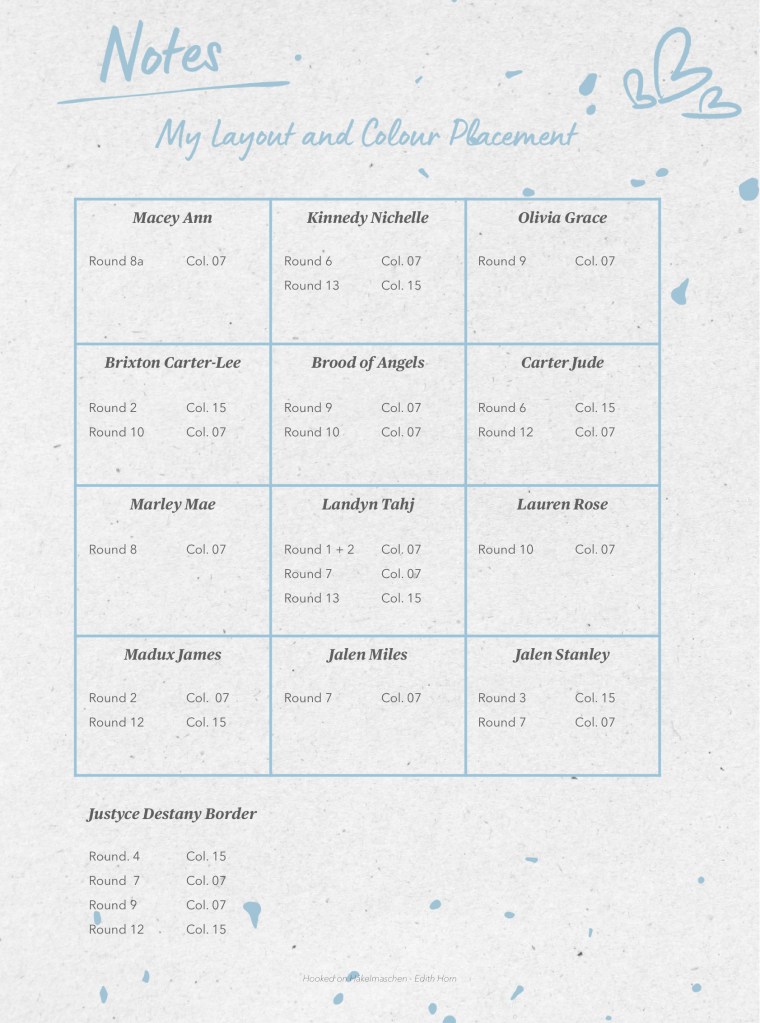
My Layout and Colour Placement
I used Drops Lima in Off White as main colour and only added a few accents with Light Taupe and Light Sea Green. So, in my notes below, I just listed the rounds with the accent colours – all other rounds are worked in Off White.
If you are interested in my colour scheme you can also download it here
My squares and the border are worked with a 4 mm hook throughout. Only for the Zipper Join and the last round of the border I went up to a 5 mm hook.
Each of my squares measures about 25 cm (about 10”). The final size of the blanket is about 90 x 115 cm ( 35,5 x 45 inch).
I am sorry, but with all my changes and redoings I did not pay attention on how much yarn I used. In total I needed a bit over 900 g of yarn. As a very rough estimation I‘d say you will need almost 50 g of Off White for each of the squares and another 100 g or 150 g for the border. Additional 2 or 3 balls of each, Light Taupe and Light Sea Green. But that’s without any guarantee.
The patterns for all these lovely squares and the border are available in Pam’s Ravelry store.
In case you missed my previous posts about this project, you will find them here
Are you celebrating Christmas and still looking for a little something to give as a gift or decorate? These two crochet patterns, Glittery Christmas Baubles and Sparkly Stars, are really quick to make and look fantastic. I’ve had a lot of fun crocheting them over the last few days and have found them quite addictive. The yarn you use will make them look very different, so they don’t necessarily have to look Christmassy. It all depends on your preference.
Both patterns require very little yarn, so they are great for using up any leftovers.
Glittery Christmas Baubles
The pattern is from Ana Morais Soares from One Skein of Love. As the name of the pattern applies, Ana has used glittery yarn in some parts. I did not have anything with glitter on hand – so mine are made with some leftover yarn from my Legacy Blanket.
A little side note: Yes, my Legacy Blanket is finally finished! To be precise, it’s been finished for about a fortnight now, but I haven’t managed to take some nice pictures yet. The weather here is mostly pretty grey at the moment – clouds, rain, or fog. I hope it gets better in the next few days!
Back to my baubles, I think they clearly show what I meant at the beginning – they look more rustic than glittery and Christmassy.
I’m totally in love with this look!
I used
Drops Lima (100 m / 50 g) – colour 100, Off White
Drops Merino Extra Fine (105 m / 50 g) – colour 07, Light Brown
Drops Merino Extra Fine (105 m / 50 g) – colour 15, Light Greyish Green
with a 3,5 mm hook.
The bauble itself consists of two halves that are sewn together. First, you crochet the two halves, then you join them together while inserting the bauble. Ana used a Christmas bauble for this. Unfortunately, I didn’t have one that was the right size. So I put a polystyrene ball inside mine. It’s a 7 cm (2 3/4 inch) ball. The circumference is about 22 cm, just over 8.5 inches. It fits perfectly!
Of course, you can use various decorative stitches to join the two halves. Alternatively, if you prefer not to stitch them together, a crochet join, such as a simple zipper join, works very well.
I tried different joins, and the one shown on the left is my favourite.
It is made with slip stitches worked through the back loops. On each half, I inserted the hook top down, from outside to inside. I started with a slip stitch through the back loop of a stitch on the lower half, then slip stitched through the corresponding stitch on the upper half. And so on … It creates a nice kind of braided effect.
Sparkly Stars
Sparkly Stars is a pattern by Joy Clements from Crochet Road, which I spotted on Ravelry. These five-pointed stars are as quick to make and as addictive as Ana’s baubles. They can also be used simply as winter decorations.
Here, too, the final look can be influenced by the yarn and colours used.
The pattern offers two different sizes, contains detailed pictures and also a link to a video tutorial.
I used the same yarn and colours as for the baubles, but this time with a 4 mm hook. So again, no sparkle or glitter.
My small stars are about 9 cm and the tall ones about 14 cm.
Both patterns, the Glittery Christmas Baubles and the Sparkly Stars are available on Ravelry.
Glittery Christmas Baubles on Ravelry Sparkly Stars on Ravelry
I will definitely make some more baubles and stars using different yarns.
You probably have seen my previous post about my test of Ana’s Magic Winter Cal when I was still working on the border. Well…
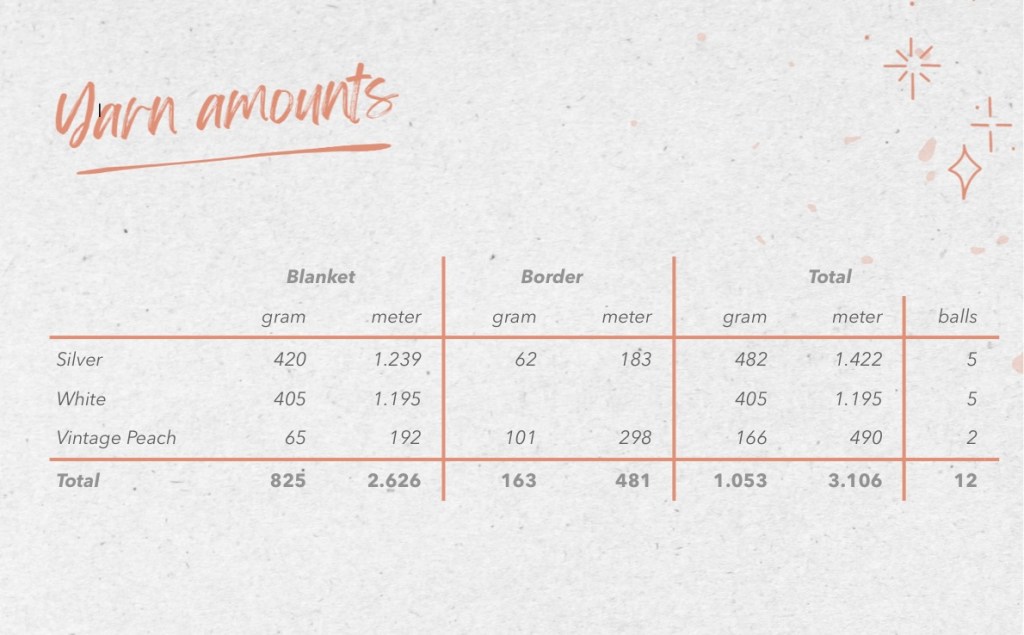
… after 840 slipstitches, 2.616 double crochets, 5.208 single crochets and another 888 slipstitches and 12 single crochets (chains not counted) the border is finished. YAY!
I opted for a two-coloured double border – all in Vintage Peach for the back layer and a combination of Silver and Vintage Peach for the front side.
In total I needed 12 balls of Stylecraft Special DK – you’ll find the detailed yarn amounts below. Made with a 4 mm hook my blanket measures about 121 x 146 cm (48 x 57 inch).
In the end, my color placement turned out to be slightly different from what I originally had in mind. But I think I got the Sunrise-on-a-frozen-winter-morning look I wanted. And – I know, I already said that last week – I am totally happy with the result!
As promised, here some detailed information about my yarn amounts.
And, if you are interested, you can download a row-by-row guide of my colour placement here.
The Magic Winter CAL started last Friday and will continue until 15th December. So, there is still time to join in.
I found that most parts of the pattern worked up quite quickly. Only the tapestry parts took me a little longer. Tapestry in Overlay Mosaic needs a bit of practice. You will have to get the hang of how to carry the yarn, especially with the double crochets. However, you only need it in a few rows. In addition, you can of course also decide to omit the tapestry technique and only work the normal overlay mosaic. All up to you!
Love shawls? Try the Little Boxes Shawl – an easy filet crochet shawl pattern with a free chart, optional written instructions, and soft cotton yarn for a lightweight, beautiful finish.
Last updated on March 12, 2026
Unfortunately, I was unable to commit to any major test projects this year. The deadlines for these tests are often very tight. When there are a thousand other things to do, it’s very difficult for me to meet them. And it’s been a very busy year so far!
Fortunately, however, I found some private time to crochet, working on my own pace.
This is how a new shawl was created!
Strictly speaking, it was also the result of a “bad buy” of yarn. To be precise, it wasn’t a bad buy at all – the yarn is fantastic! However, it simply didn’t fit the project I had in mind. So I looked for something else to make with it and the Little Boxes Shawl was born!
I recently wrote down the pattern which has now been fully tested.
Little Boxes Shawl
The shawl is made using Filet crochet, a very old crochet technique. If you are not familiar with this technique, I’ve summarised the basics on this page.
My sample was made using Lang Yarns Baby Cotton Color. The colour is #0025, a mixture of navy, purple and sage.
Baby Cotton Color is a 100 % cotton yarn with a length of 180 m / 50 g. It is pleasantly soft and wonderful to work with.
I used nearly 250 g (5 balls) and a 2,5 mm hook.
My finished and blocked shawl measures about 31 x 180 cm (12,2 x 70,9 in).
Of course, you can also use a different yarn. However, this may affect the amount of yarn used and the size of the finished shawl.
The Pattern
I’ve decided to share the filet graph as a free version here. Written instructions are available on Ravelry for a small fee. As well as the row-by-row instructions and the chart shown below, they also include tips on how I made the boxes look square. The pattern is written in US terms.
My sample is made over 71 stitches and 22 repeats in height. The size of the shawl can be adjusted by adding or reducing repeats.
Little Boxes Filet Chart
Little Boxes Shawl – Filet chart
This pattern / chart is my intellectual property, so please respect my copyright and do not claim it as your own. You may print a copy for your own use but please don’t alter, distribute or sell it. You may sell items made from this pattern in small quantities but no permission is given for mass production. Thanks for understanding and respecting!
Update, January 2025: As you can read below, the pattern was originally published in 2022 by Simply Crochet Magazine as Cal (7 parts). Ana has now summarised the complete pattern. So it is now also available in her Ravelry shop.
Finally I can show you the project I worked on from the mid-December 2021 until mid-January 2022: Talavera!
Talavera is a design by my friend Ana Morais Soares from One Skein of Love. She was asked by the Simply Crochet Magazine to design a blanket for a Cal. The Cal has just started and part 1 is published. For further information either have a look at issue 122 of the Simply Crochet Magazine, their Ravelry page or website.
It was quite a challenge to finish this beauty in more or less 4 weeks! But so worth the effort!
For her design Ana used Caron Simply Soft, an Aran weight. As you might know Aran is not my favorite yarn weight. So I went for Stylecraft Special DK.
I already showed my colour scheme a few days ago, which – again- was inspired by a mood board of Pipin Poppycrock.
I mainly followed Ana’s colour placement but – partly by accident and partly on purpose – I have made some colour changes. So here my notes: