Today is Granny Square Day! And, this year I thought about it in time!
I am a little proud! Normally it seems that I tend to completely forget about Granny Square Day, only remembering it when I see all the lovely posts on social media.
But this year I designed another small square especially for this day – just in time!
If you’re not familiar with the Granny Square Day— what it is, what it means, and its history, I made a quick Google search about it. Here is an extract from the Google AI summary:
„Granny Square Day is an annual, global celebration of the crochet granny square, held on August 15th. It’s a day where crocheters worldwide share their granny square creations online, particularly on Instagram, to form a virtual blanket. The event was started by Susan Regalia in 2014 and later taken over by Simply Crochet Magazine. It’s a chance to showcase creativity, connect with other crocheters, and contribute to a larger, collaboration.“ (copied from Google).
I’m excited to see what beautiful creations there are this year!
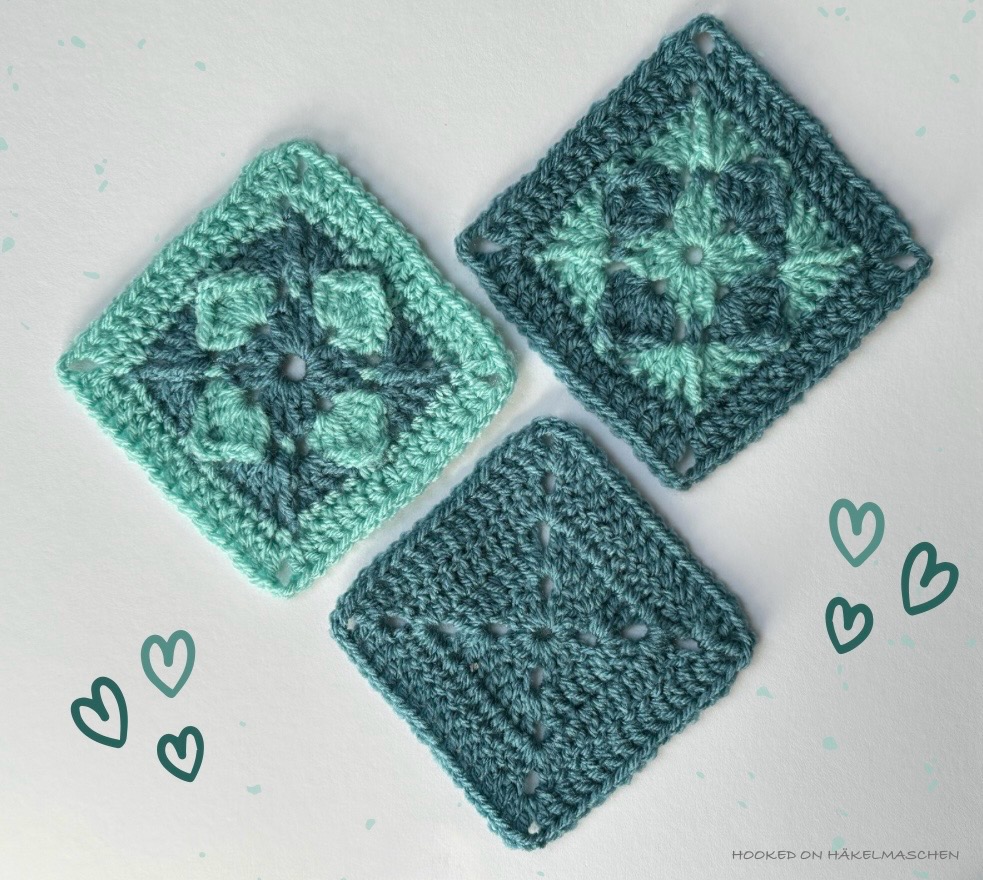
My contribution is
Simply Petals
a reminiscent of stylised flower petals. It is easy to crochet and perfect for a quick, fun project.
My samples are made with DK / light worsted yarn (#3) and a 4.0 mm hook. The finished squares measure about 10 cm (4 in).
I chose just two colours, but you can, of course, use as many as you like!
My colour combination:
# 1722 – Storm Blue and # 1842 Spearmint (both Stylecraft Special DK)
The pattern is written in US terms and uses mainly basic stitches: chain, single crochet, double crochet and treble crochet. In addition, it incorporates back post single crochet and front post treble crochet. This makes it perfect for those who enjoy crocheting but prefer patterns without too much complexity. I also think it’s ideal for adventurous beginners with a little experience.
Each square is worked in 5 rounds and has 15 stitches per side, making it easy to combine with a simple, plain square in double crochet.
I hope you like it as much as I do! You can download the free pattern here
And, since it is not included in the pattern, here a few tips for beginners:
Some of the chain spaces can be difficult to identify in the following round. So it can be helpful to mark at least some of them with a stitch marker. Here my tips
Round 2 – place a stitch marker in at least one of the chain spaces that is crocheted before a single crochet. This makes it easier to identify the starting point of round 3 and the placement of the first group of double crochet. (There is no need to mark the chain spaces besides the trebles as you won’t work in these later)
Round 3 – put at least a marker in a chain space worked directly after a front post treble. This will mark the start of round 4. Note: in round 4 you will be working in all chain spaces
Round 4 – I would suggest placing a stitch marker at least in the chain spaces before and after the single crochet that is worked into the front post treble. As in round 4, all chain spaces are worked in round 5
Depending on the yarn used and your personal tension the square might look a bit wonky at the end of round 3. Just smooth it a little with your fingers, the problem should be solved after round 4
You can find explanations of how to work all the stitches used here.
I am curious about all your creations with Simply Petals! Please use #SimplyPetals if you share them on social media.
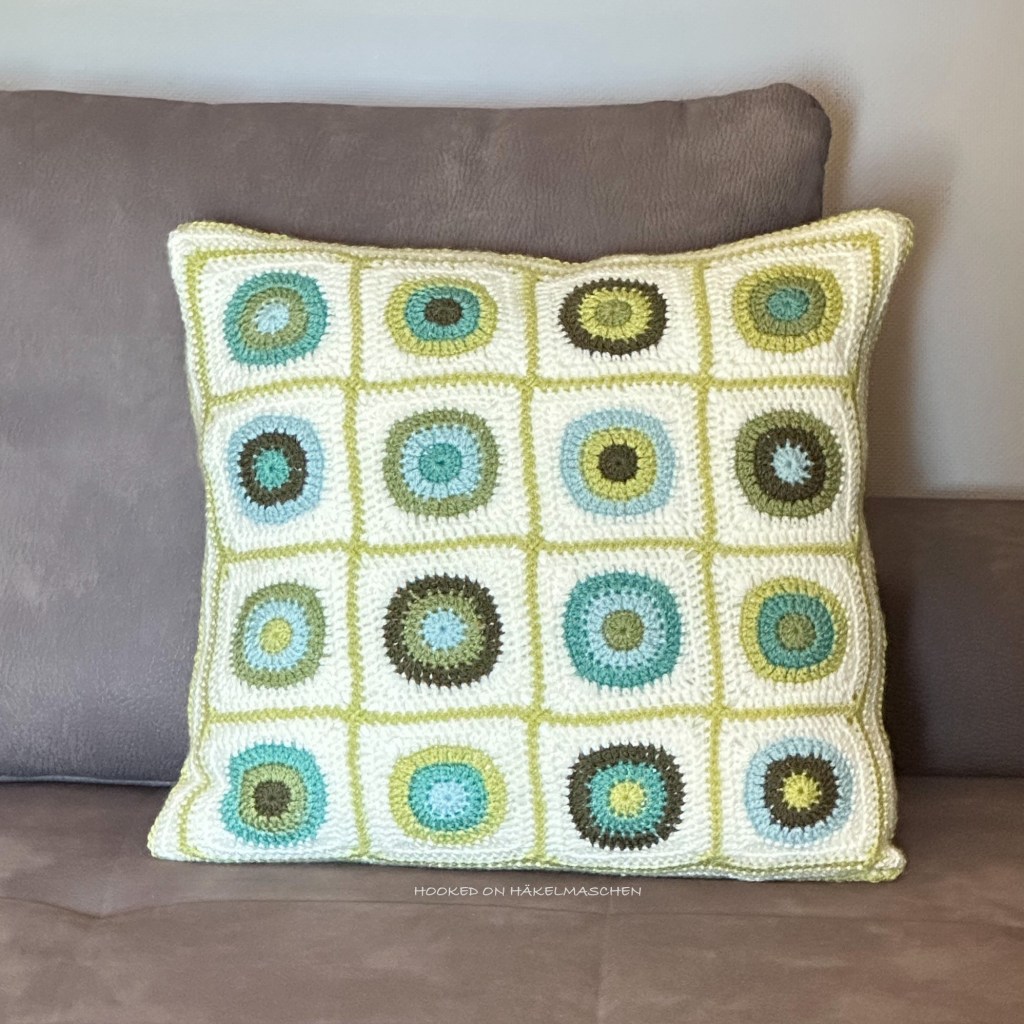
YAY – my Happy Circles cushion cover is finally finished! – Okay, to be honest, it has been for over a week now. Unfortunately, it took me a very long time to write the pattern. Like other countries in Europe, we had a terrible heatwave here. The temperatures climbed up to 40 degrees Celsius. And this was definitely too hot for my brain. I found it hard to concentrate on anything.
But now the time has come. Everything is written down and hopefully well explained!
If you have any questions about the pattern (or spot any mistakes), simply email me. You can either use the contact form or email me directly under hookedonhakelmaschen@gmail.com
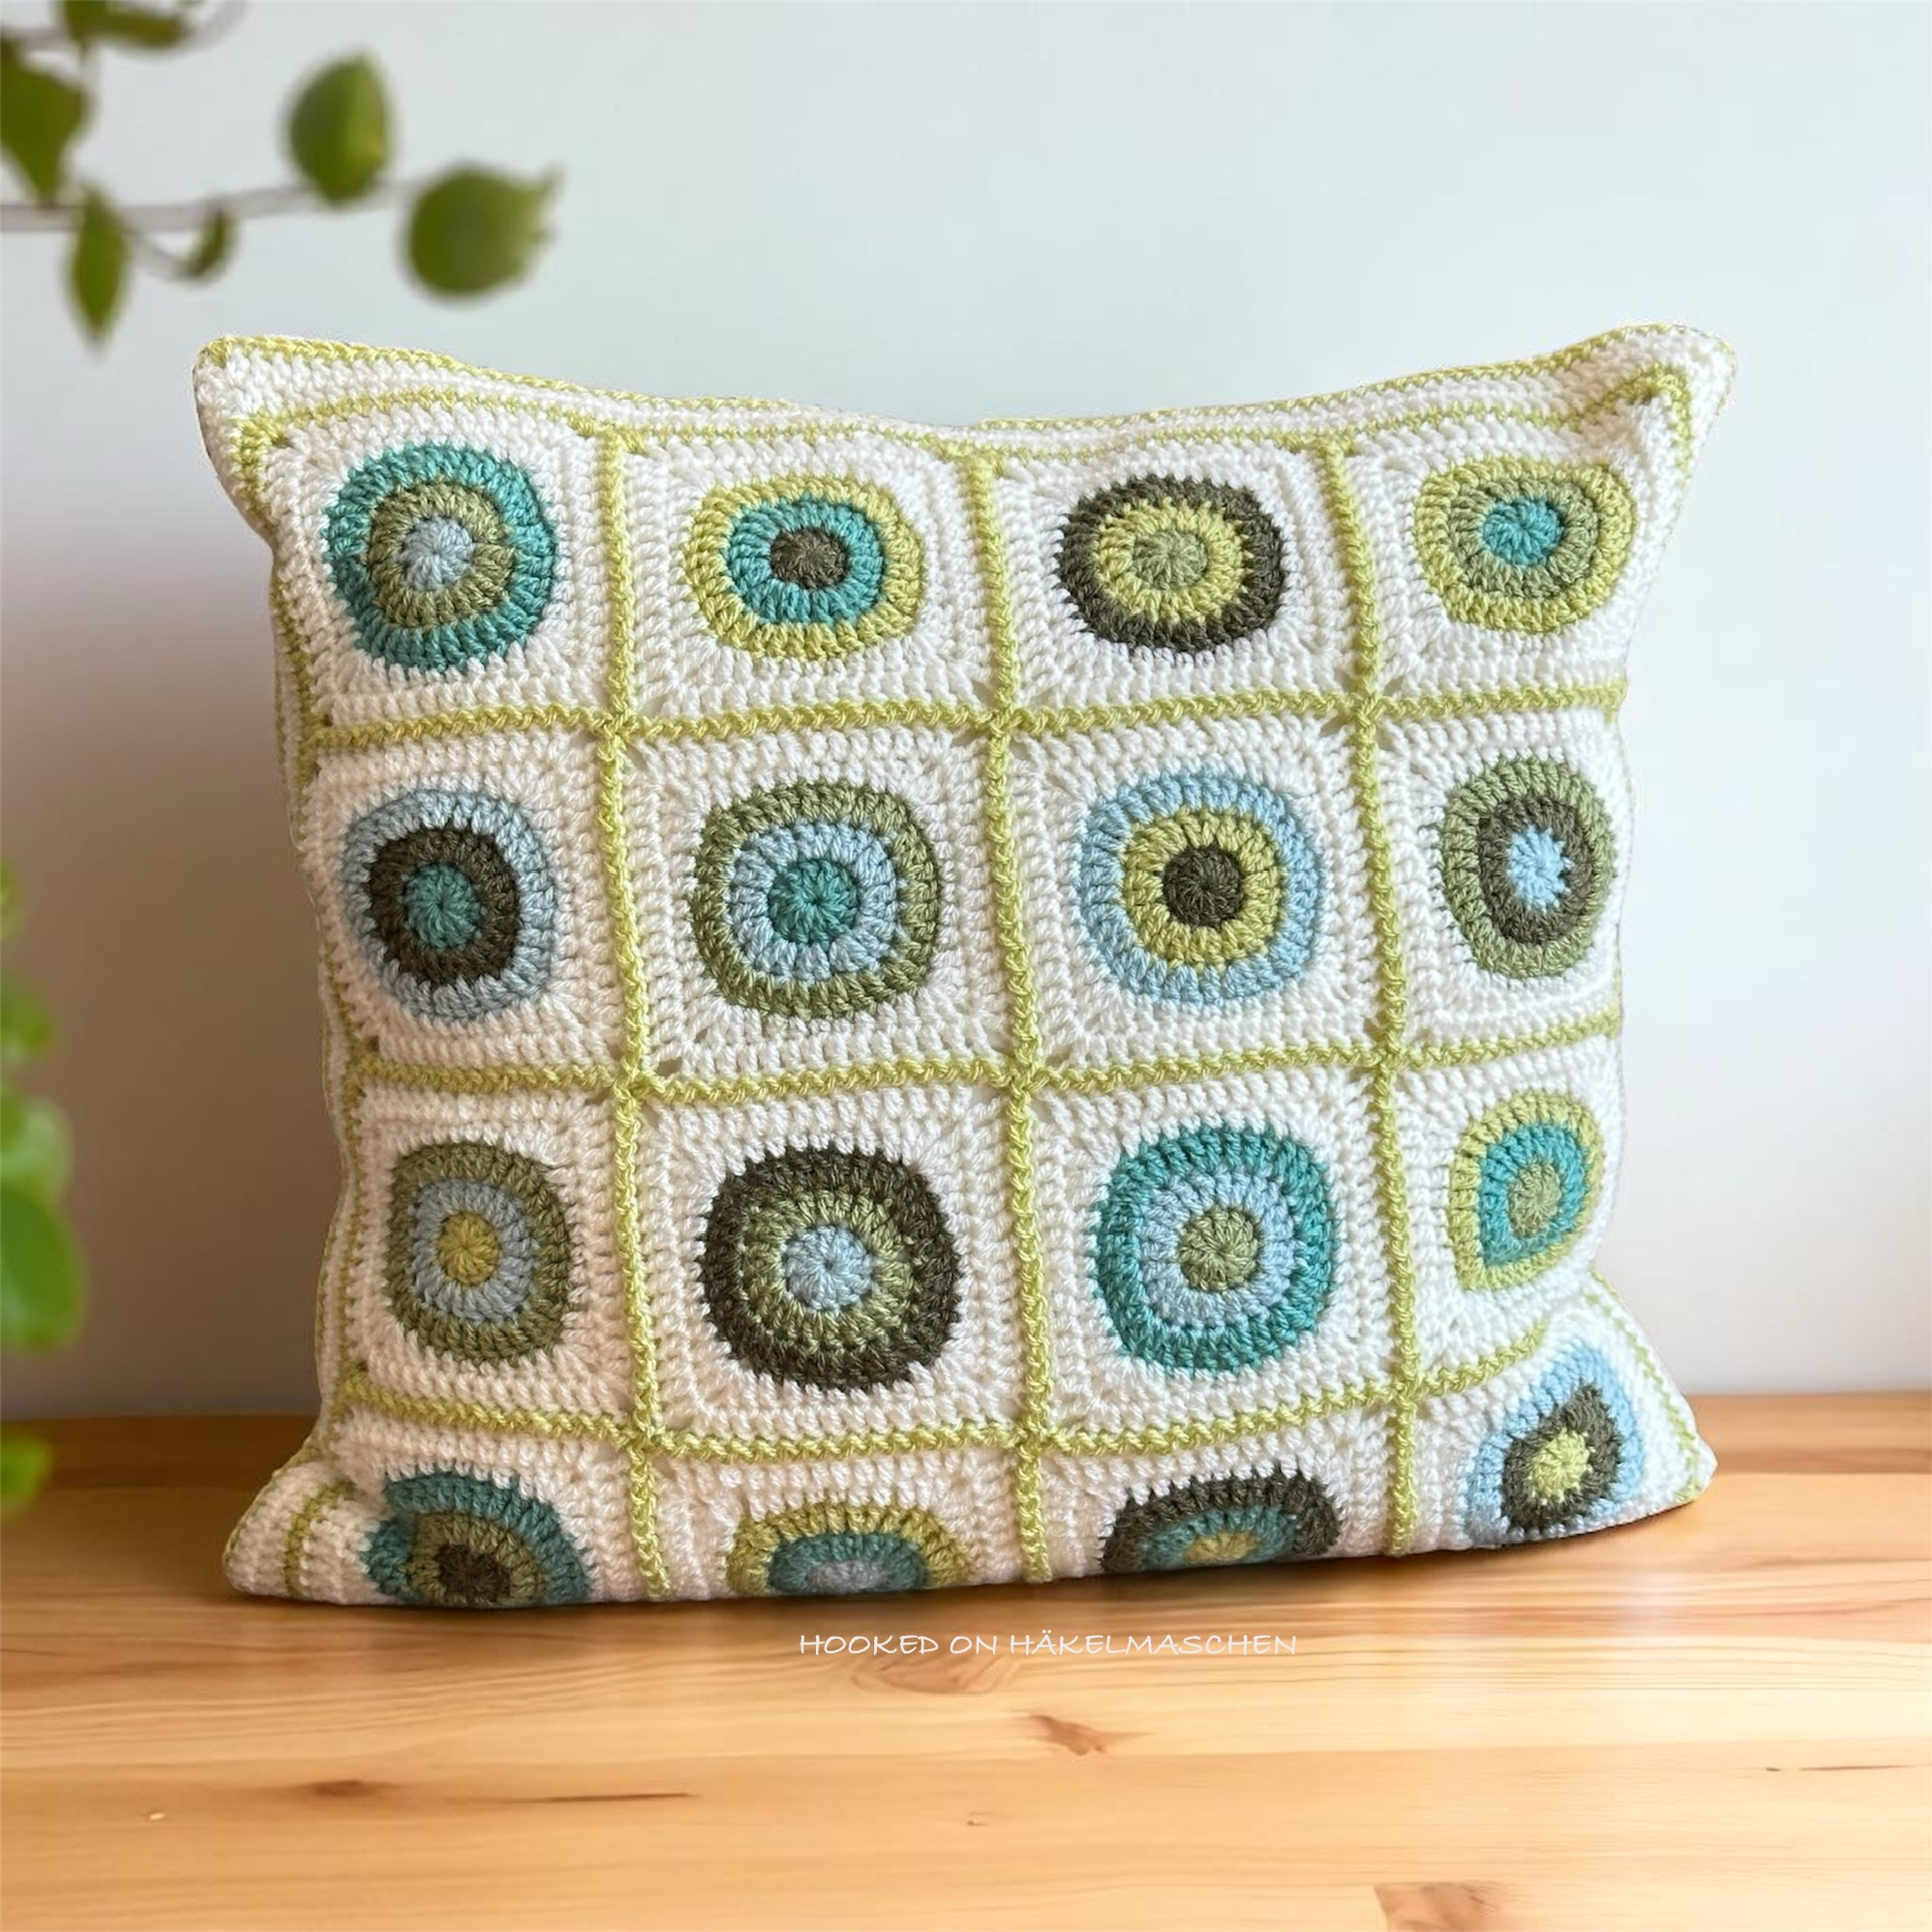
The Design
The cushion cover is designed for a 50 x 50 cm (20 x 20 inch) cushion. The finished size is about 46 x 46 cm (18 x 18 in). With the size I followed an advice I found on the internet. It said that to make a square cushion look nice and plump, the cover should be about 5 cm (2 in) smaller than the cushion. At first I was unsure whether this would really work. And when I finally put the cushion into the cover to close the last seam, I was pretty sure at first that it had become too small. But everything turned out well in the end. I am totally happy with the result!
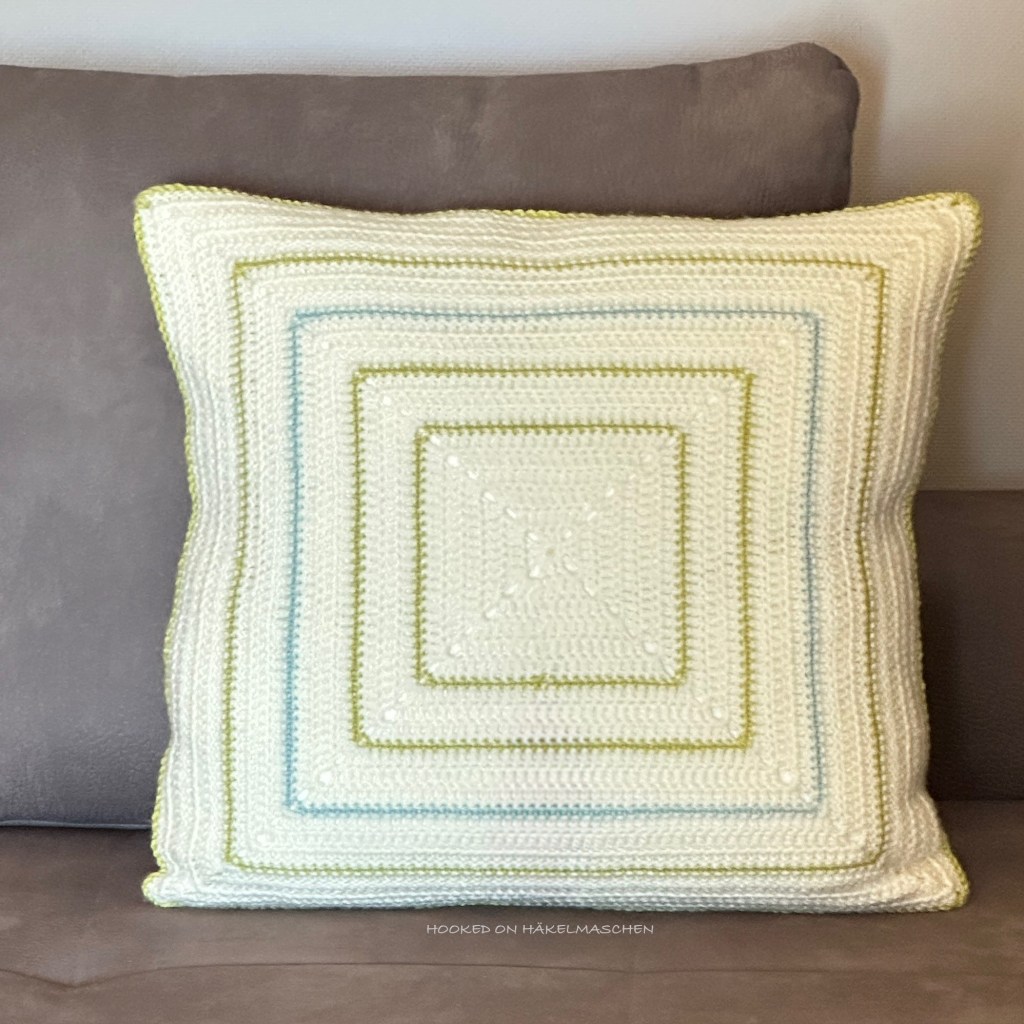
The front part of the cover is made up of 16 squares, arranged in a 4 x 4 layout. Each square measures about 10 x 10 cm (4 x 4 in). For the back, I opted for a simple square. Mainly single-coloured, with a few small contrasts.
The size is easy to adjust by enlarging or reducing the border of the front piece. The rounds for the back must then of course be adjusted accordingly.
My Colours and Colour Placement
My colour choice was inspired by a cushion cover I got from IKEA some years ago.
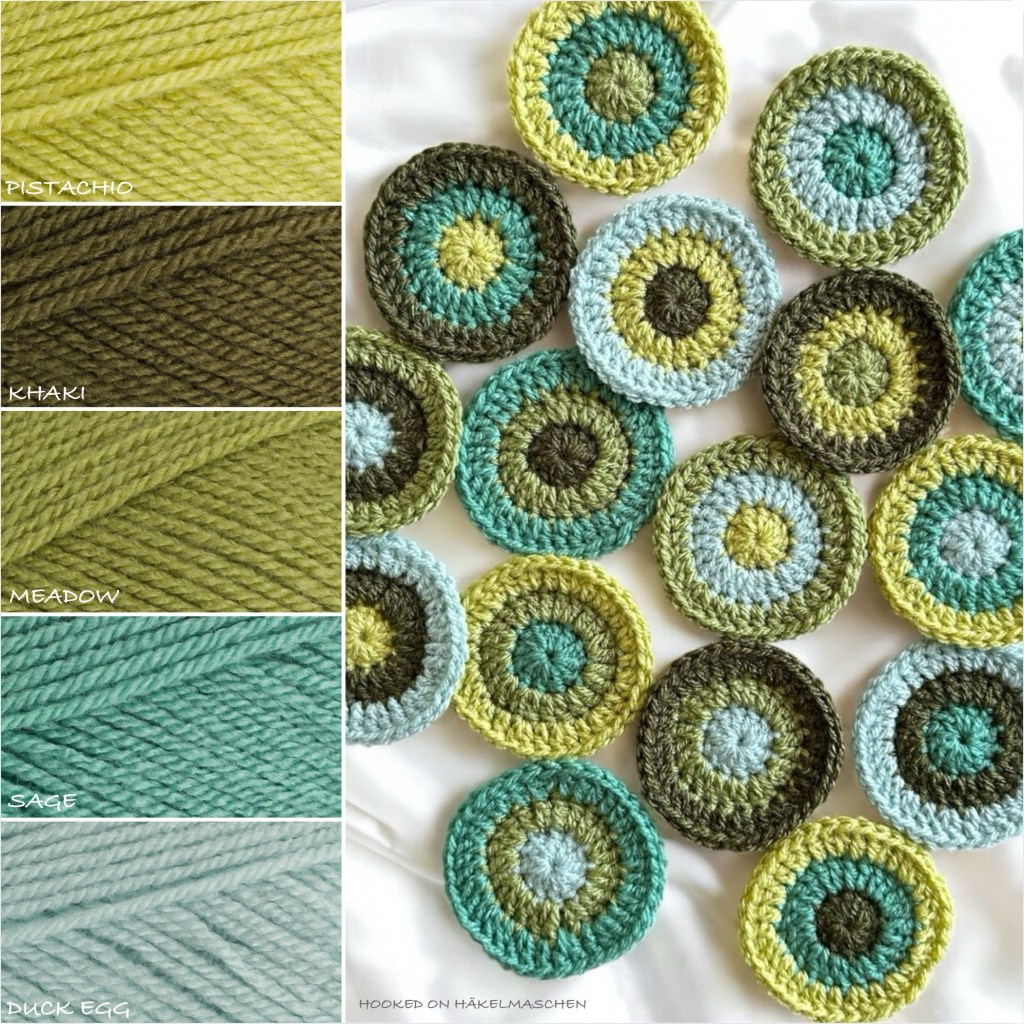
I selected five colours from my Stylecraft Special DK stash focusing on yellow-green and blue-green tones.
Originally, I wanted to create a random colour scheme for the design again. This time, however, I failed with the use of the random generator. I didn’t like the results, so I worked out something of my own. The outcome is not really random, but has a similar effect. You can read all about it in one of my earlier posts.
Of course, you can also use different yarns and/or different colours. But please bear in mind that using a different yarn may affect the size of the finished cushion. It may also change the quantity of yarn required.
I am totally happy with the result! And I hope you like it just as much!
Pam Knighton-Haener from A Yarn of Serendipity just released a lovely new design: Dahlia of Yore Square, a beautiful afghan square – just look at that …
It is already mid January and I hope you had a great start in the new year! Hubby and I got off to a very cosy start. However, right at the beginning of January, we started renovating another room in our house – very much in keeping with the theme of “new beginnings”. And a never ending story …
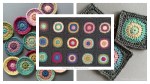
Yet, within all the renovation stuff, we have a new wall decoration in our living room! But these are not the result of our renovation work but of my colour experiments last year.
My colour experiment in 2024
You may remember that last year I experimented a little with random colour placement. This project really opened my eyes to new ways of combining colours.
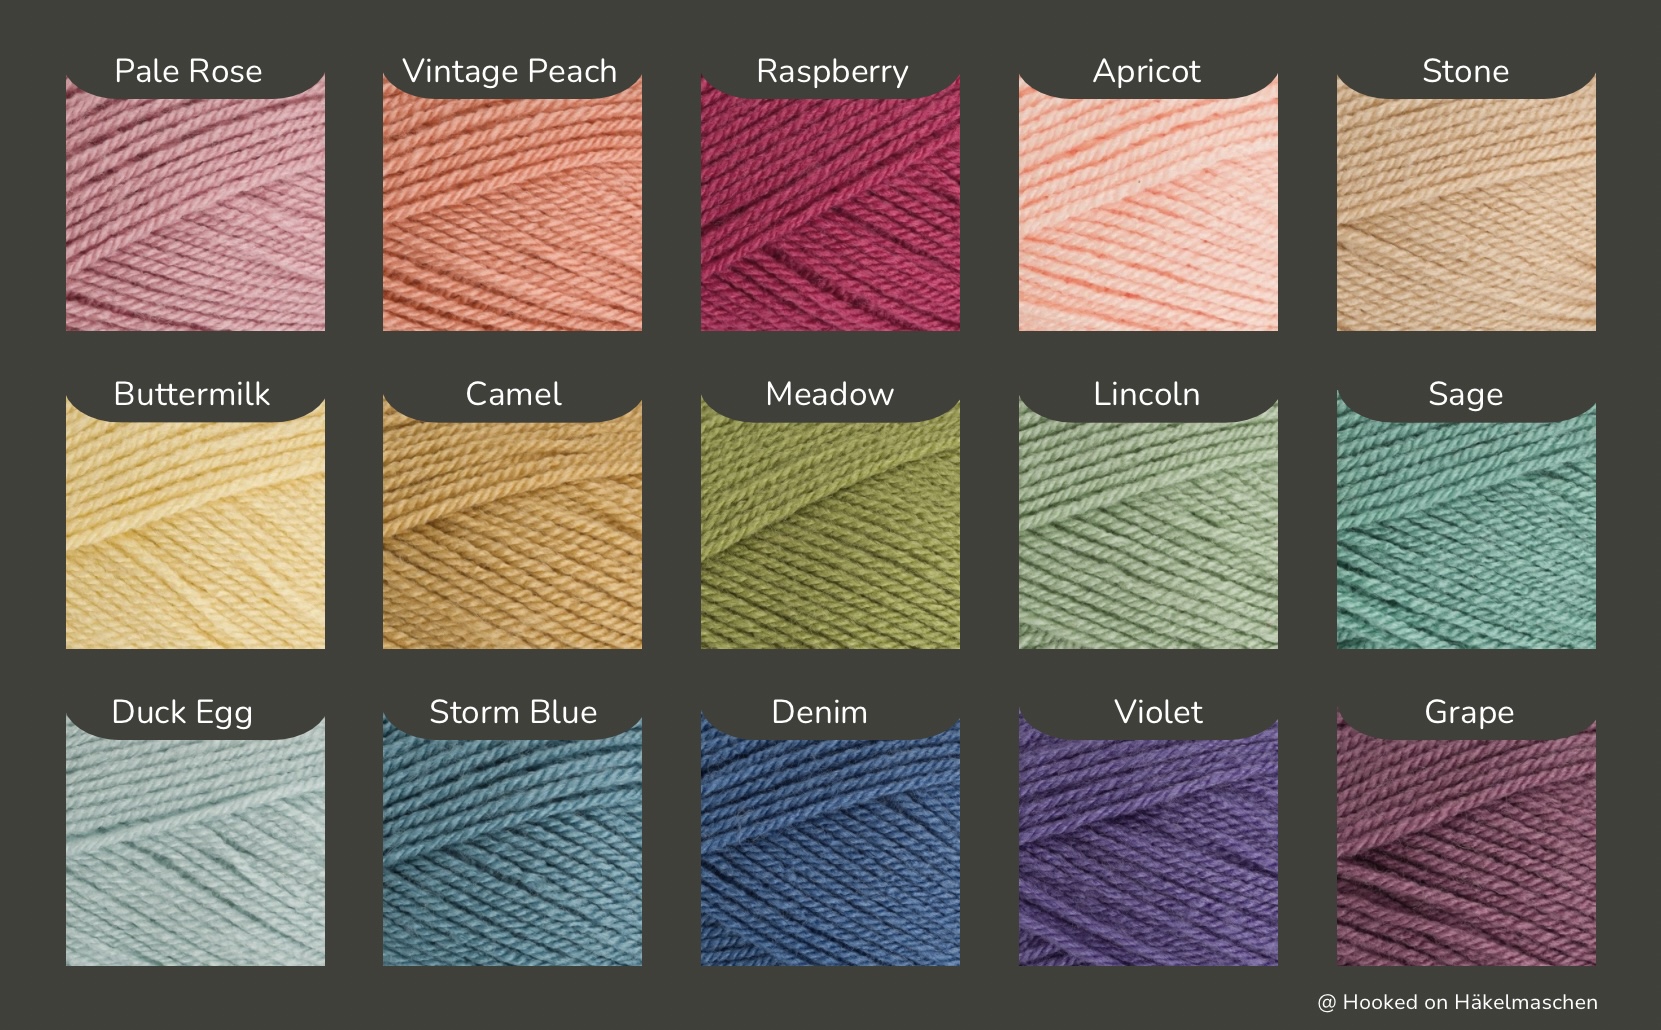
I started by selecting yarn in 15 different shades from my Stylecraft Special DK stash. Mostly leftovers from other projects.
But instead of manually compiling all possible colour combinations in a table, I tried an online random generator, Random.org . They offer a lot of free services, including a list randomizer. It works wonderfully for generating random colour combinations. I described in detail how this works in an earlier post. You can read all about it here
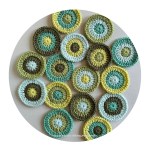
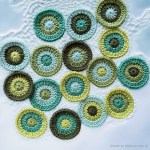
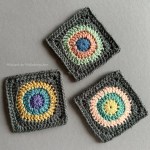
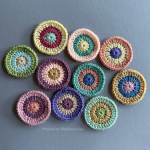
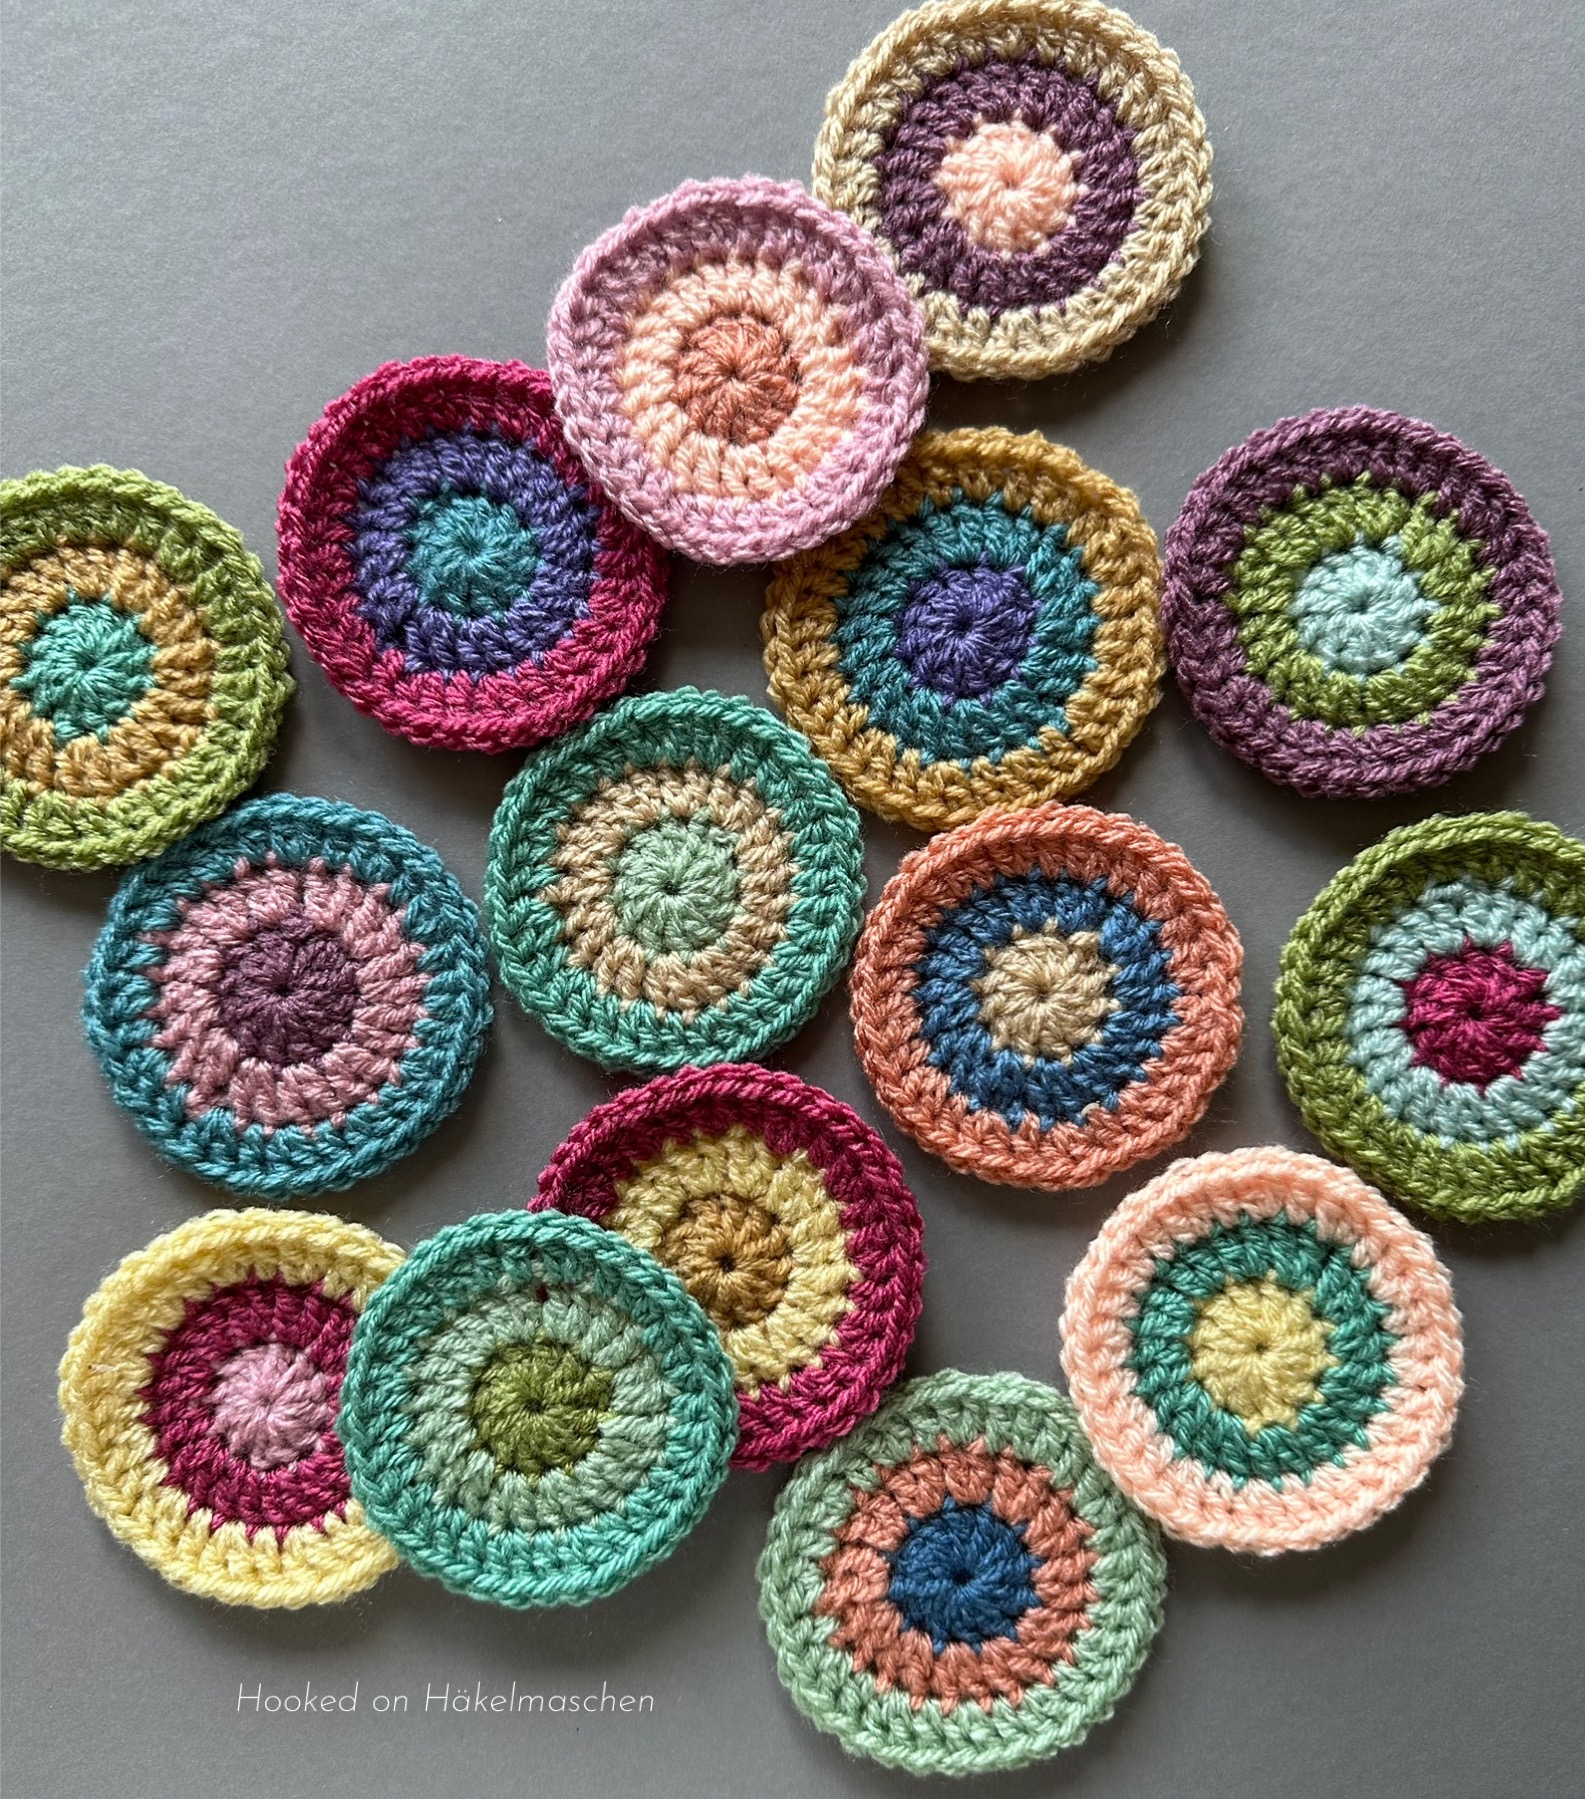
To try out the random colour combinations, I started crocheting little circles. Each with 3 rounds. In doing so, I have strictly adhered to the results that the random colour generator had given me. I only replaced a colour if it would otherwise have appeared twice in a circle. In the end, this resulted in 25 colourful circles, which I then turned into small squares. I joined them in a 5 x 5 layout. The arrangement of the squares was also generated by using the random generator.
Details on my colour placement and layout can be found in this post
After adding a small border my finished panel was about 52 x 52 cm.
At first I had thought of making a cushion cover out of it. But then I decided to use it as a wall decoration.
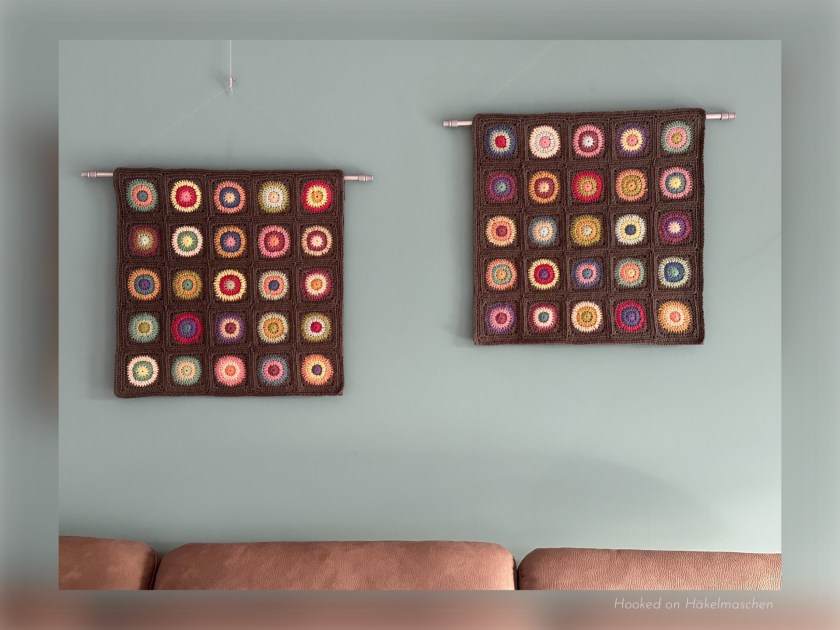
My second Panel
Overall, I was so thrilled with the result that I have since made a second panel.
I used the same colours and the same process as with the first panel. The colour combinations are completely different, but it looks just as great.
Here the results:
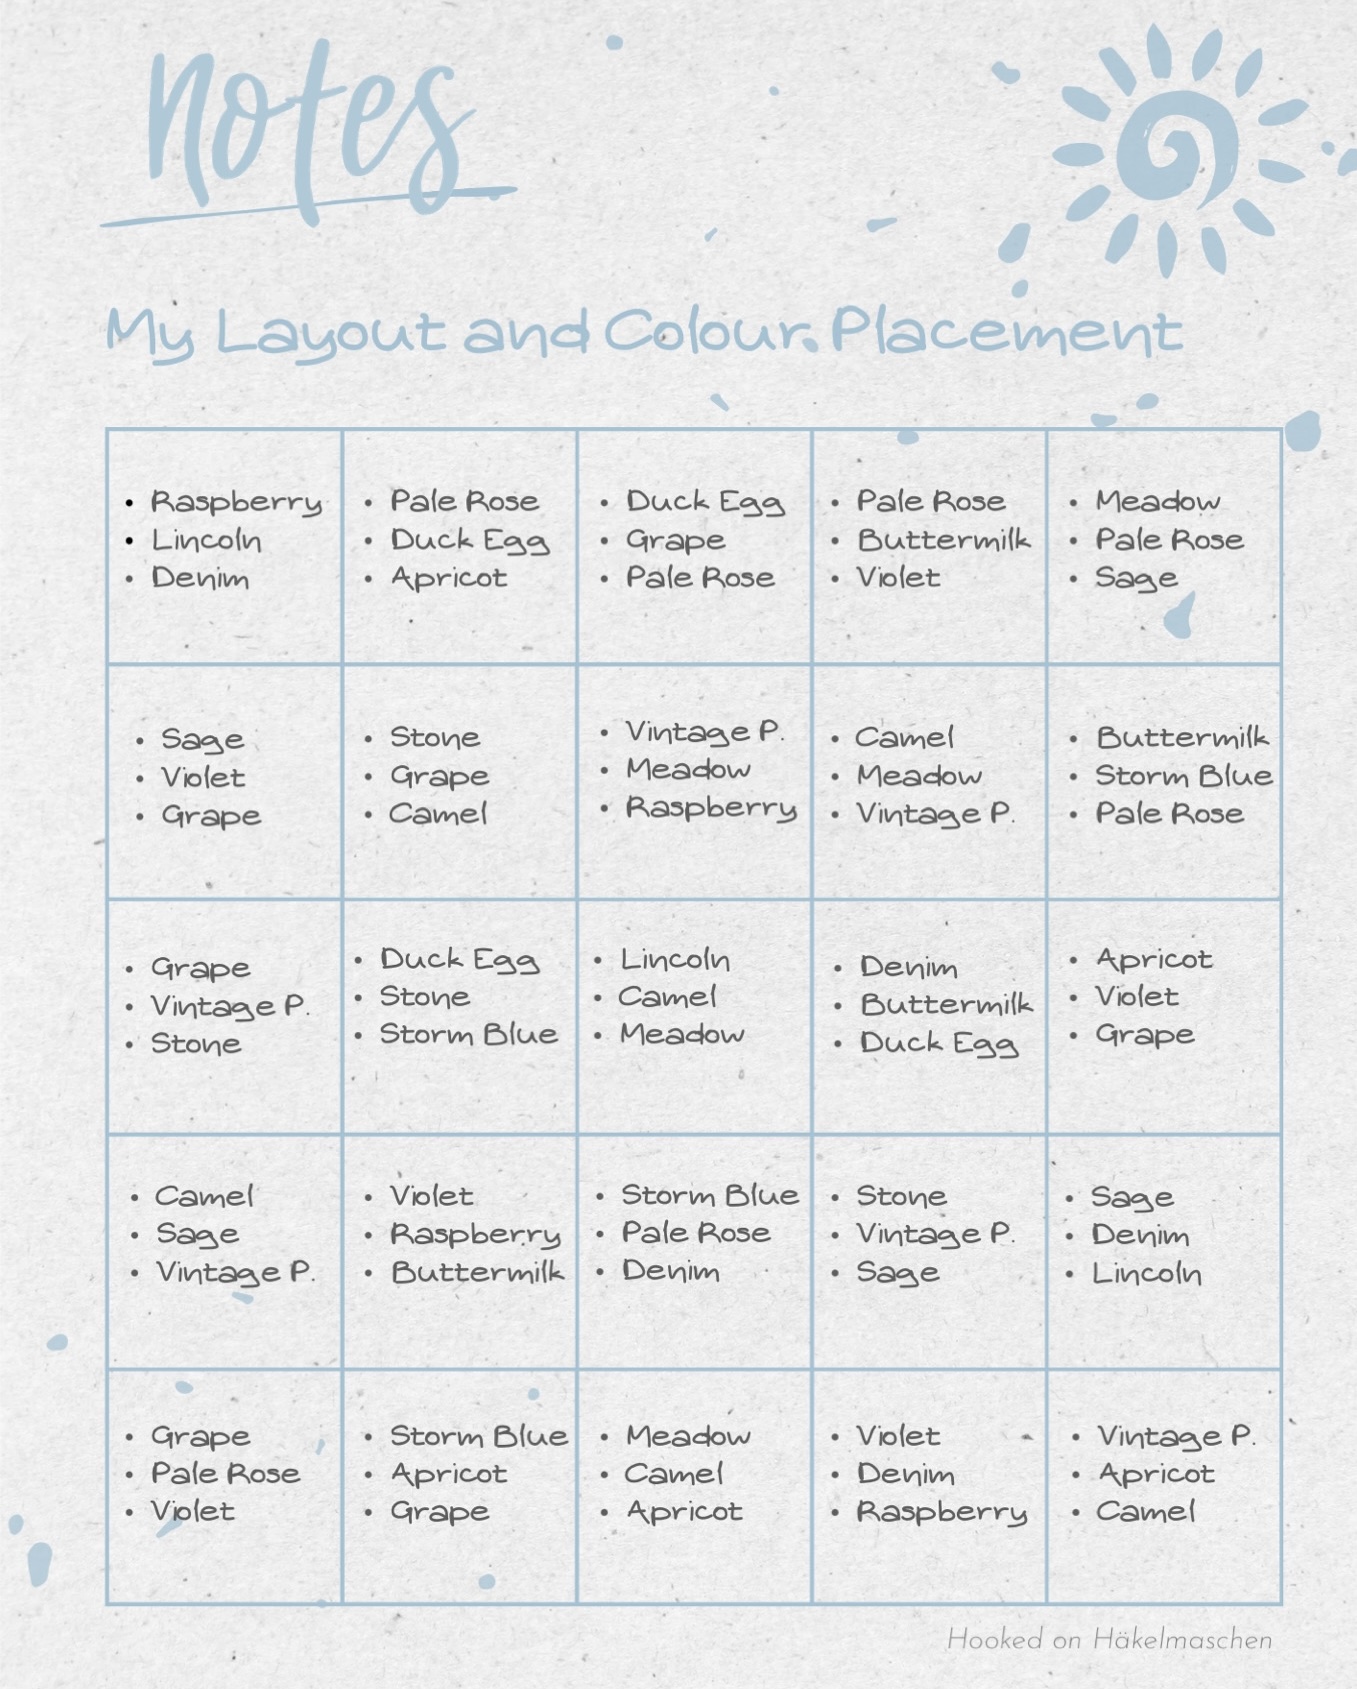
The table below shows the colour combinations that I have used for my second panel. The colours are listed for each circle in the order of rounds 1, 2 and 3. As for my first panel each circle was squared with two more rounds in the colour Graphite. At the same time, the table shows the layout in which I have arranged the squares.
I had already listed the pattern for the squares, joining, and border in a separate post. If you are interested you can find it here
But in addition, I have now written down the pattern again and summarised it in a pdf file. Besides the actual pattern, this document contains the colour combinations and layouts for both panels. So you can also download the complete file here.
Please note: Some left over yarns and 1 ball of Stylecraft Special DK for squaring and joining are sufficient for one panel.
The result of my experiment with random colour placement
In the last few weeks I have been experimenting a bit with random colour placement.
I wanted to try if a random colour placement, generated by a list randomizer from the internet, really would work. And I was curious to see whether the result would look really good in the end.
I started my „experiment” by putting together 15 different colours – mostly leftovers. All 15 looked good together. However, I personally wouldn’t place some colours right next to each other. For example, Camel and Vintage Peach or Sage and Meadow.
For a first try, I crocheted some circles. Each one with 3 rounds and each of the three rounds in a different colour. To generate the random colour placement, I used the list randomizer on Random.org.
What can I say, I was absolutely happy with the first results!
In the end I had 25 colorful circles that I wanted to keep using. So I decided to turn them into squares and combine these into a wall decoration.
Colours, Colour Placement and Layout
The colours for the circles were picked from these 15 colours, all from Stylecraft Special DK. To square the circles I used Stylecraft Special DK in the colour 1063 Graphite.
This graph shows the colours I used for each circle. They are listed in the order for rounds 1, 2 and 3.
The chart also shows the layout I have chosen for my wall hanging.
The layout is also based on the random generator.
If you want to know how this works and what exactly I did, you can read about it here:
There are a couple of different ways to crochet circles and turn them into squares. I have tried several of them while I made my circles / squares. The way described below is what worked best for me. It is adopted from a method for crocheting circles that Polly Plum describes on her site. This gives the circles a very neat look. Another advantage is that you can easily crochet over most of the yarn ends. Simply start a new round at a position opposite the end of the previous round. You can crochet over the starting tail for half a round. Then, crochet over the tail from the previous round.
I started by making all 25 circles first. Each circle consists of 3 rounds in the colours A, B and C. A, B and C change for each circle, as shown in the layout chart above. Colour D – the colour to square the circles – stays the same throughout.
Round 1, Colour A Start with a Magic Ring, ch2 (counts as first dc) , 11 dc in the ring ; close the ring and slst loosely to the first dc; cut yarn [12 dc]
Round 2, Colour B attach yarn in any stitch, ch 2 (counts as first dc), dc in same st; *2 dc in next st **; repeat from * to ** around; slst loosely to the first dc; cut yarn [24 dc]
Round 3, Colour C attach yarn in any stitch, ch2 (counts as first dc), 1 dc in same st, 1 dc in next st; *2 dc in next st, 1 dc in next st**; repeat from * to ** around ; slst loosely to the first dc; cut yarn [36 dc]
Round 4, Colour D attach yarn in any st , ch 2, (1 dc, ch1, 2 dc) in same stitch; *1 dc, 2 hdc, 2 sc, 2 hdc, 1 dc in the following 8 sts; (2 dc, ch1, 2 dc) in next st **; repeat from * to ** 3 times omitting the last corner sts; slst to first dc [per side: 6 dc, 4 hdc, 2 sc, 1 ch1-corner sp / 48 sts, 4 ch1-corner sps in total]
Round 5, Colour D Ch1 loosely (doesn’t count as a stitch) and hdc in same stitch (the one you slipped stitched in at the end of round 4); *(2 hdc, ch2, 2 hdc) in ch1-sp, hdc in next 12 sts **; repeat from * to ** 2 times; (2 hdc, ch2, 2 hdc) in next corner sp; hdc in next 11 sts; invisible join to the second hdc [per side: 16 hdc, 1 ch2-corner sp / 64 sts, 4 ch2-corner sps in total]
Using a 3,75 mm hook my squares are about 10 cm / 4 inch each.
Joining
Joining, em, yes … If you follow my blog, you know that I haven’t joined many squares so far. So I first had to find out what options are available, and tried several different joining techniques. In the end, I decided on a kind of slip stitch join. I’m not sure if there is a special name for it. I have seen this join in various places with sc, hdc, or even dc. I finally opted for a simple slip stitch. This produces a really nice flat ridge.
With this join, the actual stitch is only crocheted in one of the two squares to be connected. The opposite square is joined by pulling the loop through the corresponding opposite stitch. It may look a little complicated at first, but I’m sure you’ll find the rhythm after a few stitches.
I first worked the horizontal joins, afterwards the vertical joins. If you like to follow my joining method, here is what to do:
My joining method
First arrange the first two rows of squares according to your planned layout. The right sides of the squares should be facing you. The join is only worked through the back loops (the inner loops). The hook is always inserted from top to bottom (from the right side of the square to the wrong side).
This graph helps to visualize what square I am talking about in the next.
Tip: Make sure not to twist the squares while connecting them. It is helpful to use a locking stitch marker especially when joining the first two rows of squares. This helps to hold them together. And take care to work the join not too tight. Best is to go up a hook size. I used a 4.5 mm crochet hook for mine.
Horizontal join
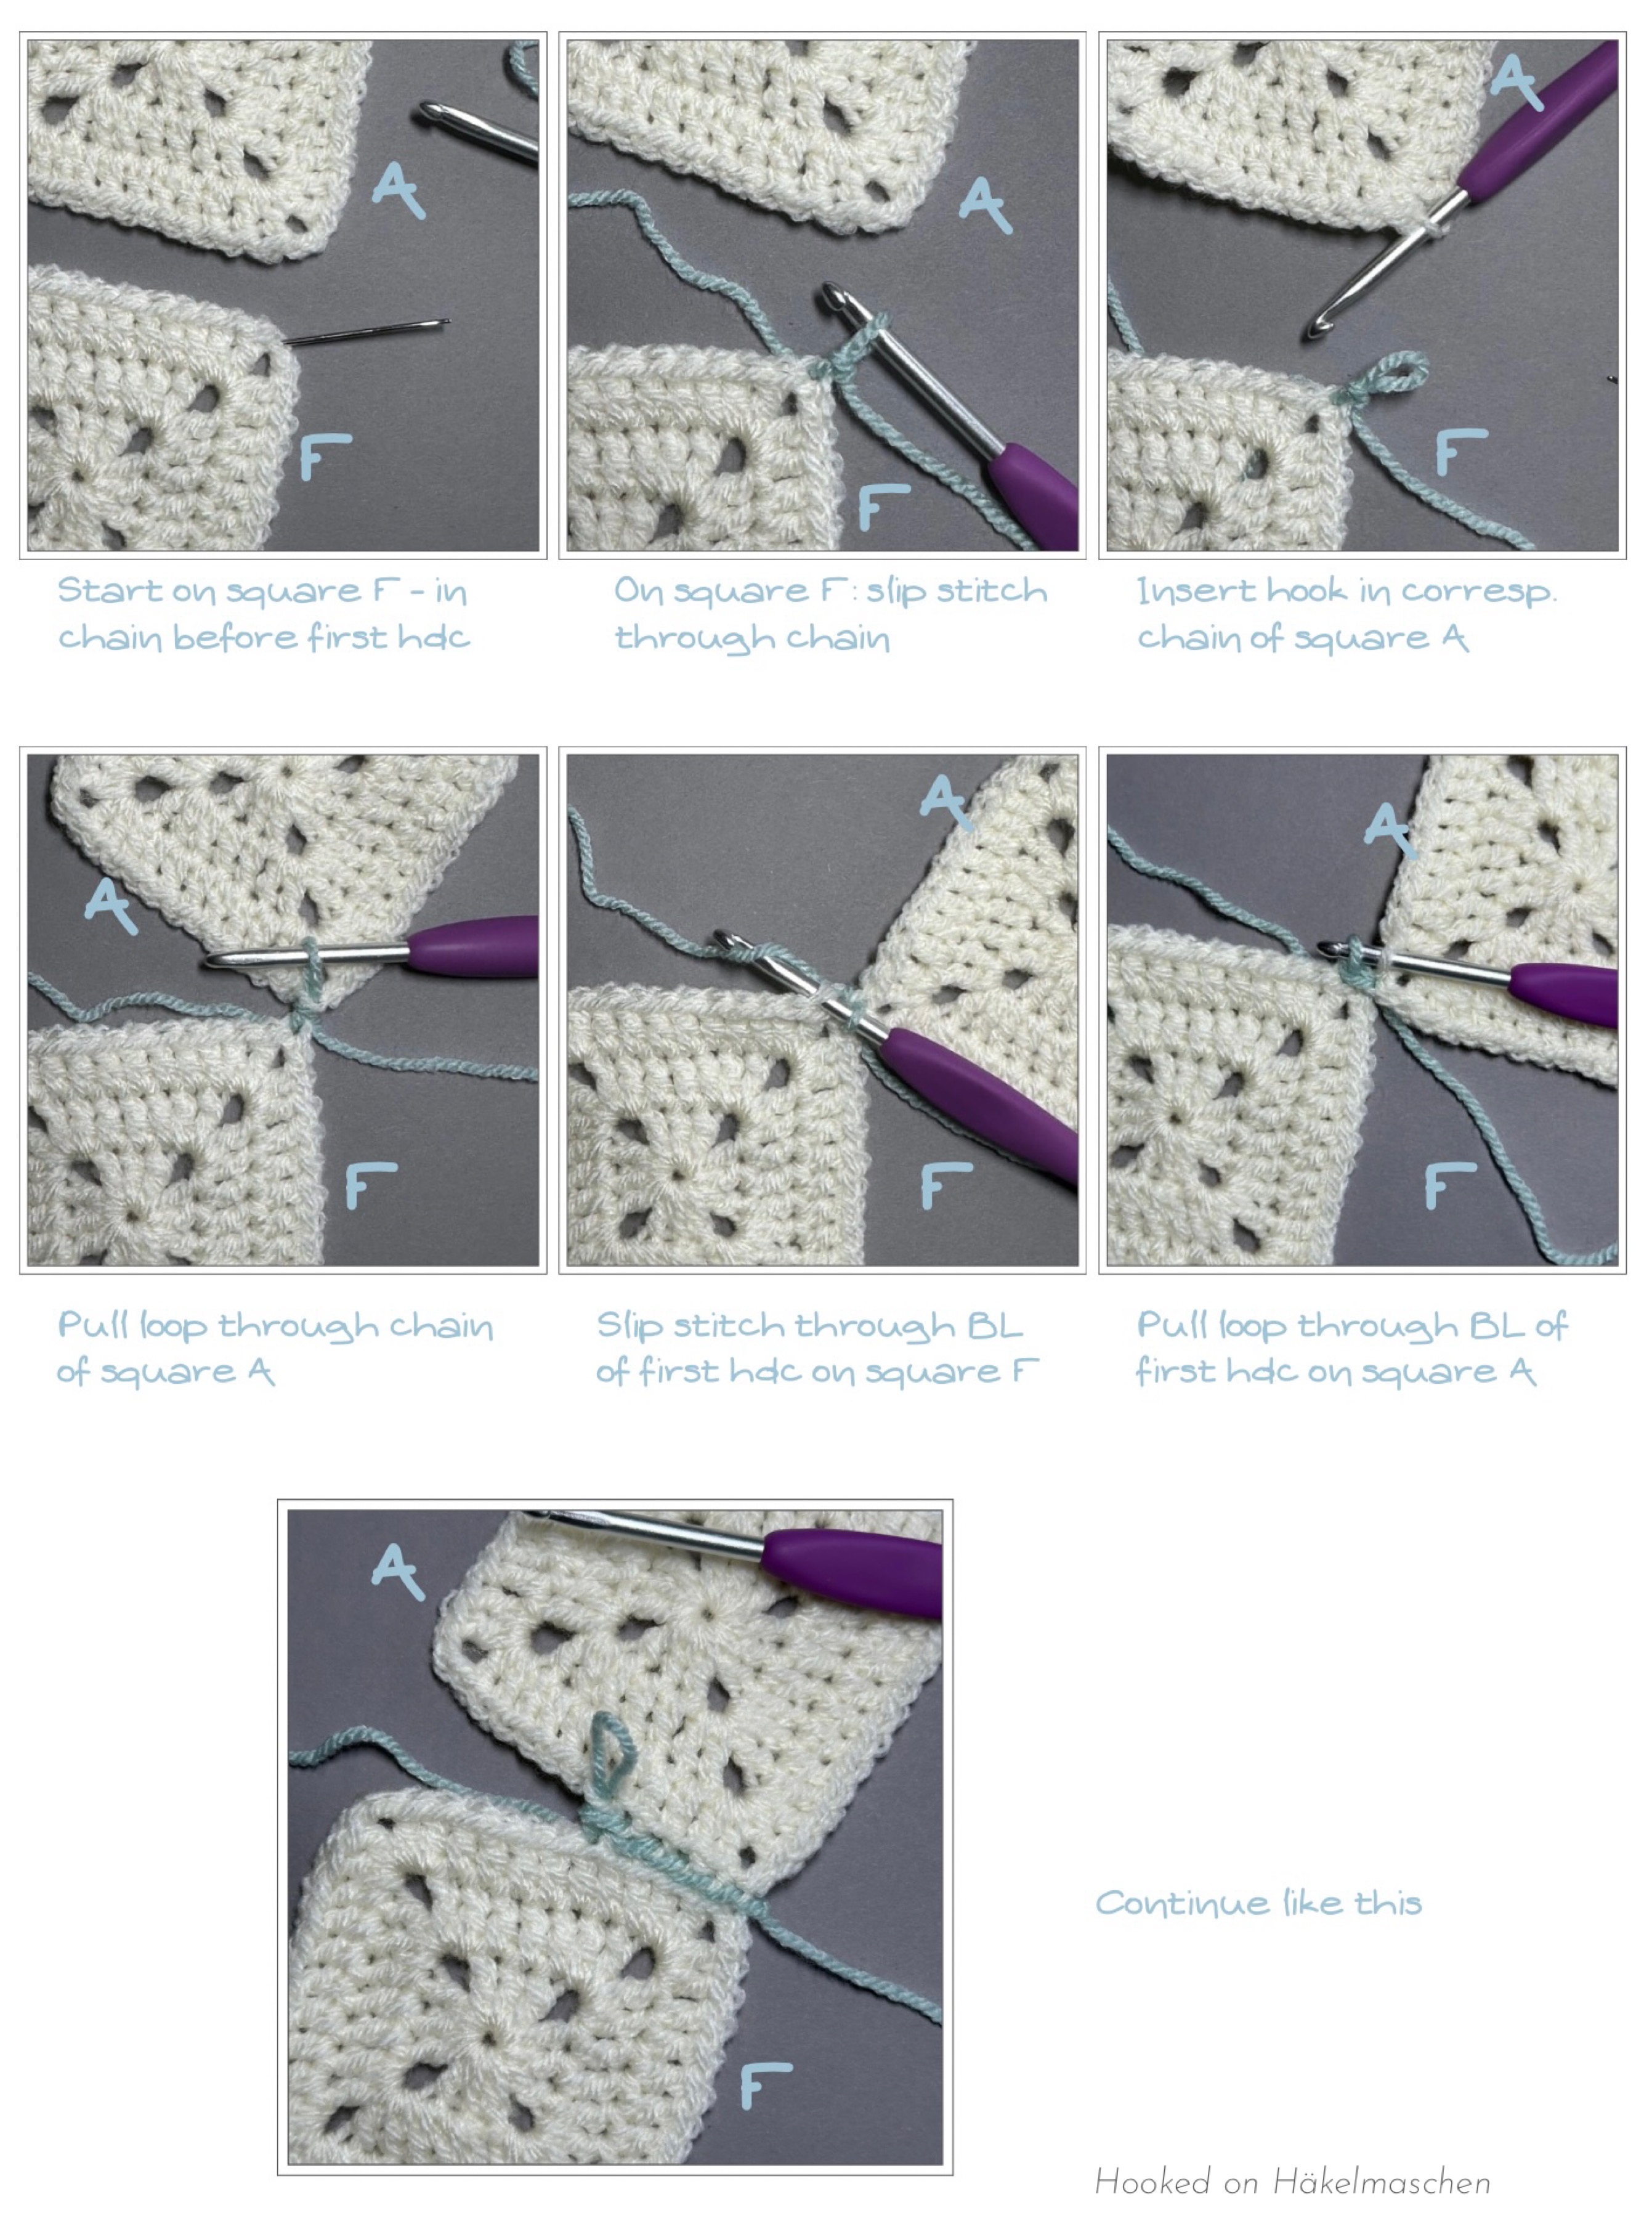
Referring to the graph above: Work from right to left (provided you are right-handed, like me). Start with joining square F to square A, square G to square B and so on.
First joining row
Begin with square F. Start with a slip knot on the hook. Insert the hook in the chain next to the first hdc of square F. Work the first slip stitch on square F. Remove the hook from the loop. Insert the hook in the corresponding chain of square A, grab the loop and pull it through.
Leave the loop on the hook and work a slip stitch through the first hdc of square F. Connect to square A by pulling the loop through the corresponding stitch of square A, like described above.
Continue until you reach the corner spaces of squares F and A. Work a slip stitch / „pull through“ in the first chain of the ch2-corner spaces.
Move on to squares G and B. Start in the second chain of the corner space. Work the same steps as above.
Repeat these steps until all squares of this row are joined, fasten off.
Second, third and fourth joining row
For the second horizontal join start with connecting square K to square F, square L to square G and so on – work the same steps as above
repeat the same steps for the third and fourth horizontal join
Vertical join
For the vertical join repeat the same steps as before, also working from right to left. I started with joining square V to square U. At the transition from two squares to the next two squares, simply work over the existing horizontal join.
Work away all tails.
Border
Round 1, Colour D Start with a standing stitch in any corner sp *(Sc, ch2, sc) in corner sp; BLsc in next 16 sts; 1 hdc in corner sp, skip join; [1 hdc in corner sp; BLsc in next 16 sts; 1 hdc in corner sp, skip join] 3 times; BLsc in next 16 sts **; repeat from* to ** 3 more times, slst to the first sc [per side: 82 sc, 8 hdc, 1 ch2-corner sp / 360 sts, 4 ch2-corner sps in total]
Round 2, Colour D ch 1, *3 sc in corner-sp, BLsc across to next corner sp **; repeat from * 3 more times, slst in BL of first sc [per side: 93 sc / 372 sts in total]
Round 3, Colour D Slip stitch in back loop of each stitch around [372 sts in total] fasten off and work away the tails
Abbreviations (US terms)
slst – slip stitch
ch – chain
sc – single crochet
hdc – half double crochet
dc – double crochet
BL – back loop
BLsc – back loop single crochet
sp(s) – space(s)
st(s) – stitch(es)
* … ** – marks a repeat
[… ] – repeat instructions as many times as specified
For an explanation on how to work these stitches have a look here
Finishing
So far all my crocheted wall hangings a made from patterns using Overlay Mosaic. This technique gives the panel a bit of weight. The dropped down dc practically double every row. Additionally, the double border adds some weight and you can also easily stabilise the panel with rods. So it’s no problem to hang it up nice and straight.
That’s exactly what I missed when I was thinking about mounting my new panel! Using an Acrylic yarn made it very light weight and I was afraid that it might not hang straight.
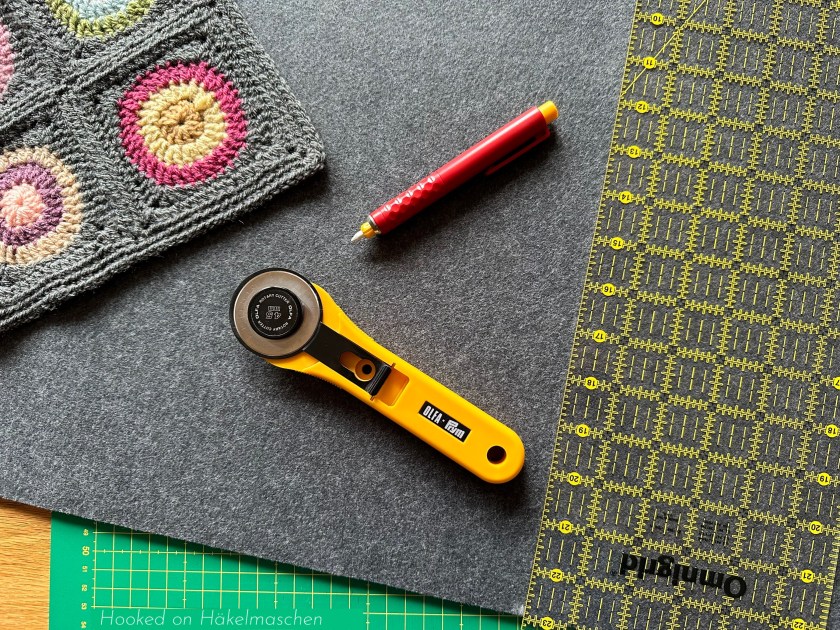
So, I got myself some felt – 4 mm thick and anthracite-coloured. I cut this to size and pinned my panel in place. I let the felt overlap a few cm at the top edge. This was later used to create a tunnel for the mounting. I sewed the panel in place along the edges using a running stitch.
Now that I’ve finished, I think the panel could also have been sewn on with a sewing machine. But, I hadn’t worked with felt of this thickness before, so I just didn’t dare. Especially as I was so short on felt that I didn’t have a test piece. Lessons learnt!
After sewing, I folded the upper overhang of the felt back at the edge. I fixed it on the backside with some suitable glue. This created a tunnel through which I can push the rod for hanging. Finished!
My panel measures about 52 x 52 cm / 20 1/2 inch.
In my living room
I think I will make another one. Same colours, different placement. And of course I will use the randomizer again for the placement of the colours and for the layout. I am already curious how it will look like!
Some days ago, on Wednesday, it was Granny Square Day. Em …, I can’t believe it, but I missed it completely!
Blame it on the heat, or the summer flu I’m suffering from at the moment and that is making me very tired, or whatever … I don’t know!
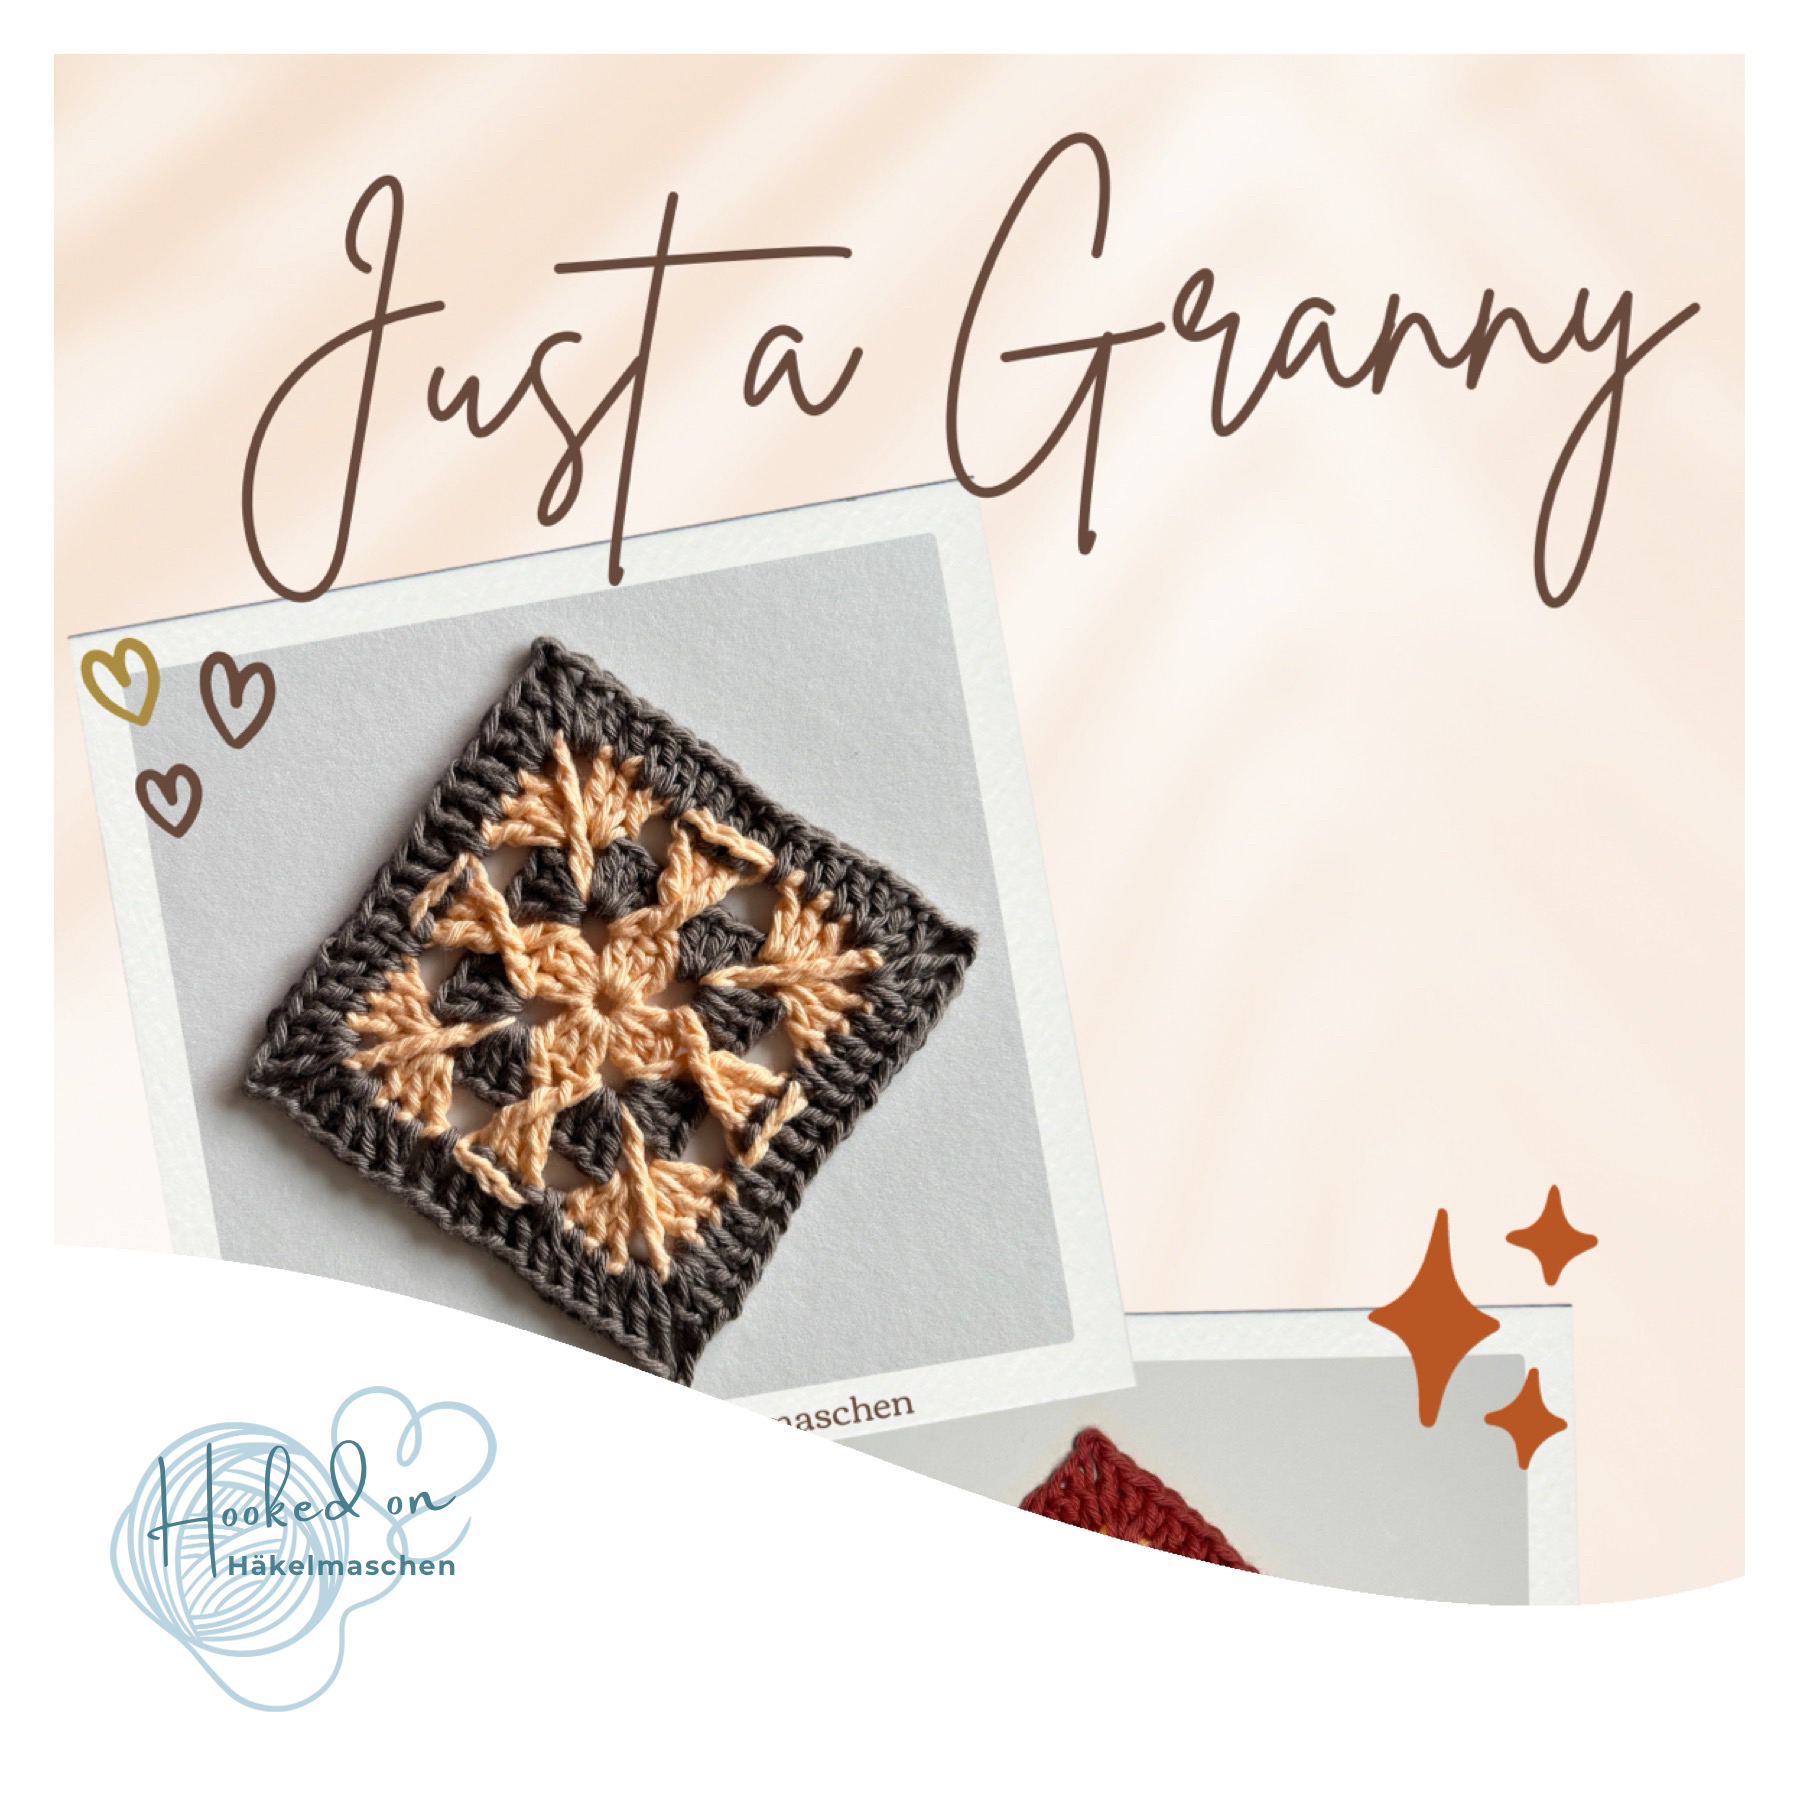
However. Lately I’ve been experimenting a bit with colours and colour combinations using circles and Granny Squares. In this process, I also created a little Granny. So, to honour Granny Square Day, too late or not, I thought I’d share the pattern with you.
Nothing big, but quite nice, I think.
Just a Granny
“Just a Granny” is a four round Granny Square and measures about 10 cm / 4 inch- if made with a #3 (DK / worsted weight) yarn.
I made my version using only two colours as I think it shows the pattern best. Of course you can also use more colours or a different yarn. Using a different yarn though might affect the size of the square.
The Granny requires only a small amount of yarn and I used some leftovers from my stash. For both I used Hobbii Rainbow Cotton 8/6. It is 100 % Cotton and has a yardage of 105 m / 50 g. I find it best to work with a 3,75 mm hook.
I made two colour variants. The first one is made with
# 49 – Peach
# 47 – Dark Old Rose
… and the second one uses
# 65 – Apricot
# 12 – Volcano Gray
Apricot and Volcano Gray is one of my favourite colour combinations. Unfortunately it looks like #65 Apricot is discontinued, at least in the 8/6 quality.
The Pattern
Like a regular granny, the pattern mostly uses double crochet, but also includes extended treble crochet, double treble crochet, and shallow back post double crochet (all US terms). Due to these special stitches I have categorised the pattern as „beginning intermediate”. But since it is only a few stitches and rows, I think that even an adventurous beginner can do it. Of course, the placement of the stitches is explained in the pattern. And if you have any questions, please don’t hesitate to contact me.
In case you’ve never heard about a shallow back post double crochet: it is more or less worked in the same way as a normal bpdc. Only the placement of the stitch is a bit different which makes it a bit less textured. The pattern includes a link to a helpful video on how to do this stitch (made not by me but by Tamara Kelly from Moogly).
Finally I managed to write down the two missing patterns for my Tunisian phone cozies. Yes, I know, it took some time…
But all are ready now!
I created these little bags while experimenting with different Tunisian crochet techniques. If you’ve just started Tunisian crochet, they are great for practising new techniques and/or stitches. Or perhaps they will inspire you to create something beautiful with Tunisian crochet yourself.
The bags are designed for an iPhone 14 Pro and measure approximately 9.5 x 17 cm. However, the size of all 4 patterns can be easily adjusted.
Each cosy, including the flap, is worked in one piece and then sewn together.
I used Stylecraft Special DK in various colours and a 4.5 mm Tunisian crochet hook. Each bag requires approximately 20 to 25 g of yarn, making the patterns ideal for using up leftover yarn.
If you need help or want to refresh your knowledge of the basics of Tunisian crochet, please have a look at these tutorials
The special stitches used are explained in the corresponding patterns.
Please note: The patterns are not tested yet. So, if you find any mistakes or have any question, please don‘t hesitate to contact me.
How I define skill levels in my Tunisian crochet patterns
There is no official, universally agreed system for skill levels in Tunisian crochet. What is considered easy or advanced can vary depending on personal experience and familiarity with certain techniques.
For my patterns, I define the skill level based on a combination of the stitches used, the techniques involved, and the amount of shaping or pattern complexity.
Beginner / Easy patterns use basic Tunisian stitches and simple, repetitive row structures with little to no shaping.
Intermediate patterns combine different stitches and may include colour changes or simple shaping techniques.
Advanced patterns introduce more specialised Tunisian stitches, multiple techniques within one project, and/or more complex construction.
Each cozy below includes a short overview of the required stitches and techniques, so you can easily decide if it matches your current skill level.
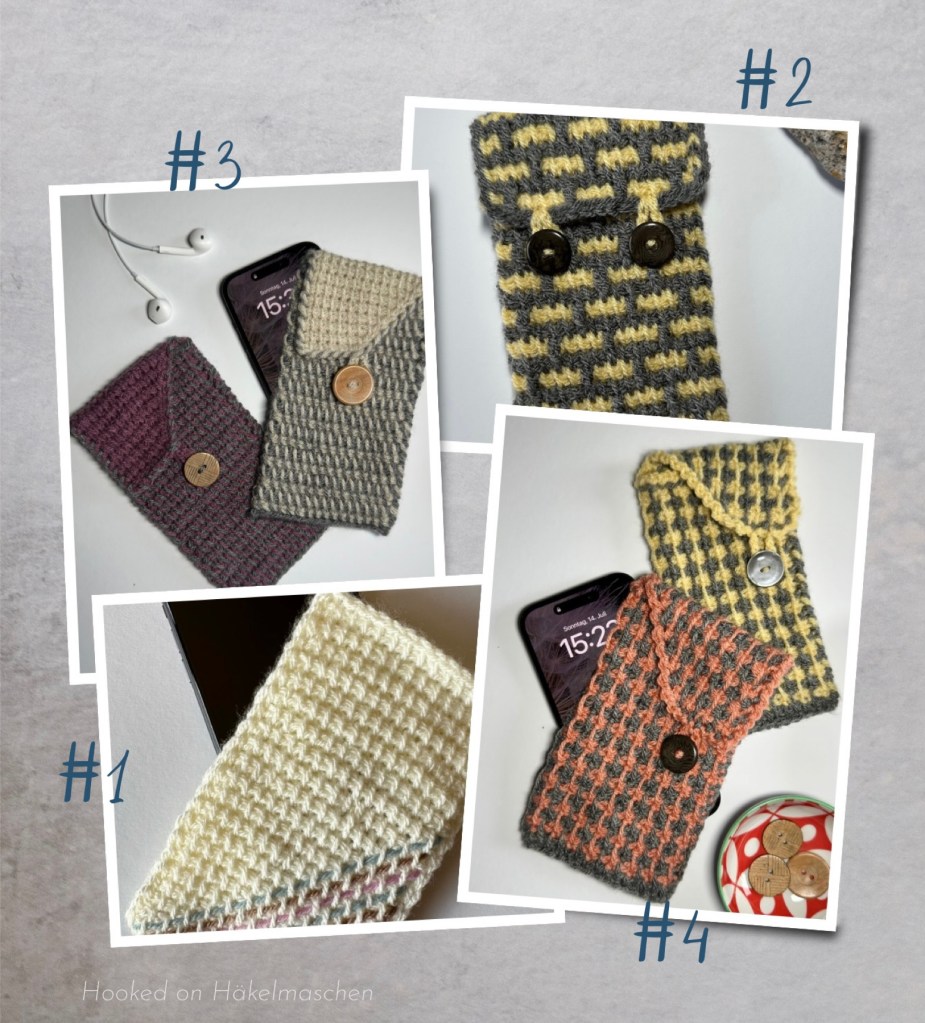
Phone Cozy #1
A simple and easy pattern to practise the Tunisian simple stitch.
The cozy is decorated afterwards by weaving in some colourful threads.
Techniques used: only basic techniques such as foundation, forward-, and return pass
Phone Cozy #2
This design uses the Tunisian brick stitch. The pattern is good to practise colour changes and a stitch that also can be used in Tunisian mosaic crochet.
Stitches used: extended Tunisian simple stitch, Tunisian slip stitch
Techniques used: basic techniques, colour changes on the right-hand side, and decreases on the right-hand side
Additional notes
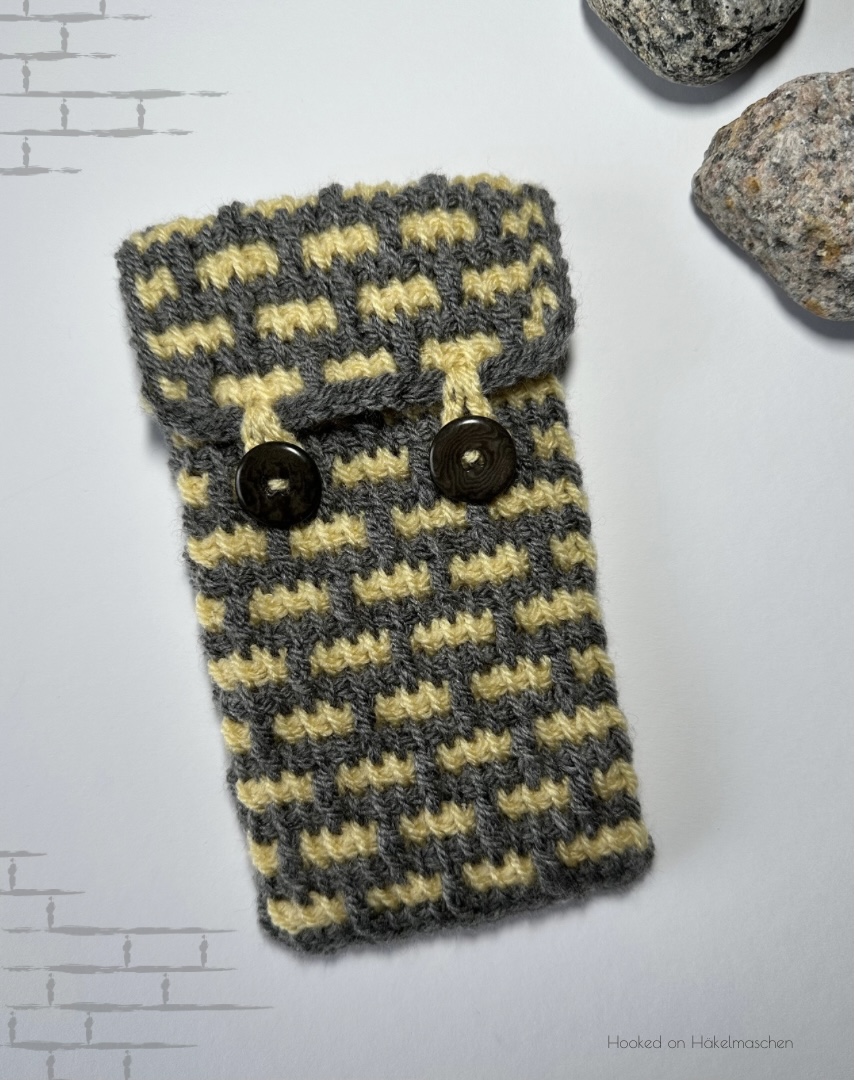
The stitching of a button and a corresponding closure is optional for the cosies. Therefore, I did not go into more detail with the individual patterns, except for #2.
For the loops I simply crocheted a small chain to form a little eyelets.
The size and position of the eyelet naturally will depend on the size and position of the button.
Here some pictures of what I did:
But there are, of course, other ways to close the bags, such as small straps or press studs for instance. It is also possible to dispense with a fastener altogether and simply leave the pouches open.
I hope you found some inspiration for your next Tunisian crochet project. Happy hooking!
I’ve finally written down the pattern for my second Tunisian crochet phone pouch.
This pattern is slightly more challenging than Cozy #1 because it uses two colours. Nevertheless, it is a simple pattern that even beginners can easily master.
Pattern details
The cozy is designed for an iPhone 14 Pro and measures approximately 9.5 x 17 cm.
Stitch pattern
The pattern is based on a common Tunisian stitch pattern known as Brick stitch or Grid stitch.
It is usually worked in two colours to enhance the visual effect, but it can also be made in a single colour, which really highlights the structure.
The pattern uses a combination of Tunisian simple stitch and Tunisian front post double crochet stitch. The Tunisian front post double crochet stitch is worked similarly to a front post stitch in regular crochet and is also used in Tunisian mosaic crochet.
Both, the Tunisian front post double crochet stitch and the colour change are explained in the PDF-pattern.
Sizing
The pattern has a four-row repeat and works in multiples of 4 stitches plus 1. The size can be easily adjusted by adding or subtracting stitches or repeats as needed.
Shaping
The cozy is worked in one piece, including the flap. So, there’ s only minimal sewing required.
cutaway diagram
Only the bottom and sides need to be joined.
Of course, it is also possible to work the pouch without the flap. In that case, simply continue working the instructions for binding off (row 23 in the PDF-pattern) until the end of the row.
Finishing
After binding off, the flap of my cozy rolled up a little. Smoothing it with my fingers and adding a small border solved this issue.
To close the flap, I sewed on two buttons. This is optional, but I think it adds a nice finishing touch.
Yarn and colours
I used Stylecraft Special DK yarn and a 4.5 mm Tunisian crochet hook.
In total, I used just over 20 g of yarn. The pattern is therefore perfect for using up leftovers!
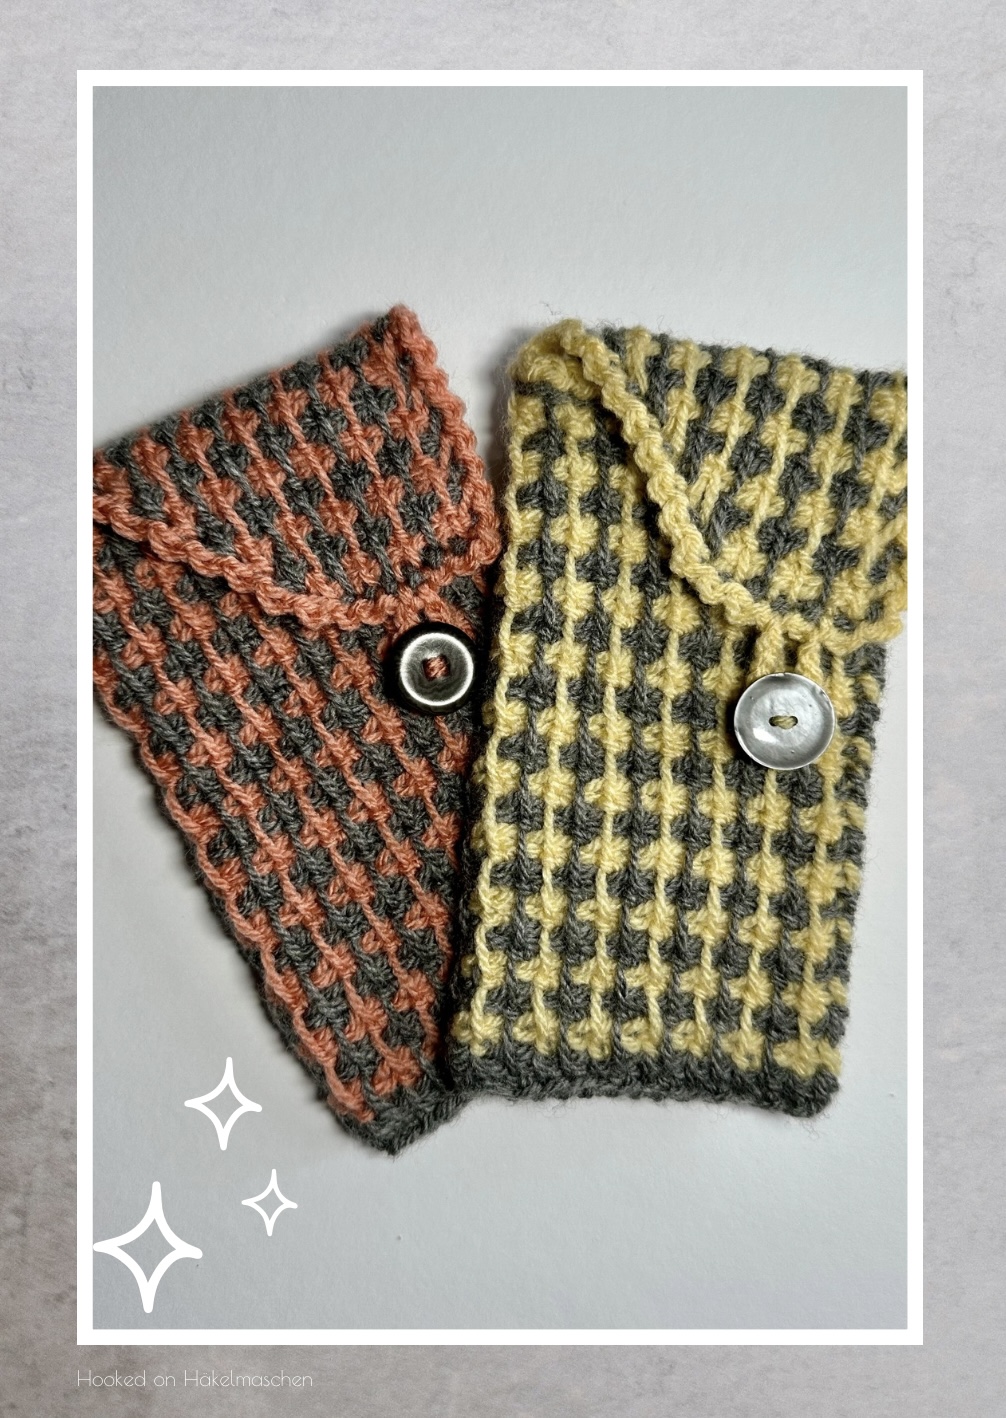
My colours are Grey and Buttermilk. I love the way they go together! They even remind me a little of honeycombs when combined with this stitch pattern.
Other colour combinations or yarn types work just as well. Just make sure to use somewhat contrasting colours, and remember that different yarn weights will affect the size of your cozy..
As you may know, I’ve been experimenting a bit with Tunisian crochet lately.
I have mastered the basic stitches in Tunisian crochet for a long time and years ago I have also crocheted several patterns. But I never worked Tunisian crochet using two different colours or tried Tunisian mosaic crochet. I have also never looked into the possibilities of decorating a finished piece with cross stitch or weaving. And, besides a kind of ‚join as you go‘-method, I‘ve never joined pieces made with Tunisian crochet. So really time for me to experiment a bit!
The results are 4 different mobile phone covers for my iPhone that I would like to show you here. I will write down the patterns one by one, so that you can make one for yourself if you like.
In case you have never done Tunisian crochet before (or need a refresher), you can find the basics of this technique here.
Tunisian Mobile Cozy I
The first one is a really simple one and absolutely beginner friendly. It is more or less just made from a rectangle made with Tunisian Simple Stitch. No changing colors, no decreases, just some basics. So it’s a great starter piece!
My cozy – made for an iPhone 14 Pro – measures about 9,5 x 16 cm. If you need a different size, the pattern is easy to adjust.
If you are new to Tunisian crochet, please take a look at the detailed explanations first:
Small amount of Stylecraft Special DK, colour 1005 Cream
some leftover yarns in different colours
4,5 mm Tunisian crochet hook
scissors
yarn needle
If you decide to use a different yarn or if you want your phone cover to be a different size, you will have to make a few adjustments:
you will probably have to adjust the number of chains you cast on. My phone is 7, 2 cm wide and 0,8 cm heigh. I made my chain about 9,5 cm long which is equal to: 1 times the width of my phone plus 2 times the height plus 0,5 cm (7,2 + 1,6 + 0,5 cm). The 0,5 cm are just to give it a bit ‚room‘ for joining.
you will probably also have to adjust the number of rows you work. You can easily measure this while working, your crochet piece should have twice the length of your phone. Just wrap it around your phone from time to time and you will know when you have to stop.
Stitches / Abbreviations
FwP
Forward Pass
RtP
Return Pass
TSS
Tunisian Simple Stitch Insert hook from right to left under front vertical bar of the next stitch, pull up a loop and keep it on the hook
yo
yarn over
Pattern
Foundation / Row 1
Cast on 16 chains loosely
FwP: Start in the 2nd chain from hook and pick up a loop from the back bar of every chain – 16 loops on hook
RtP: don’t turn your work, just work from left to right now yo and pull through the 1st loop on the hook, *yo and pull through the next 2 loops on hook, repeat from * until there is only 1 loop on hook
Row 2
FwP: working from right to left, skip first vertical bar, 14 TSS, work end stitch (16 loops on hook)
RtP: work Standard Return Pass like explained above
Row 3 – 43
repeat row 2
Bind off
My rectangle measured about 9,5 cm in width and 32 cm in length.
Decorating
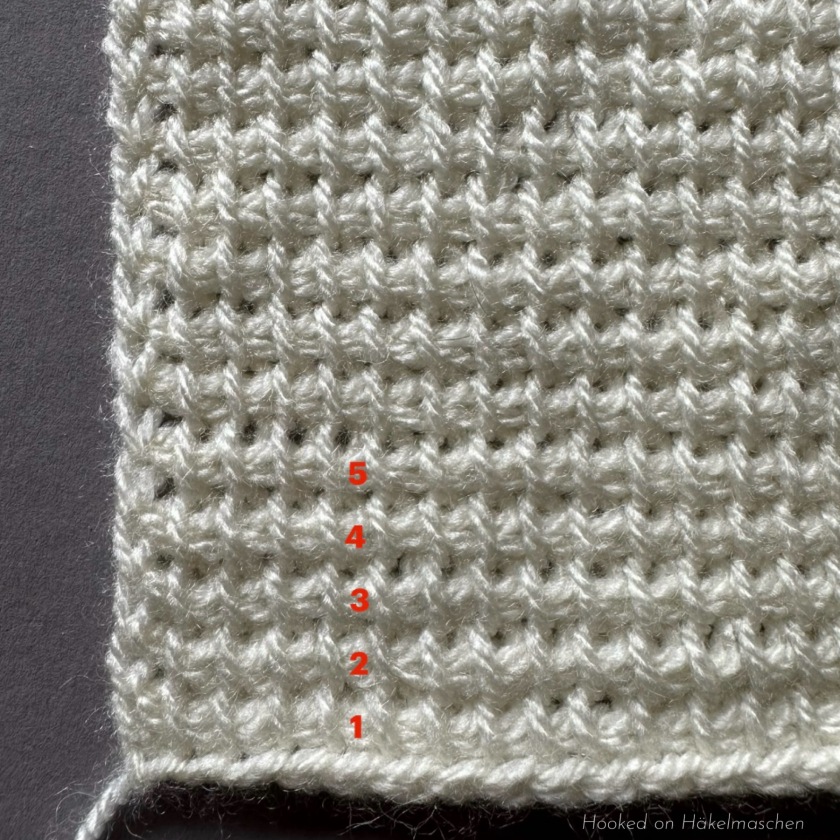
Now you can start decorating your cozy by „weaving“ different yarns under the vertical bars of the Tunisian Simple Stitches. If you like to do it similar to mine, here is what I’ve done:
I used some left over yarns from King Cole Comfort DK in the colour 1729, Glacier and Stylecraft Special DK in 1390, Clematis and 1064, Mocha.
I started in row 23, counted bottom up. (If you are unsure how to count the rows, this picture will help.)
Thread a needle and bring the yarn up under the horizontal bar of the last stitch (end stitch) on the left side (pic 1). Weave the yarn under the front vertical bar of the next stitch in the same row. Then go up a diagonal line, always going one stitch to the right and one row to the top (pic 2) until you reach the right edge (pic 3). Continue doing the same with the next thread, starting in the same row but one stitch to the right (pic 4). Gently sew away the loose yarn ends on the back.
Finishing
I simply joined the edges with a row of slip stitches. I used my main colour, so my stitches are nearly invisible. But it also can be a nice effect to use a contrasting colour. Just fold the rectangle to the half. If you did 43 rows the middle will be row 22. Grab both loops of the first / last stitch of rows 21 and 23 and start with your first slip stitch. (Row 22 stays unworked.) . Go up the edge until the last stitches are joined. Finish off and work away the tails. Do the same on the other side. Finished!
A free pattern for a simple & cozy crochet decoration
Post revised in December 2025
Back in 2023, I was looking for some easy-to-make Christmas decorations.
Although our home is furnished in a clean and simple style, I prefer my Christmas decorations to feel a bit more traditional and nostalgic. I had been looking for something like a candy cane or a classic Christmas wreath, and somehow that search sparked the idea to make my own. So I grabbed some yarn, picked up my hook, and got started…
I really like the result! And I thought I might as well write down the pattern and share it with you. Maybe you like it too…
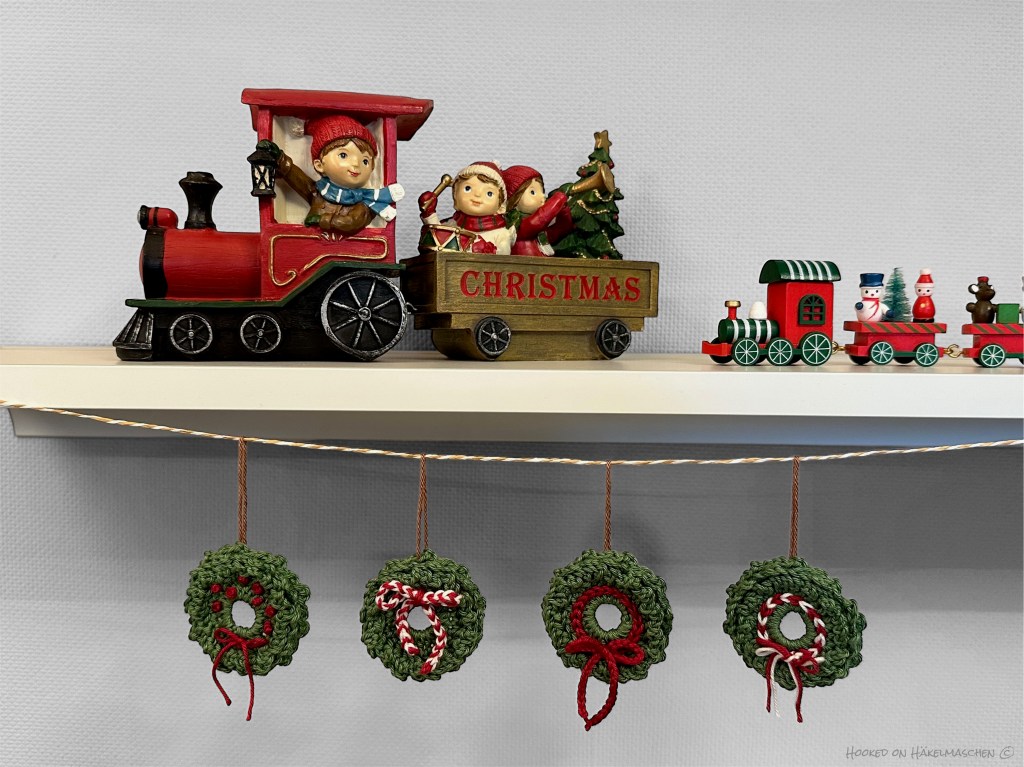
I used Schachenmayr Catania and a 2.75mm hook to make my wreaths. They measure about 6 cm in diameter, which is between 2 1/4 and 2 1/2 inches.
I used
212 Khaki – for the wreath
192 Weinrot (Wine Red) – for decoration
105 Natur (Off White) – also for decoration
You will need only small amounts.
Catania is 100 % mercerised cotton and has 125 m per 50 g. You can easily substitute it with any other sport weight yarn.
And, the pattern will also work with any other yarn weight. Only the size of the finished wreath might vary.
And of course you can use any other colour you like and decorate your wreath with whatever comes to your mind.
Some ideas for decoration
To decorate the little Christmas wreaths, you can simply sew on a few beads or stars, for example. Or cut out small shapes from felt and stick them on …
Unfortunately, I didn’t have any of these items on hand, so I focussed on what you can do with yarn.
I immediately thought of some ribbons and bows. But you can also just embroider some French Knots, as shown in the picture below (bottom right).
Variant A – A Simple “Red Ribbon”
To symbolise a little ribbon, I simply worked a round of slip stitches around the stitches of round 1. The ends of the ribbon (made of chains) are tied to a bow.
To make the chains as small as possible, I used a crochet hook that was one size smaller (2.75 mm) than for the wreath (2.75 mm). The slip stitches were made with a 3.5 mm hook to avoid them from being too tight.
Here is how to make Variant A
The yarn has to be on the back side of the work for the slip stitches, but on the front to work the chain stitches.
Therefore, insert the hook between any two hdc of round 1 and bring the yarn from back to front
Start with the smaller hook size. Make a slip knot and chain 22. My chain was about 7 cm / 2 3/4 inch long.
Change to the bigger hook size. Start at the stitch to the left of the chain (where the thread comes in front) and slip stitch around all the stitches of round 1.
Change to the smaller hook again. Make another 22 chains.
Fasten off and secure the ends – either with some knots or just sew them away on the back side
It might look a bit bulky if the bow is tied, so just lay it in shape and fix it with a thread as described below (Variant B).
Variant B – A Two-coloured “Bow”
This bow is made from a chain, approximately 15 or 16 cm (about 6 inch) long.
Here is how to make Variant B
As before, it’s best to use a smaller hook size to ensure the chains are nicely small. I used my 1.75mm hook again.
The bow is made with two different colours (A and B). To get the striped effect, the colours are changed with every stitch.
Please note: You probably have to work a little more slowly and tighten the previous stitch slightly with each colour change.
Start with a slip knot on the hook using colour A.
Grab the colour B thread and make a chain.
Grab the colour A thread again to make the next chain
Continue like this until you reach the desired length
And a word about the yarn ends:
Like shown in the photo above, I simply cut off the yarn at the ends of the chain and untangled it a little. Unfortunately, I didn’t like it at all!
So here’s my tip: Think twice before cutting the thread. You can just as easily sew it on the back (shown in the photo on top of the page). Looks better, doesn’t it?
Variant C – A Two-coloured “Ribbon”
A two-coloured alternative to variant A
Here is how to make Variant C
For this two-coloured ribbon, again, the yarn is needed in the back to work the slip stitches. Start and end of the threads are needed on the front to tie the bow.
So, bring the yarn to the front between any two stitches of round 1. Like in Variant A, only this time, the two threads, (colour A and B) at once.
Leave the tails long enough to tie the bow later. Mine we’re about 20 cm long
On the front side: start with a slip knot in one of the threads (colour A)
Using colour A, slip stitch around the stitch directly to the left of the thread.
Work the second slip stitch around the next stitch, using colour B
Work the next slip stitch using colour A again – and so on
As with the two-colored chain (Variant B), you will probably have to tighten the previous stitch a bit after the color change.
At the end of the round, cut the yarn, again leaving a long tail. Bring the ends to the front and tie a bow. Then, shorten them to your desired length.
In case you want to hang your wreaths, simply attach a thread, ribbon, or cord to the backside. Ensure it’s roughly aligned with the centre of the bow (where appropriate).
If you like my little Christmas Wreath and would like to make one too, you can download the free pattern here
The pattern is not tested. So, if you spot any errors or have any questions, don’t hesitate to contact me. And please, feel free to add your projects to my Ravelry page.