Actually, I wanted to have finished my Happy Circles cushion cover a long time ago! But sometimes life turns out differently than you might think.
Everything had started out so nicely …
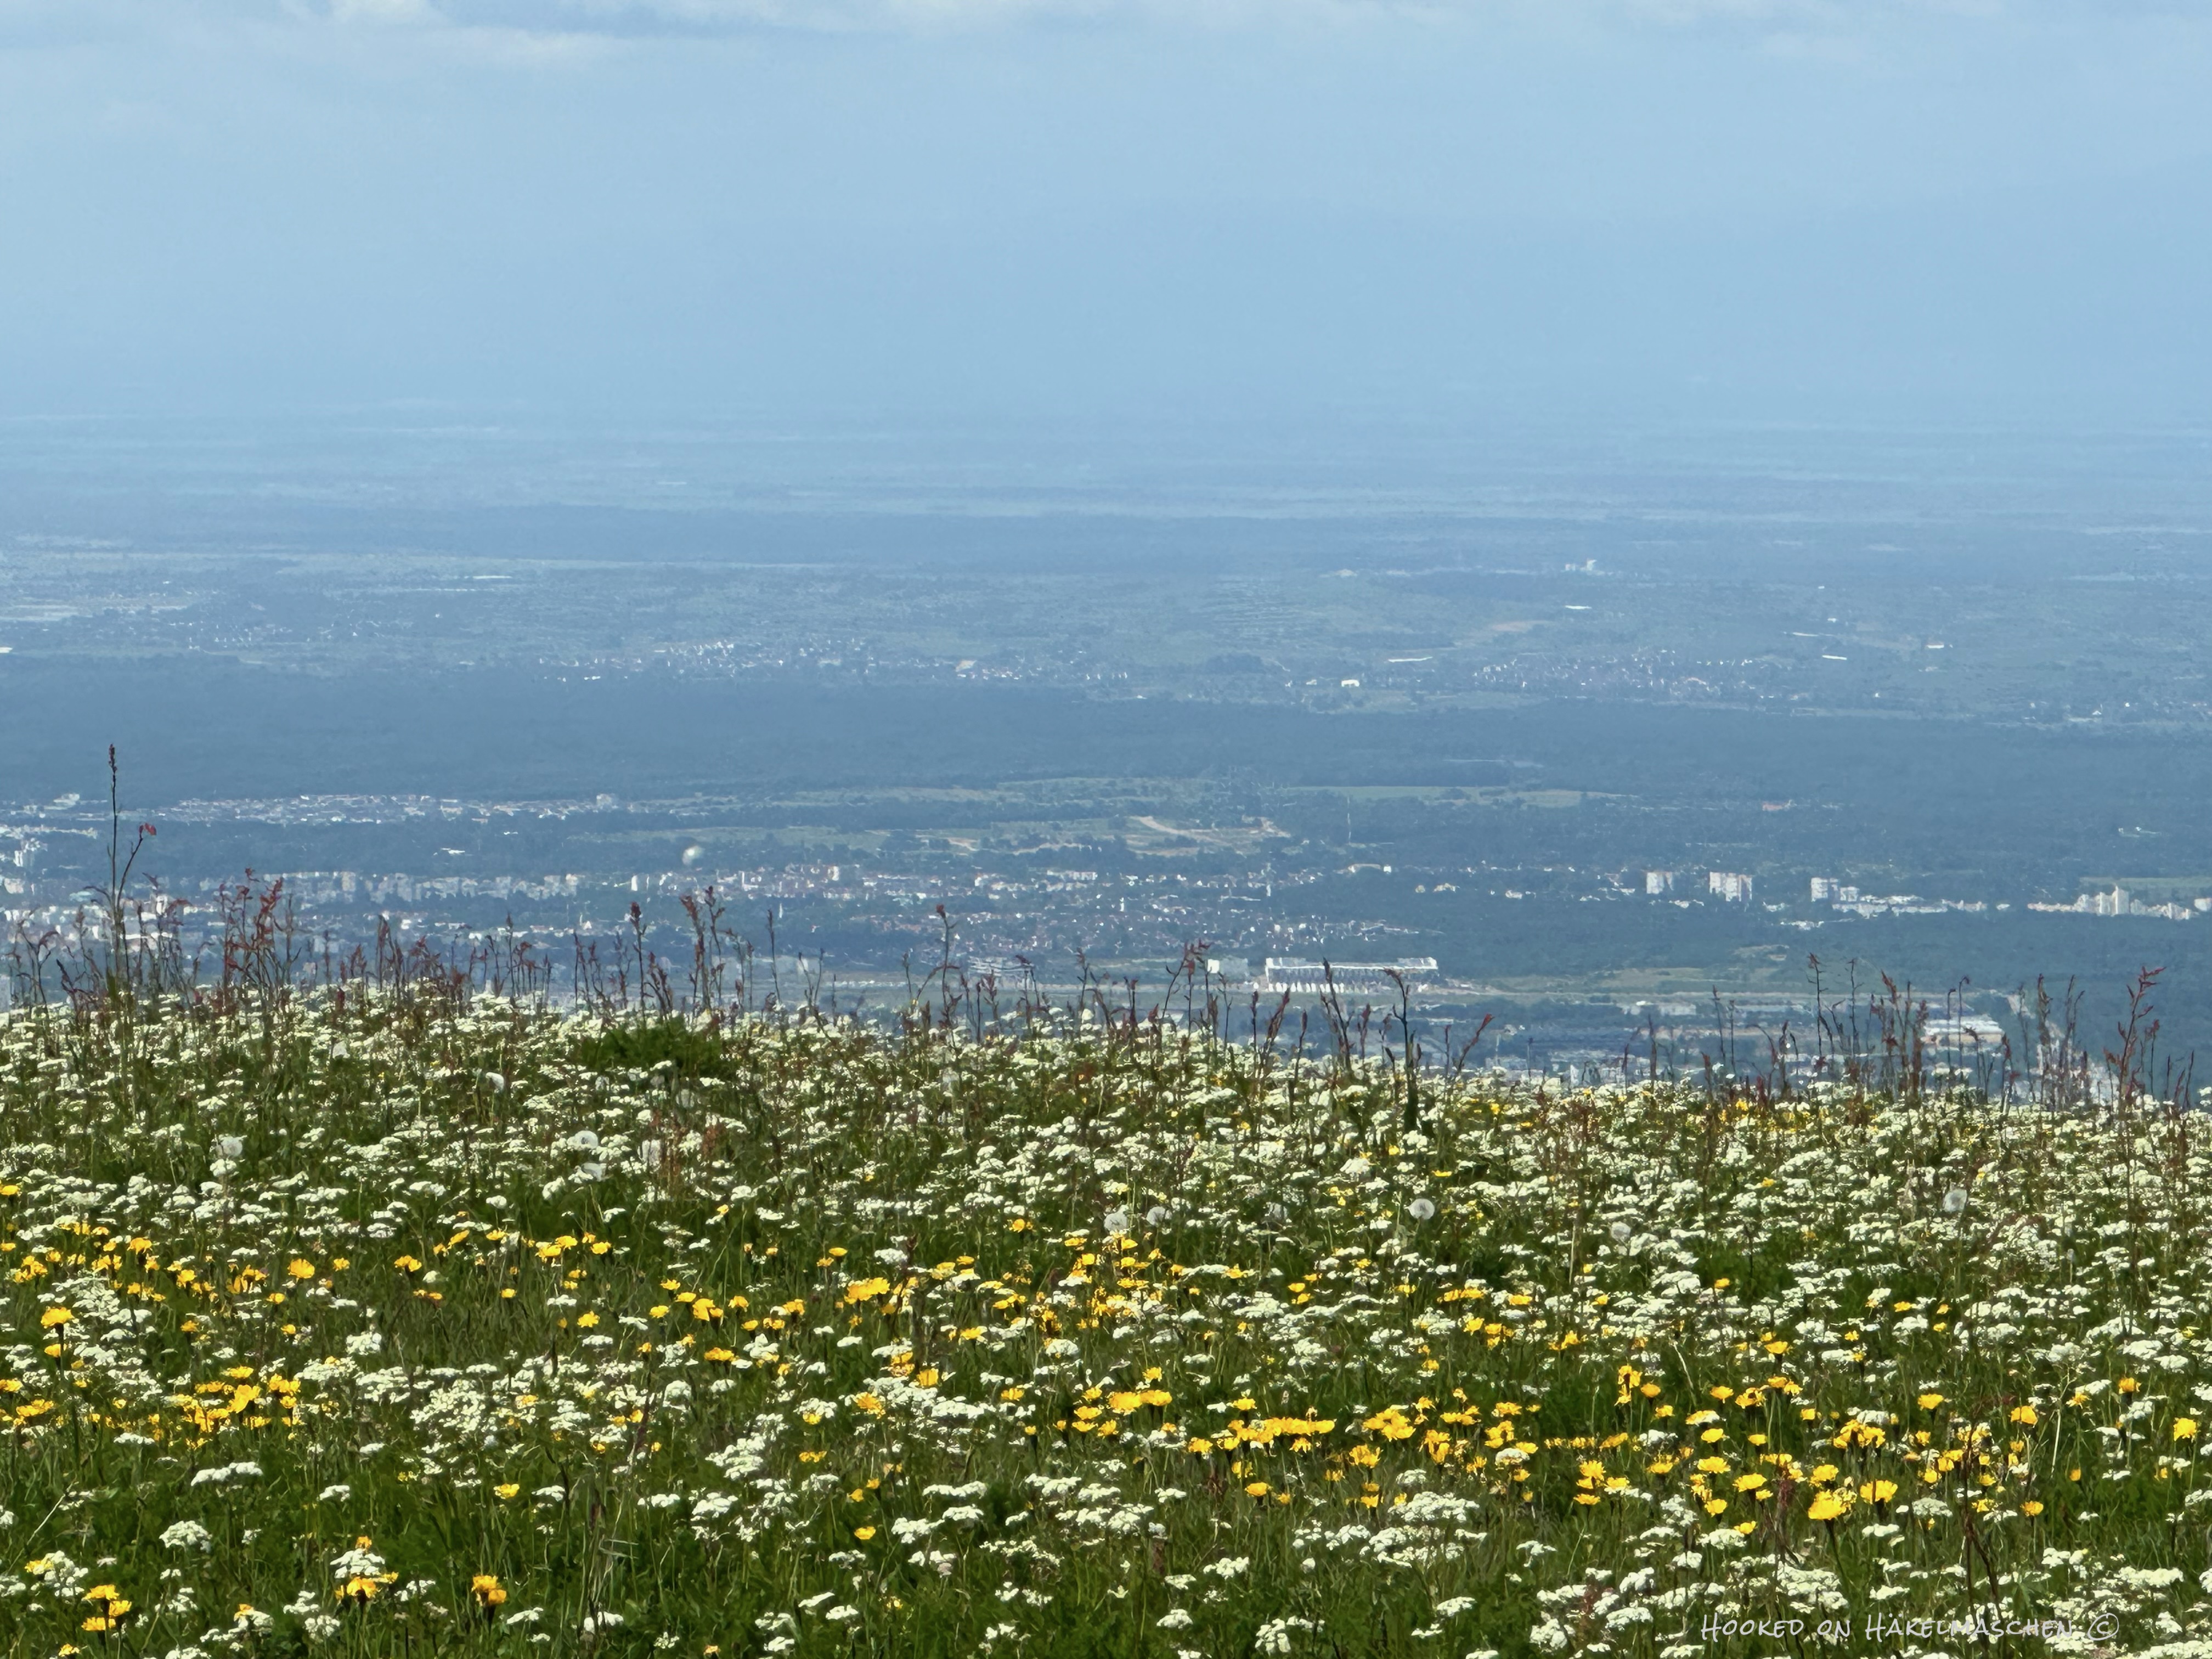
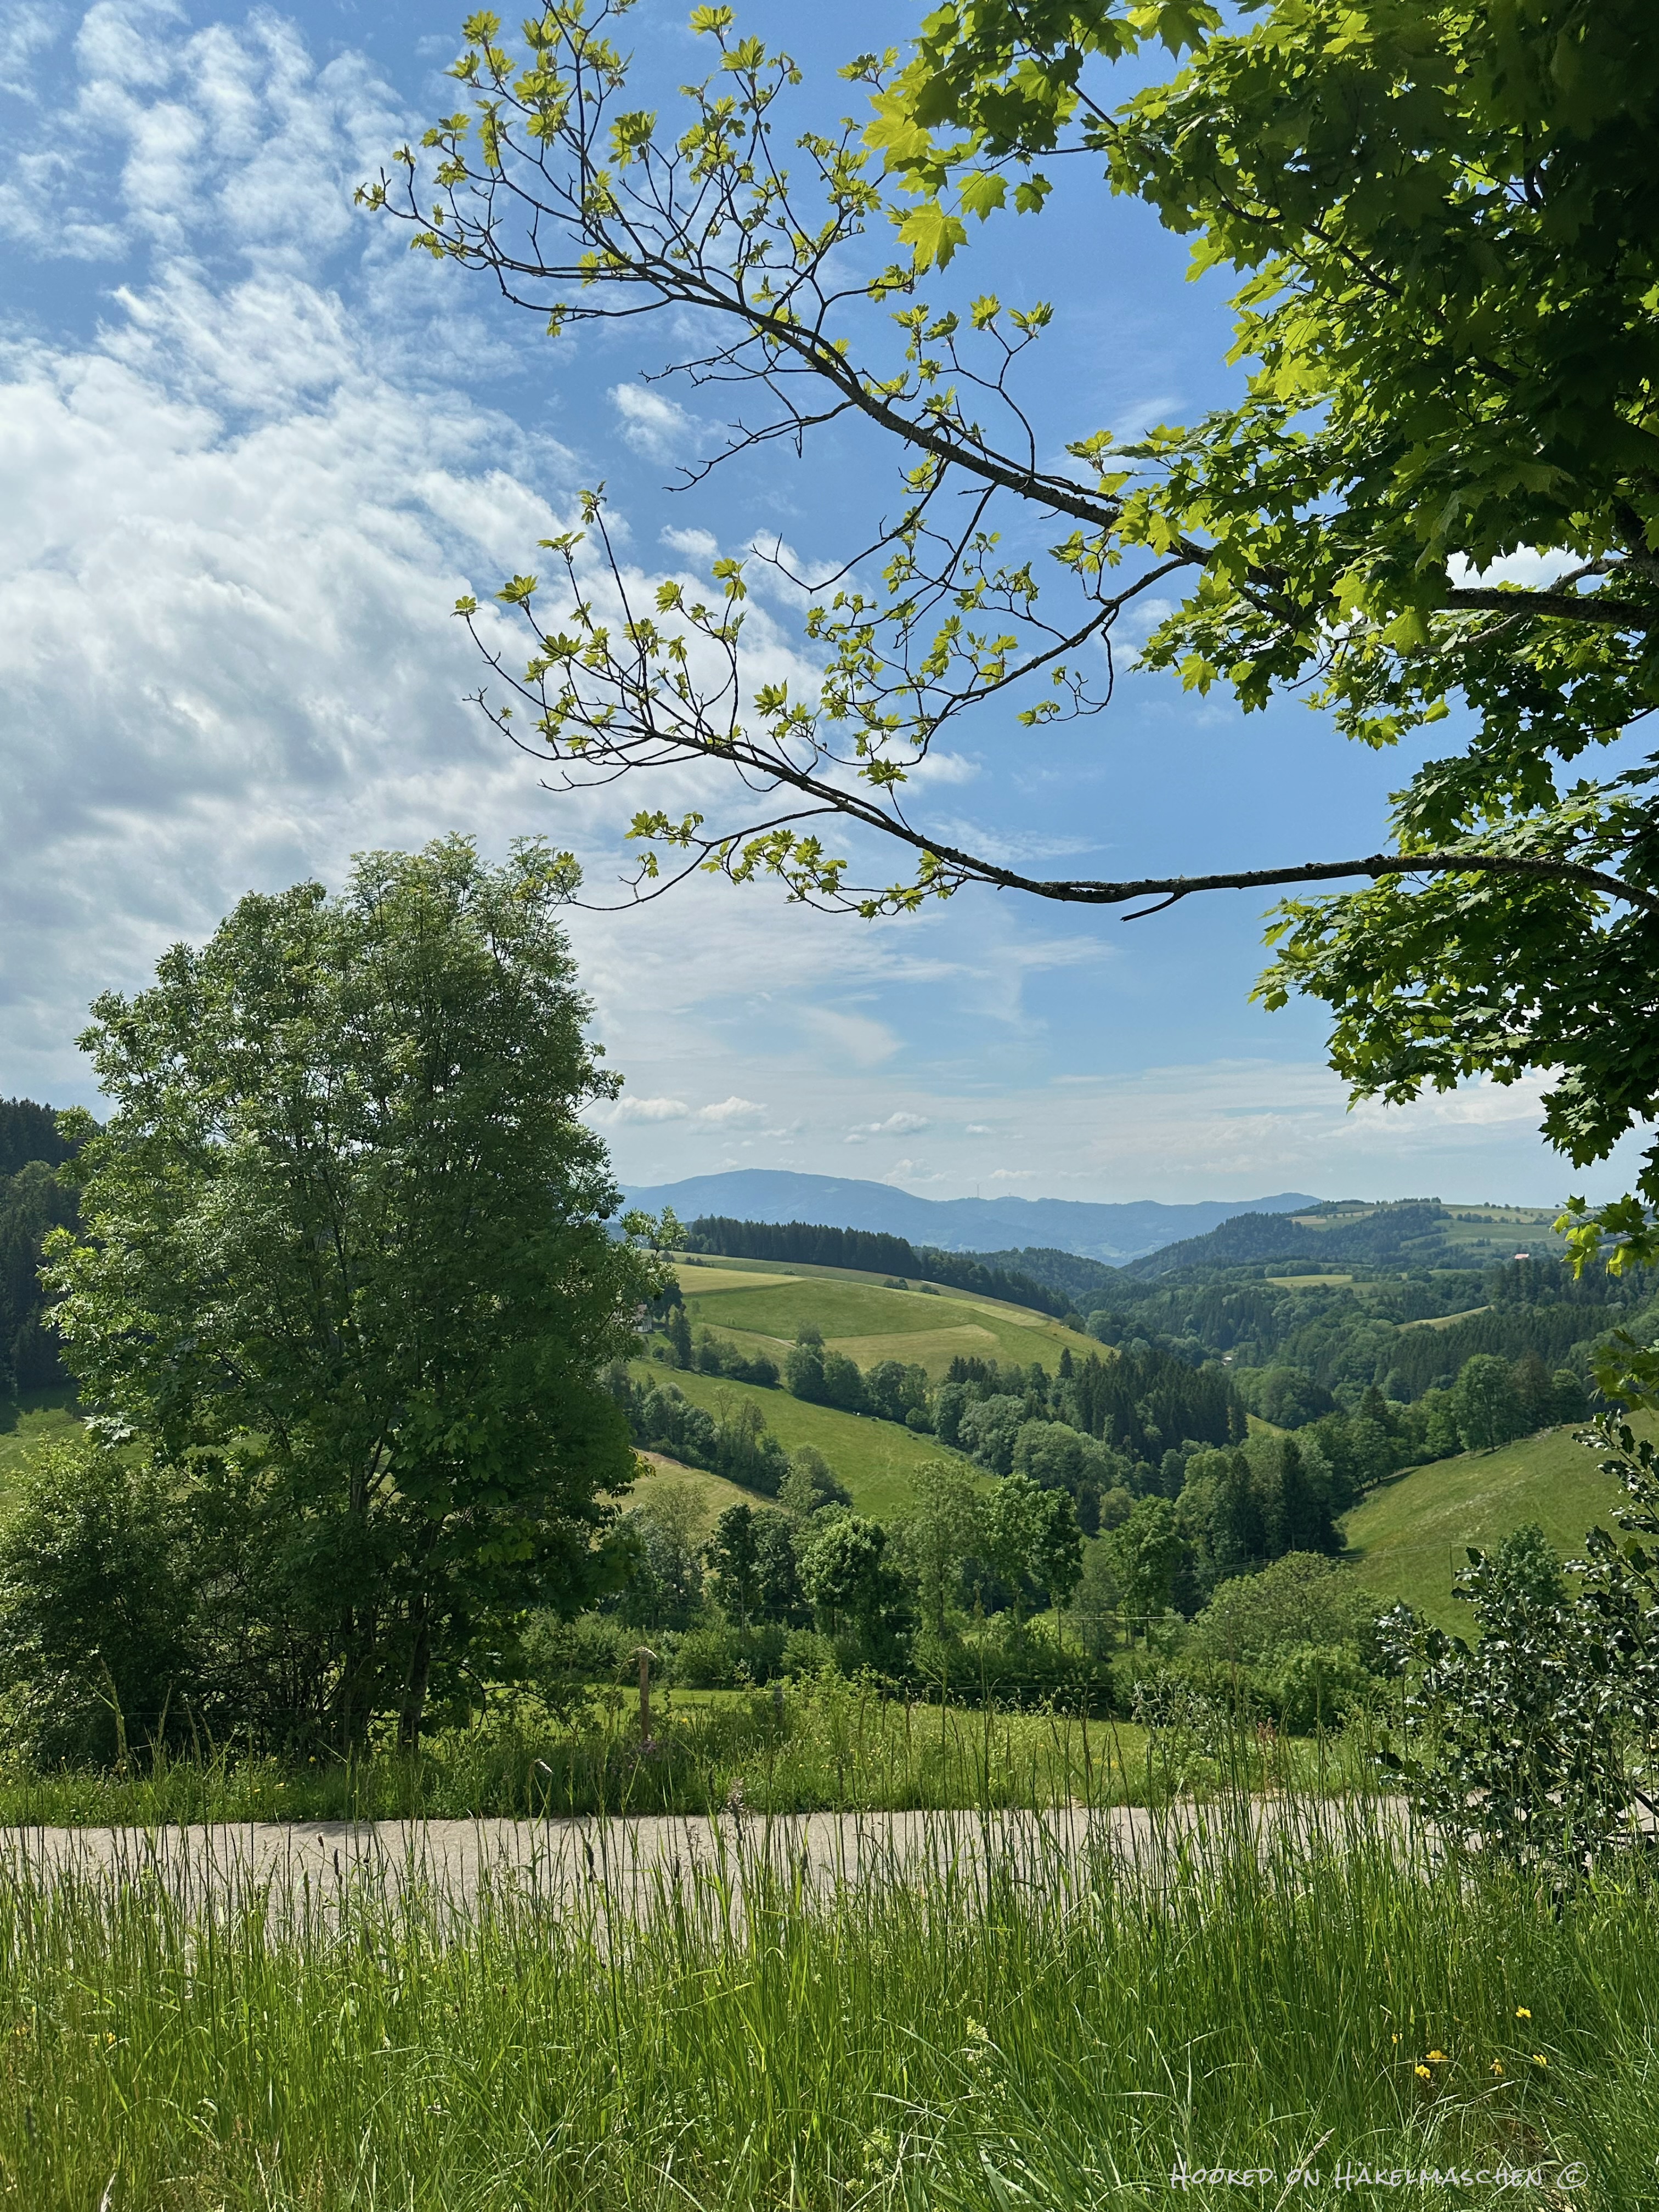
End of May is my birthday, so we travelled to the Black Forest for about 10 days. Even though the weather wasn’t so good, we really enjoyed our time. I love the Black Forest, especially at this time of year! Due to the mountainous landscape and the altitude, there is relatively little agriculture but all the more livestock breeding with cows, sheep and goats. The meadows just bloom wonderfully at this time of year! We had beautiful long walks and a very relaxing time!
Here some
Holiday impressions
Of course, I also had my crochet stuff with me (and a little bit of knitting). But I have to admit that I didn’t get as far with it as I had intended. Towards the end of the holiday I was kind of tired and at the same time my bones were aching … When we got home, I realised that I had contracted a COVID infection. Unfortunately, that put me out of action for another 10 days …
I’m starting to feel better now, even if my voice is still a bit raspy and I’m still coughing – at least my brain is working again!!
My crochet progress
Unfortunately there’s not much news to report about my cushion cover. Let alone a final photo and / or a pattern.
At least I have finished the front panel. All my squares are joined and I also added a small border.
still unblocked …
… the front side
The finished size of the panel is 46 x 46 cm (about 18 x 18 inch). I would like to use the cover for a 50 x 50 cm (20 in) cushion. I read somewhere that the cover for a square cushion should be about 5 cm (2 in) smaller than the insert to ensure a nice fit. Until now, I have always made the cushion covers to fit exactly. I then often had the problem that they tended to look too big, especially at the corners. So I thought I’d give the smaller size a try. I only hope that it will work out well! Otherwise I will have to start over.
At the moment I’m working on the back. I opted for a simple square. Crocheted in rounds with double crochet. I still have two or three rounds to go, then the joining can begin.
Work in progress …
… the back side
I can’t wait to see how it turns out …
I hope to finish it in the course of next week. Then it’s time to write down the pattern!
Have a lovely weekend 💕
Edit 06.07.2025: I’ve just stumbled over my notes: I was wrong about the size of the cushion cover. It should not be 10 % smaller as I had originally written, but 5 cm (2 in). I have just corrected this – sorry!
Back then I used 15 different colours and created the random arrangement of the colours with a random generator. I was totally happy with the result! You‘ll find all information about it in this post.
Choosing colours for my new project
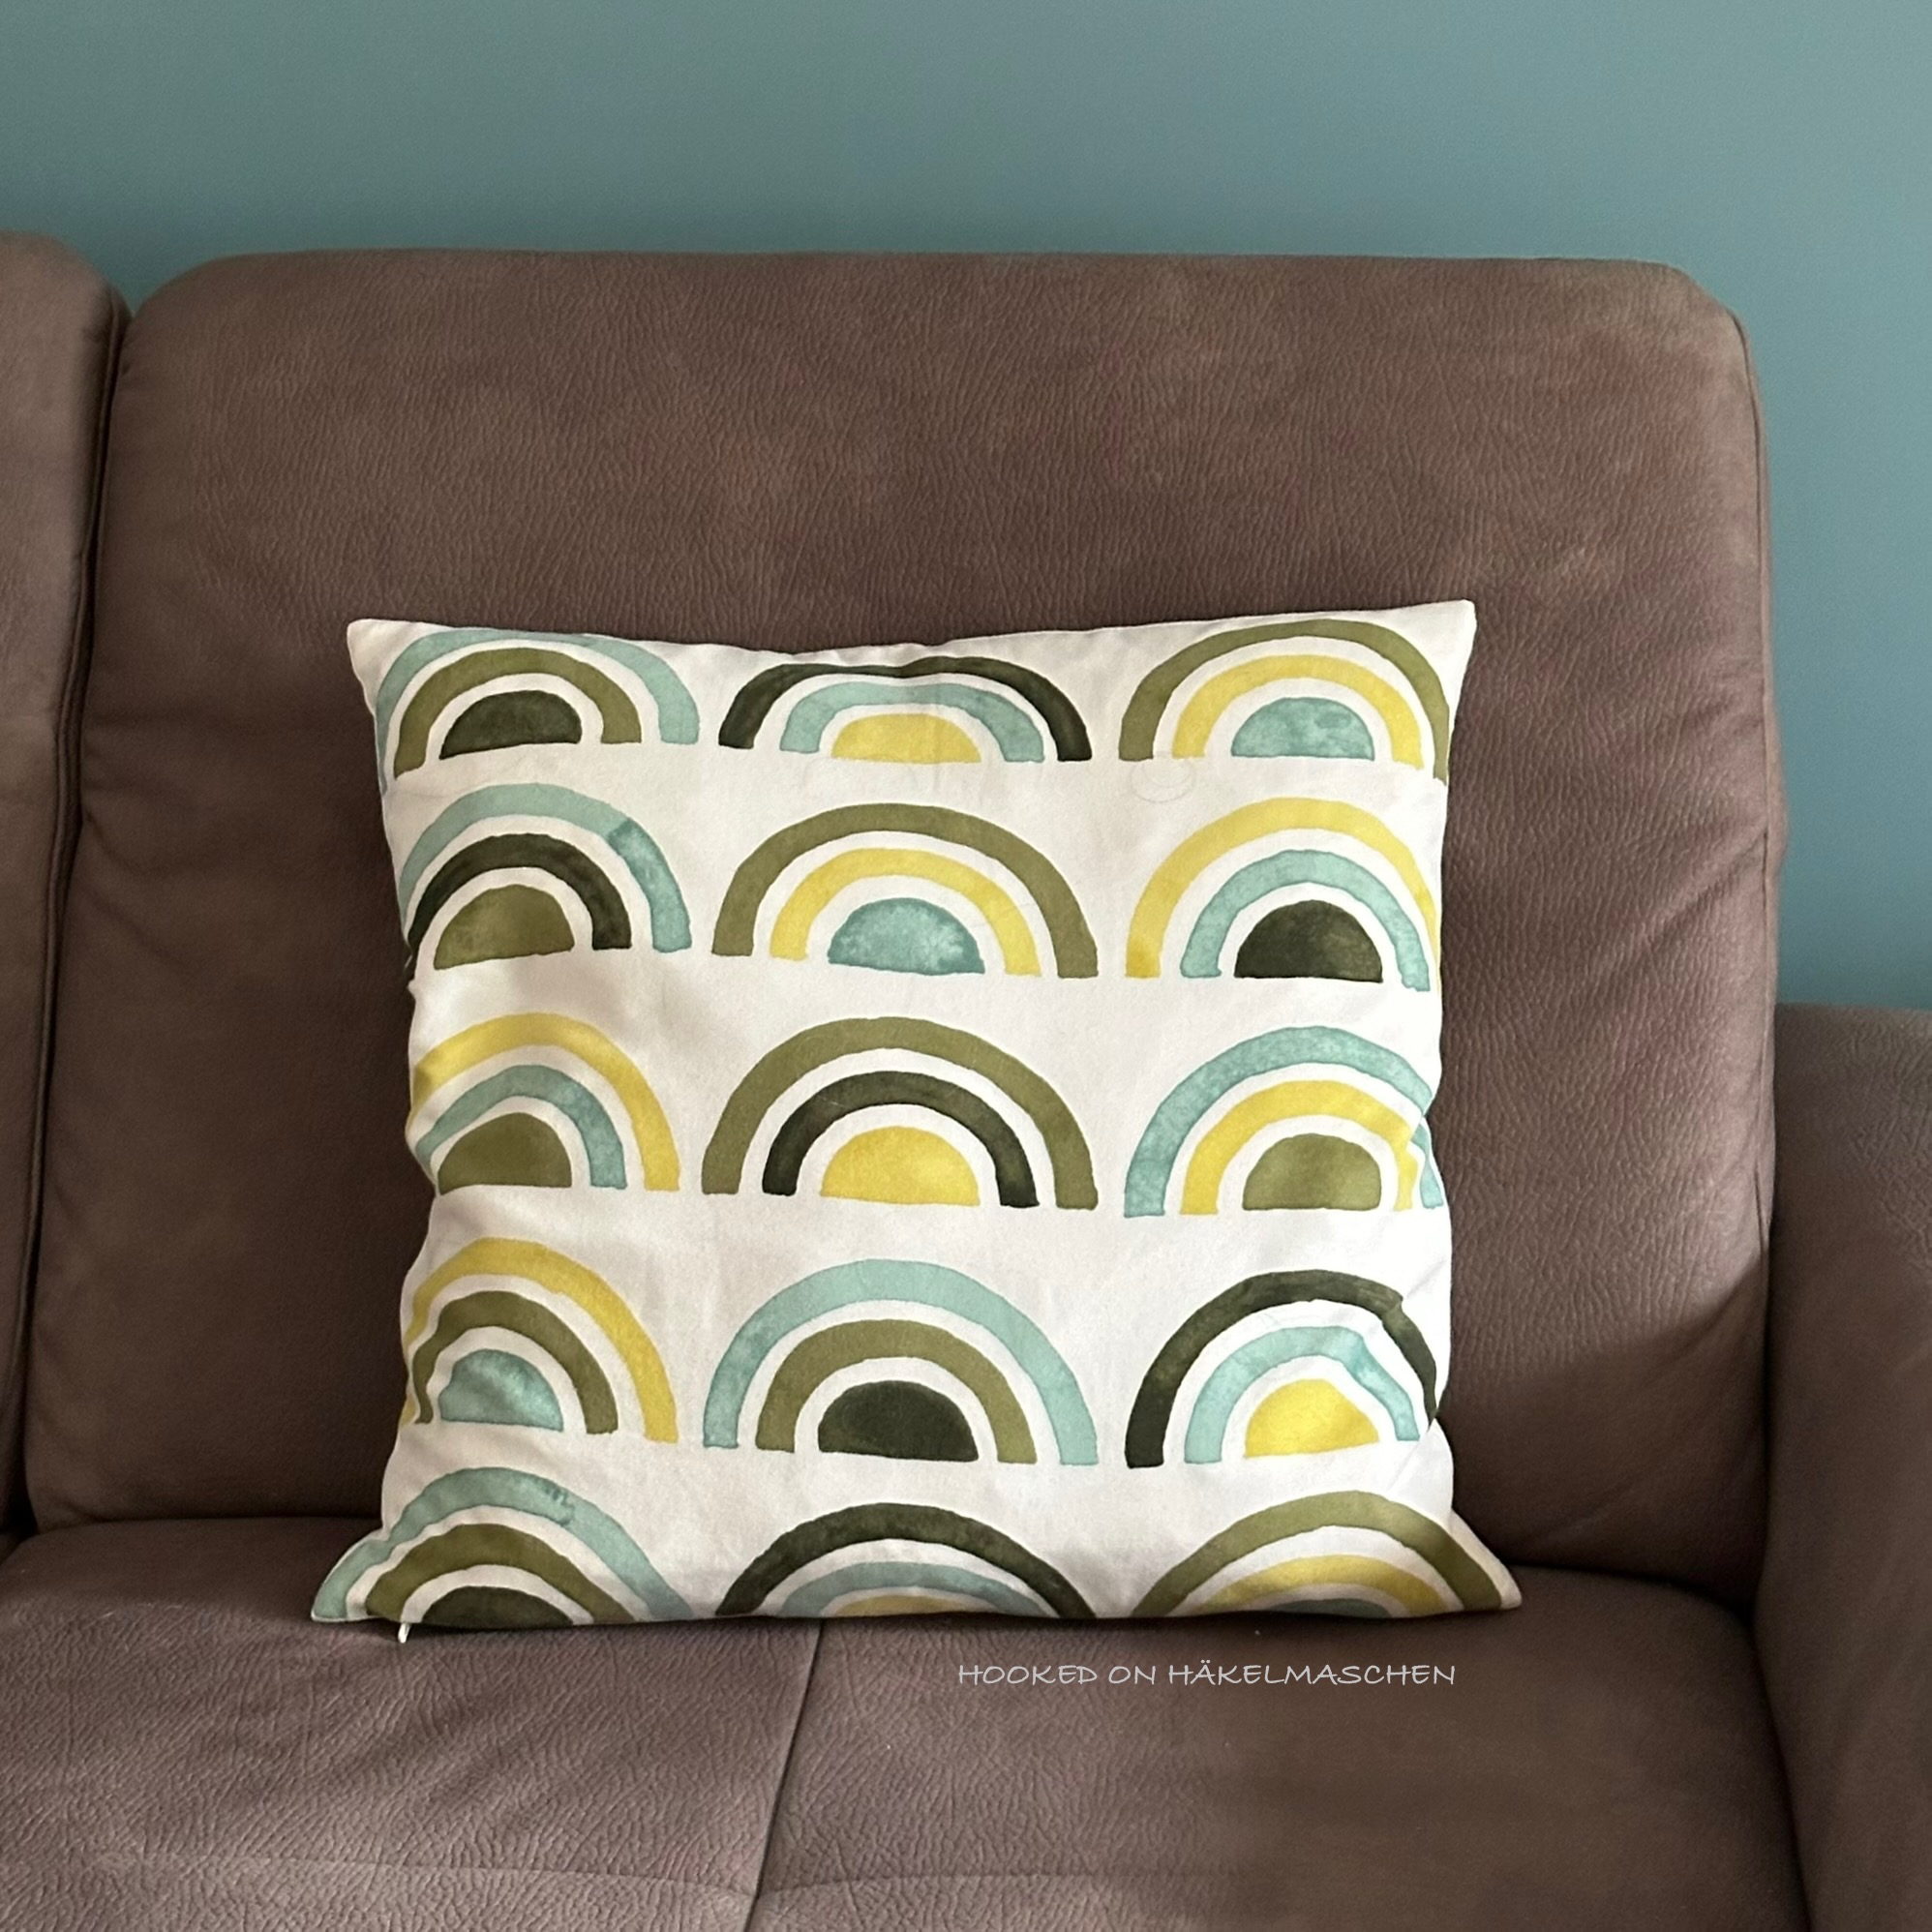
Although I am using a similar pattern, the colours will be different in my new project. I’m using a colour combination that I’ve wanted to try for a long time.
My inspiration is a cushion I have from IKEA.
A mixture of green and blue tones, with a yellow undertone in the green shades.
For my Happy Circles wall hangings, the random colour placement worked so well, so I wanted to use the same method for the cushion cover.
Well…
Using a random generator
Unfortunately, using a random generator didn’t work out as expected this time.
No matter how many times I started the random generator and regardless of the order in which I entered the colours., they were not evenly distributed. Certain colours appeared more frequently than others.
What happened?
A bit frustrated, I then took a closer look at the topic, and it is actually logical. This effect is known as ‚true randomness‘ and that’s exactly what random.org provides. Without any corrections, repetitions and clusters are not only possible but even to be expected in true randomness.
What I learned is:
A pure random generator aims to be random, not uniform – therefore repetitions can occur that quickly catch the eye and may feel unbalanced in a small colour set. In a larger colour set, however, this same kind of distribution can create an attractive tension that supports the design.
So it wasn’t a mistake of the randomizer, it just wasn’t the right tool for this specific project
That’s why I decided to create my own ‚controlled’ randomness with a more balanced distribution of colours.
Creating my own randomness
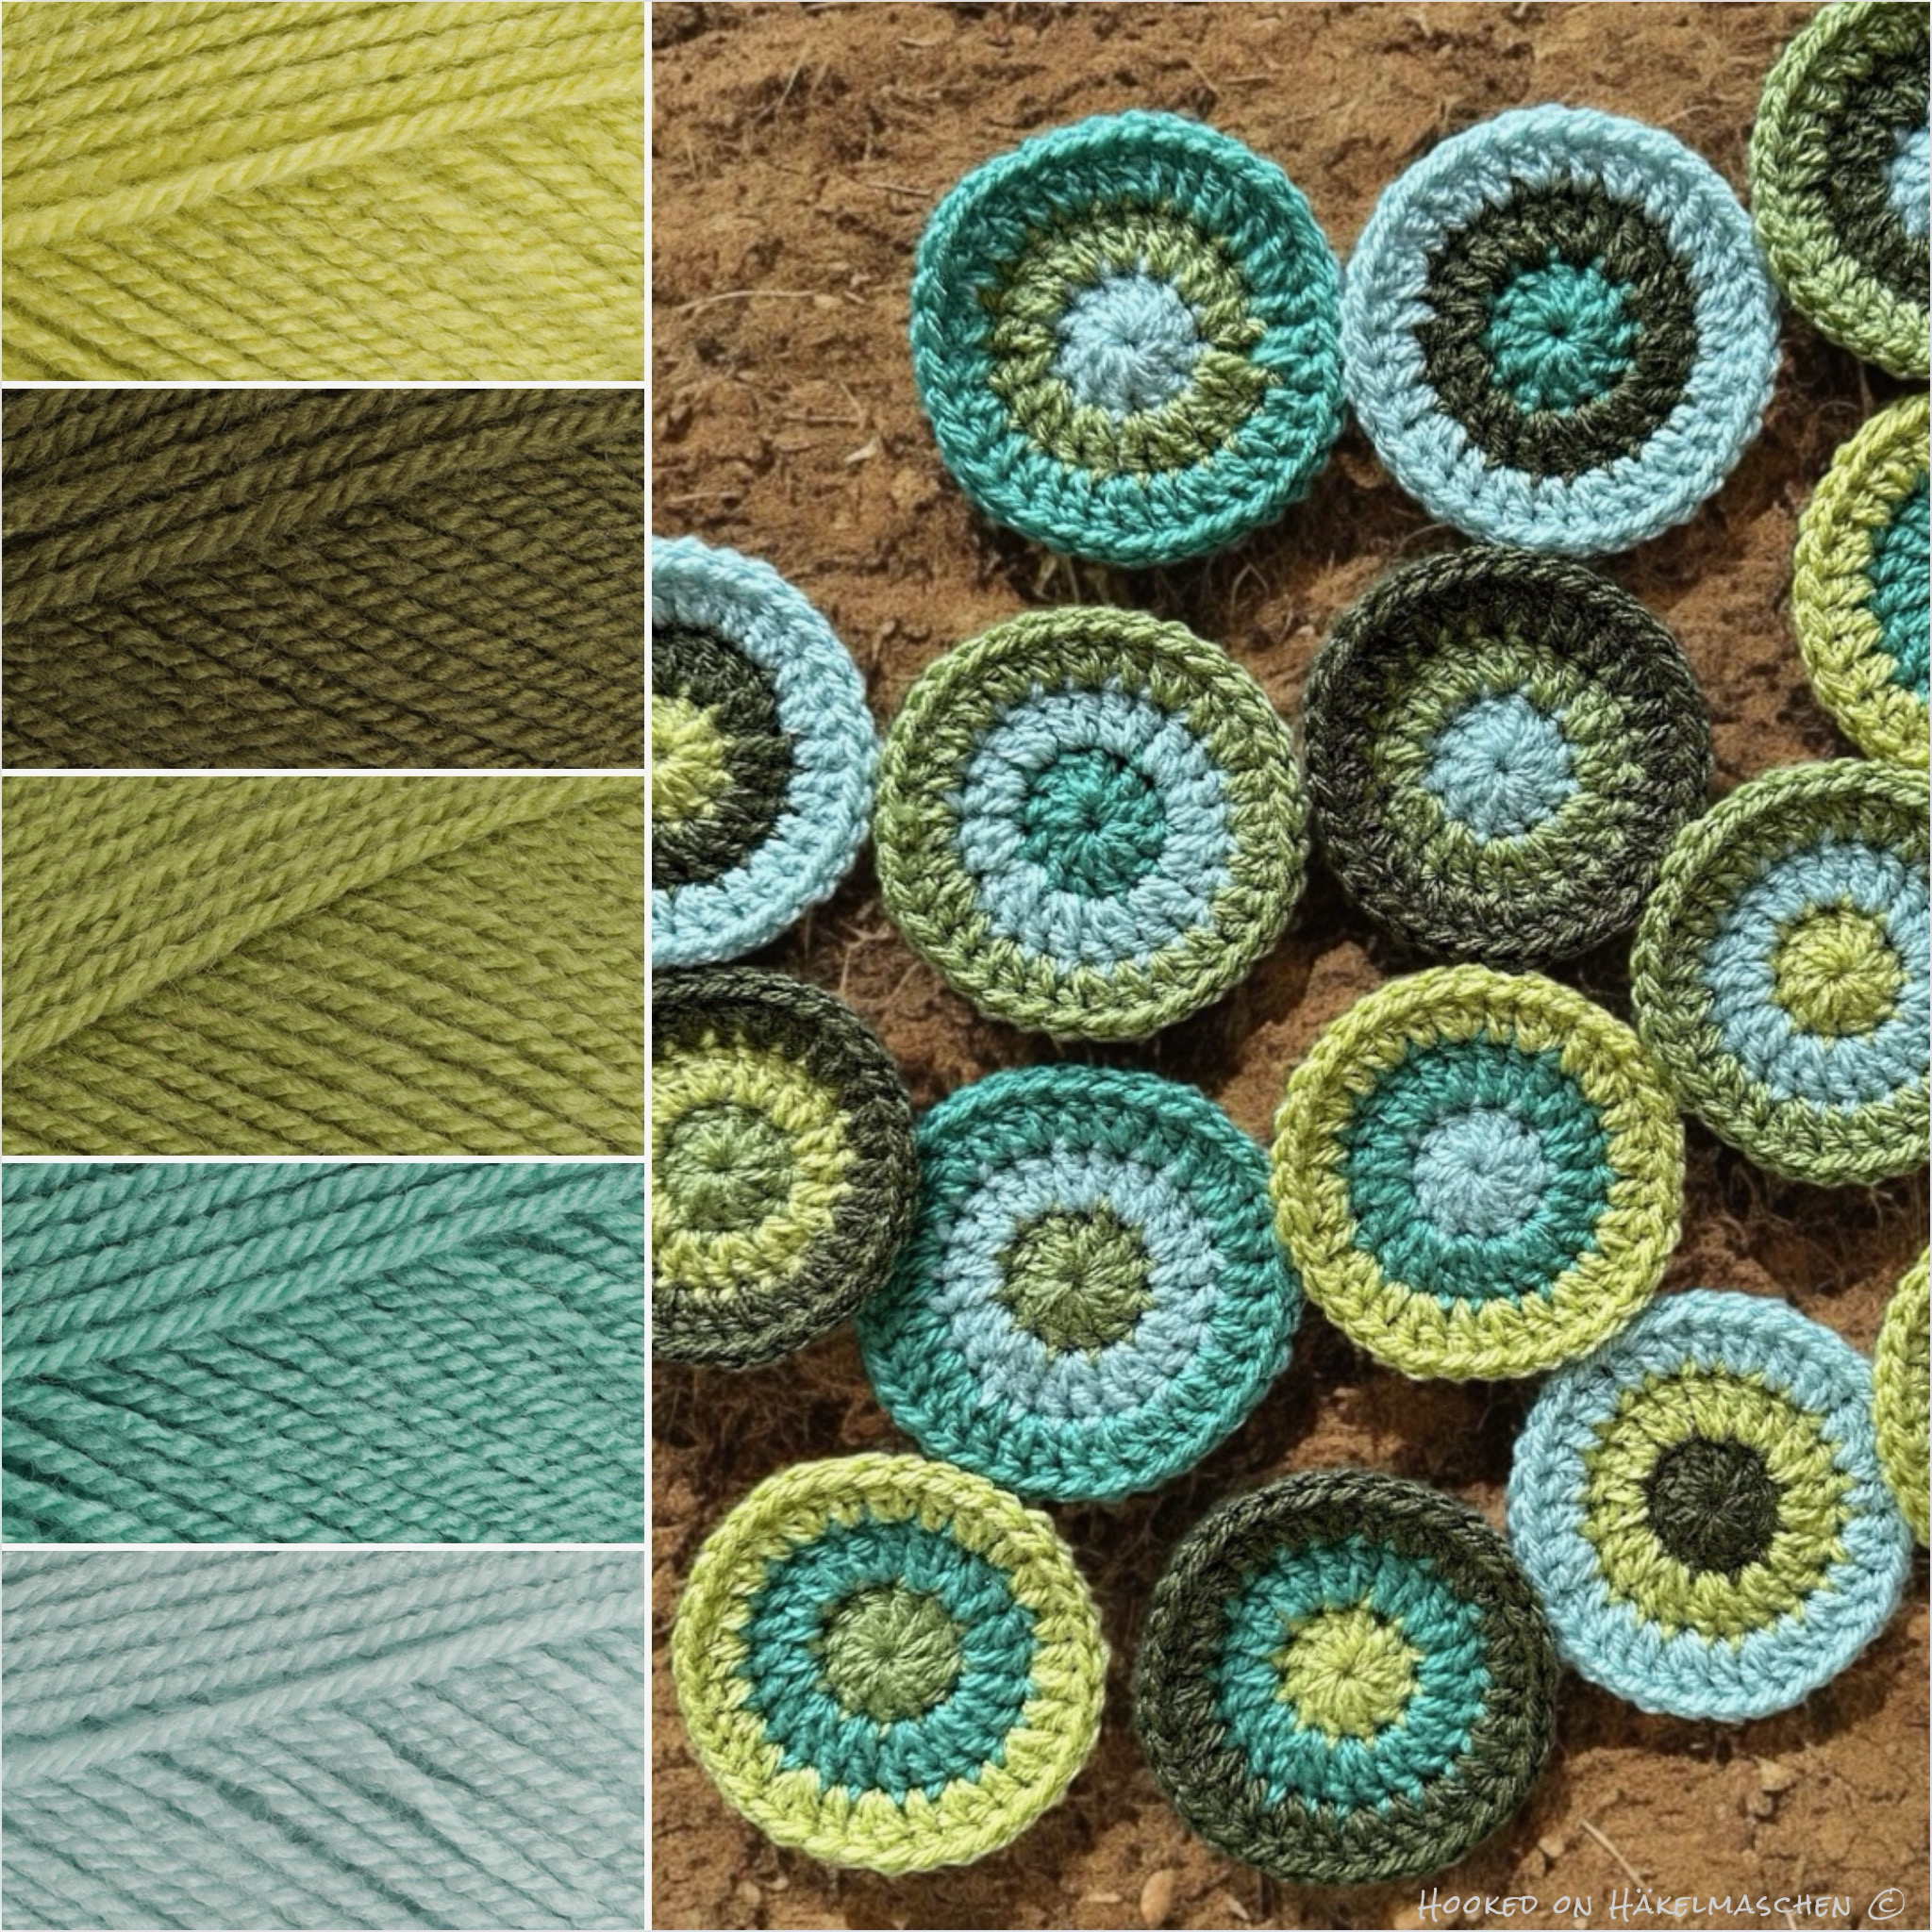
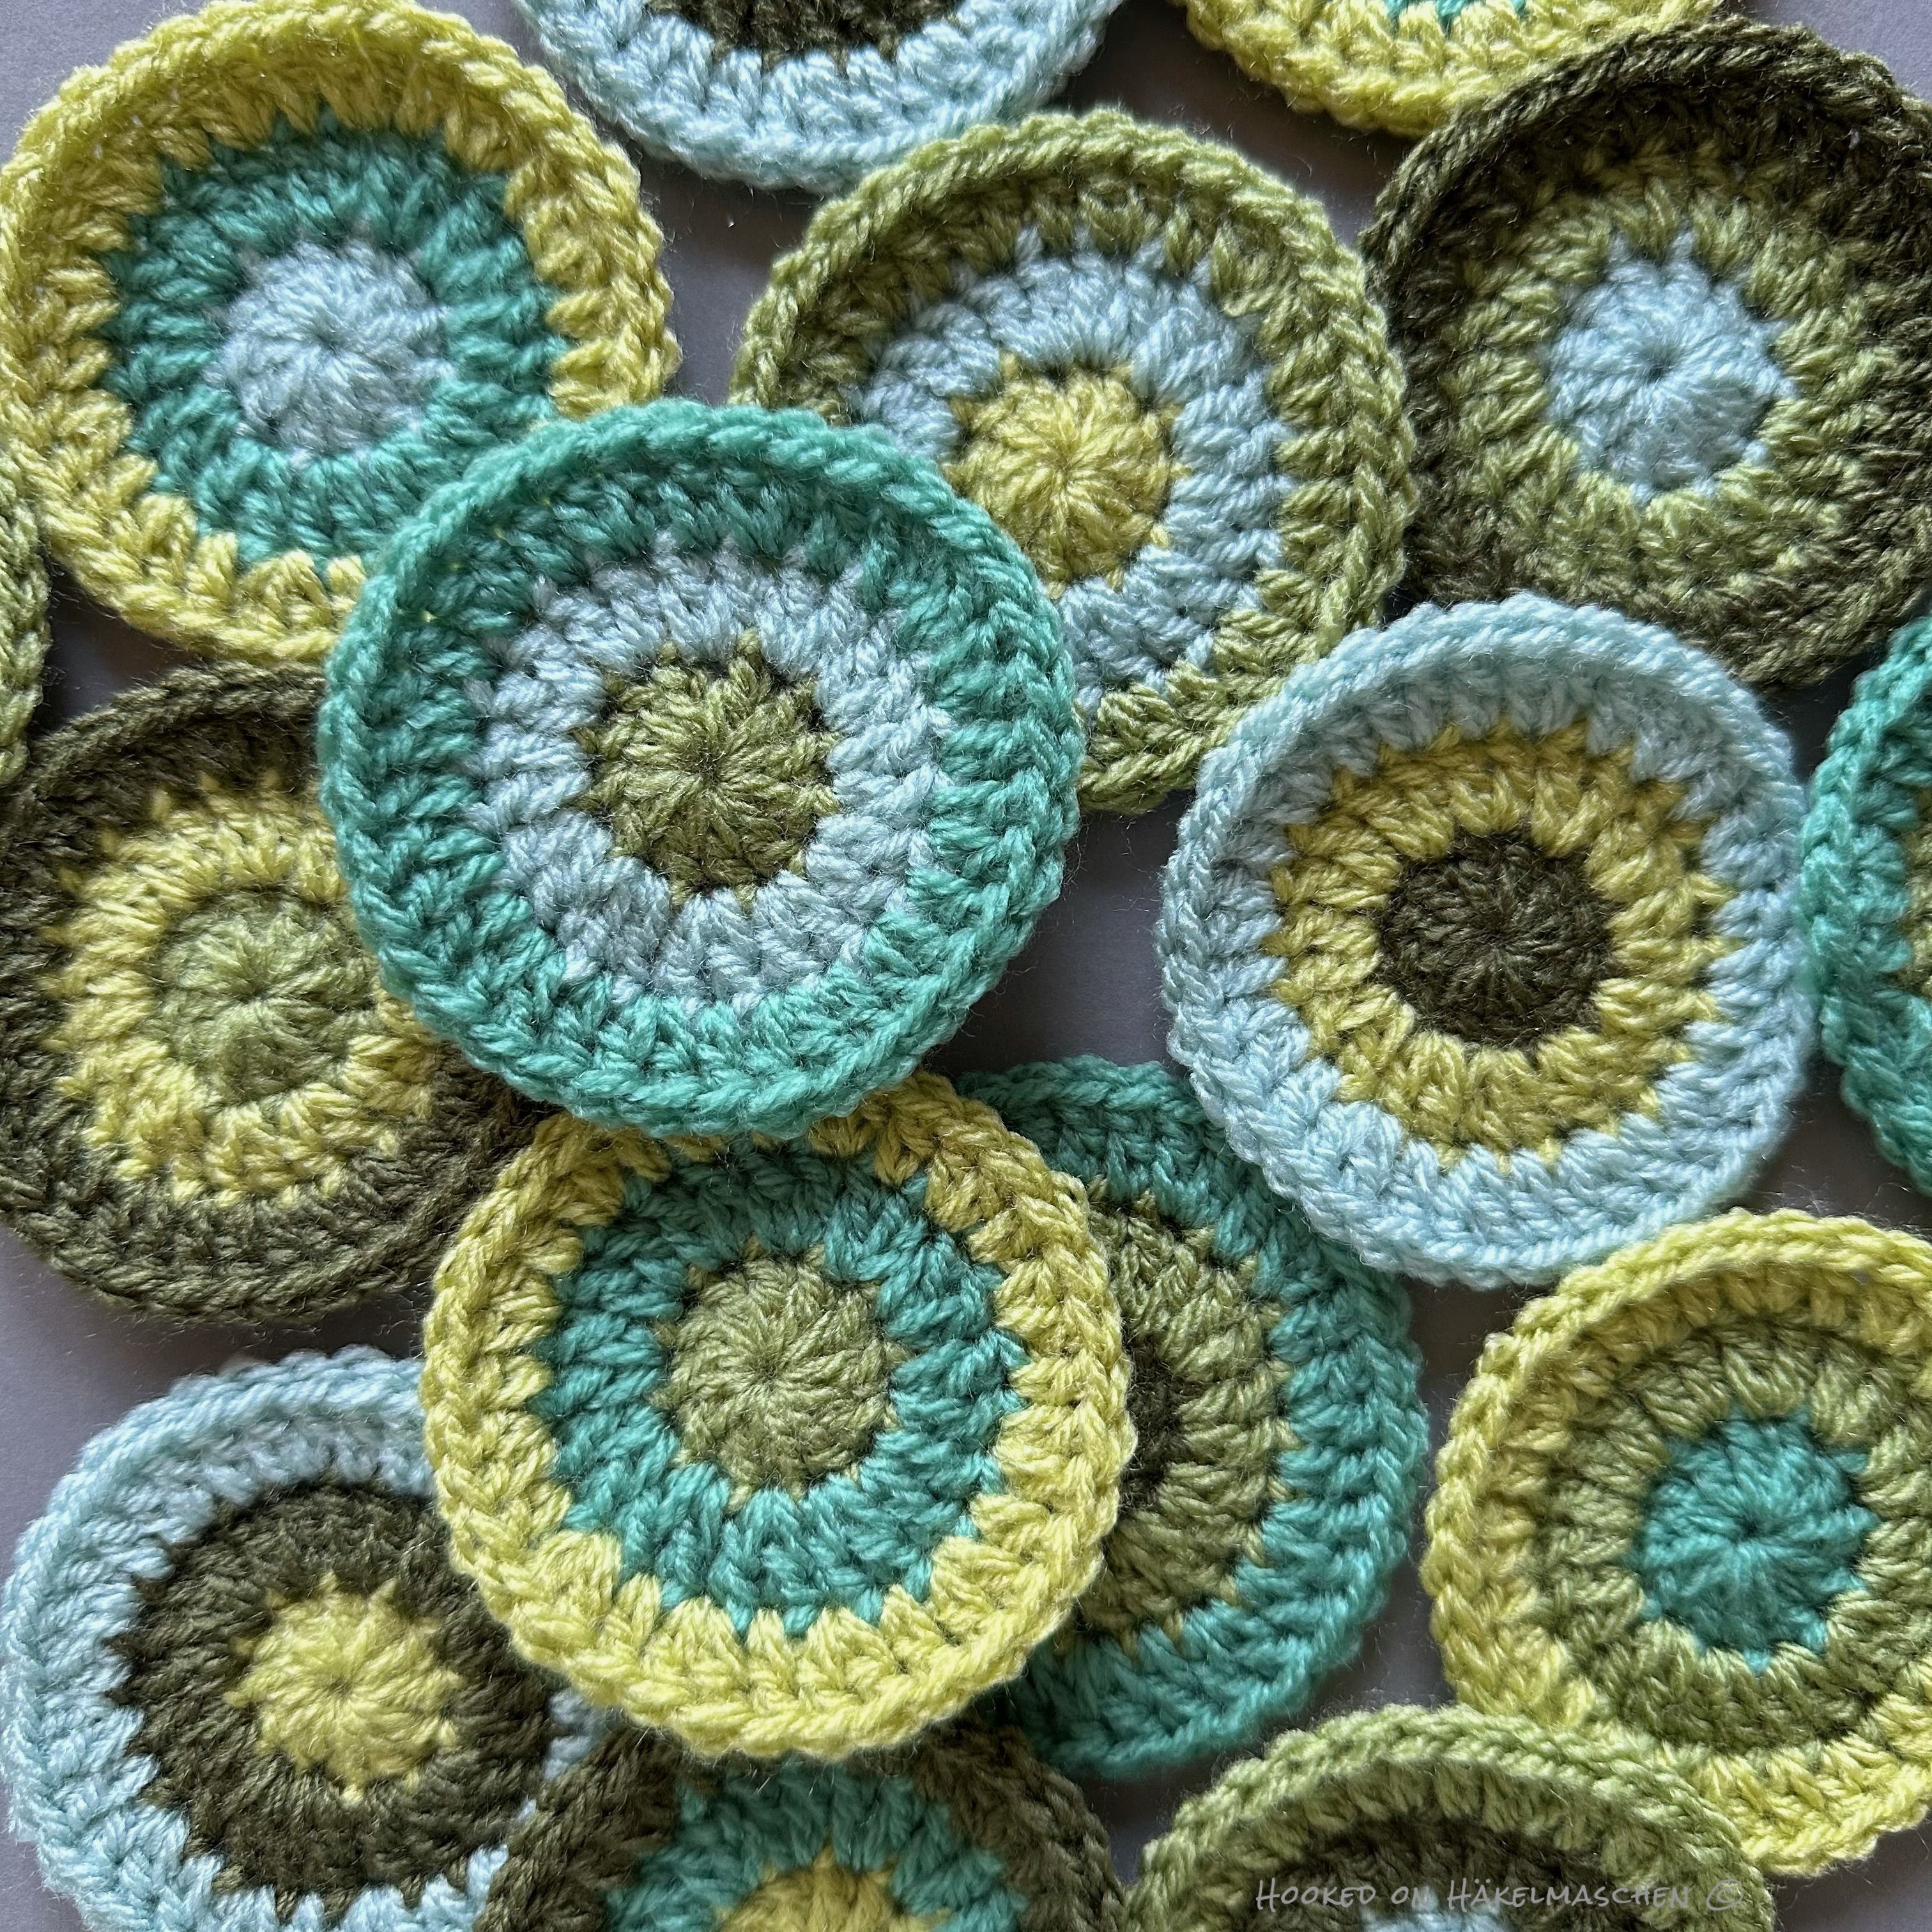
My starting point was
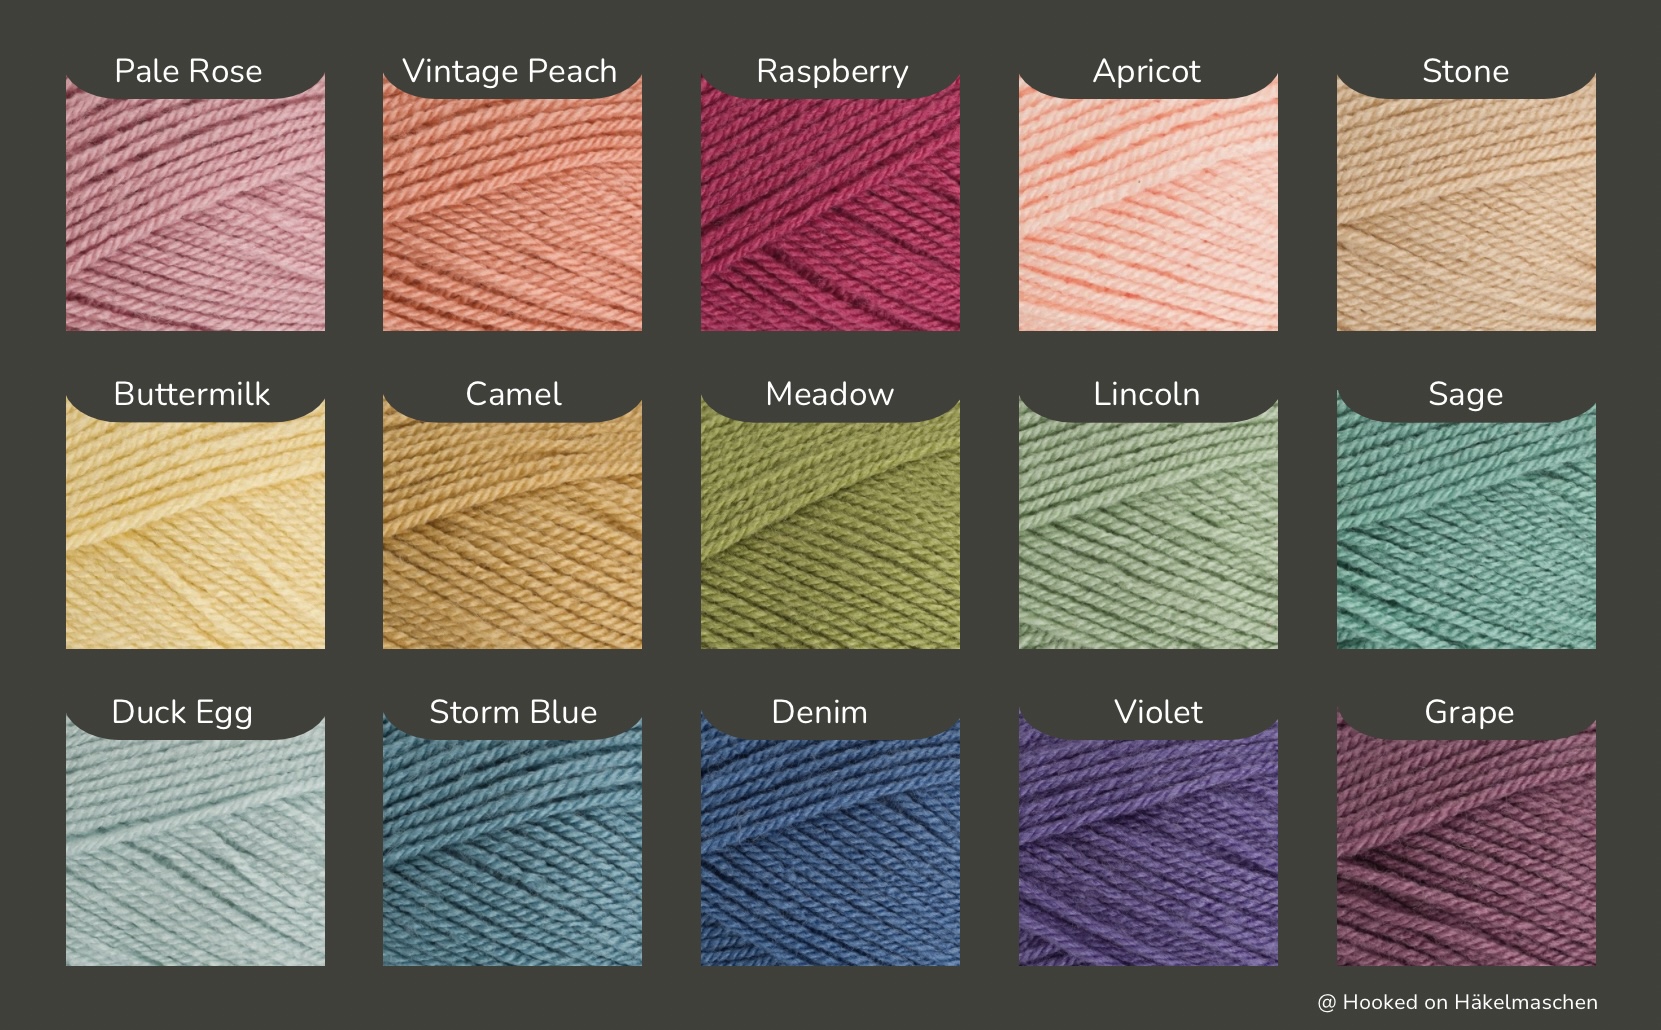
The five colours I wanted to use
First, I assigned a letter from A – E to each colour – without a specific scheme, just to make it easier
The sixteen circles I needed to create the squares for my front panel
The layout I planned was a 4 x 4 layout – 4 squares wide and 4 squares high
A – Duck Egg B – Meadow C – Sage D – Pistachio E – Khaki
I decided to start 4 circles with the same colour and 3 circles each with one of the other 4 colours. Makes a total of 16.
So I listed the 16 circles in a table and assigned them the colours A – E. Circles 1 – 4 started with colour A, circles 5 -7 with colour B and so on. This was the colour placement for the first round.
To determine the colours for the second round, I started at circle #1 with colour B (as it had already colour A for round 1) In the following I entered the colours consecutively downwards. To avoid two rounds having the same colour, I skipped the relevant letter in these cases. For example: in circle #6, following the sequence, it should have been colour B for round 2. I skipped this to C as B was already assigned for round 1.
Afterwards I did the same for round 3, starting at circle #1 with colour C.
The final result is shown in the table below. In this way, the colour combination looks much more balanced.
Random colour sequence
The finished circles were then ‚squared’ by adding two more rounds in Cream.
Creating a layout
Similar to my wall hangings, I created the final layout with the random generator.
Very easy, although it sounds a bit complicated when written.
Each of my squares already had a number, defined by the colour arrangement (according to the table above / random colour sequence)
I also numbered the places in a 4 x 4 grid symbolizing the layout (shown as mall grid, upper left in the picture below)
I entered numbers 1 -16, symbolizing the squares into the list generator of random.org and generated a random result
I arranged the squares according to this result in the 4×4 grid, made some changes and voilà …
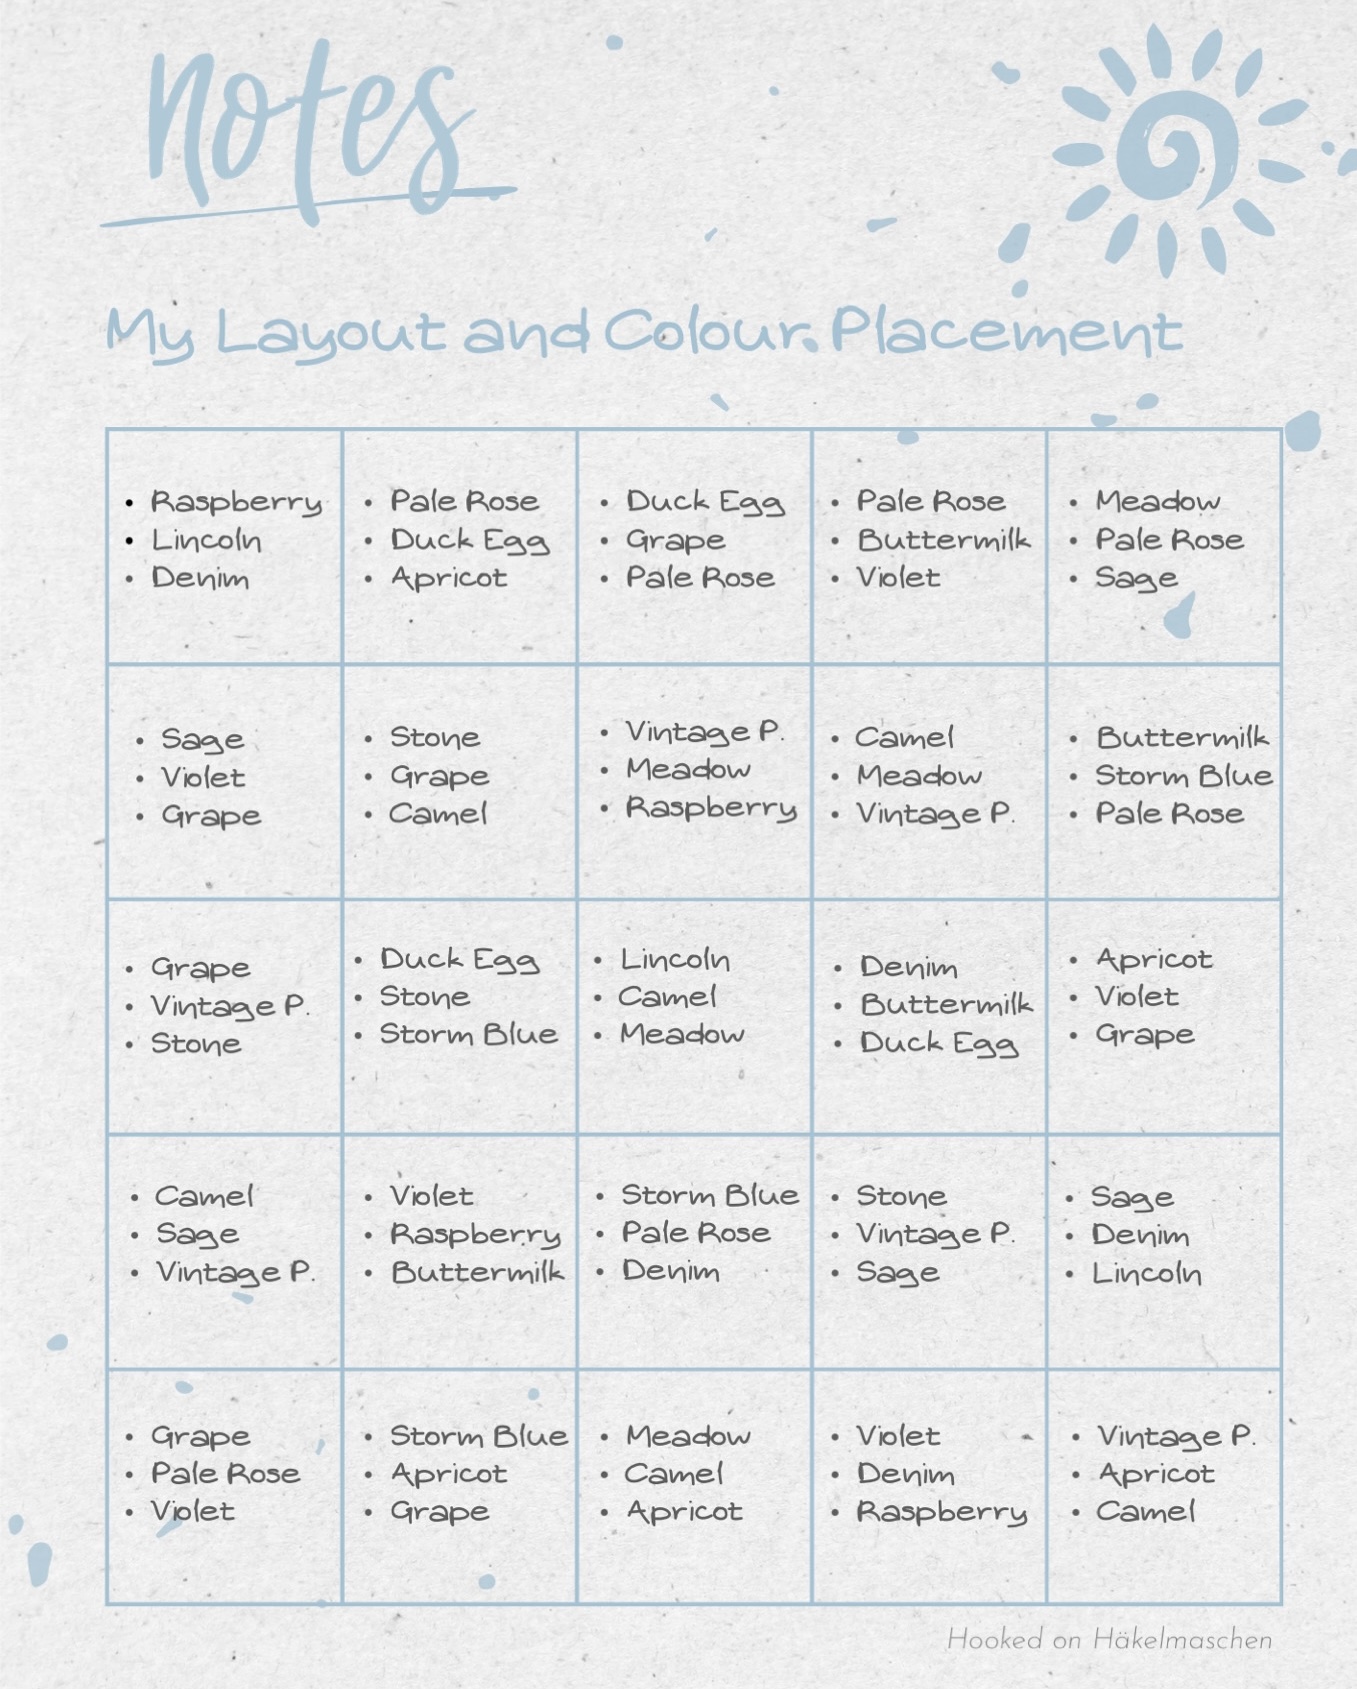
Below my detailed list of the colours used for the circles for each round and the corresponding layout.
Final colour scheme and layout
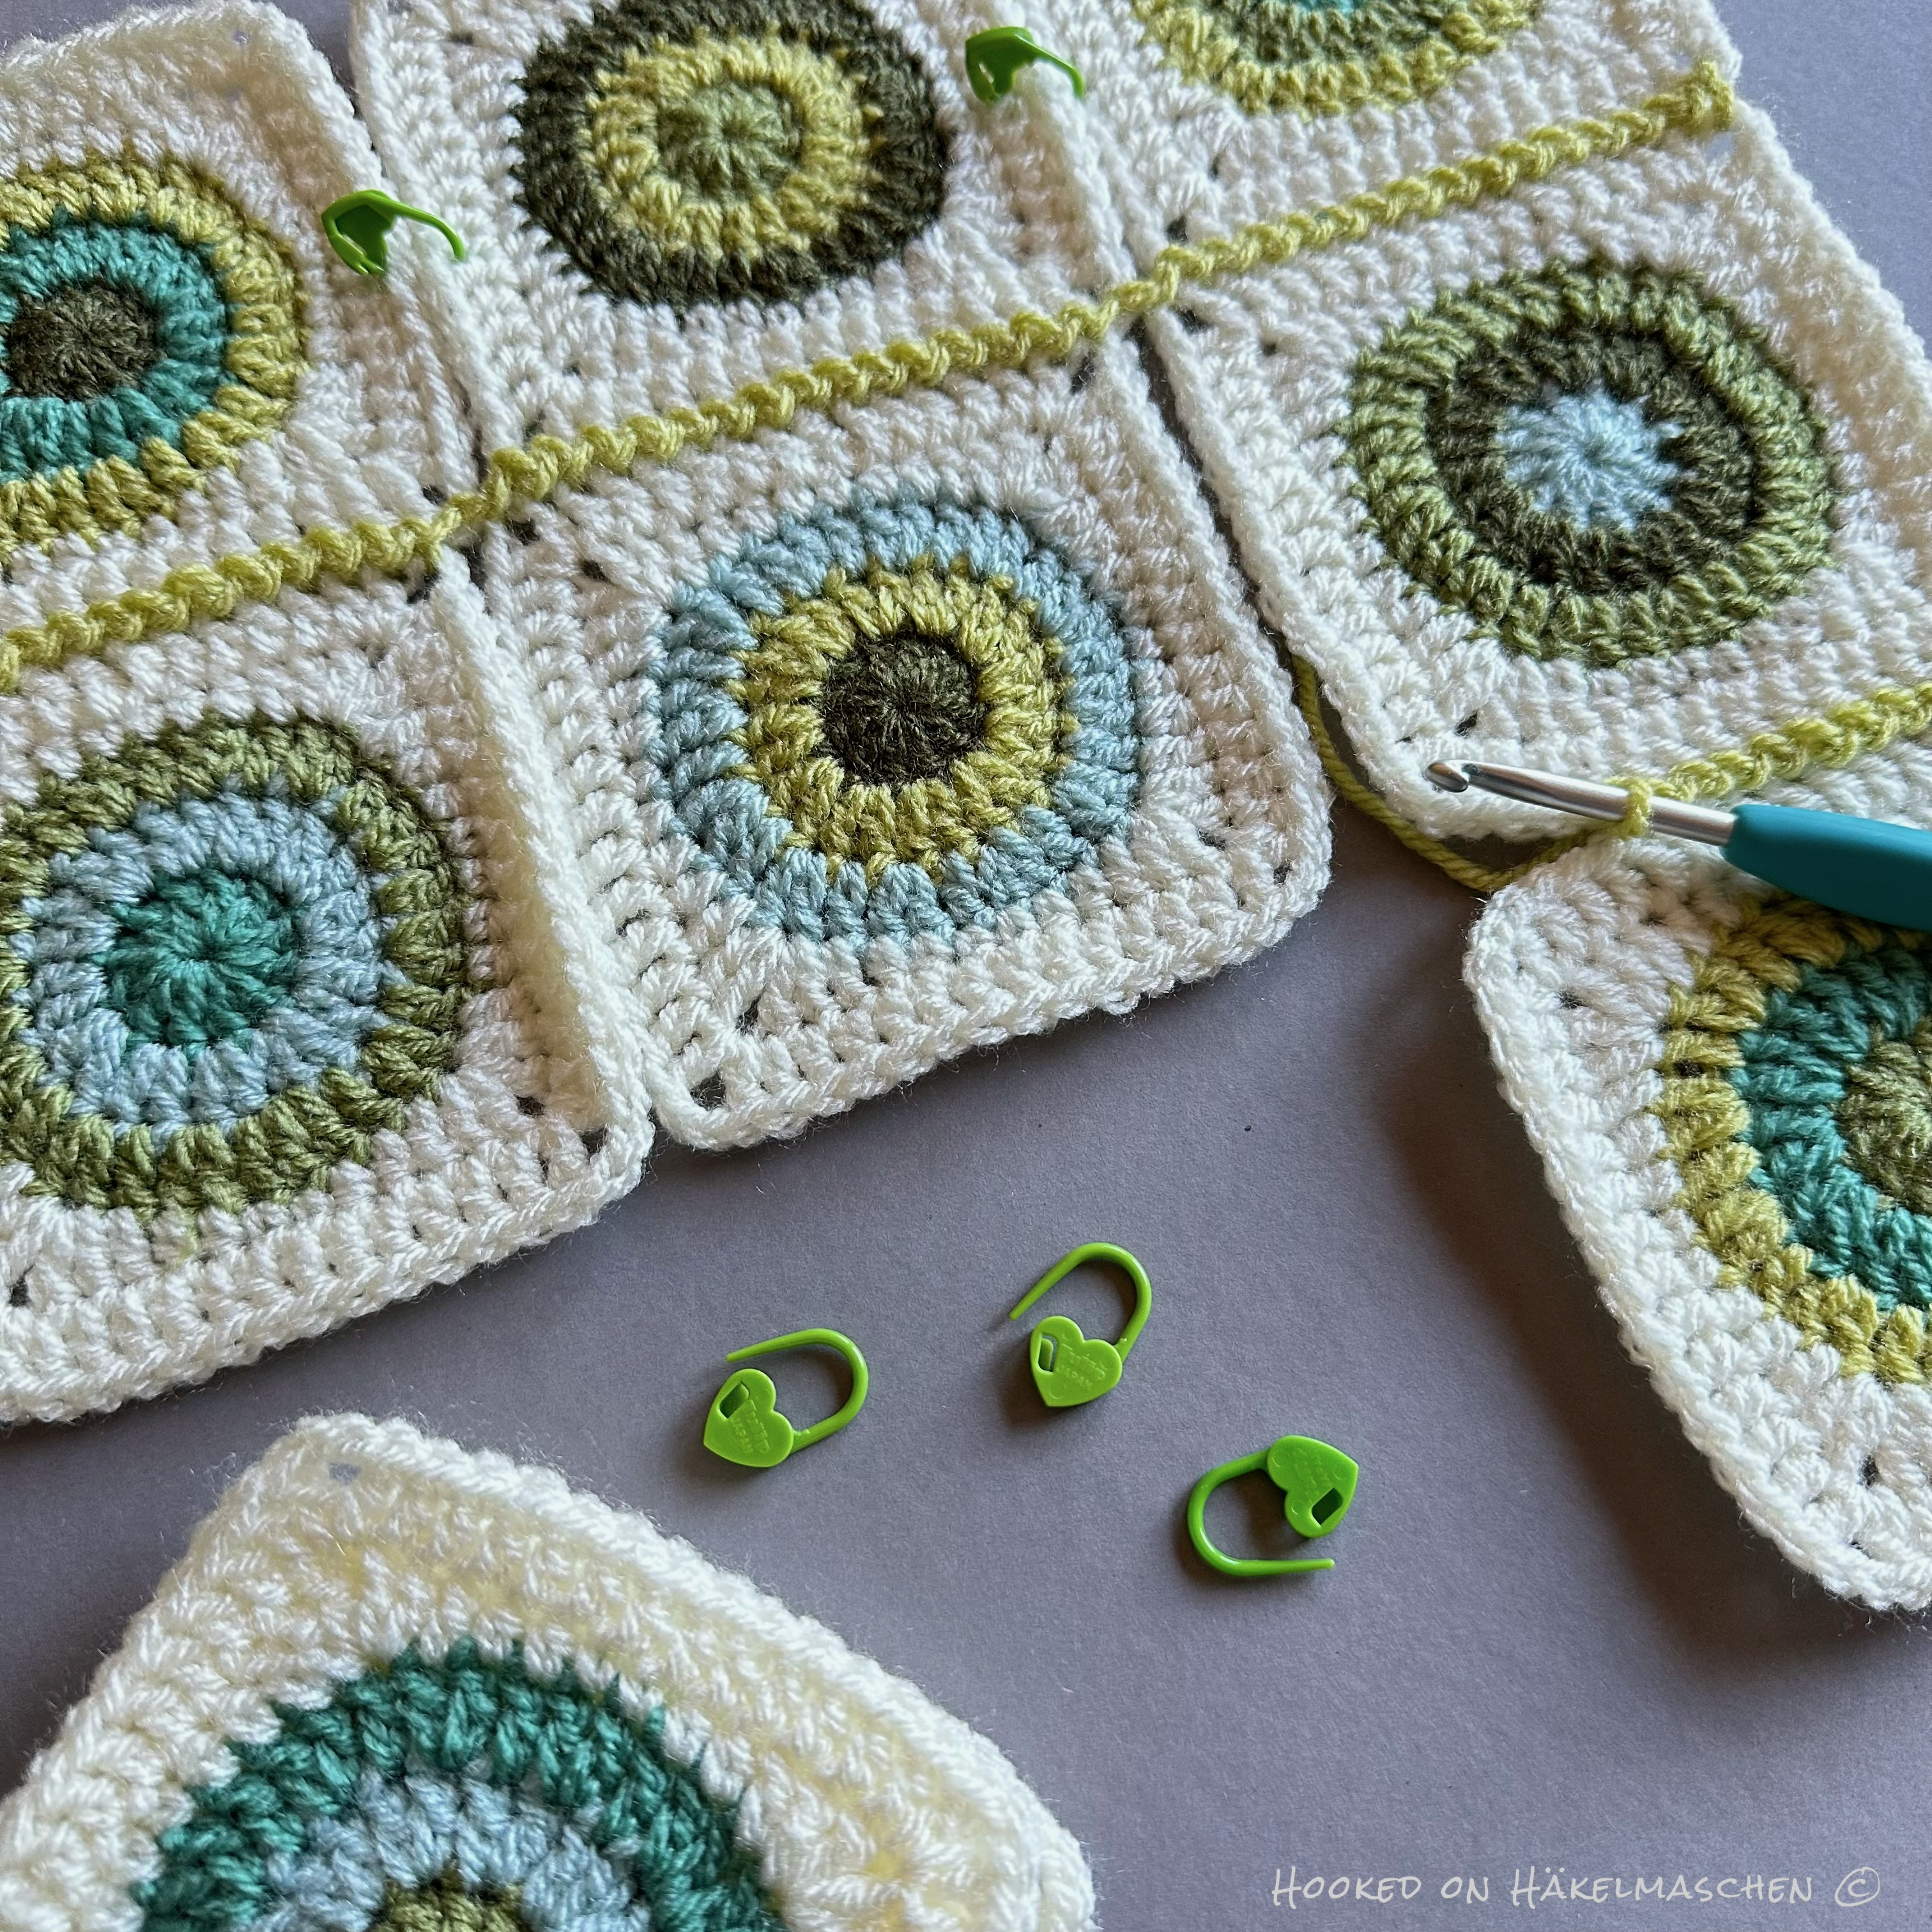
Joining the squares
Currently I am working on the join…
For my wall hangings, I had opted for a relatively inconspicuous joining method in the colour of the squares. In comparison, I now use Pistachio, so it’s more of a contrasting colour. And I opted for the Zig Zag Slip Stitch Join.
I really like how this turns out!
After joining, I will probably have to work a few more rounds around the whole panel to achieve the desired size.
However, I’m still not sure what the back should look like. Single coloured or colourful? I think I’m leaning towards single-coloured, but that could still change …
It is already mid January and I hope you had a great start in the new year! Hubby and I got off to a very cosy start. However, right at the beginning of January, we started renovating another room in our house – very much in keeping with the theme of “new beginnings”. And a never ending story …
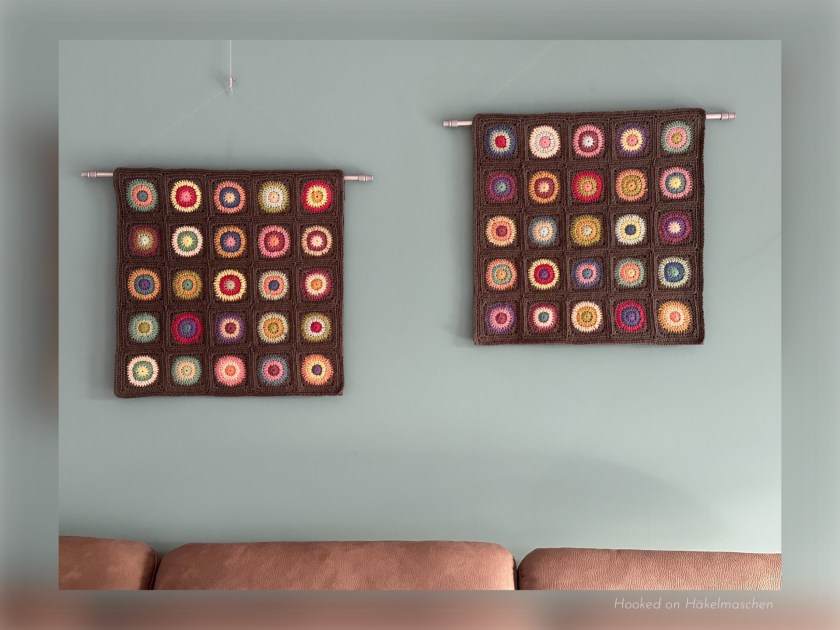
Yet, within all the renovation stuff, we have a new wall decoration in our living room! But these are not the result of our renovation work but of my colour experiments last year.
My colour experiment in 2024
You may remember that last year I experimented a little with random colour placement. This project really opened my eyes to new ways of combining colours.
I started by selecting yarn in 15 different shades from my Stylecraft Special DK stash. Mostly leftovers from other projects.
But instead of manually compiling all possible colour combinations in a table, I tried an online random generator, Random.org . They offer a lot of free services, including a list randomizer. It works wonderfully for generating random colour combinations. I described in detail how this works in an earlier post. You can read all about it here
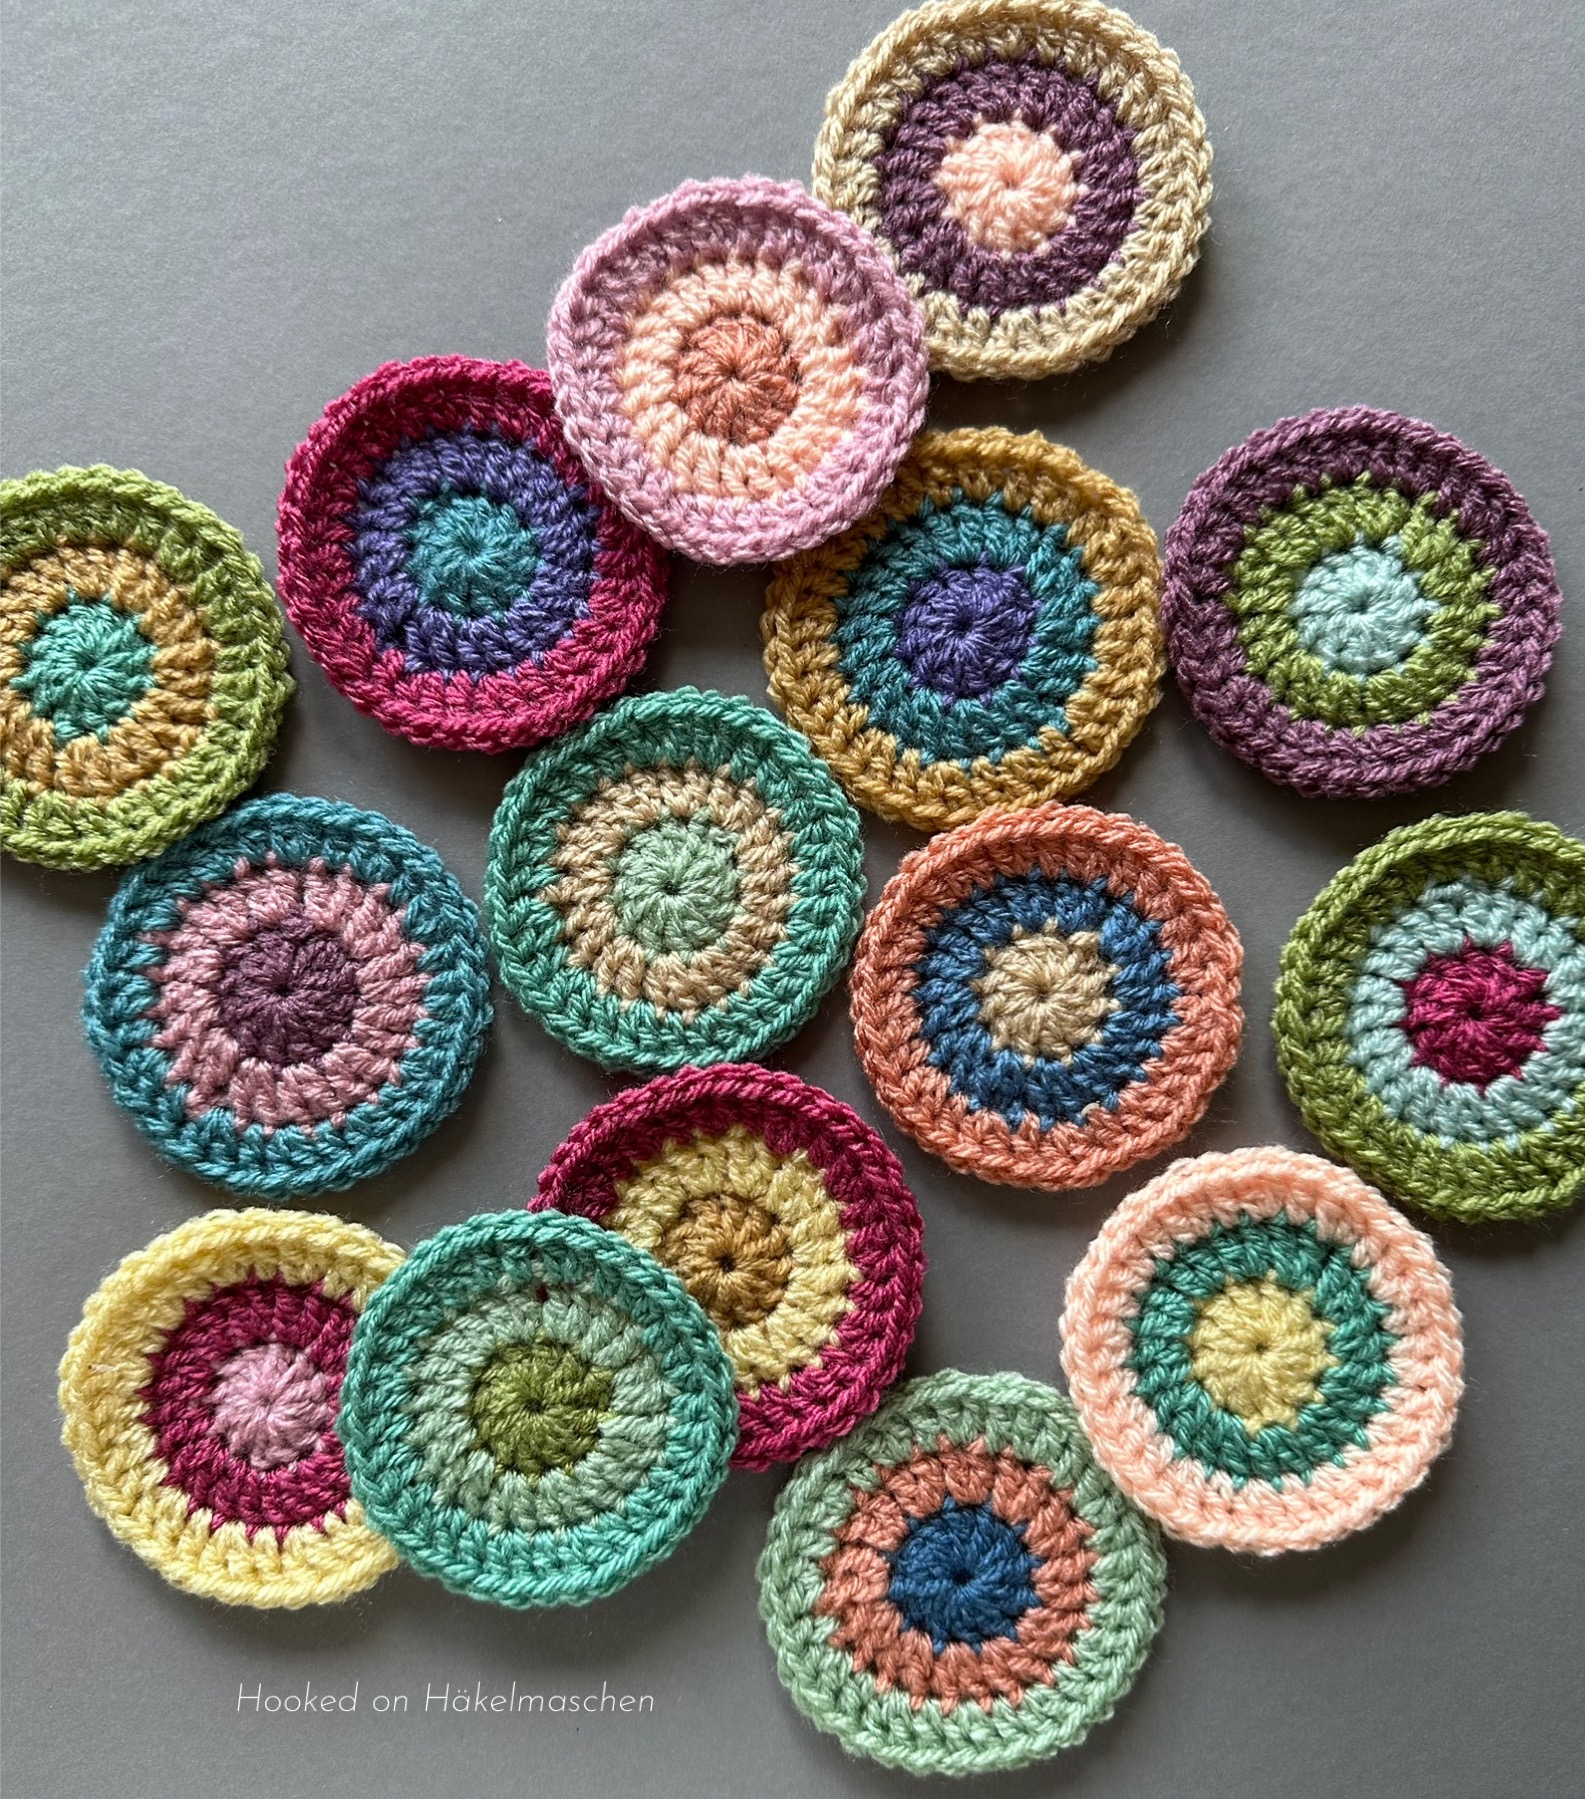
To try out the random colour combinations, I started crocheting little circles. Each with 3 rounds. In doing so, I have strictly adhered to the results that the random colour generator had given me. I only replaced a colour if it would otherwise have appeared twice in a circle. In the end, this resulted in 25 colourful circles, which I then turned into small squares. I joined them in a 5 x 5 layout. The arrangement of the squares was also generated by using the random generator.
Details on my colour placement and layout can be found in this post
After adding a small border my finished panel was about 52 x 52 cm.
At first I had thought of making a cushion cover out of it. But then I decided to use it as a wall decoration.
My second Panel
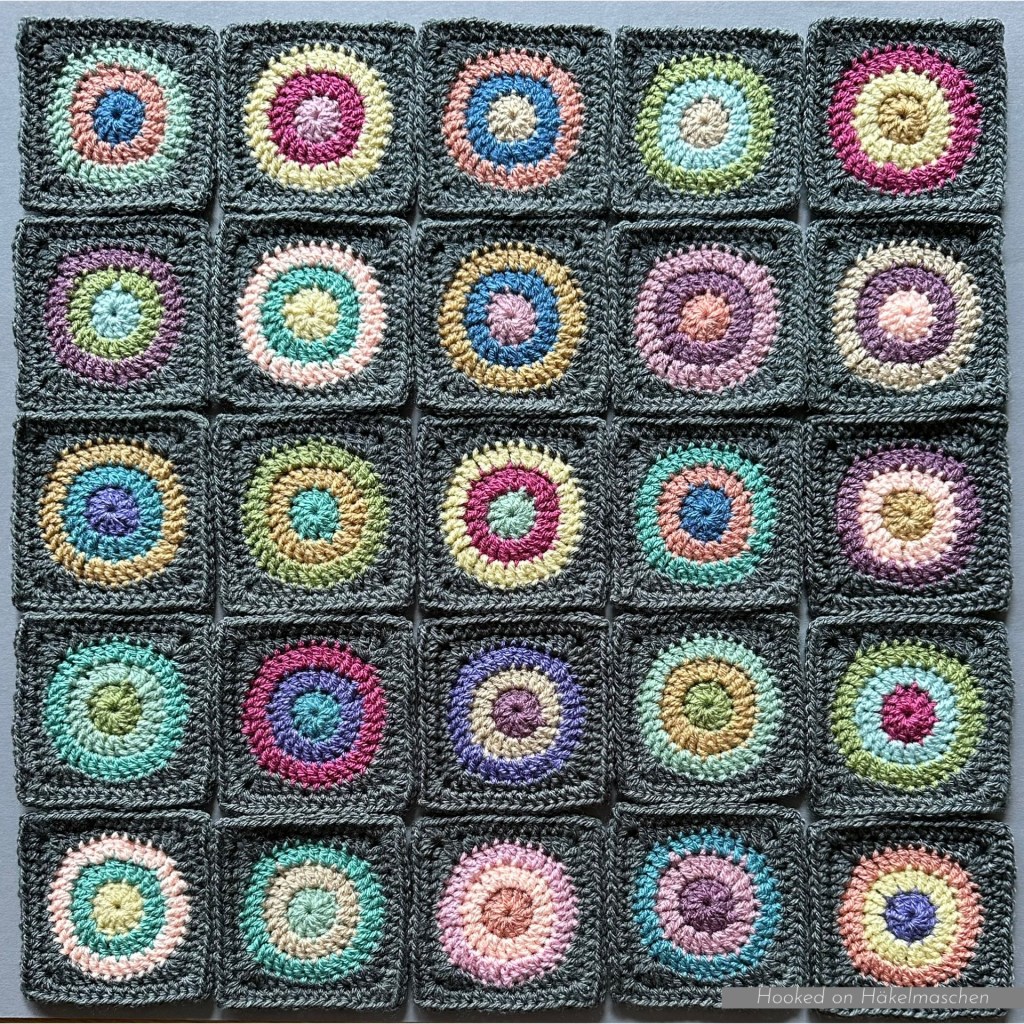
Overall, I was so thrilled with the result that I have since made a second panel.
I used the same colours and the same process as with the first panel. The colour combinations are completely different, but it looks just as great.
Here the results:
The table below shows the colour combinations that I have used for my second panel. The colours are listed for each circle in the order of rounds 1, 2 and 3. As for my first panel each circle was squared with two more rounds in the colour Graphite. At the same time, the table shows the layout in which I have arranged the squares.
I had already listed the pattern for the squares, joining, and border in a separate post. If you are interested you can find it here
But in addition, I have now written down the pattern again and summarised it in a pdf file. Besides the actual pattern, this document contains the colour combinations and layouts for both panels. So you can also download the complete file here.
Please note: Some left over yarns and 1 ball of Stylecraft Special DK for squaring and joining are sufficient for one panel.
The result of my experiment with random colour placement
In the last few weeks I have been experimenting a bit with random colour placement.
I wanted to try if a random colour placement, generated by a list randomizer from the internet, really would work. And I was curious to see whether the result would look really good in the end.
I started my „experiment” by putting together 15 different colours – mostly leftovers. All 15 looked good together. However, I personally wouldn’t place some colours right next to each other. For example, Camel and Vintage Peach or Sage and Meadow.
For a first try, I crocheted some circles. Each one with 3 rounds and each of the three rounds in a different colour. To generate the random colour placement, I used the list randomizer on Random.org.
What can I say, I was absolutely happy with the first results!
In the end I had 25 colorful circles that I wanted to keep using. So I decided to turn them into squares and combine these into a wall decoration.
Colours, Colour Placement and Layout
The colours for the circles were picked from these 15 colours, all from Stylecraft Special DK. To square the circles I used Stylecraft Special DK in the colour 1063 Graphite.
This graph shows the colours I used for each circle. They are listed in the order for rounds 1, 2 and 3.
The chart also shows the layout I have chosen for my wall hanging.
The layout is also based on the random generator.
If you want to know how this works and what exactly I did, you can read about it here:
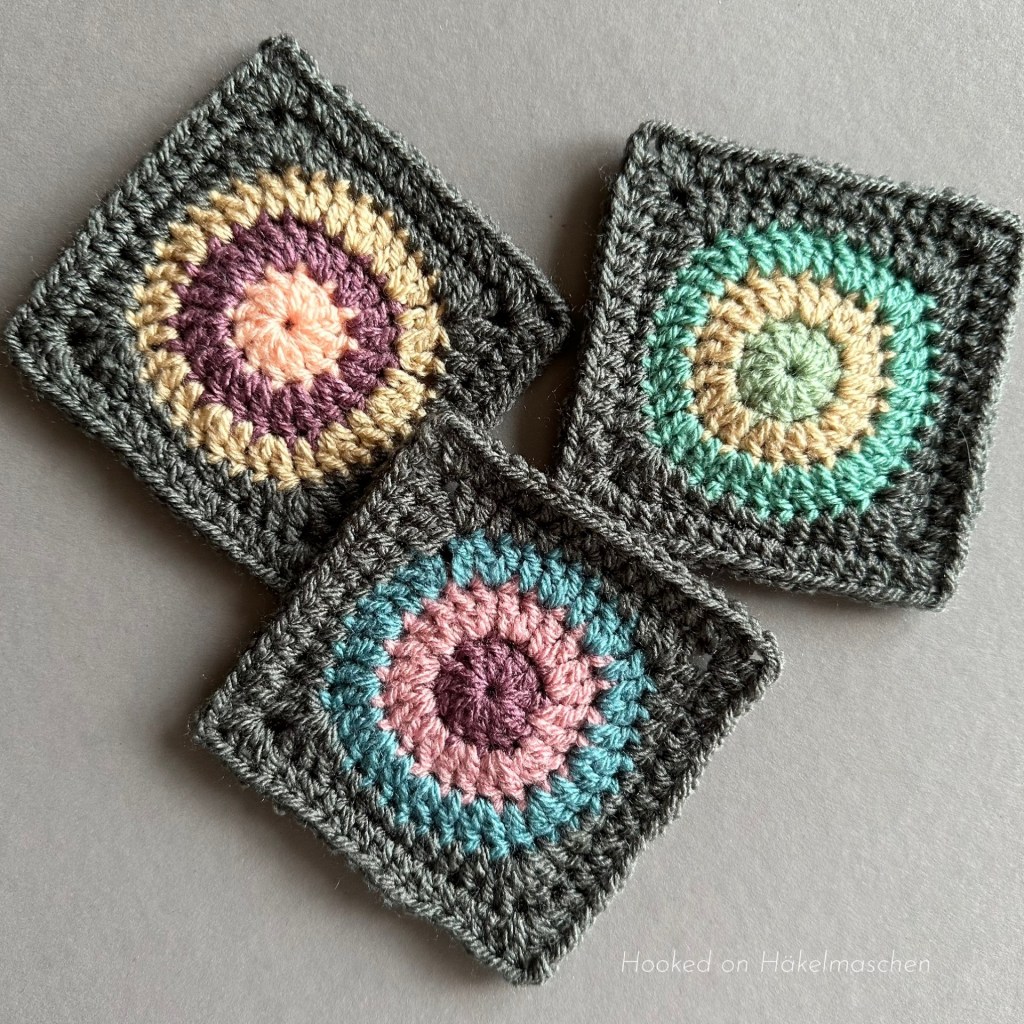
There are a couple of different ways to crochet circles and turn them into squares. I have tried several of them while I made my circles / squares. The way described below is what worked best for me. It is adopted from a method for crocheting circles that Polly Plum describes on her site. This gives the circles a very neat look. Another advantage is that you can easily crochet over most of the yarn ends. Simply start a new round at a position opposite the end of the previous round. You can crochet over the starting tail for half a round. Then, crochet over the tail from the previous round.
I started by making all 25 circles first. Each circle consists of 3 rounds in the colours A, B and C. A, B and C change for each circle, as shown in the layout chart above. Colour D – the colour to square the circles – stays the same throughout.
Round 1, Colour A Start with a Magic Ring, ch2 (counts as first dc) , 11 dc in the ring ; close the ring and slst loosely to the first dc; cut yarn [12 dc]
Round 2, Colour B attach yarn in any stitch, ch 2 (counts as first dc), dc in same st; *2 dc in next st **; repeat from * to ** around; slst loosely to the first dc; cut yarn [24 dc]
Round 3, Colour C attach yarn in any stitch, ch2 (counts as first dc), 1 dc in same st, 1 dc in next st; *2 dc in next st, 1 dc in next st**; repeat from * to ** around ; slst loosely to the first dc; cut yarn [36 dc]
Round 4, Colour D attach yarn in any st , ch 2, (1 dc, ch1, 2 dc) in same stitch; *1 dc, 2 hdc, 2 sc, 2 hdc, 1 dc in the following 8 sts; (2 dc, ch1, 2 dc) in next st **; repeat from * to ** 3 times omitting the last corner sts; slst to first dc [per side: 6 dc, 4 hdc, 2 sc, 1 ch1-corner sp / 48 sts, 4 ch1-corner sps in total]
Round 5, Colour D Ch1 loosely (doesn’t count as a stitch) and hdc in same stitch (the one you slipped stitched in at the end of round 4); *(2 hdc, ch2, 2 hdc) in ch1-sp, hdc in next 12 sts **; repeat from * to ** 2 times; (2 hdc, ch2, 2 hdc) in next corner sp; hdc in next 11 sts; invisible join to the second hdc [per side: 16 hdc, 1 ch2-corner sp / 64 sts, 4 ch2-corner sps in total]
Using a 3,75 mm hook my squares are about 10 cm / 4 inch each.
Joining
Joining, em, yes … If you follow my blog, you know that I haven’t joined many squares so far. So I first had to find out what options are available, and tried several different joining techniques. In the end, I decided on a kind of slip stitch join. I’m not sure if there is a special name for it. I have seen this join in various places with sc, hdc, or even dc. I finally opted for a simple slip stitch. This produces a really nice flat ridge.
With this join, the actual stitch is only crocheted in one of the two squares to be connected. The opposite square is joined by pulling the loop through the corresponding opposite stitch. It may look a little complicated at first, but I’m sure you’ll find the rhythm after a few stitches.
I first worked the horizontal joins, afterwards the vertical joins. If you like to follow my joining method, here is what to do:
My joining method
First arrange the first two rows of squares according to your planned layout. The right sides of the squares should be facing you. The join is only worked through the back loops (the inner loops). The hook is always inserted from top to bottom (from the right side of the square to the wrong side).
This graph helps to visualize what square I am talking about in the next.
Tip: Make sure not to twist the squares while connecting them. It is helpful to use a locking stitch marker especially when joining the first two rows of squares. This helps to hold them together. And take care to work the join not too tight. Best is to go up a hook size. I used a 4.5 mm crochet hook for mine.
Horizontal join
Referring to the graph above: Work from right to left (provided you are right-handed, like me). Start with joining square F to square A, square G to square B and so on.
First joining row
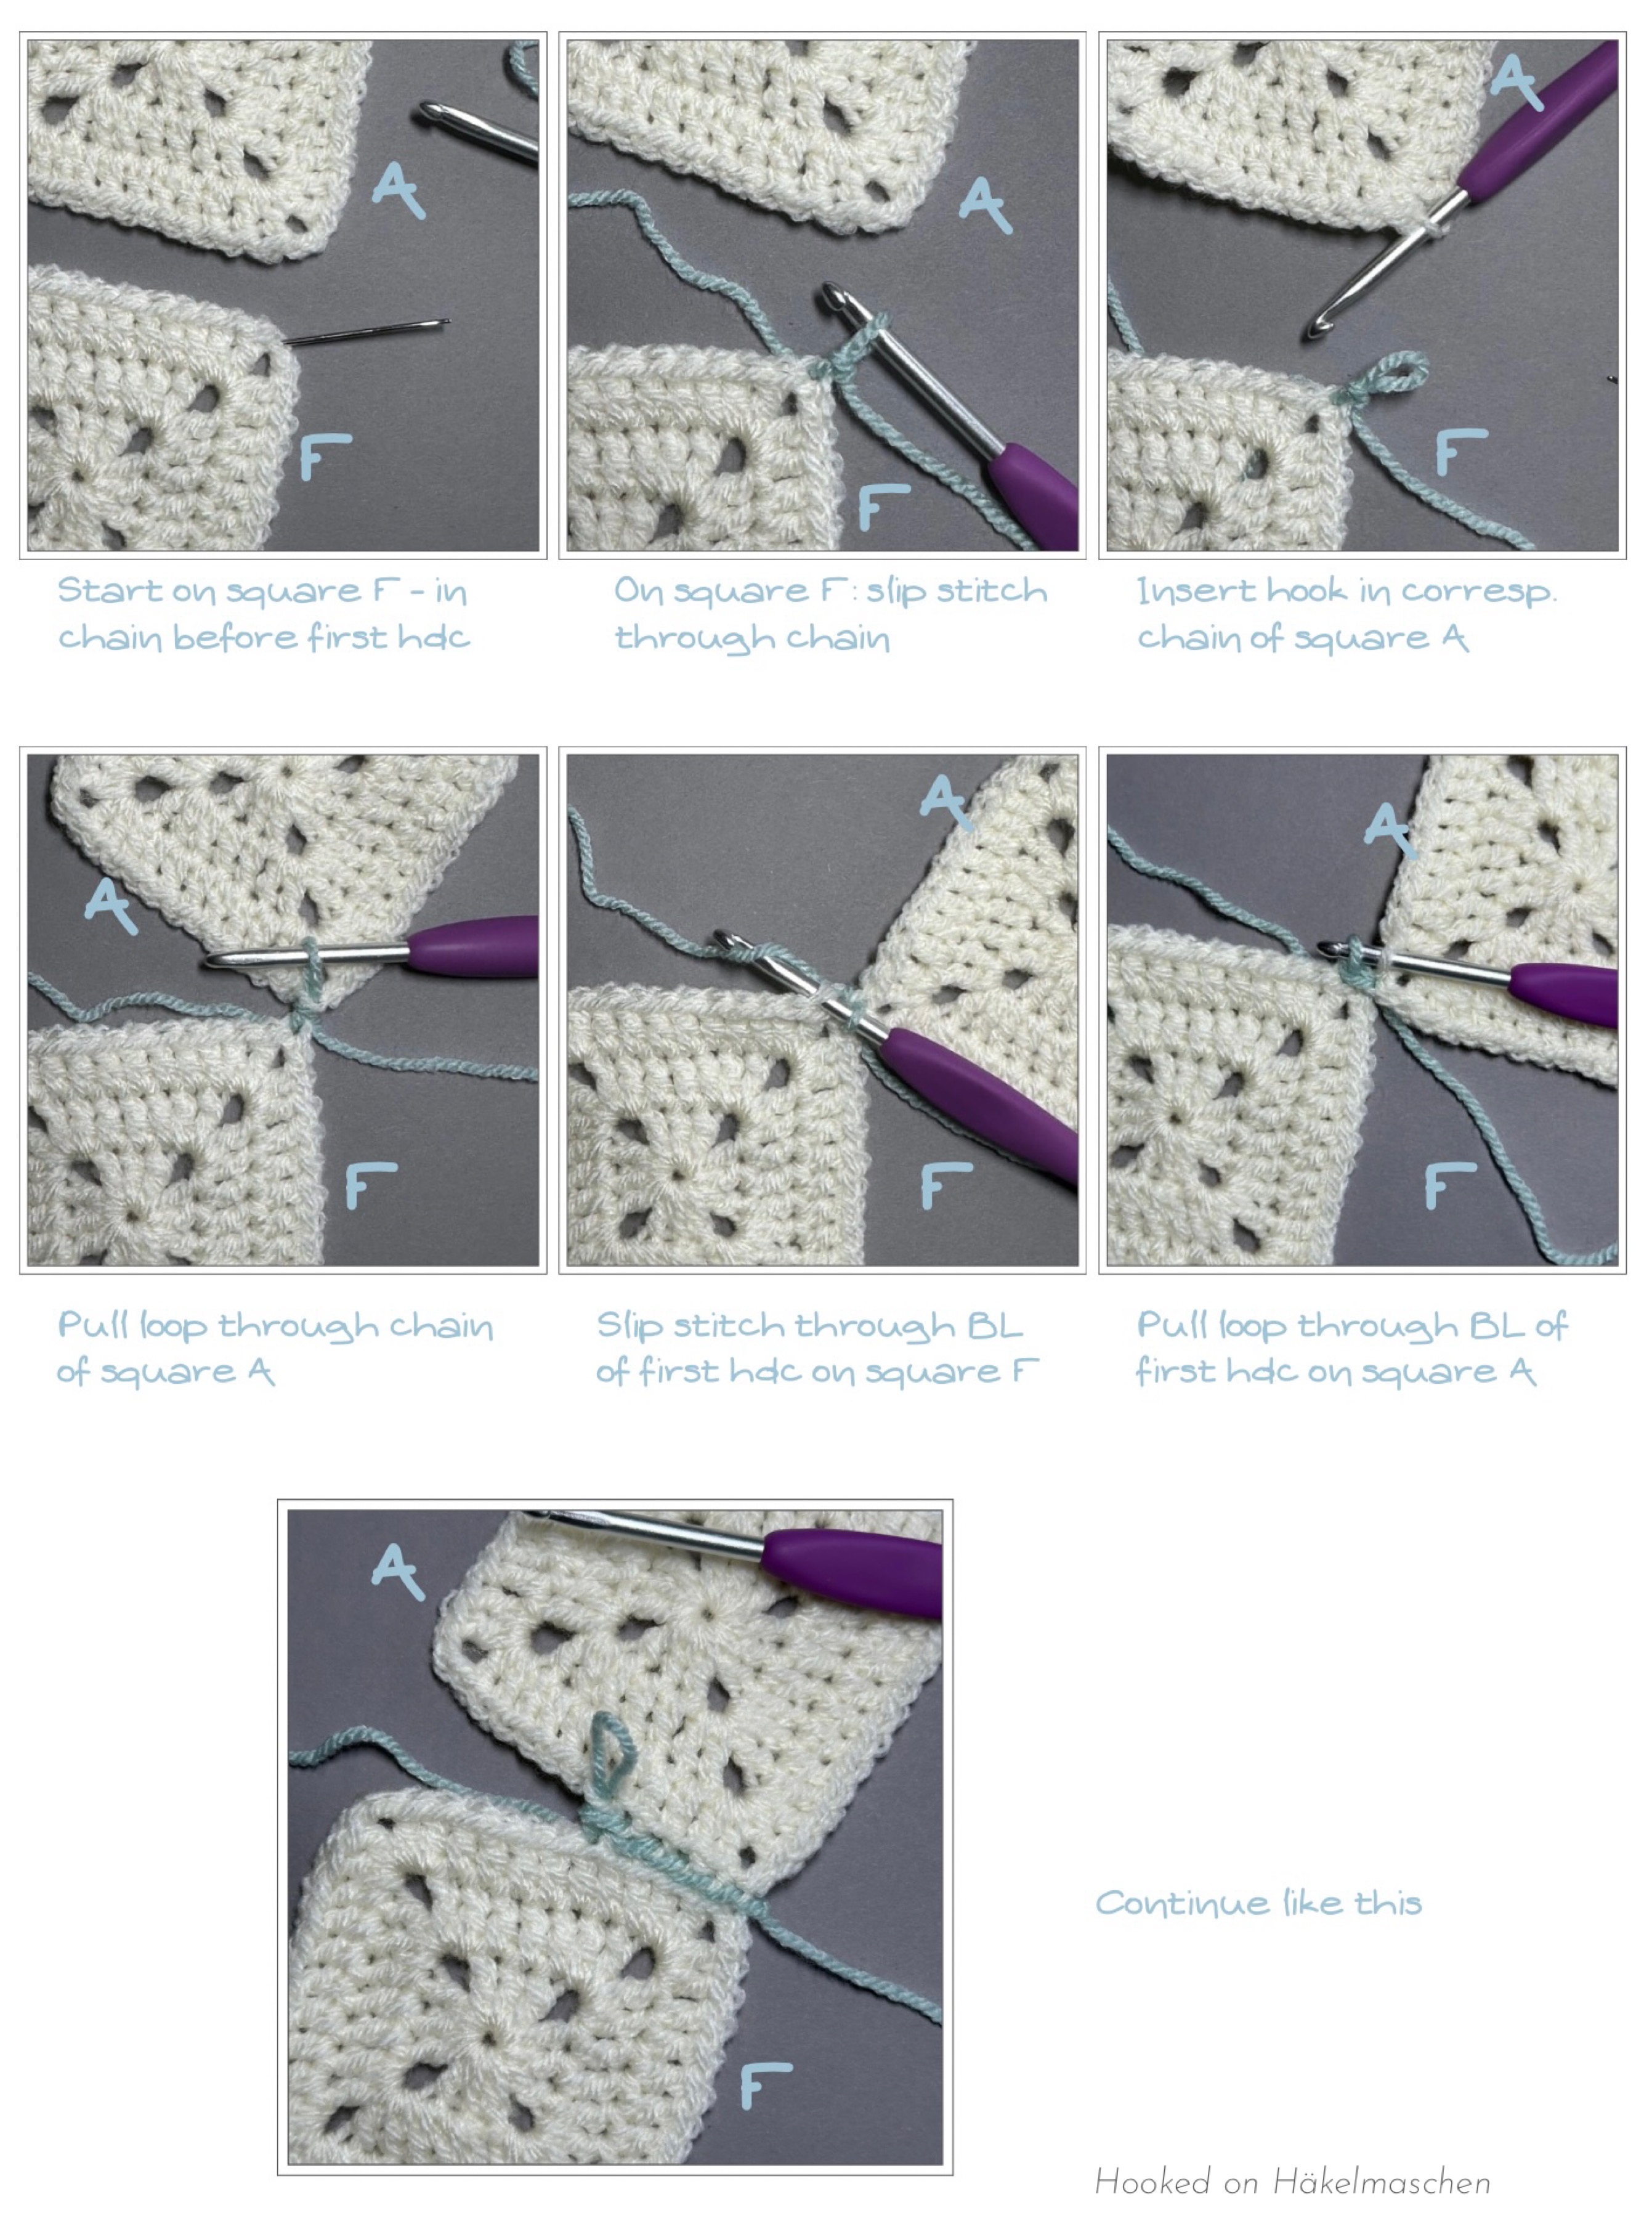
Begin with square F. Start with a slip knot on the hook. Insert the hook in the chain next to the first hdc of square F. Work the first slip stitch on square F. Remove the hook from the loop. Insert the hook in the corresponding chain of square A, grab the loop and pull it through.
Leave the loop on the hook and work a slip stitch through the first hdc of square F. Connect to square A by pulling the loop through the corresponding stitch of square A, like described above.
Continue until you reach the corner spaces of squares F and A. Work a slip stitch / „pull through“ in the first chain of the ch2-corner spaces.
Move on to squares G and B. Start in the second chain of the corner space. Work the same steps as above.
Repeat these steps until all squares of this row are joined, fasten off.
Second, third and fourth joining row
For the second horizontal join start with connecting square K to square F, square L to square G and so on – work the same steps as above
repeat the same steps for the third and fourth horizontal join
Vertical join
For the vertical join repeat the same steps as before, also working from right to left. I started with joining square V to square U. At the transition from two squares to the next two squares, simply work over the existing horizontal join.
Work away all tails.
Border
Round 1, Colour D Start with a standing stitch in any corner sp *(Sc, ch2, sc) in corner sp; BLsc in next 16 sts; 1 hdc in corner sp, skip join; [1 hdc in corner sp; BLsc in next 16 sts; 1 hdc in corner sp, skip join] 3 times; BLsc in next 16 sts **; repeat from* to ** 3 more times, slst to the first sc [per side: 82 sc, 8 hdc, 1 ch2-corner sp / 360 sts, 4 ch2-corner sps in total]
Round 2, Colour D ch 1, *3 sc in corner-sp, BLsc across to next corner sp **; repeat from * 3 more times, slst in BL of first sc [per side: 93 sc / 372 sts in total]
Round 3, Colour D Slip stitch in back loop of each stitch around [372 sts in total] fasten off and work away the tails
Abbreviations (US terms)
slst – slip stitch
ch – chain
sc – single crochet
hdc – half double crochet
dc – double crochet
BL – back loop
BLsc – back loop single crochet
sp(s) – space(s)
st(s) – stitch(es)
* … ** – marks a repeat
[… ] – repeat instructions as many times as specified
For an explanation on how to work these stitches have a look here
Finishing
So far all my crocheted wall hangings a made from patterns using Overlay Mosaic. This technique gives the panel a bit of weight. The dropped down dc practically double every row. Additionally, the double border adds some weight and you can also easily stabilise the panel with rods. So it’s no problem to hang it up nice and straight.
That’s exactly what I missed when I was thinking about mounting my new panel! Using an Acrylic yarn made it very light weight and I was afraid that it might not hang straight.
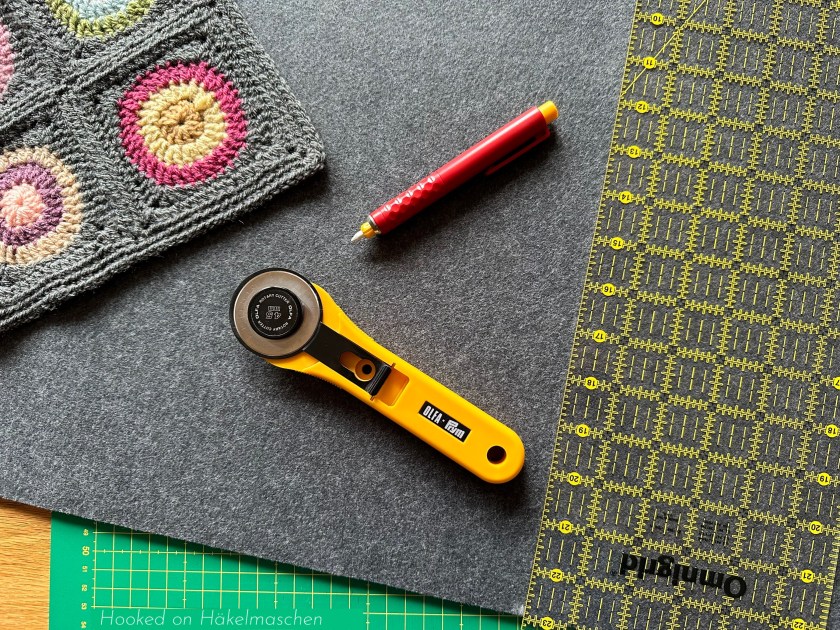
So, I got myself some felt – 4 mm thick and anthracite-coloured. I cut this to size and pinned my panel in place. I let the felt overlap a few cm at the top edge. This was later used to create a tunnel for the mounting. I sewed the panel in place along the edges using a running stitch.
Now that I’ve finished, I think the panel could also have been sewn on with a sewing machine. But, I hadn’t worked with felt of this thickness before, so I just didn’t dare. Especially as I was so short on felt that I didn’t have a test piece. Lessons learnt!
After sewing, I folded the upper overhang of the felt back at the edge. I fixed it on the backside with some suitable glue. This created a tunnel through which I can push the rod for hanging. Finished!
My panel measures about 52 x 52 cm / 20 1/2 inch.
In my living room
I think I will make another one. Same colours, different placement. And of course I will use the randomizer again for the placement of the colours and for the layout. I am already curious how it will look like!
About three weeks ago (3 weeks already??) I told you about my experiment with random colour placement.
Originally, I had no particular purpose in mind when I started this journey. I had read about random colour placement and wanted to give it a try – that’s all.
But to be honest, I had my doubts. I had put together 15 colours. They all matched somehow, but there were still colours among them that I personally wouldn’t place next to each other. Raspberry, Duck Egg and Meadow for example is a combination that I would never have chosen myself. So, looking at the colour combinations the random generator gave me, I couldn’t imagine to get nice results. But after I had finished the first three or four circles, I was so amazed at the result that I really wanted to try out all the combinations. In the end I had 25 colourful circles. I turned them into small squares because I wanted to make something out of them.
In case you missed my previous post, you can read about it here. There you will also find details about the Numbers spreadsheet I am talking about below, the colours and randomizer I used, and so on.
I finally decided to make a small wall hanging out of the squares. I plan to arrange them in a 5 x 5 layout. Each square is about 10 x 10 cm, so that will make a panel of about 50 x 50 cm.
In the last few weeks, however, I have not been as fit as I would have liked to be. I have a pretty persistent cold that gets better from time to time but doesn’t quite go away. So, besides testing a beautiful square for Pam and checking and translating the final patterns for Ana’s Fall Sweet Fall Cal I didn’t have much time and energy to work any further on the hanging. But at least I’ve managed to decided on a layout!
What about a Random Layout?
When I tried to arrange my squares in my 5 x 5 grid I didn’t really know where and how to start.
I usually have difficulties with such things. I’m hardly able to make it look random. I orientate myself far too much on what I think looks good together. So I end up with areas that look absolutely great, but also a rest that doesn’t fit together at all. Do you know what I mean?
That’s why I wondered if something like the random colour placement would also work for a layout. Could it work to arrange the squares in a random order instead of following some kind of „pattern”? It was at least worth a try!
So, again I tried the list randomizer from random.org and had a final layout in just a few steps:
1. Numbering my squares
Firstly, I assigned each square a number from 1 – 25. This was just to make the entries in the randomizer a little easier. I didn’t have to type in all the colour combinations but only numbers.
I simply used my Numbers spreadsheet for this. I had created this table when listing the colour combinations. It therefore had no particular order, but was listed in the order in which the results came from the random generator. I have simply numbered these entries from 1-25.
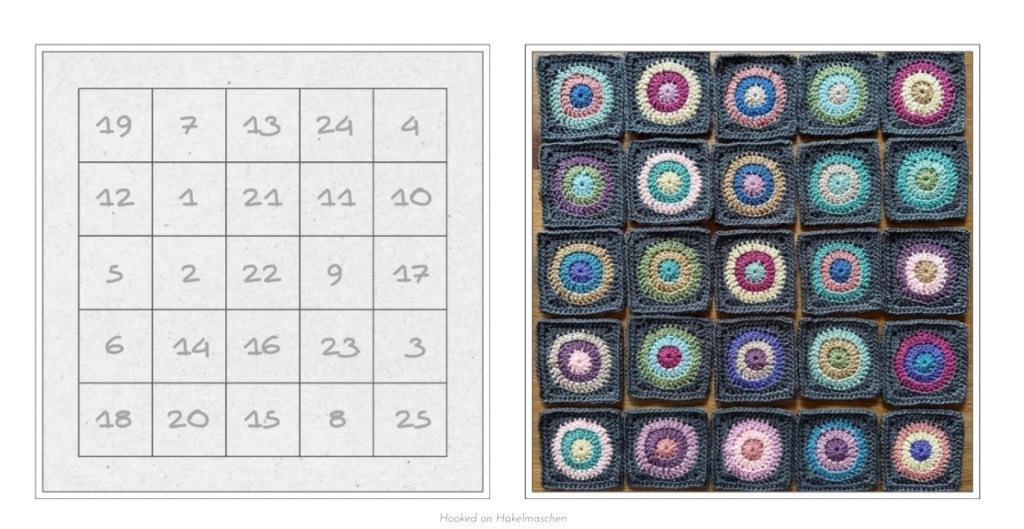
2. Drawing a layout grid
Secondly I created a grid showing my 5 x 5 layout and numbered the boxes from 1 to 25 as well. This served to clearly identify the location of my squares later on. My grid is shown in the picture above.
You can just draw something like this on a sheet of paper. Or, if you are – more like me – the No-Paper-Type you can use Excel or Numbers. If you want to have square boxes, simply reduce the column width a little and increase the row height.
3. Randomisation
Afterwards I entered my numbers from 1-25 into the list randomizer. If you use random.org, you can either make your entries directly on their website or copy them from an existing list in Excel, Numbers, Word, Pages, etc.
Then just hit the button „Randomize”. Wait a moment. Copy the result back to your Excel, Numbers, Word, Pages or whatever. That’s all!
As I have seen, there are also other tools that have a random generator. These, of course, may work differently.
4. Arranging the squares
The result the randomizer gave me was – surprise – a list of the 25 numbers in random order: 19, 7, 13, 24, 4, 12 …
I arranged my squares exactly in this order.
I picked square #19 (from my list I knew it had the colour combination Storm Blue, Vintage Peach, Sage) and, following my layout grid, put it on place #1. Square # 7 (Pale Rose, Raspberry, Buttermilk) moved on place # 2, and so on …
Here is the result:
Random Layout
Left side the layout grid with the numbers in the order the randomizer gave me. And right side the corresponding squares.
Not bad, is it?
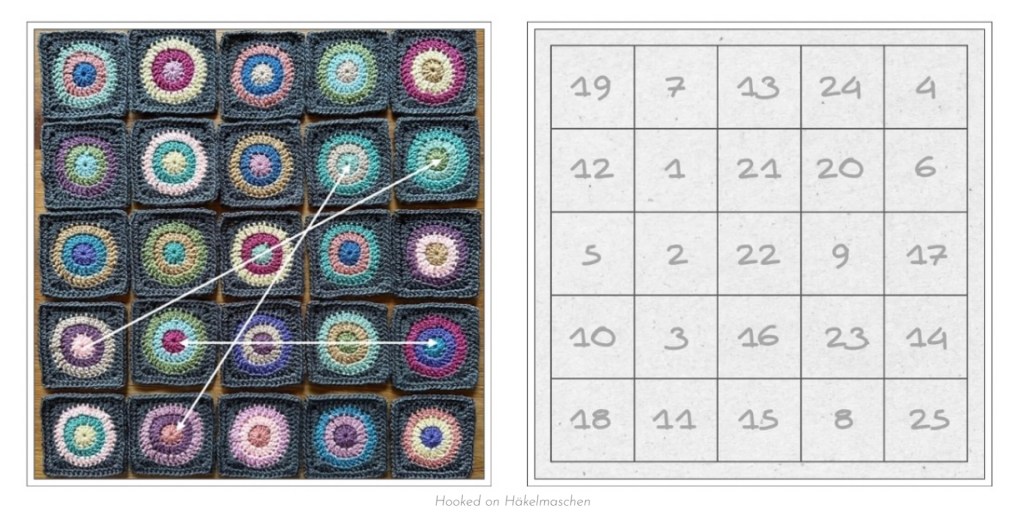
5. Changes
I only made 3 changes by switching some of the squares to make the colour arrangement a bit more balanced. And voilà …
Changes and final layout grid
Left side the changes I made and right side the final layout grid.
My final Layout
My final layout
Colour Details
For all those who are interested, I have listed all the colour combinations and the corresponding layout:
All colours are from Stylecraft Special DK. For squaring the circles I used the colour Graphit.
My Conclusion
Even though I initially had my doubts, a colour combination created with a random generator works surprisingly well.
It is definitely a great way to arrange colours in simpler shapes, such as Granny squares, Triangles, Hexagons. Shapes, which you want to highlight the colours more than the stitches.
Presumably this method cannot be used for every design. I could imagine that it might not work so well with detailed and structured patterns. Afghan squares or blankets where the colours serve to highlight the design. However, I haven’t tried it yet.
And random placement of different squares etc. works great as well. At least it gives you a good basis on which you can continue to work.
And, the best thing is, if you really don’t like something, you don’t have to use it. And you can make changes at any time.
In any case, the randomizer helped me a lot and was a great support. I will definitely use it again!
The only thing I would perhaps change: For a layout, I wouldn’t number my squares (only) in an Excel or Numbers table. I would simply pin small pieces of paper (in this case: yes!) with the corresponding numbers on them. That probably makes the subsequent sorting a lot easier. Unfortunately, I only came up with this idea afterwards. My snuffy head was probably to blame :).
See you soon, hopefully with some further progress on my wall hanging 💕