I love yarn and I love working with yarn. I especially love crochet and Tunisian crochet.
Sometimes I test crochet patterns, sometimes I design something myself and sometimes I just make something nice for myself.
Some weeks ago I had the pleasure of testing another design by Pam Knighton-Haener from AYarnof Serendipity:
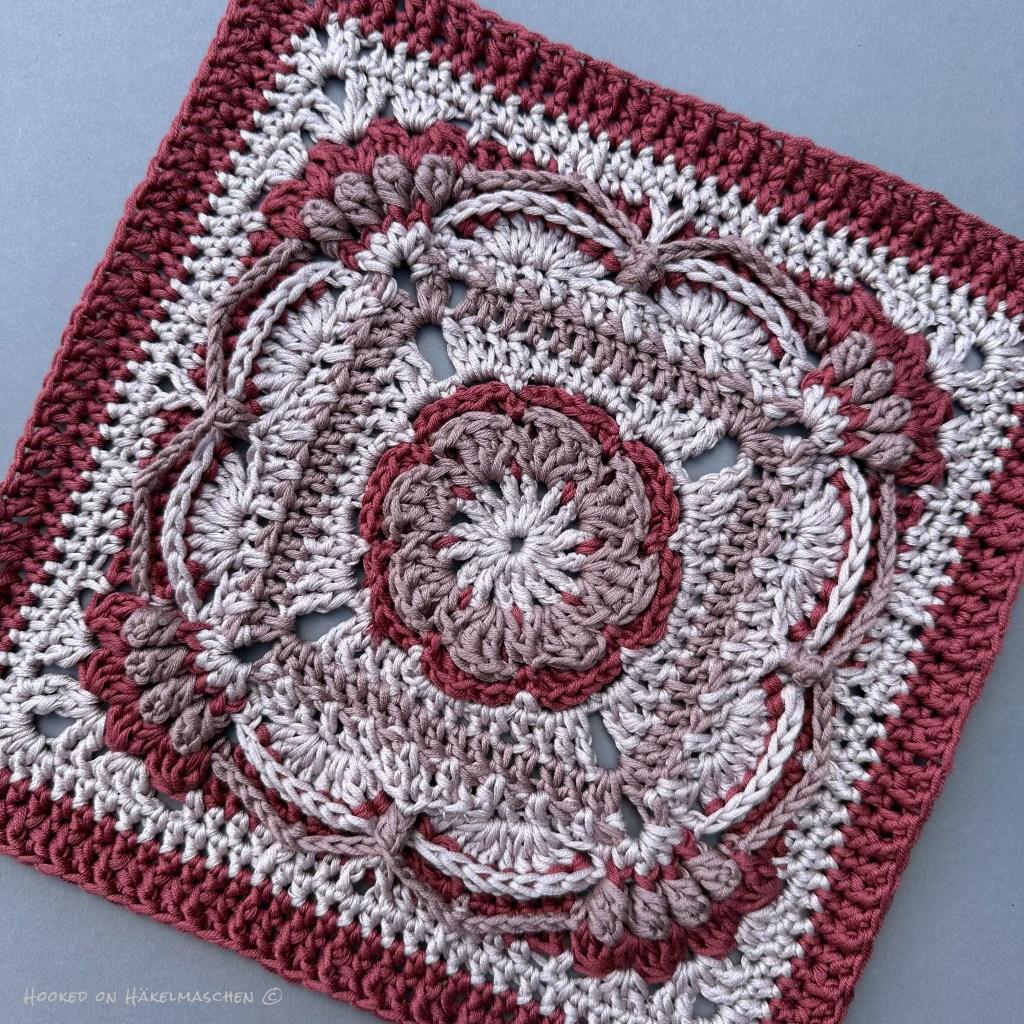
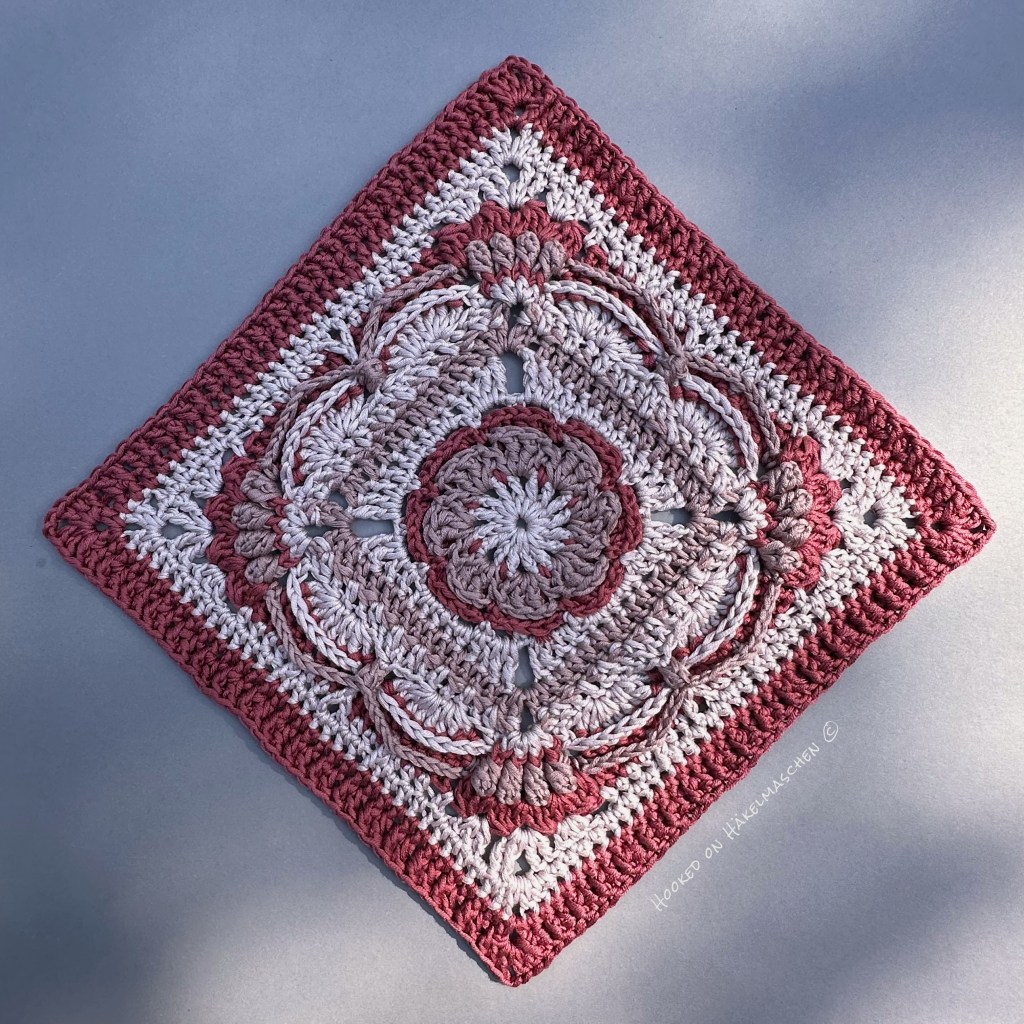
The Around the World Square – The Pattern
With the Around the World Square Pam designed another lovely Afghan square. The pattern offers two colour schemes, one with 5 colours and one with 7. It is designed with worsted weight / Aran (#4) yarn and will have a finished size of about 28 cm (11 in) or 30 cm (12 in) depending on wether you work with a 4.5 or 5 mm crochet hook. The size and the number of stitches per side, of course, fit perfectly with all her other 11 / 12 inch squares.
The pattern is rated with an intermediate skill level. As almost always in Pam’s patterns, there are also a few special stitches here. But – also as always – everything is well explained. Besides, there are plenty of detailed pictures to help. Therefore, I think that even an ambitious beginner can crochet this square. The pattern is available on Ravelry, and if you hurry, you can still get a 30% discount until the end of July 2025. The discount also applies to all other patterns by Pam. It’s worth a look!
Around the World Square – My Version
Yarn and colours I used
For my test-version I used Hobbii Rainbow Cotton 8/6 from my stash. Rainbow Cotton 8/6 is a 100 % cotton yarns and has 105 m / 50 g (115 yards / 1.76 ounces). Hobbii classifies it as a fine/sport weight yarn. Personally, I find that it is one of the thicker types, almost a DK weight. I therefore mostly use a 3.75 or 4.0 mm hook to work with it. For the Around the World Square I decided on my 4.0 mm Clover Amour hook. And, looking at the result, this was the correct choice.
Here my colour choice…
Unfortunately, by now, some of them are discontinued in the 8/6 quality.
My colour placement
I decided on a version with 5 colours. At first, however, I wasn’t sure whether my colours would really go together. That’s why I didn’t simply replace the colours of the five-colour version with my own. Instead, I once again created my individual colour placement. Even though I had doubts at first, I think the colours match quite well.
I have listed my colour placement here.
My square came out with about 26 cm (10.5 in) and I’m absolutely happy with the result!
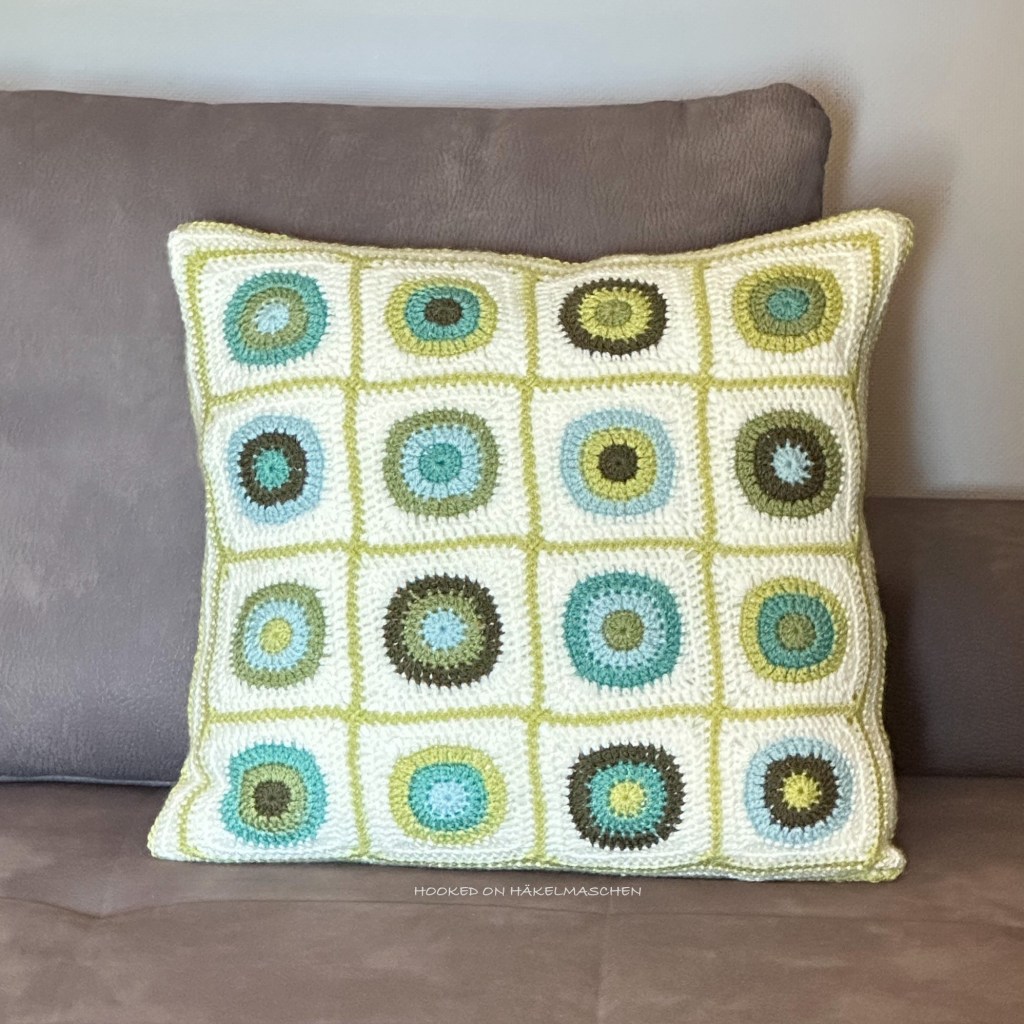
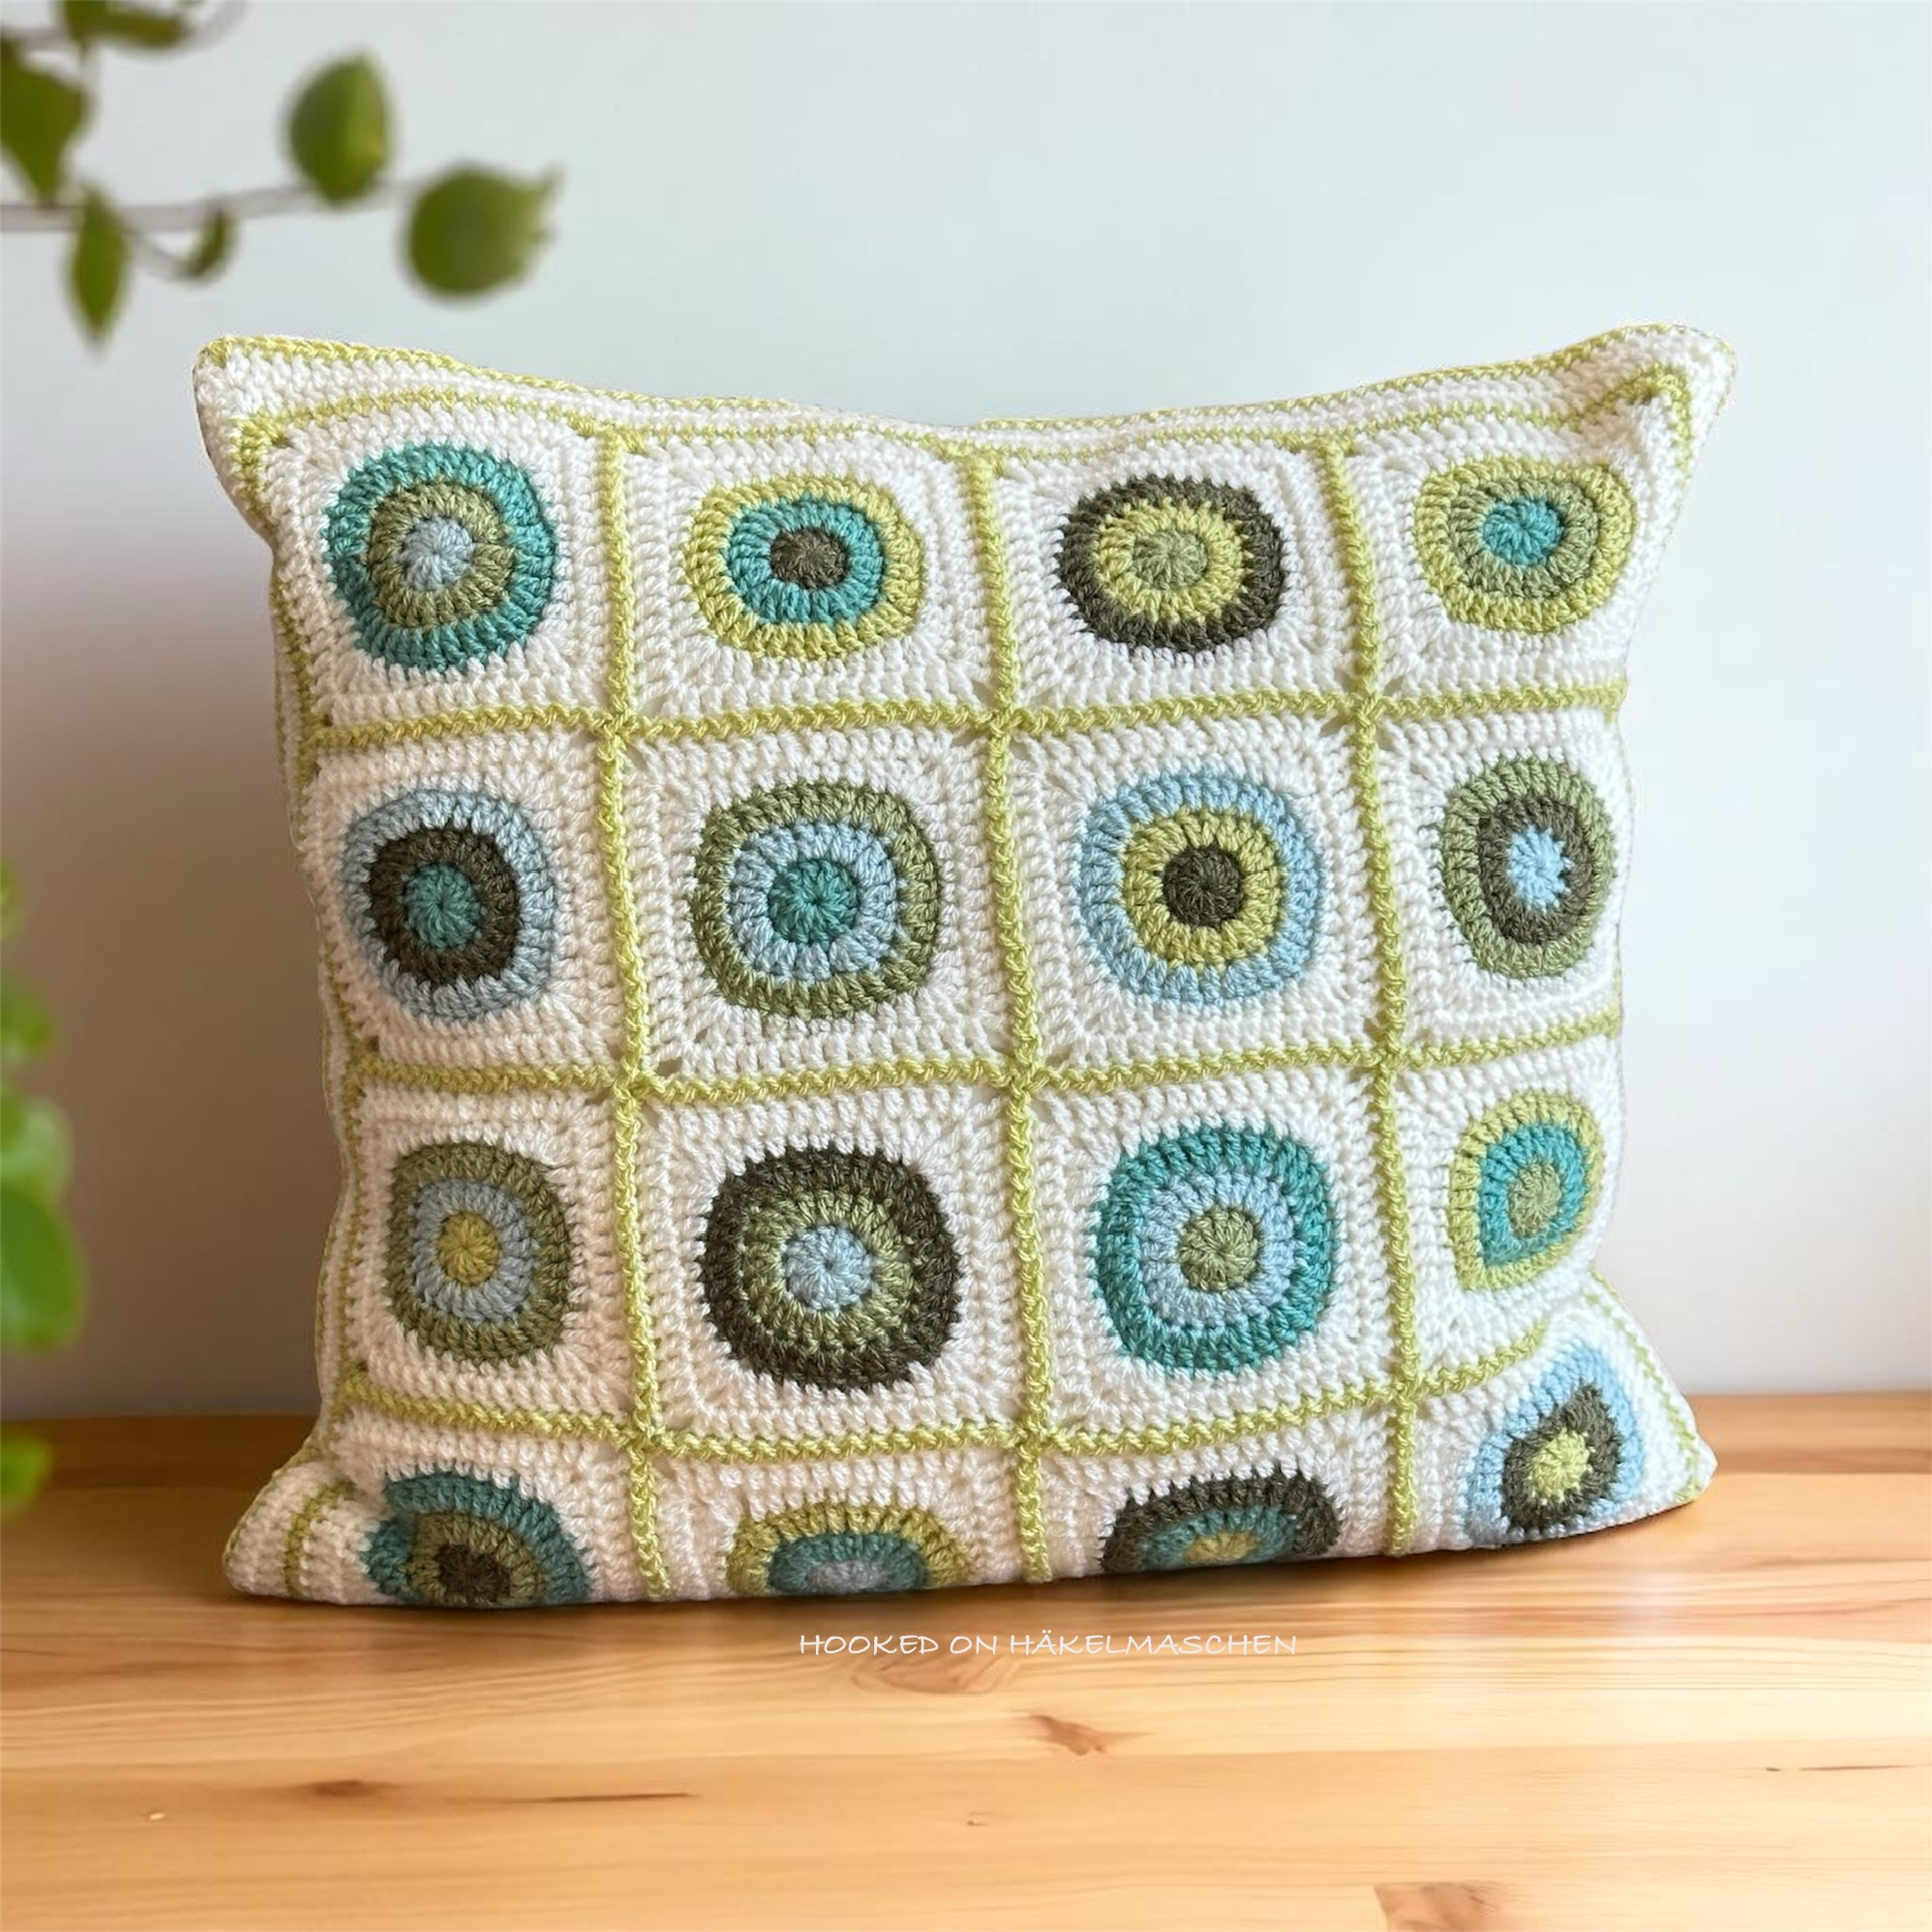
YAY – my Happy Circles cushion cover is finally finished! – Okay, to be honest, it has been for over a week now. Unfortunately, it took me a very long time to write the pattern. Like other countries in Europe, we had a terrible heatwave here. The temperatures climbed up to 40 degrees Celsius. And this was definitely too hot for my brain. I found it hard to concentrate on anything.
But now the time has come. Everything is written down and hopefully well explained!
If you have any questions about the pattern (or spot any mistakes), simply email me. You can either use the contact form or email me directly under hookedonhakelmaschen@gmail.com
The Design
The cushion cover is designed for a 50 x 50 cm (20 x 20 inch) cushion. The finished size is about 46 x 46 cm (18 x 18 in). With the size I followed an advice I found on the internet. It said that to make a square cushion look nice and plump, the cover should be about 5 cm (2 in) smaller than the cushion. At first I was unsure whether this would really work. And when I finally put the cushion into the cover to close the last seam, I was pretty sure at first that it had become too small. But everything turned out well in the end. I am totally happy with the result!
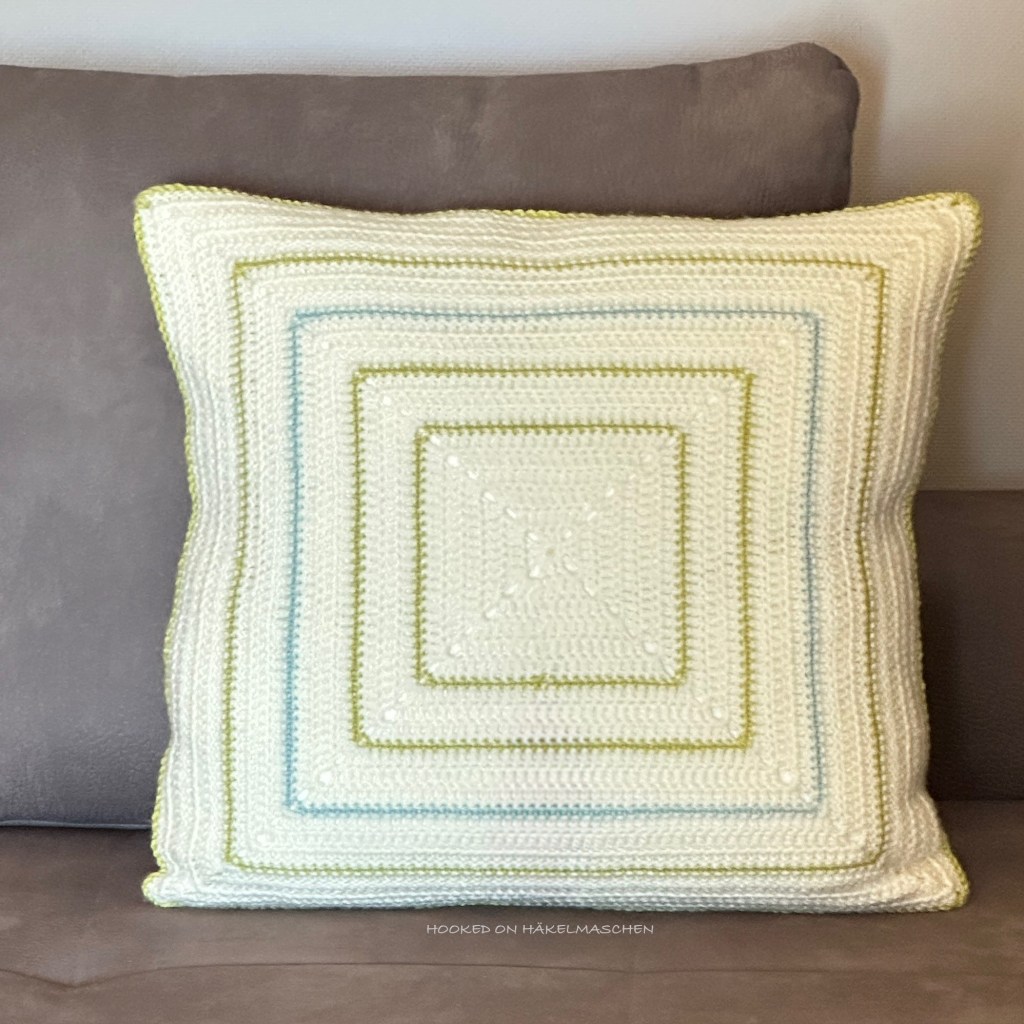
The front part of the cover is made up of 16 squares, arranged in a 4 x 4 layout. Each square measures about 10 x 10 cm (4 x 4 in). For the back, I opted for a simple square. Mainly single-coloured, with a few small contrasts.
The size is easy to adjust by enlarging or reducing the border of the front piece. The rounds for the back must then of course be adjusted accordingly.
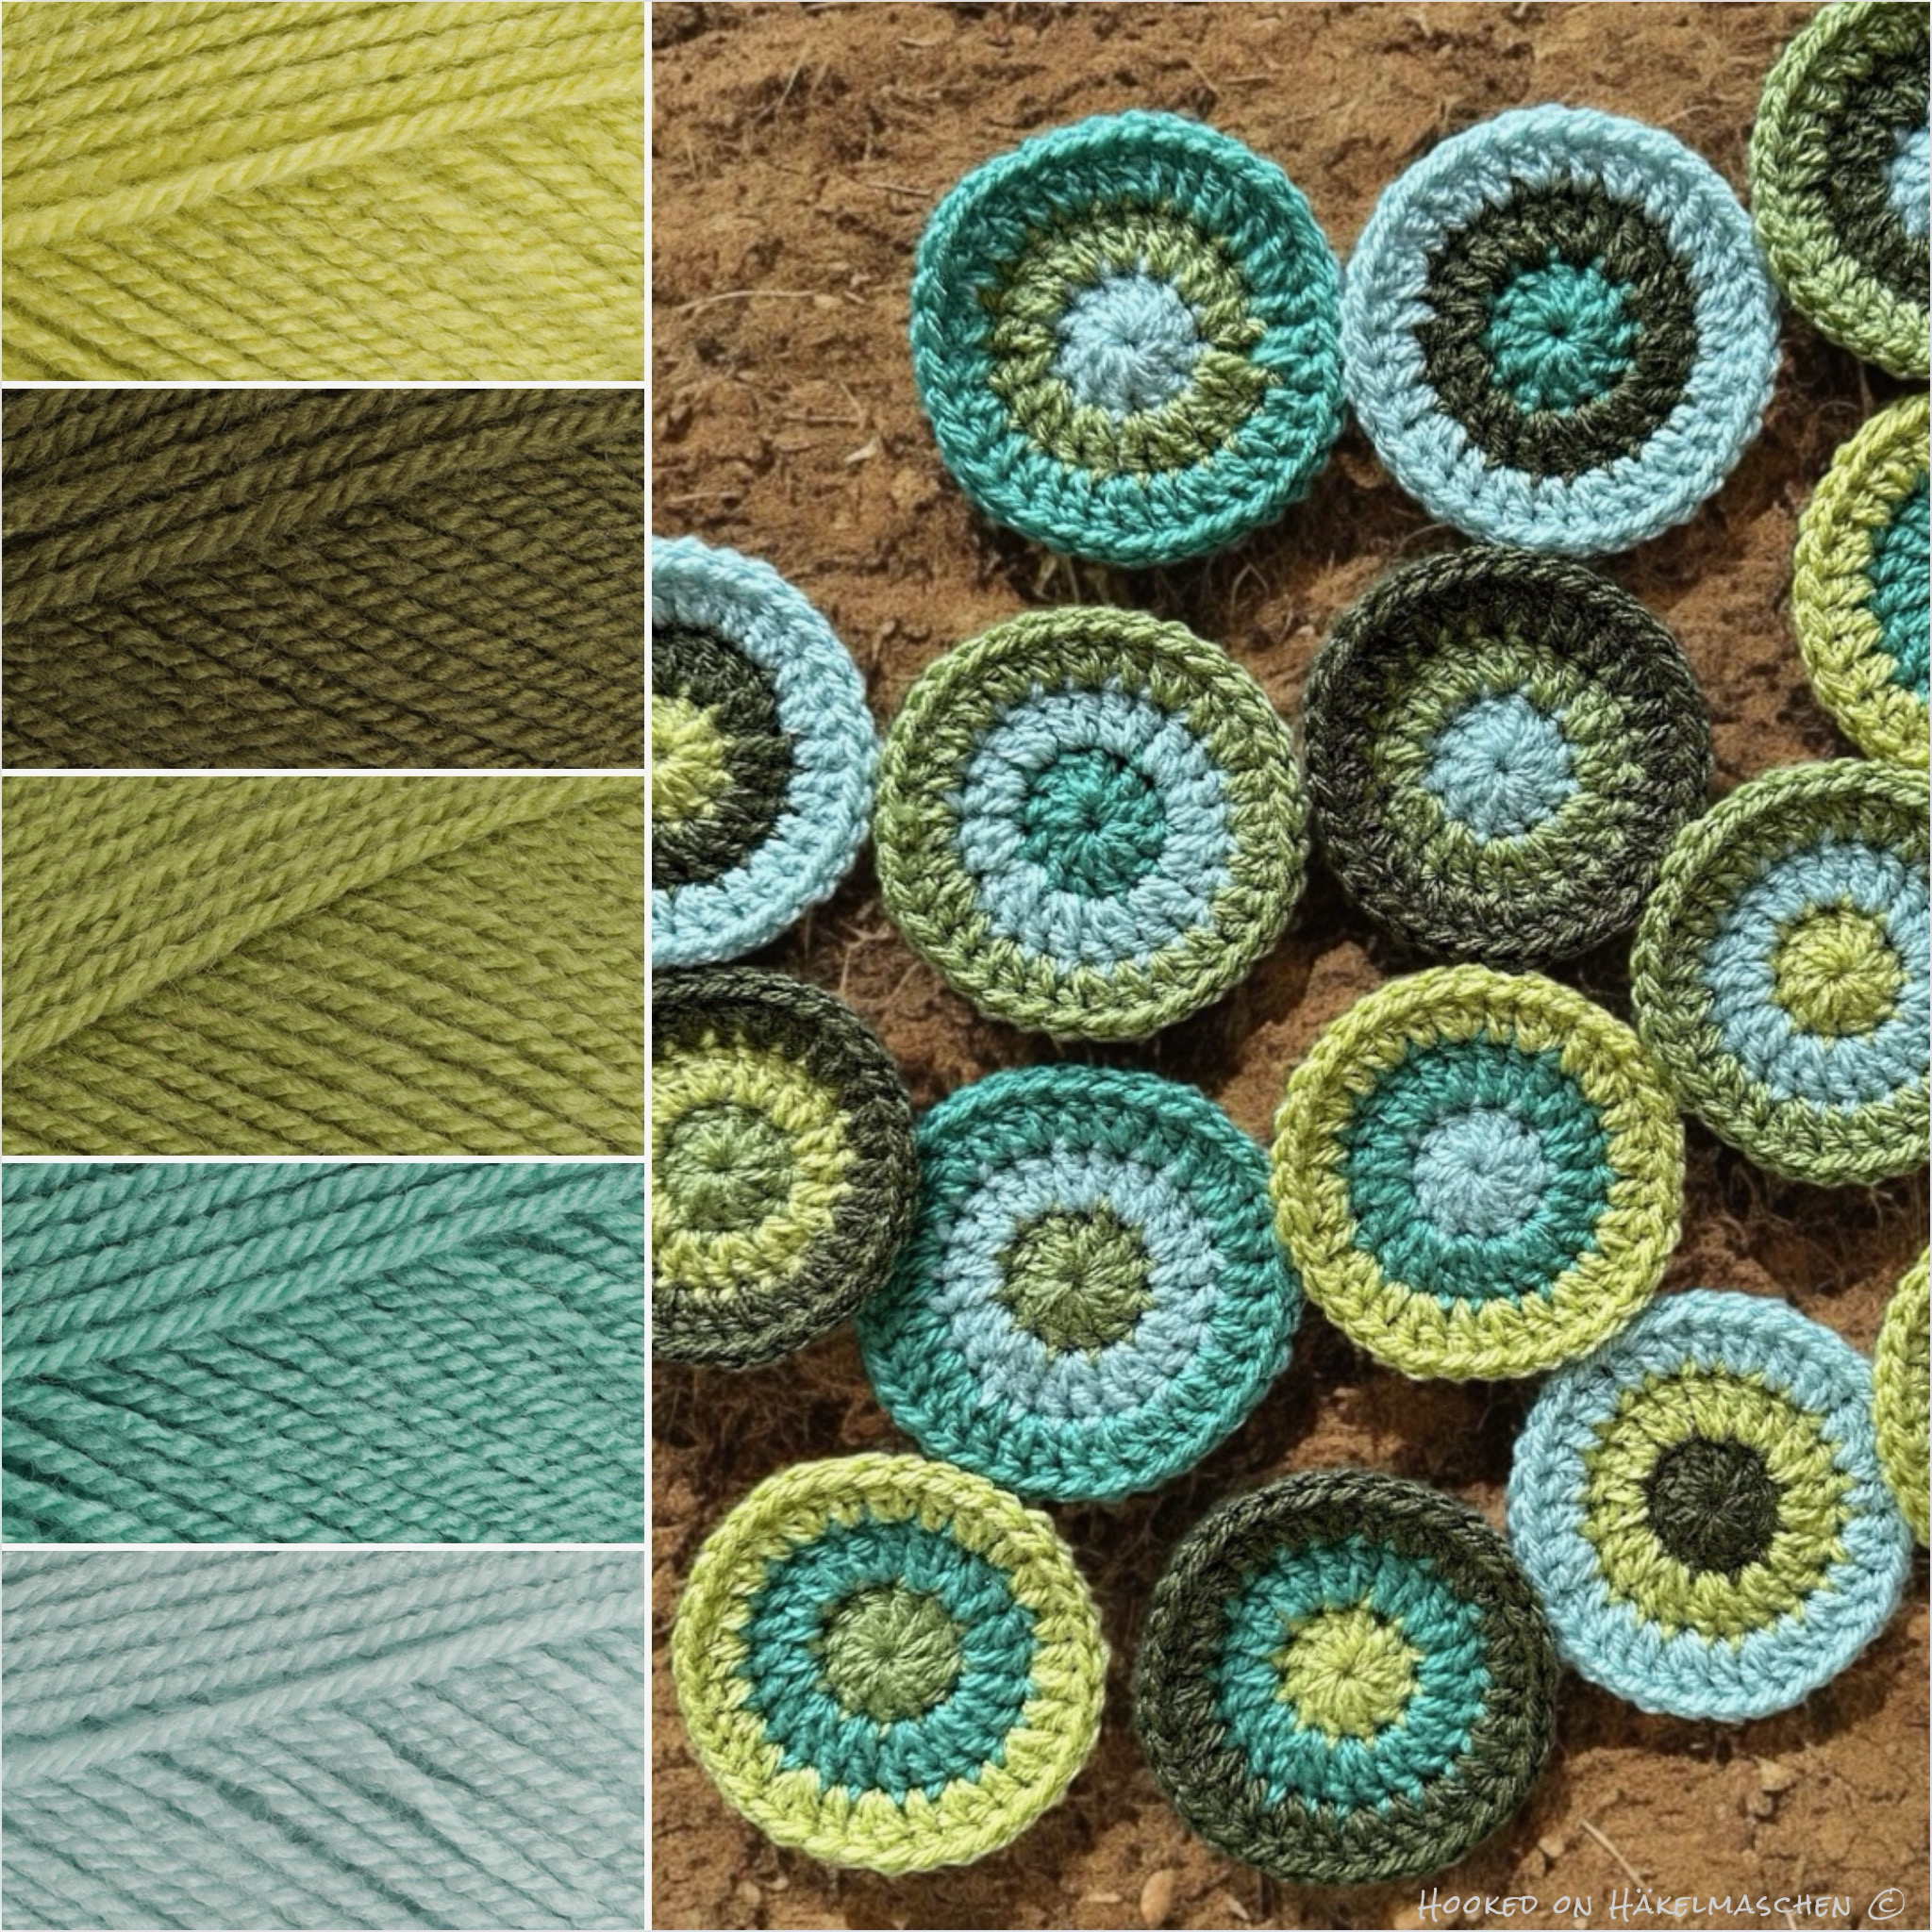
My Colours and Colour Placement
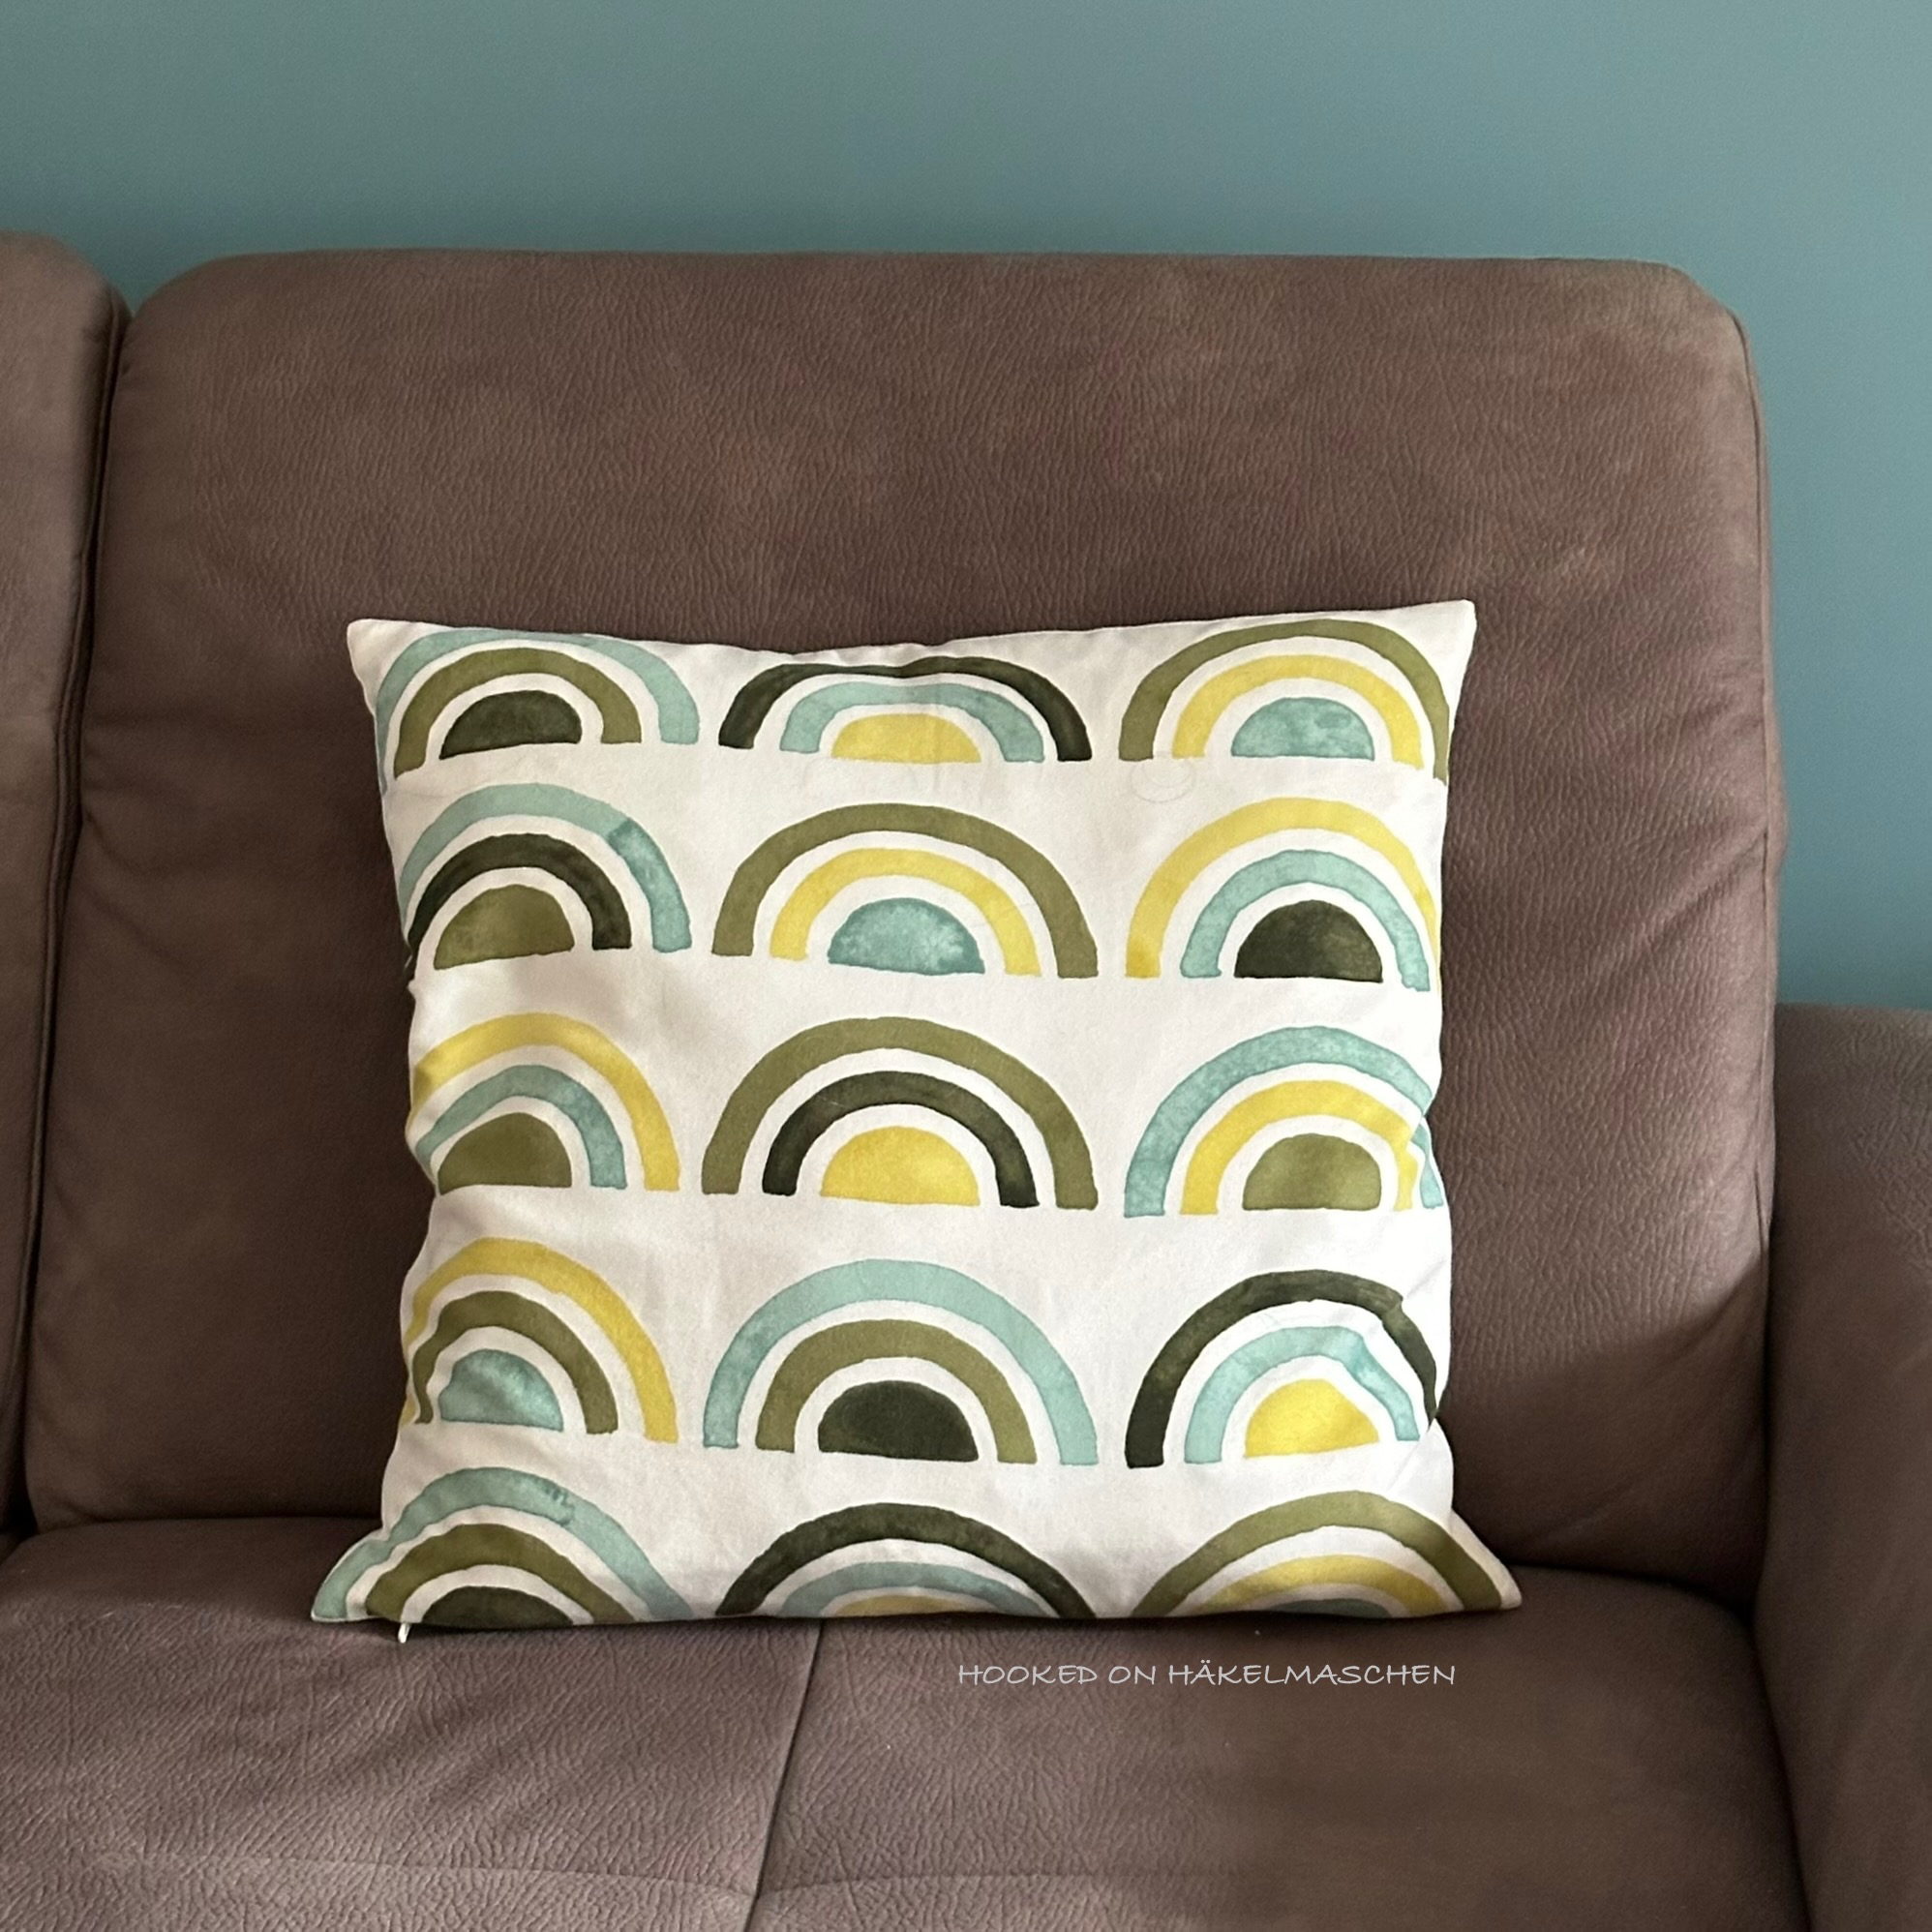
My colour choice was inspired by a cushion cover I got from IKEA some years ago.
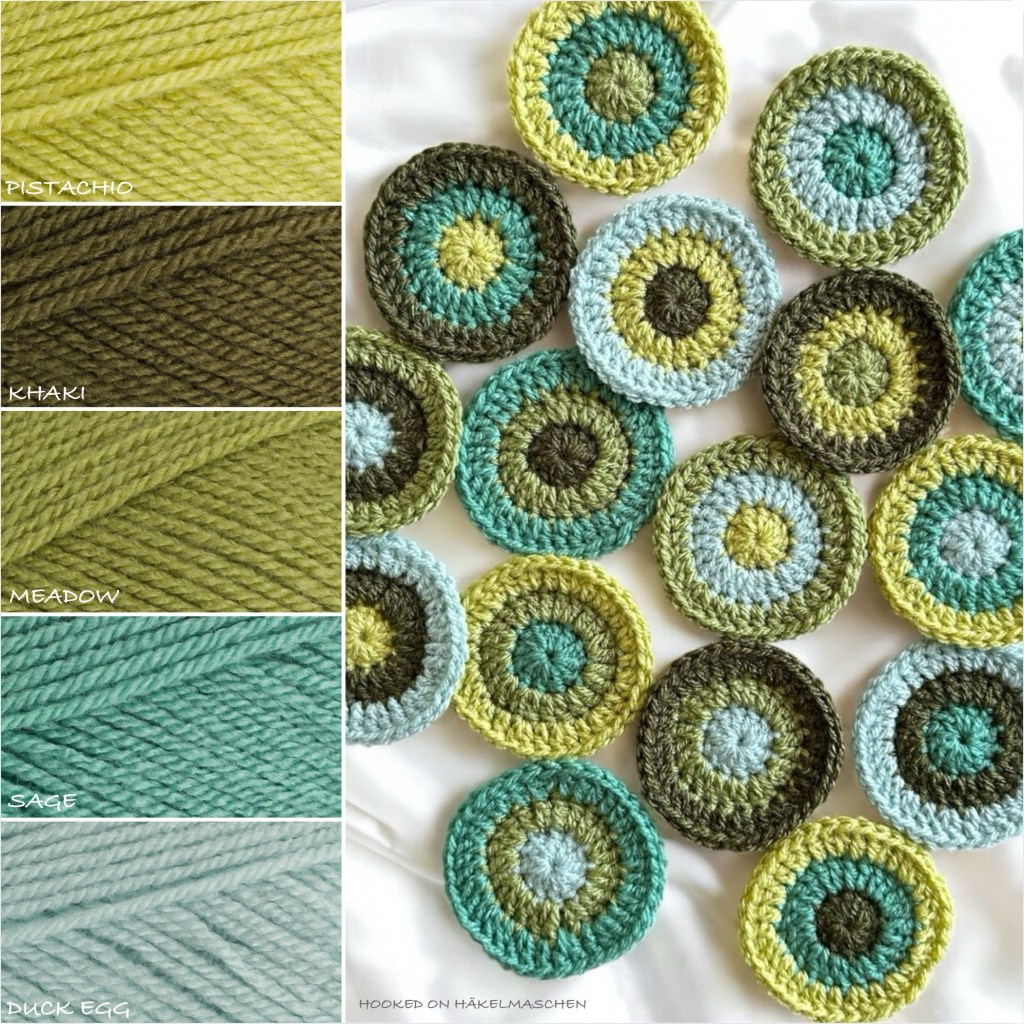
I selected five colours from my Stylecraft Special DK stash focusing on yellow-green and blue-green tones.
Originally, I wanted to create a random colour scheme for the design again. This time, however, I failed with the use of the random generator. I didn’t like the results, so I worked out something of my own. The outcome is not really random, but has a similar effect. You can read all about it in one of my earlier posts.
Of course, you can also use different yarns and/or different colours. But please bear in mind that using a different yarn may affect the size of the finished cushion. It may also change the quantity of yarn required.
I am totally happy with the result! And I hope you like it just as much!
Actually, I wanted to have finished my Happy Circles cushion cover a long time ago! But sometimes life turns out differently than you might think.
Everything had started out so nicely …
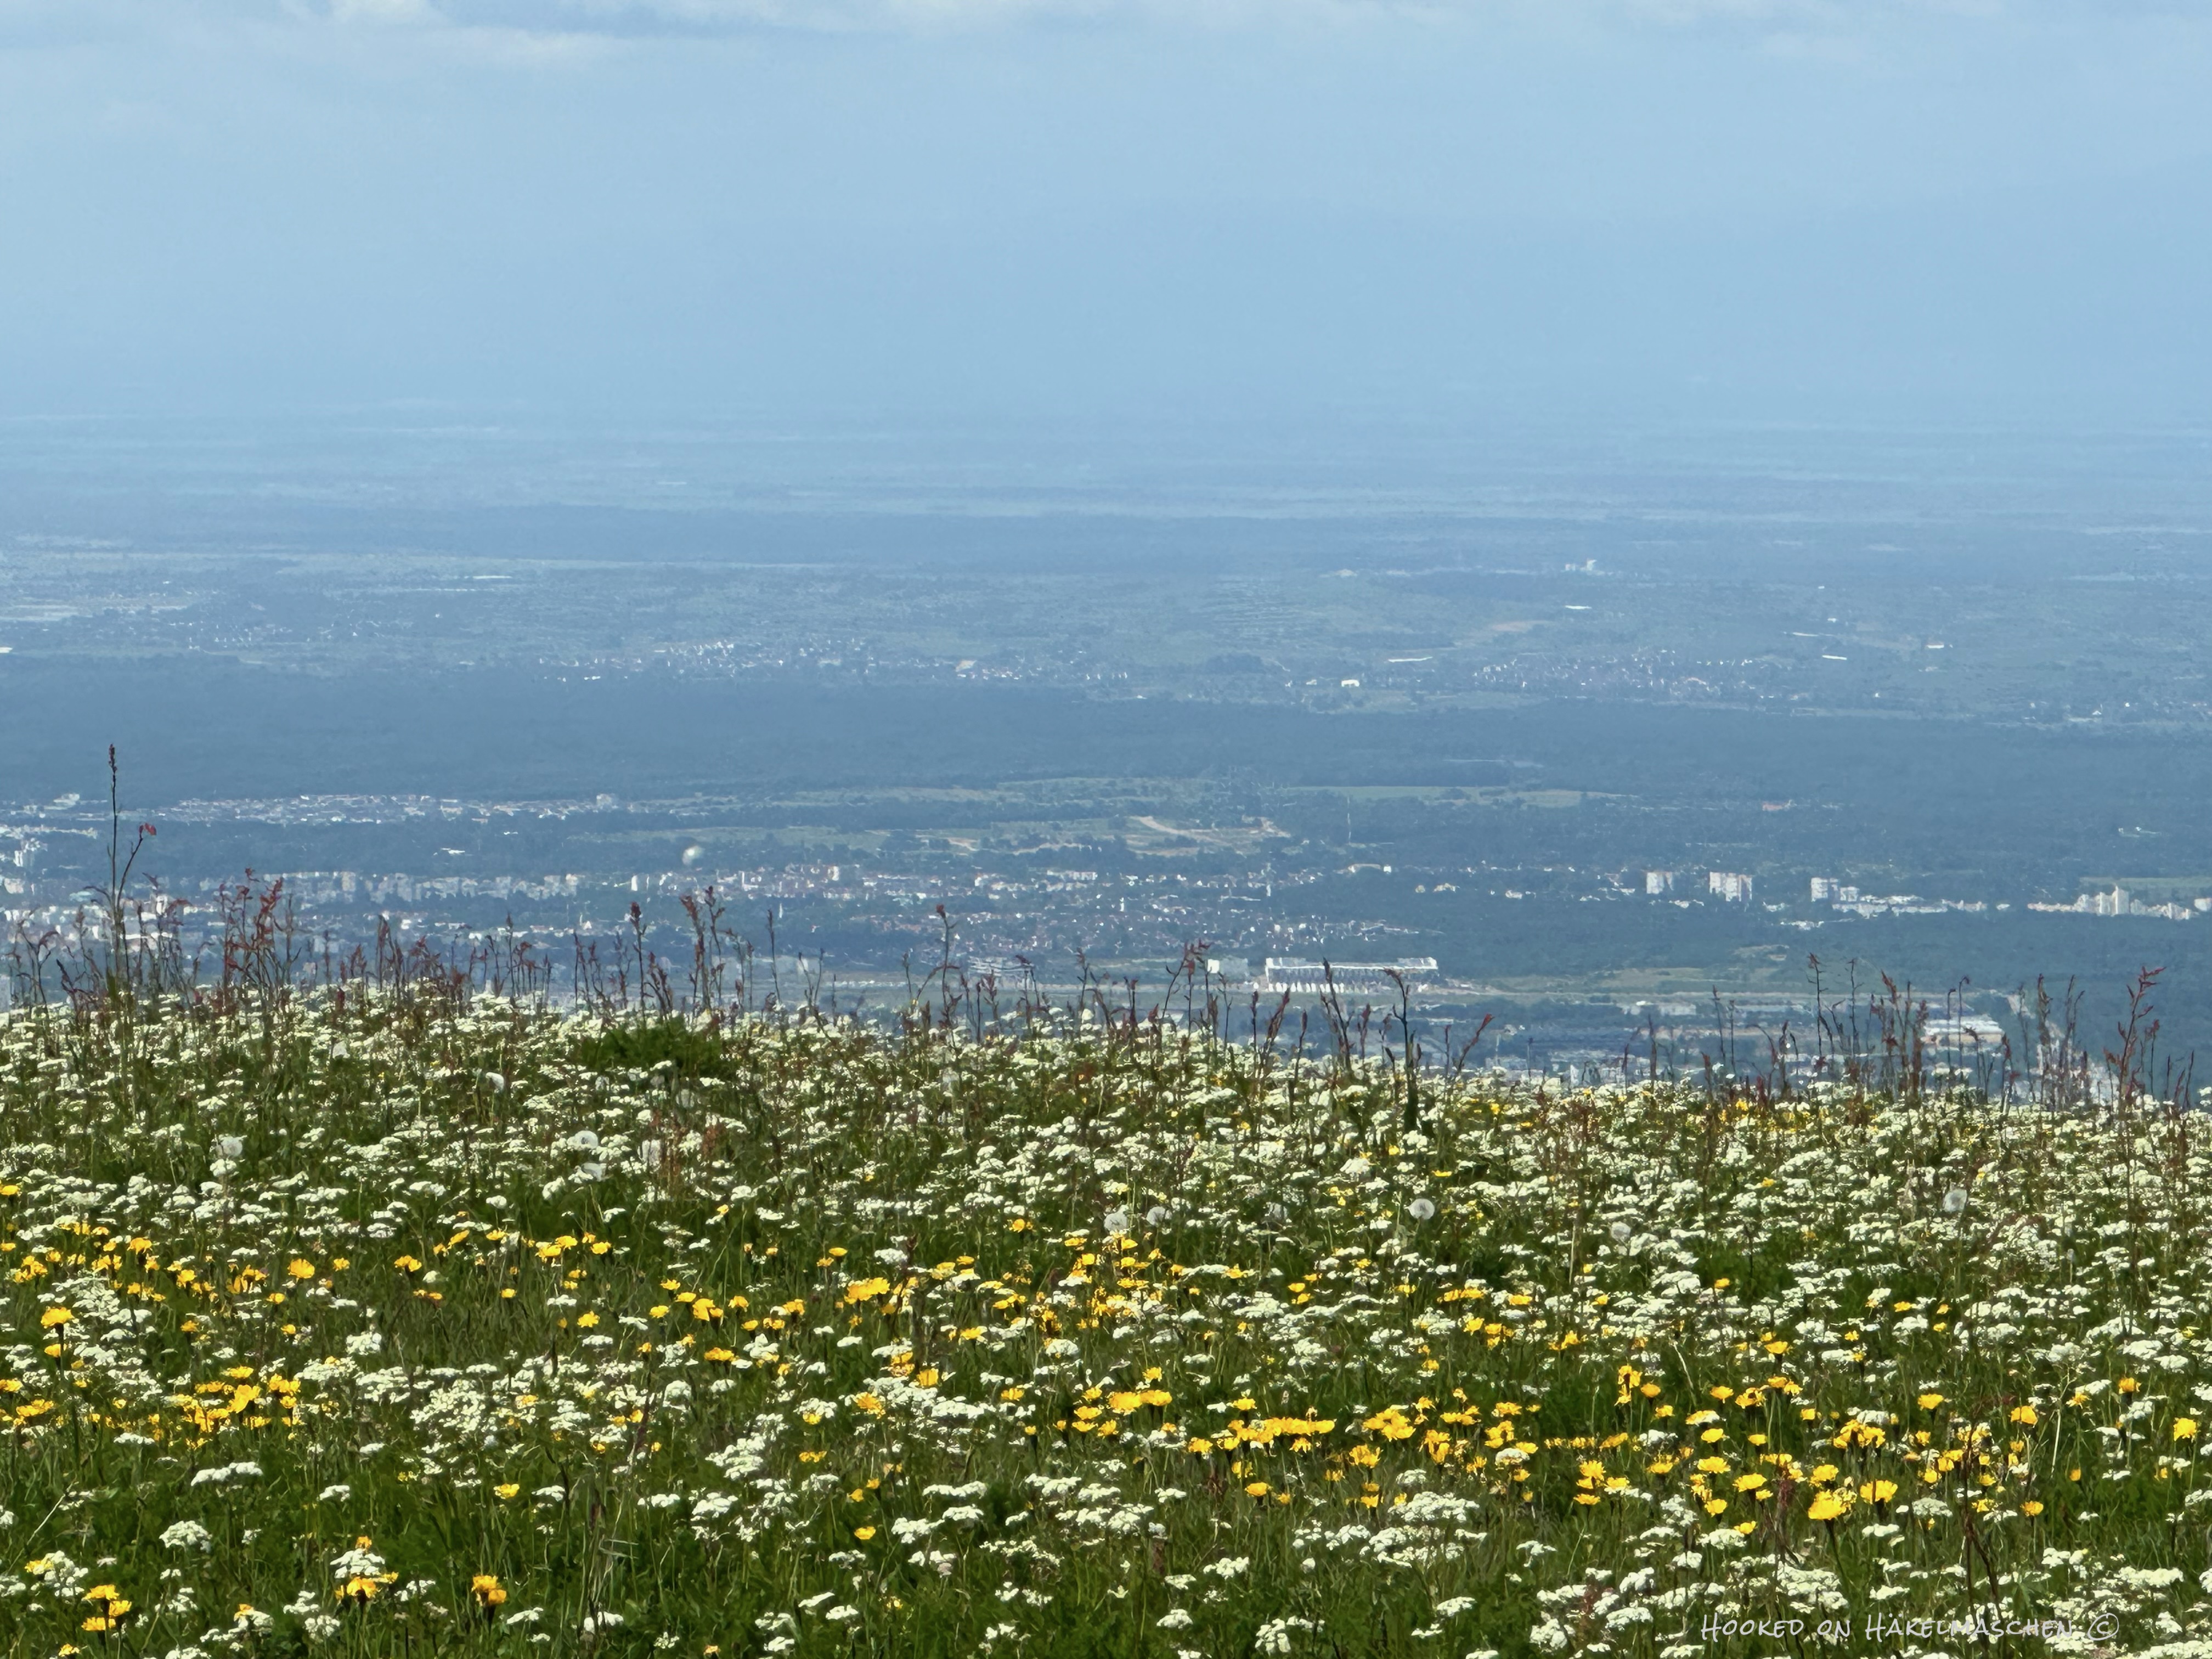
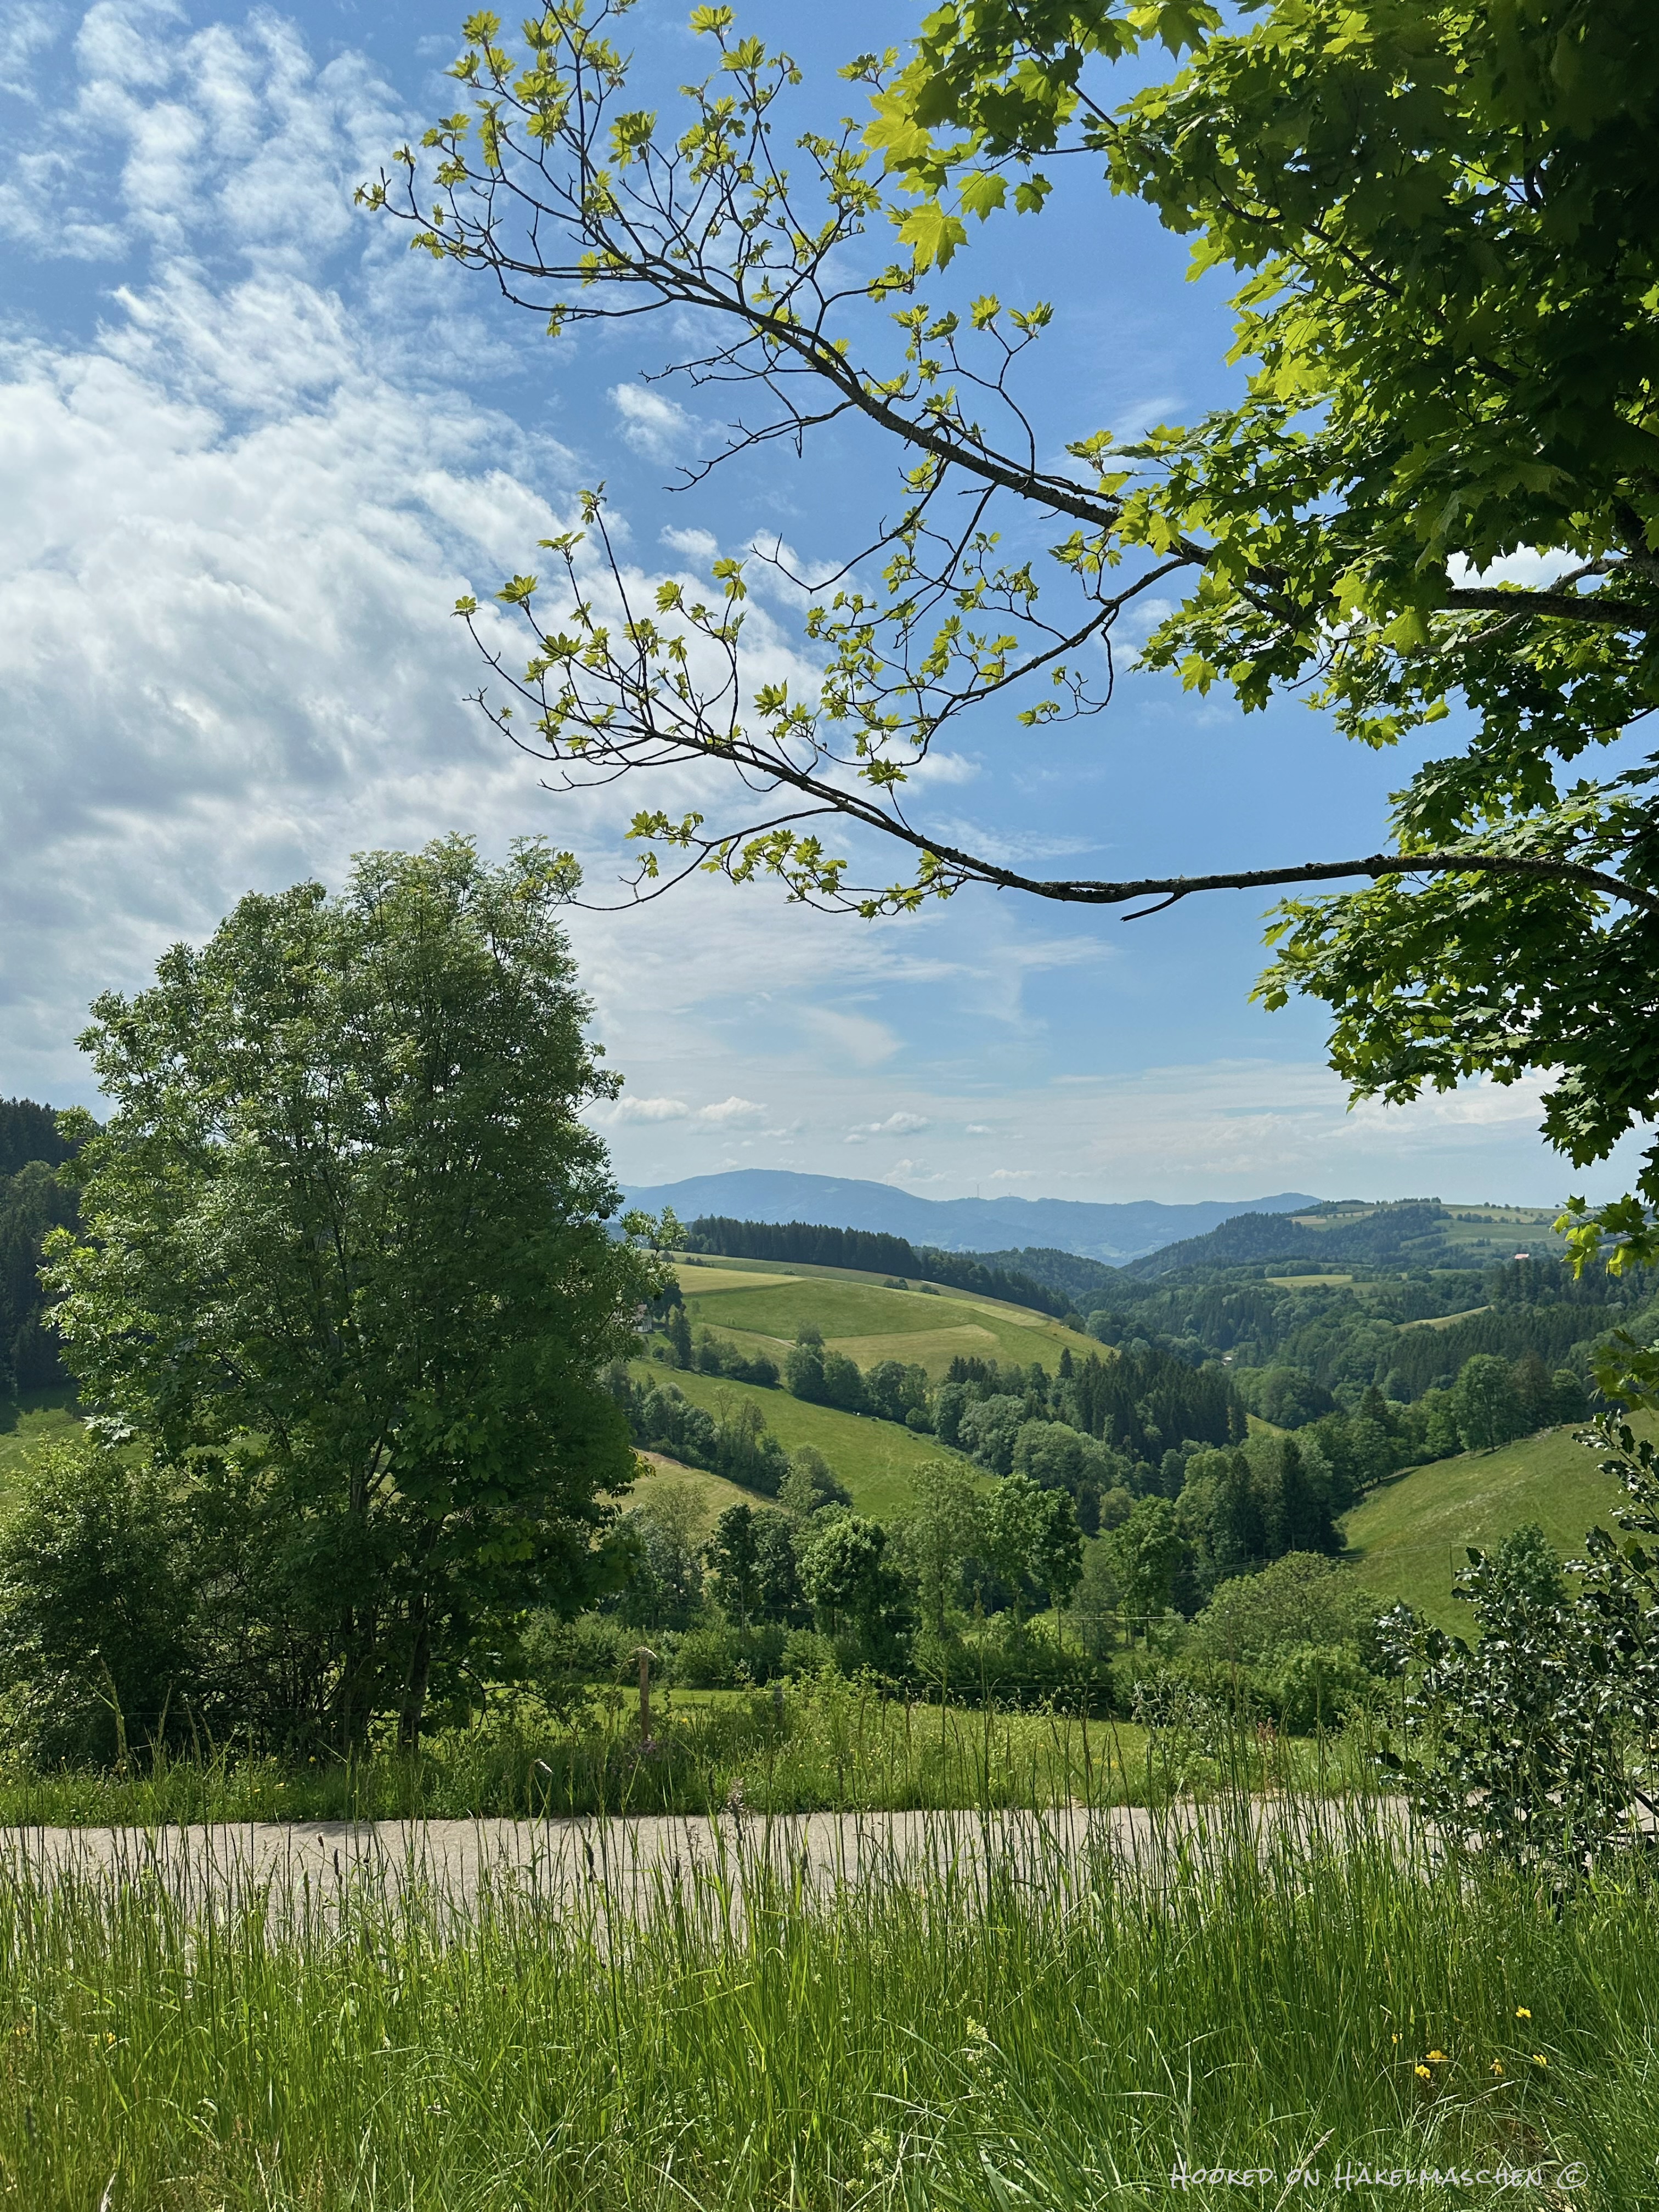
End of May is my birthday, so we travelled to the Black Forest for about 10 days. Even though the weather wasn’t so good, we really enjoyed our time. I love the Black Forest, especially at this time of year! Due to the mountainous landscape and the altitude, there is relatively little agriculture but all the more livestock breeding with cows, sheep and goats. The meadows just bloom wonderfully at this time of year! We had beautiful long walks and a very relaxing time!
Here some
Holiday impressions
Of course, I also had my crochet stuff with me (and a little bit of knitting). But I have to admit that I didn’t get as far with it as I had intended. Towards the end of the holiday I was kind of tired and at the same time my bones were aching … When we got home, I realised that I had contracted a COVID infection. Unfortunately, that put me out of action for another 10 days …
I’m starting to feel better now, even if my voice is still a bit raspy and I’m still coughing – at least my brain is working again!!
My crochet progress
Unfortunately there’s not much news to report about my cushion cover. Let alone a final photo and / or a pattern.
At least I have finished the front panel. All my squares are joined and I also added a small border.
still unblocked …
… the front side
The finished size of the panel is 46 x 46 cm (about 18 x 18 inch). I would like to use the cover for a 50 x 50 cm (20 in) cushion. I read somewhere that the cover for a square cushion should be about 5 cm (2 in) smaller than the insert to ensure a nice fit. Until now, I have always made the cushion covers to fit exactly. I then often had the problem that they tended to look too big, especially at the corners. So I thought I’d give the smaller size a try. I only hope that it will work out well! Otherwise I will have to start over.
At the moment I’m working on the back. I opted for a simple square. Crocheted in rounds with double crochet. I still have two or three rounds to go, then the joining can begin.
Work in progress …
… the back side
I can’t wait to see how it turns out …
I hope to finish it in the course of next week. Then it’s time to write down the pattern!
Have a lovely weekend 💕
Edit 06.07.2025: I’ve just stumbled over my notes: I was wrong about the size of the cushion cover. It should not be 10 % smaller as I had originally written, but 5 cm (2 in). I have just corrected this – sorry!
Back then I used 15 different colours and created the random arrangement of the colours with a random generator. I was totally happy with the result! You‘ll find all information about it in this post.
Choosing colours for my new project
Although I am using a similar pattern, the colours will be different in my new project. I’m using a colour combination that I’ve wanted to try for a long time.
My inspiration is a cushion I have from IKEA.
A mixture of green and blue tones, with a yellow undertone in the green shades.
For my Happy Circles wall hangings, the random colour placement worked so well, so I wanted to use the same method for the cushion cover.
Well…
Using a random generator
Unfortunately, using a random generator didn’t work out as expected this time.
No matter how many times I started the random generator and regardless of the order in which I entered the colours., they were not evenly distributed. Certain colours appeared more frequently than others.
What happened?
A bit frustrated, I then took a closer look at the topic, and it is actually logical. This effect is known as ‚true randomness‘ and that’s exactly what random.org provides. Without any corrections, repetitions and clusters are not only possible but even to be expected in true randomness.
What I learned is:
A pure random generator aims to be random, not uniform – therefore repetitions can occur that quickly catch the eye and may feel unbalanced in a small colour set. In a larger colour set, however, this same kind of distribution can create an attractive tension that supports the design.
So it wasn’t a mistake of the randomizer, it just wasn’t the right tool for this specific project
That’s why I decided to create my own ‚controlled’ randomness with a more balanced distribution of colours.
Creating my own randomness
My starting point was
The five colours I wanted to use
First, I assigned a letter from A – E to each colour – without a specific scheme, just to make it easier
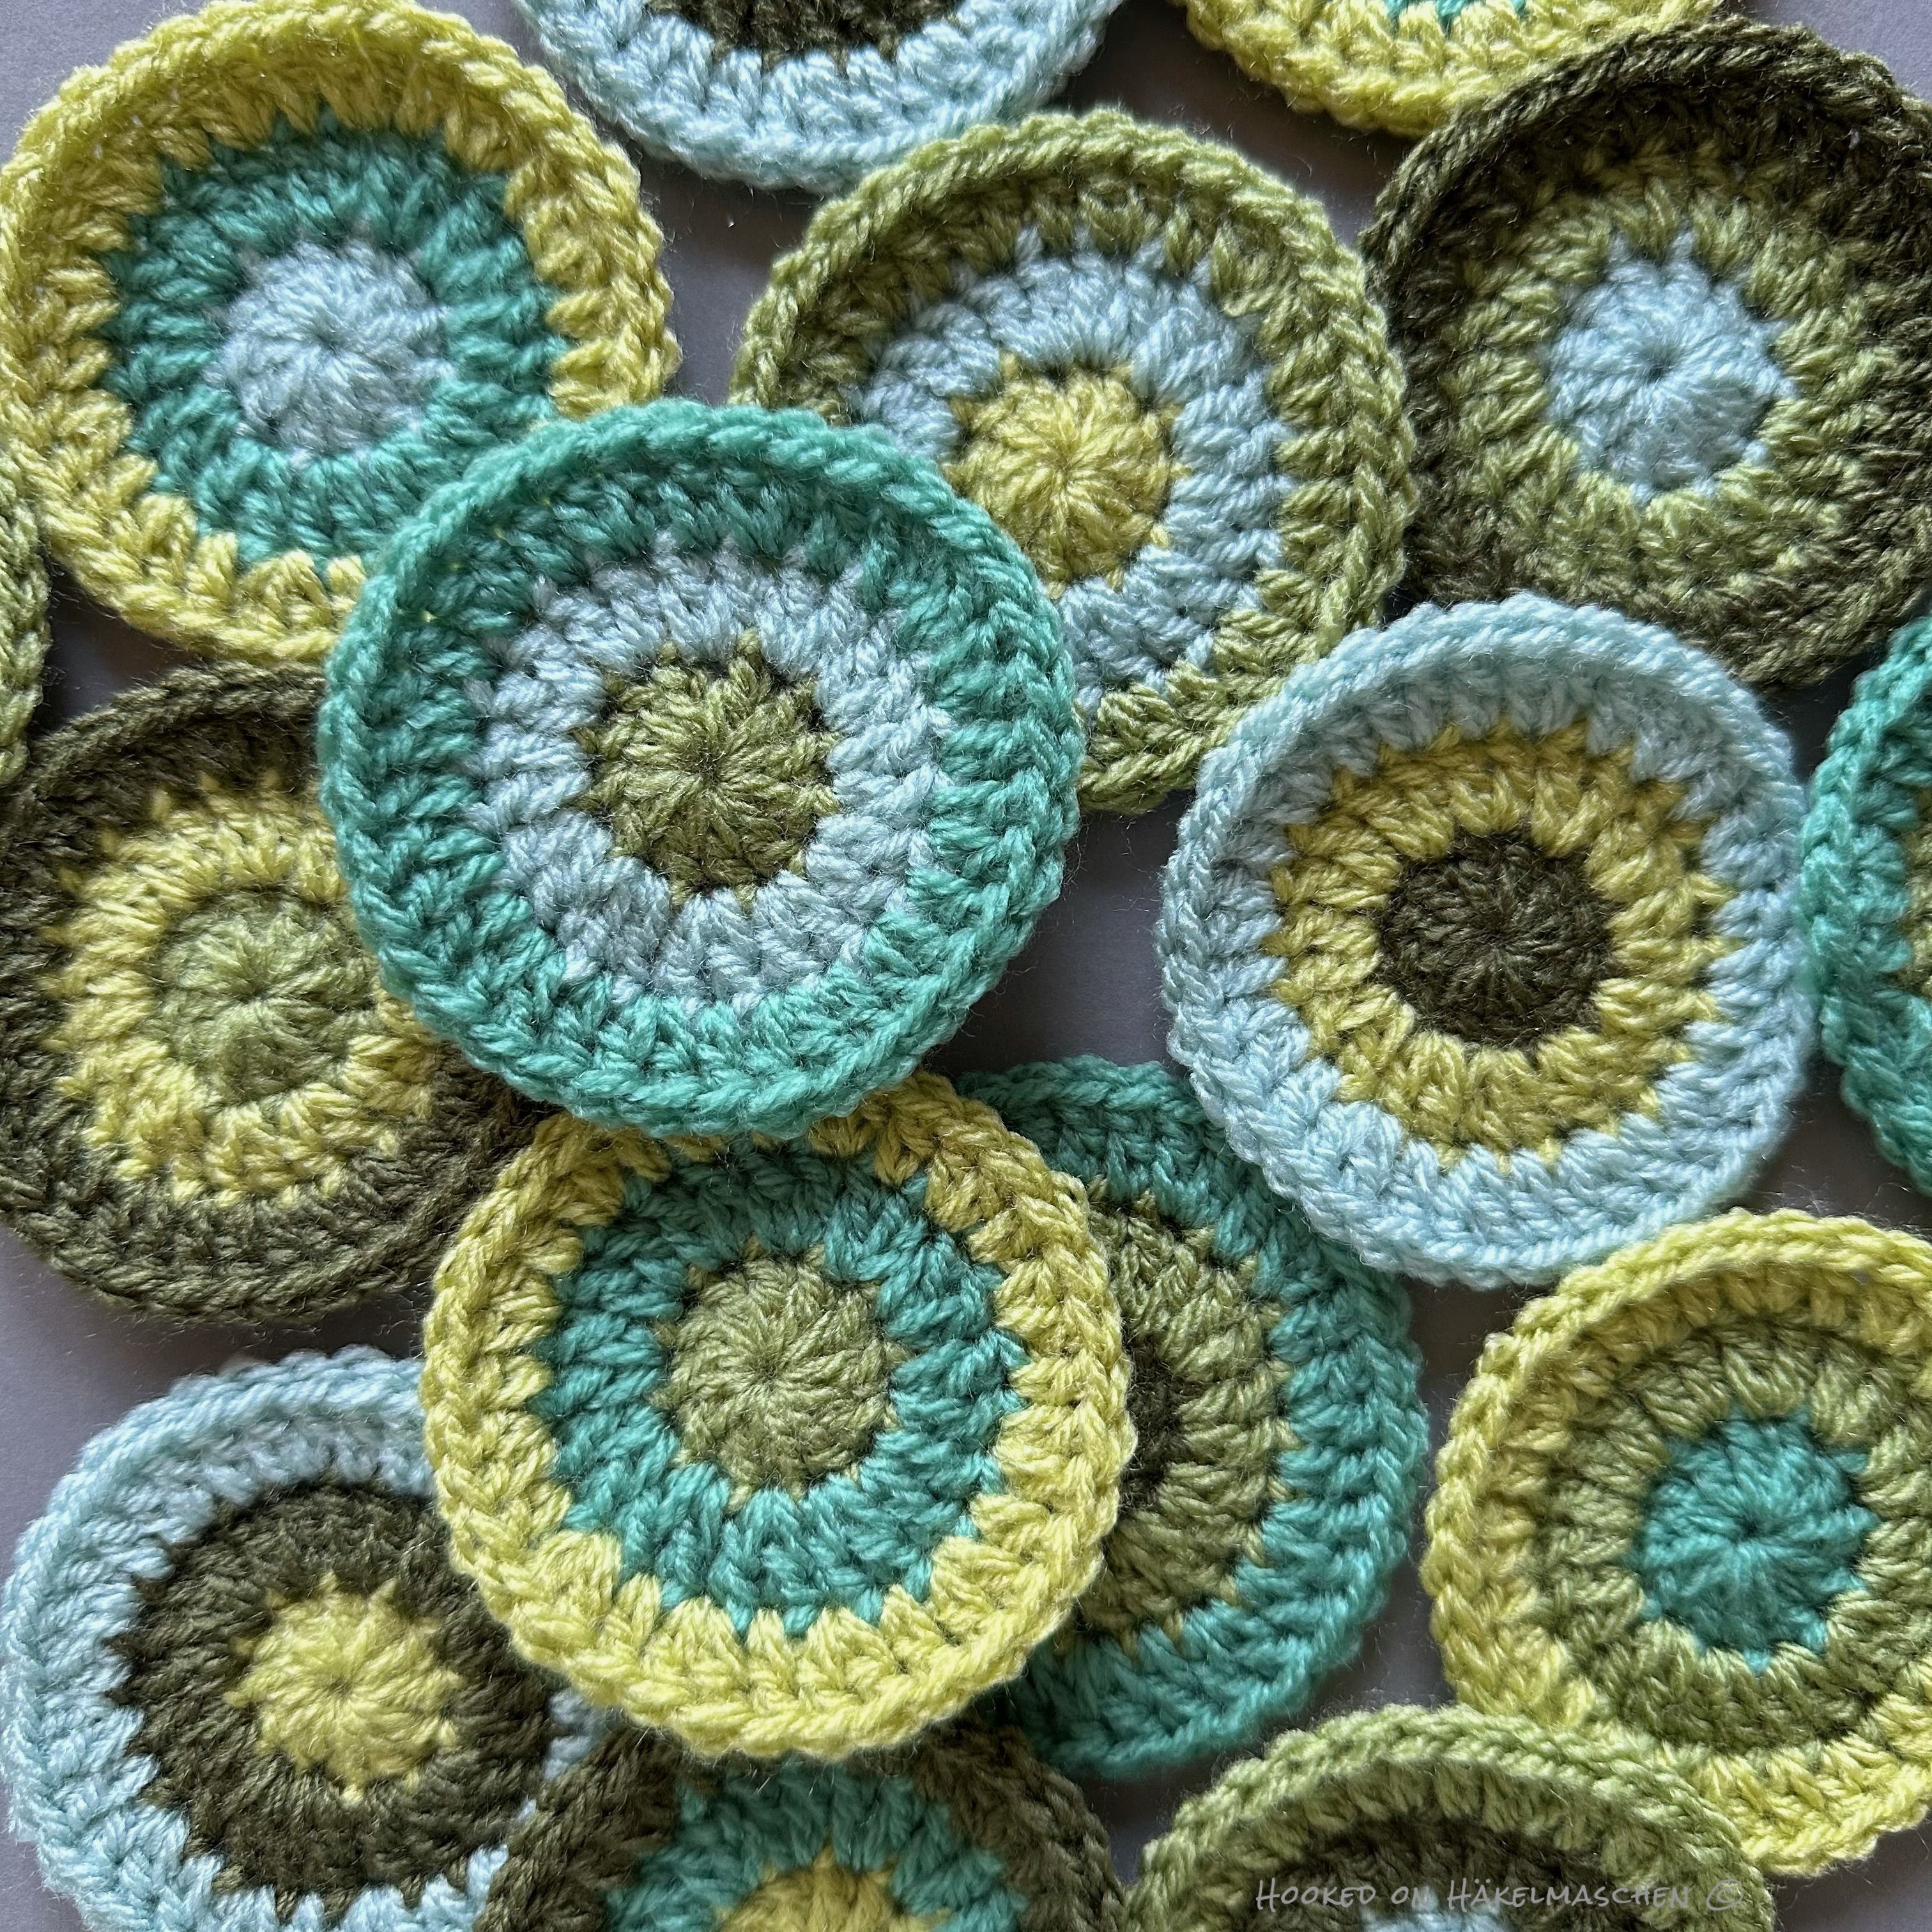
The sixteen circles I needed to create the squares for my front panel
The layout I planned was a 4 x 4 layout – 4 squares wide and 4 squares high
A – Duck Egg B – Meadow C – Sage D – Pistachio E – Khaki
I decided to start 4 circles with the same colour and 3 circles each with one of the other 4 colours. Makes a total of 16.
So I listed the 16 circles in a table and assigned them the colours A – E. Circles 1 – 4 started with colour A, circles 5 -7 with colour B and so on. This was the colour placement for the first round.
To determine the colours for the second round, I started at circle #1 with colour B (as it had already colour A for round 1) In the following I entered the colours consecutively downwards. To avoid two rounds having the same colour, I skipped the relevant letter in these cases. For example: in circle #6, following the sequence, it should have been colour B for round 2. I skipped this to C as B was already assigned for round 1.
Afterwards I did the same for round 3, starting at circle #1 with colour C.
The final result is shown in the table below. In this way, the colour combination looks much more balanced.
Random colour sequence
The finished circles were then ‚squared’ by adding two more rounds in Cream.
Creating a layout
Similar to my wall hangings, I created the final layout with the random generator.
Very easy, although it sounds a bit complicated when written.
Each of my squares already had a number, defined by the colour arrangement (according to the table above / random colour sequence)
I also numbered the places in a 4 x 4 grid symbolizing the layout (shown as mall grid, upper left in the picture below)
I entered numbers 1 -16, symbolizing the squares into the list generator of random.org and generated a random result
I arranged the squares according to this result in the 4×4 grid, made some changes and voilà …
Below my detailed list of the colours used for the circles for each round and the corresponding layout.
Final colour scheme and layout
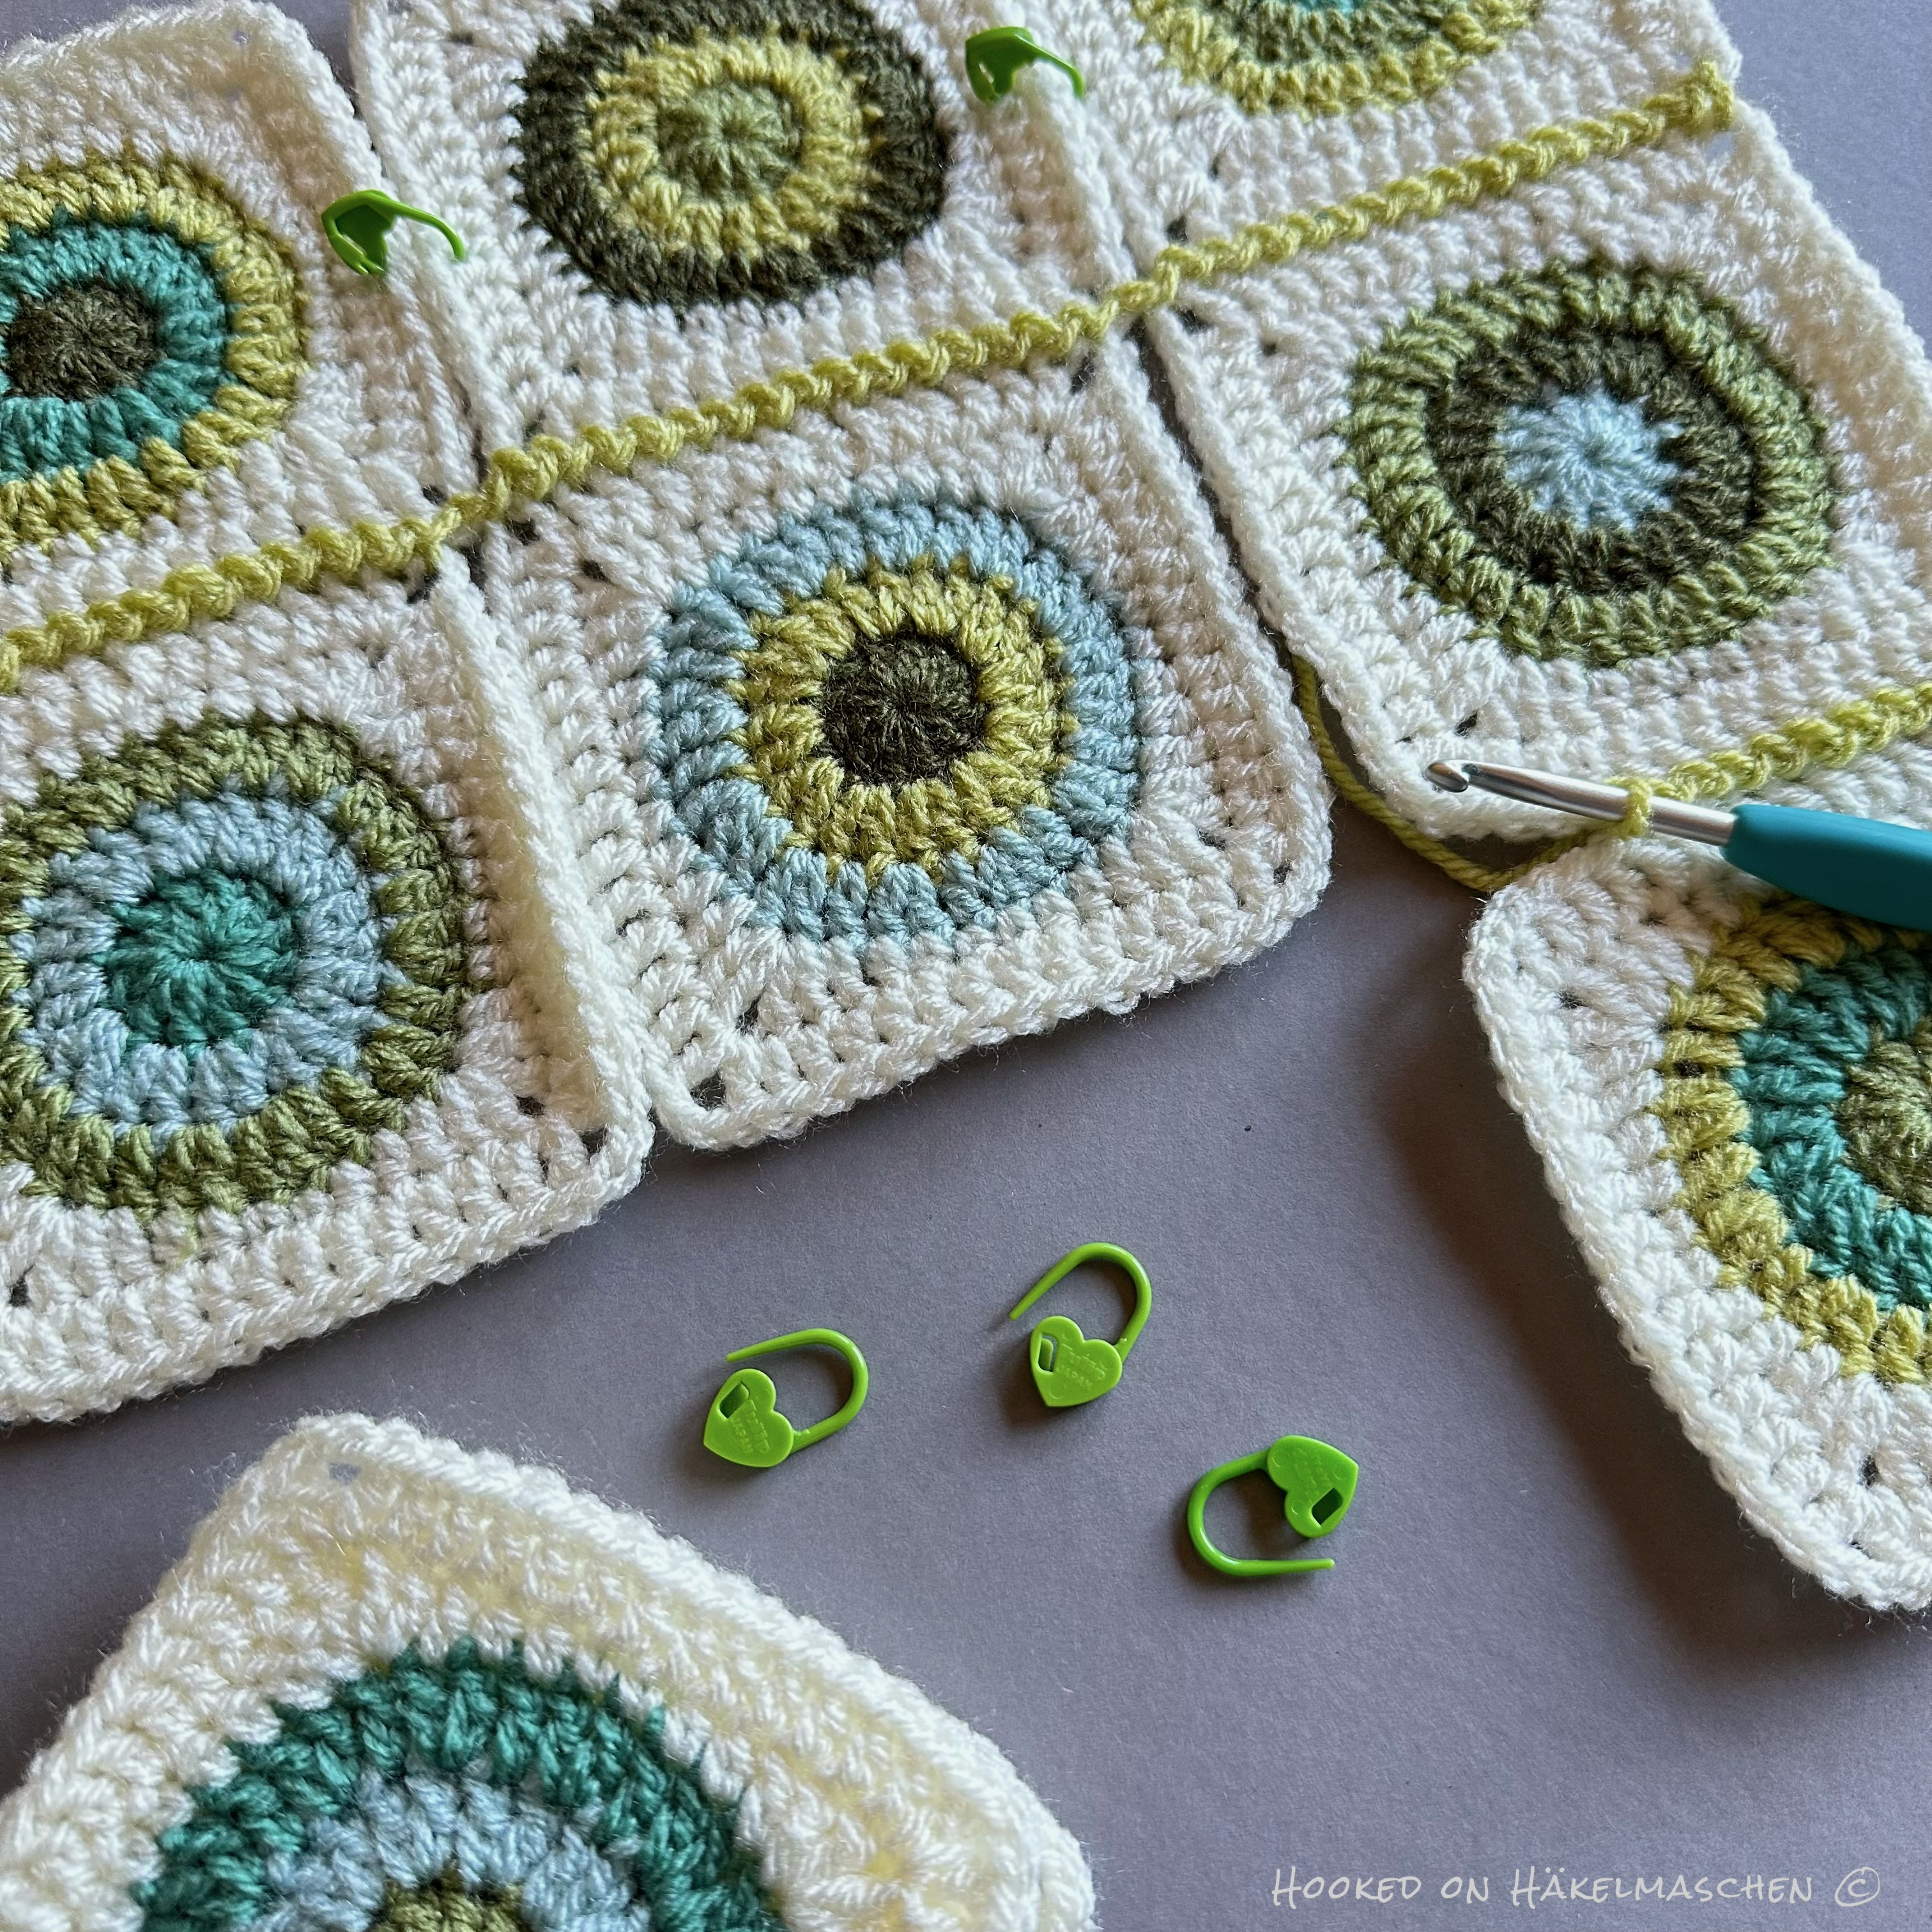
Joining the squares
Currently I am working on the join…
For my wall hangings, I had opted for a relatively inconspicuous joining method in the colour of the squares. In comparison, I now use Pistachio, so it’s more of a contrasting colour. And I opted for the Zig Zag Slip Stitch Join.
I really like how this turns out!
After joining, I will probably have to work a few more rounds around the whole panel to achieve the desired size.
However, I’m still not sure what the back should look like. Single coloured or colourful? I think I’m leaning towards single-coloured, but that could still change …
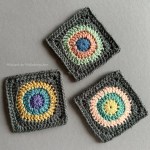
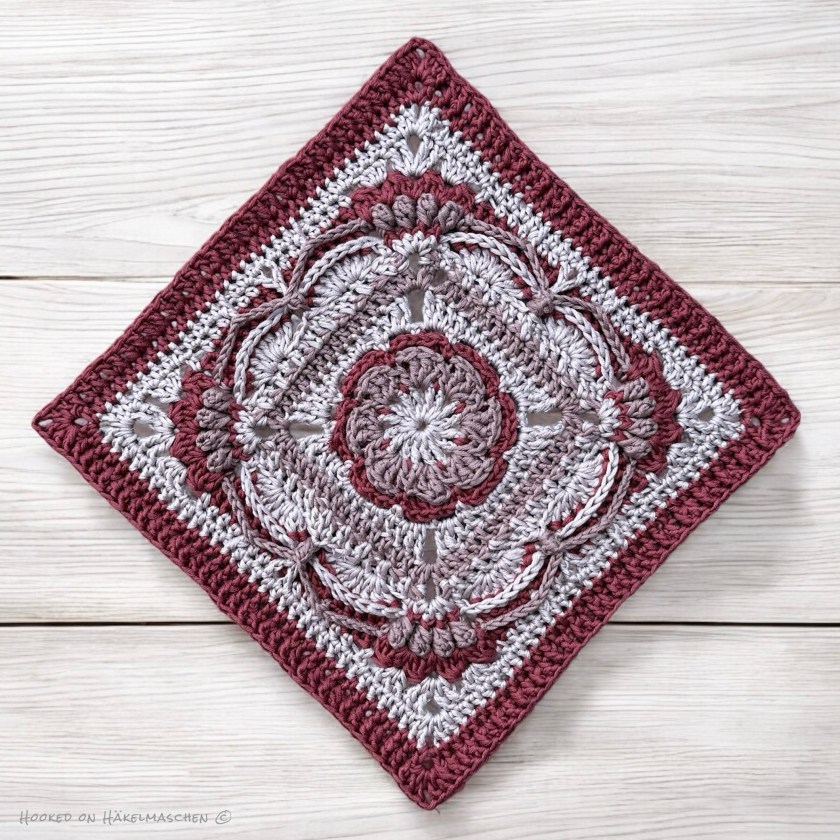
Last week I showed you the new design by Pam Knighton-Haener from A Yarn of Serendipity: the Dahlia of Yore Square. I had the pleasure of helping to test the pattern. So, today I‘d like to show you my version of this lovely design.
But I have to admit, I wasn’t familiar with the word yore at all. Though, I had to look up the name of the design first.. In case you feel the same way since English is not your native language either, here is the explanation I got from Google:
Yore means “long ago” and is used in the same way as “yesteryear”, “days gone by” and “old times”. Yore has a sentimental or nostalgic undertone and implies that the old times described are in some way superior to the present.
My yarn choice
With my yarn selection I tried to do justice to the name of the design. I decided on Drops Muskat as the slightly muted colours and silky sheen of the yarn emphasise a vintage look for me.
Drops Muskat is a mercerised cotton yarn and has about 100 m / 50 g. It is rated as a Double Knit (DK) / light worsted yarn weight (#3), great to work with a 4 mm hook.
In the past I had used this yarn before for another design of Pam, the Sage Advice square. Therefore, I knew that it is not easy to crochet. The yarn is spun from many thin threads and you have to be very careful not to pull any of these threads. But the result is fantastic, isn’t it?
The colours were a bit hard to capture with my iPhone. So, in my photos, the Silver Orchid looks a little more silver than it does in reality.
My colour placement corresponds to colourway 1 from the pattern. I replaced – colour A with Silver Orchid – colour B with Nutmeg and – colours C and D with Pomegranate
Only in rounds 15 and 16 I used colour C instead of colour B.
My finished and blocked square measures about 26 cm, that’s about 10 1/4 inch.
About the pattern
The Dahlia of Yore pattern is available on Ravelry. The difficulty is rated as mid-intermediate. There are a few special stitches, but all are well explained. Additionally, detailed photos for each round help in case something should be unclear.
And, as always, the size and the final stitch count of the Dahlia of Yore Square match to Pam’s other squares perfectly. So it’s easy to integrate the square into a larger project – perhaps in a blanket or a cushion cover.
It‘s definitely worth trying! I absolutely happy with mine!
Pam Knighton-Haener from A Yarn of Serendipity just released a lovely new design: Dahlia of Yore Square, a beautiful afghan square – just look at that …
About a week ago, we returned from a relaxing holiday on the North Sea coast. Those were wonderful days! The weather was cold but mostly sunny. So we had long walks on the beach … Sigh*
Back home – we live about 500 kilometres south in central Germany – we then noticed that spring is slowly arriving…
The birds start singing, the apple tree is showing tiny green leaves, and our little peach tree has the first pink blossoms. Spring time!
These first delicate shades of green and pink inspired me to bring some colour into our home as well.
Although I really don’t crochet much at the moment, I spontaneously thought of making something Easter-themed. The search for a pattern led me back to a site that I had actually discovered last year: Bomuldskys .
It is a Danish site, and Emilie, the person behind it, lives in Copenhagen. She offers both, paid and free patterns. I just LOVE her style and her designs, especially the greeting cards.
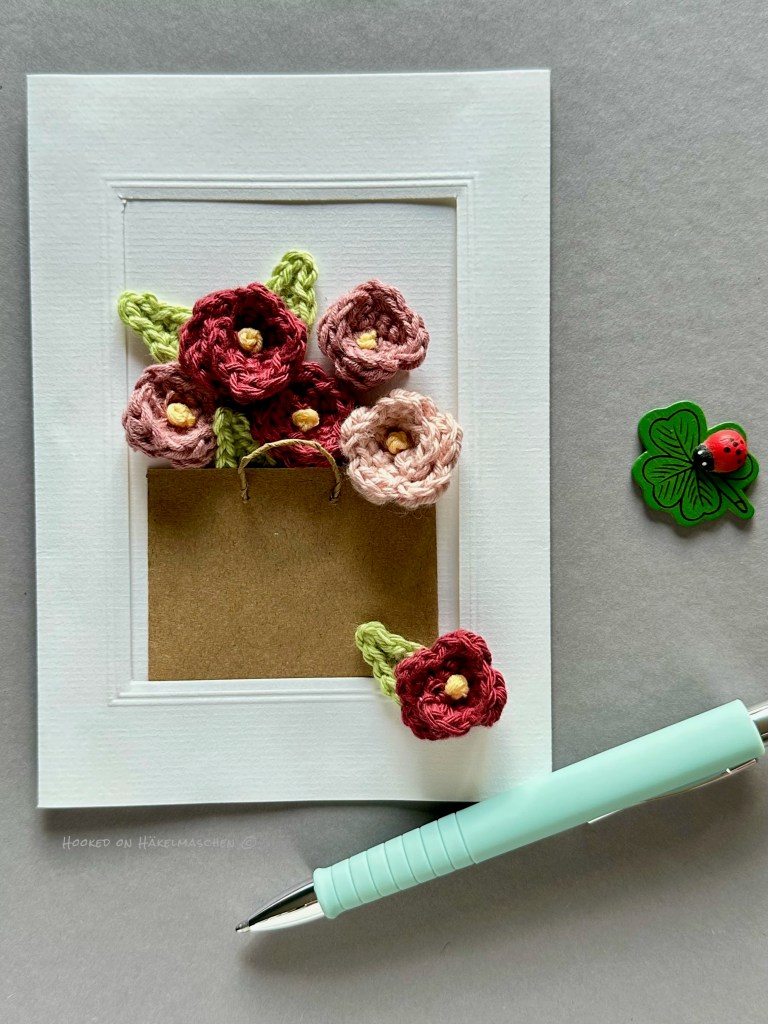
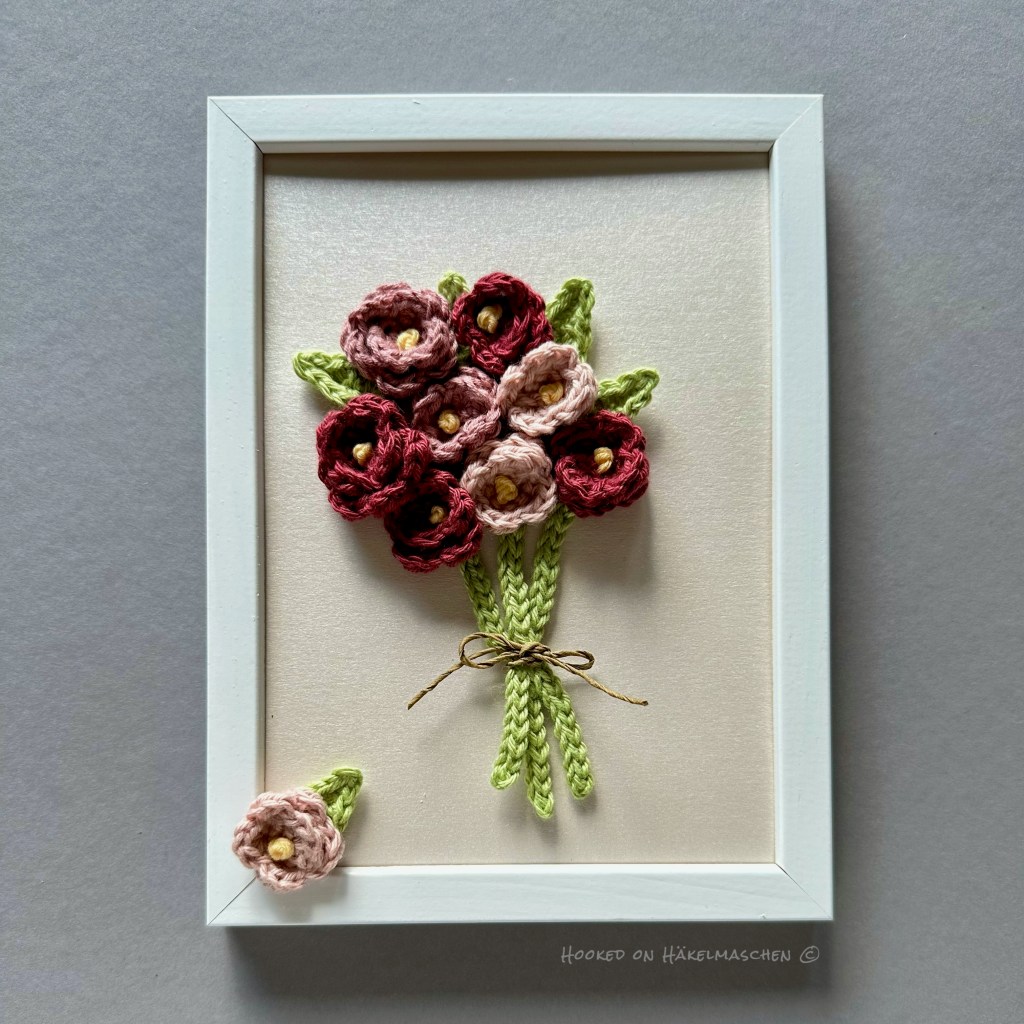
Last year I already fell in love with one of her Christmas designs. Due to my eye problems, however, I didn’t have the patience to make it. This time Summer Flowers caught my eye. It is a pattern for a greeting card that shows a bunch of roses, tucked in a paper bag. The pattern is available for free on her website and I just had to try it!
Summer Flowers – The Pattern
The pattern is written in US terms. It contains the instructions for the small and the large flowers, as well as the leaves. The instructions only require a few basic stitches. I found it easy to understand and I think it should be doable even for beginners. And it’s really quick and easy to make!
Yarn and colours I used
I used a mixture of different cotton yarns from my stash. All are classified as sport weight (#2) yarns. I worked them with a 2.5 and 2.75 crochet hook. Please note: you will find some detailed notes about the hook sizes at the end of this post.
Hobbii Rainbow Cotton 8/4 (160 m / 50 g)
64 – Dark Powder Rose
46 – Old Rose
Drops Safran (160 m / 50 g)
57 – Mauve
10 – Vanilla Cream
Cotton Kings Cotton 8/4
41 – a green shade, I have no name for this one, sorry
Pleasenote: I got the Cotton King some time ago as part of a colour pack from Hobbii yarn shop but it looks like the brand doesn’t exist any more.
My Greeting Card
My materials for the greeting card
For the greeting card I made
1 big and 2 small flowers in Dark Powder Rose (Hobbii Rainbow Cotton)
1 big flower in Old Rose (Hobbii Rainbow Cotton)
2 small flowers in Mauve (Drops Safran)
4 leaves in green (Cotton King)
The stamen are embroidered in Vanilla Cream (Drops Safran)
I found a suitable card and paper (for the little bag) in the stationery shop. The card is a craft card with a window on the front where you can place a photo or similar. The pattern calls for an A6 card, mine was a bit different, about 12 x 17 cm (4 3/4 x 6 3/4 inch).
Assembling of my greeting card
For the assembly of the flower bouquet I orientated myself on the instructions and the photo from the pattern. I first made the little bag and glued it on using a craft glue. Afterwards, I arranged the flowers and leaves until I found a position I liked and glued them on.
I absolutely love the result, although I think that my ‚bag’ turned out a little too big.
I will probably use it as birthday card for a dear friend. But it would also make a nice Easter card, wouldn‘t it?
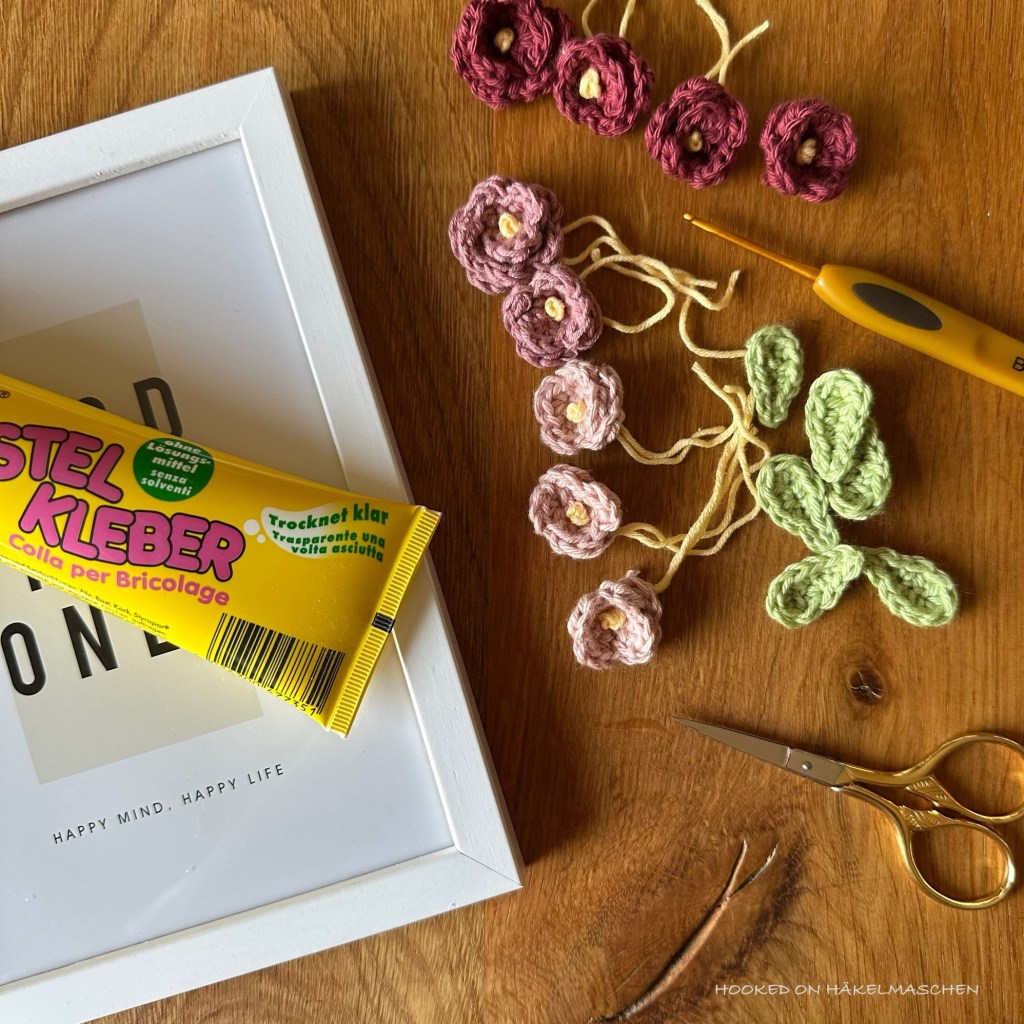
The flowers and leaves are really quick and easy to make! This made me want to do more, so I crocheted some more flowers and leaves and made a
Flower Collage
My materials for the flower collage
I used the same yarn and colours as for the card. I made another
1 big and 3 small flowers in Dark Powder Rose (Hobbii Rainbow Cotton)
3 small flowers in Old Rose (Hobbii Rainbow Cotton)
1 big and 1 small flower in Mauve (Drops Safran)
5 leaves and 3 stems in green
The little stems were not part of the pattern.
I just made a chain in a suitable length (mine are between 18 and 20 chains long) and slip stitched all the way back in each chain.
For the collage I got a white picture frame that is 13 x 18 cm (5 x 7 inch) in size.
Assembling of my flower collage
First, I disassembled the frame, removed the glass, and cut a piece of cardboard to the right size. I then inserted the cardboard into the frame to create a nice background for my bouquet of flowers.
The further process was basically the same as for the card. I first arranged the flowers and leaves until I liked the placement and colour distribution. Then I glued on the individual parts. I started with the stems and then worked from the bottom upwards.
A Word about the Hook Size
According to the instructions, a 2.0 mm crochet hook should be used. I understand the intention behind it. Amigurumi etc. Are often worked with a smaller crochet hook to obtain the necessary stability. Still, 2.0 mm seemed to me personally too small for the yarn I used. Especially as both yarns tend to split a bit when a small hook is used.
But please, don’t get me wrong! I love both, Hobbii Rainbow Cotton and Drops Safran. I especially like their softness and the matte look. I just find it difficult to work them with a smaller hook than recommended on the label.
For the card, I therefore crocheted the flowers with a 2.75 mm hook. This is the size I normally use with this yarn. At first they seemed a bit loose to me. So I went down to a 2.25 mm hook when I made the flowers for the collage. There were pros and cons: I preferred the structure of the flowers made with the smaller hook. But the ones made with the bigger hook were easier to shape.
I think you can’t see any difference in the end. So both seems to be ok.
I hope I was able to inspire you a little for a beautiful and quickly made spring decoration.
You might be wondering why it’s been so quiet here – so here’s what’s been going on. I’m still dealing with some health issues. As I mentioned last year, one of my eyes has been troubling me. About four months ago, my vision suddenly worsened, and my ophthalmologist diagnosed an oedema – a kind of swelling inside the eye.
I’m now receiving injections as part of the treatment (right into the eye – definitely not my favourite experience!). After each treatment, I have to give my eye several days of rest, which means no reading, no sports, no bending over, and so on. Needless to say, this limits what I can do with my crochet projects.
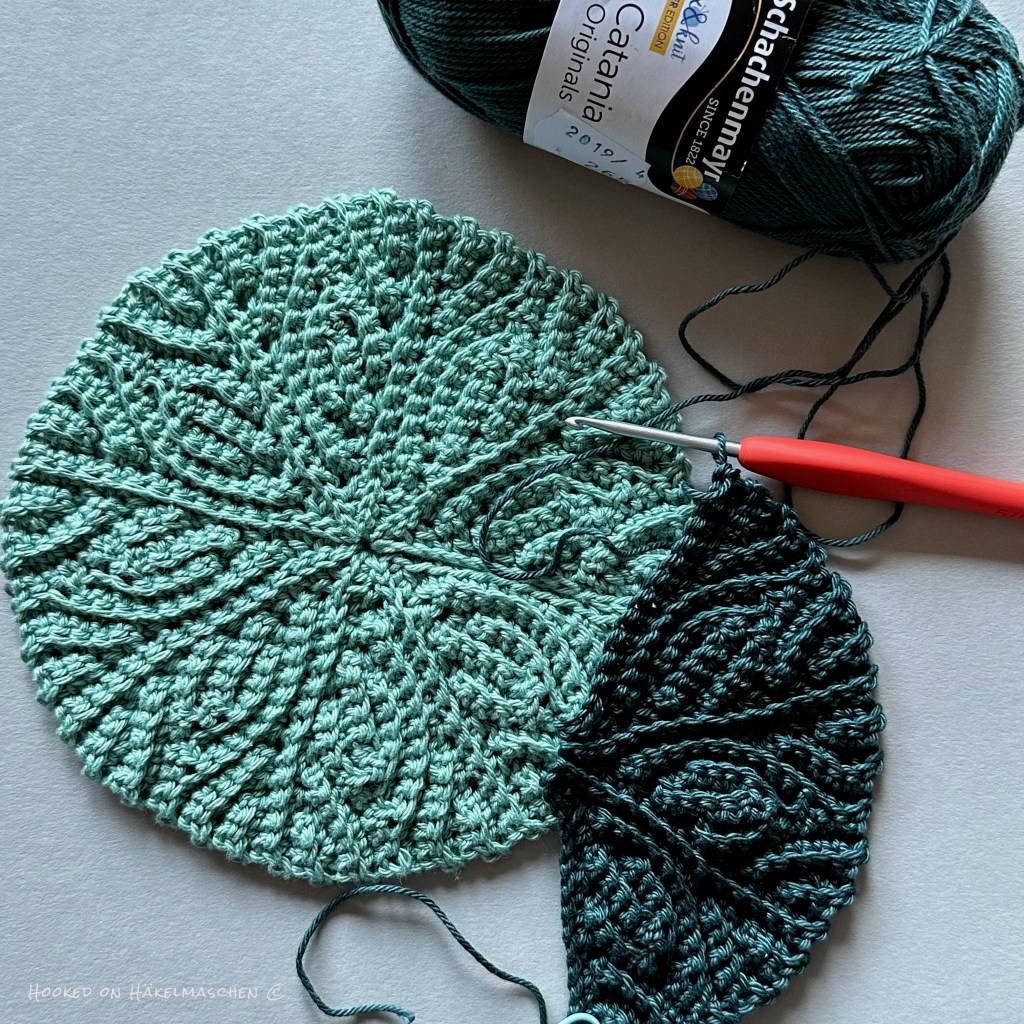
Still, I’m feeling hopeful! Subjectively, the treatment seems to be helping, but focusing on anything for too long remains a challenge. So I’m taking things slowly and sticking mostly to smaller projects for now. And yay – slowly but happily – I finally finished a set of coasters!
What’s more, this project taught me something completely new: short rows in crochet. Until now, I had only known short rows from knitting – where I‘ve often used them for shaping sock heels.
Despite the differences between knitting and crochet, the idea behind short rows is pretty much the same in both: as the name suggests, only part of a row is worked, which helps you create specific shapes. But before this project, I had never tried them in crochet at all.
Gift Coasters
Last December, I bought an eBook from Tatsiana of Lilla Bjorn Crochet, who hosted a mystery make-along with four delightful patterns: Gift Coaster, Gift Bauble, Gift Mandala Garland, and Pixel Coaster & Purse. Even though the MAL has ended, the patterns remain available on Ravelry – either individually or bundled as an eBook.
Although I got the eBook in December, it wasn’t until now that I finally had the time and energy to start one of the projects. I chose to begin with the Gift Coaster, which happens to use short rows.
I am absolutely fascinated by the effects you can achieve with short rows and working in the back loops.
The coaster consists of eight sections, crocheted one after the other to form a circle. The instructions are very detailed, and the PDF even includes a photo tutorial showing exactly where to place the stitches at the transition from short to full rows. If you prefer visual and spoken guidance, there’s also a link to a video tutorial. Personally, I normally don’t like watching videos. But I found this one very helpful, especially the section about the joining at the end to finish the coaster.
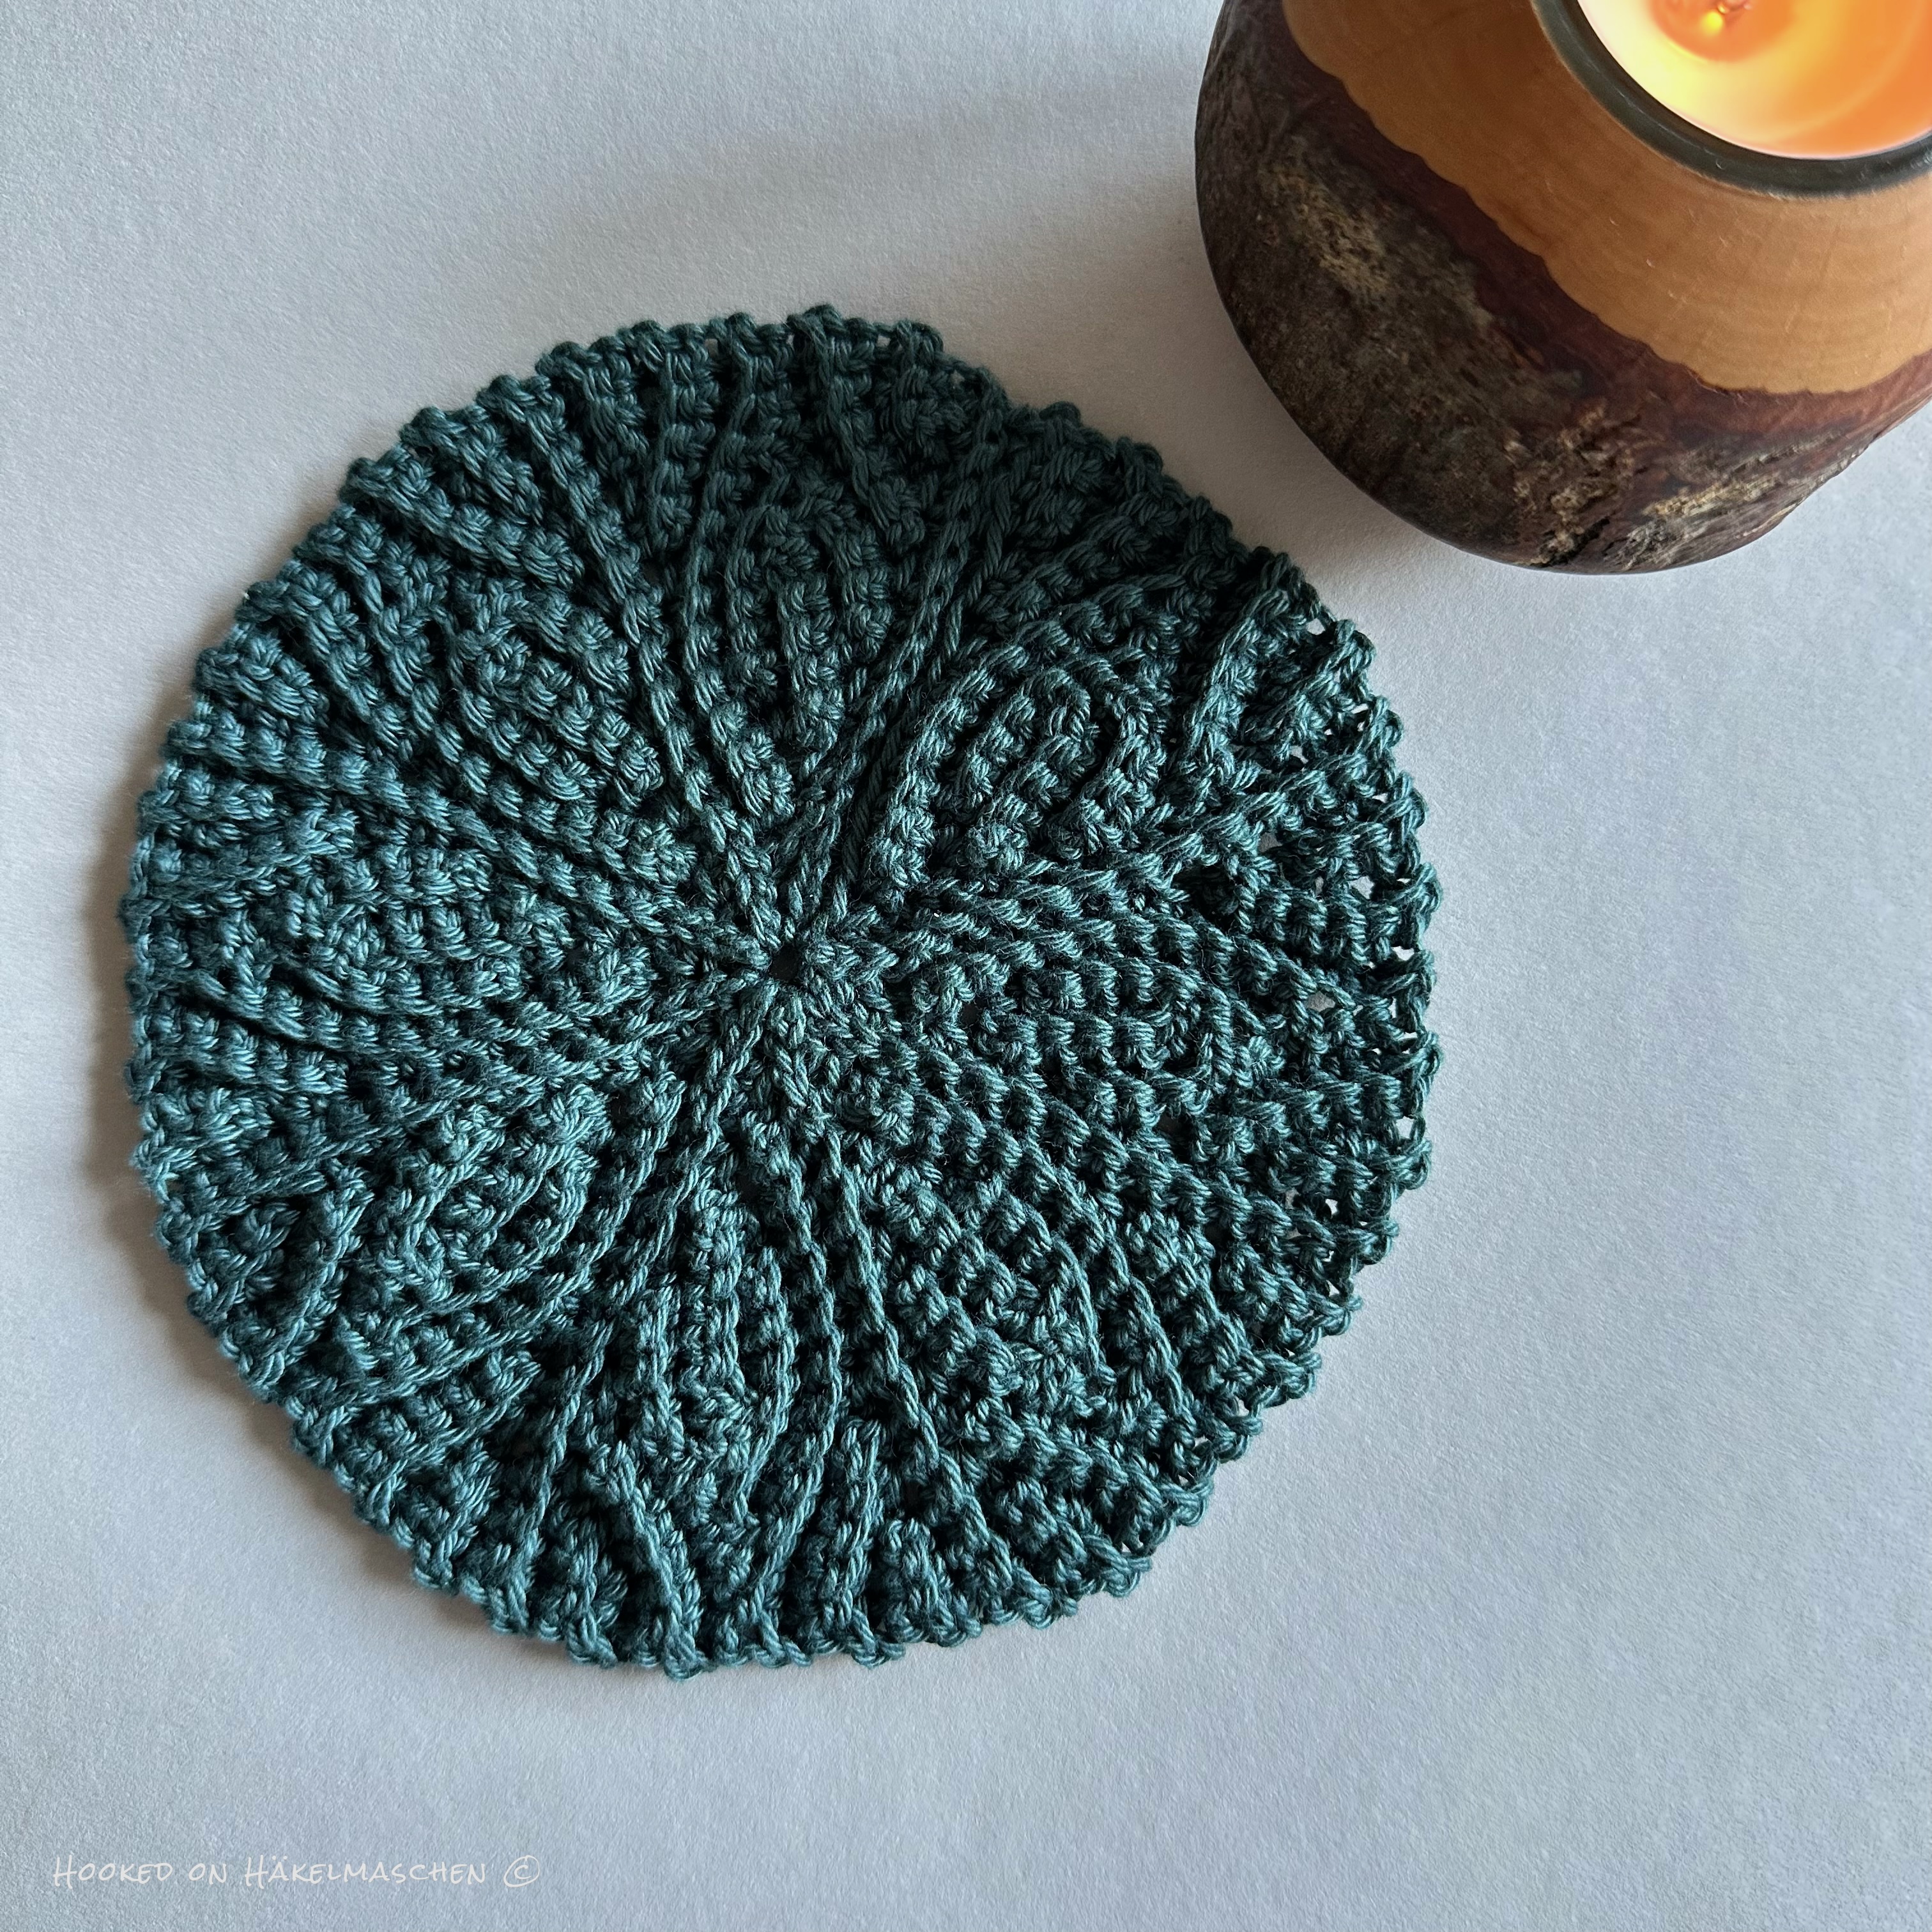
My version of the Gift Coaster
For my samples, I used Schachenmayr Catania yarn with a 3 mm hook. Catania is 100 % mercerized cotton with 125 m / 137 yds per 50 g. It is classified as a #2 Fine / Sport weight yarn. My colours were 0244 Agave and 00507 Salbei (Sage) – a combination I absolutely love.
Salbei was from a limited edition back in 2022, so I’m not even sure if it’s still available!
My coasters finished at about 15 cm in diameter, just as they should.
I was just going through my emails and came across a slightly older email from Pam. It was from September last year and she was telling me that the book 60 Quick Granny Squares would be available on Amazon from the beginning of November 2024. Ugh, I had completely forgotten! Time to catch up!
60 Quick Granny Squares – The Book
I don’t normally write book reviews and I don’t want this to be one either. Actually it is more about some desings by Pam Knighton-Haener from A Yarn of Serendipity – a designer for whom I sometimes test.
Back in 2023 she was asked by a book publisher if she could design some 6 inch squares. She said yes and five of her designs are now presented in this book. I would like to introduce them – or rather my test versions of them. But first a word about the book
Unfortunately I don’t own it yet, so I can’t say too much about it. But I took a look at the extensive reading sample on Amazon. So I can at least give a brief summary:
In the preview I especially love the fact that all 60 designs – created by different designers – are shown there at the beginning! (A lot of books don’t offer this.) All designs feature Cascade 220 Superwash yarn. It is a DK (#3) yarn, 100 % wool, with a yardage of 200 m / 100g. AND all designs look very beautiful!
The patterns are both, written and charted. Some of the squares are more beginner friendly, others a little more challenging. In addition to the patterns, the book also describes various techniques and gives helpful tips. E.g. how to start a square, how to change colours, how to join the squares, and so on. And there are some projects at the end for which the squares can be used. A book that is definitely worth a second look!
Pam’s Designs and my test versions
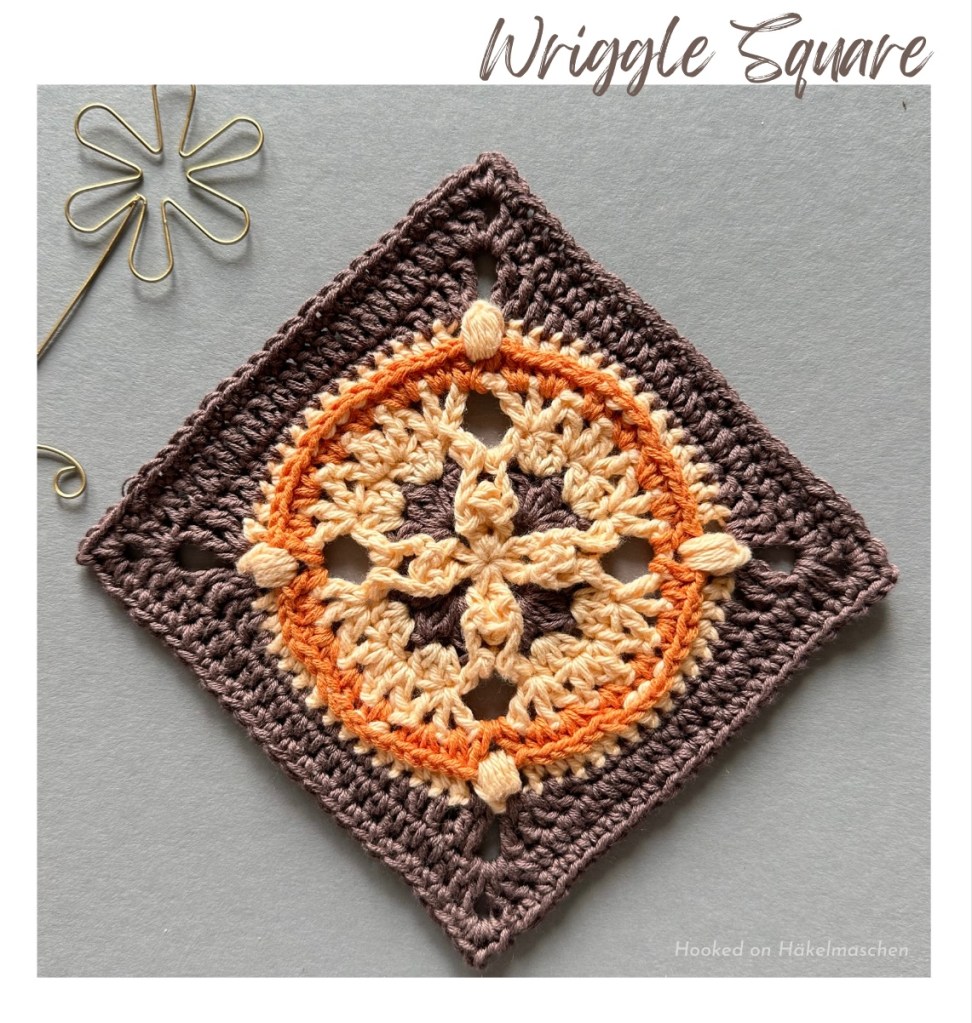
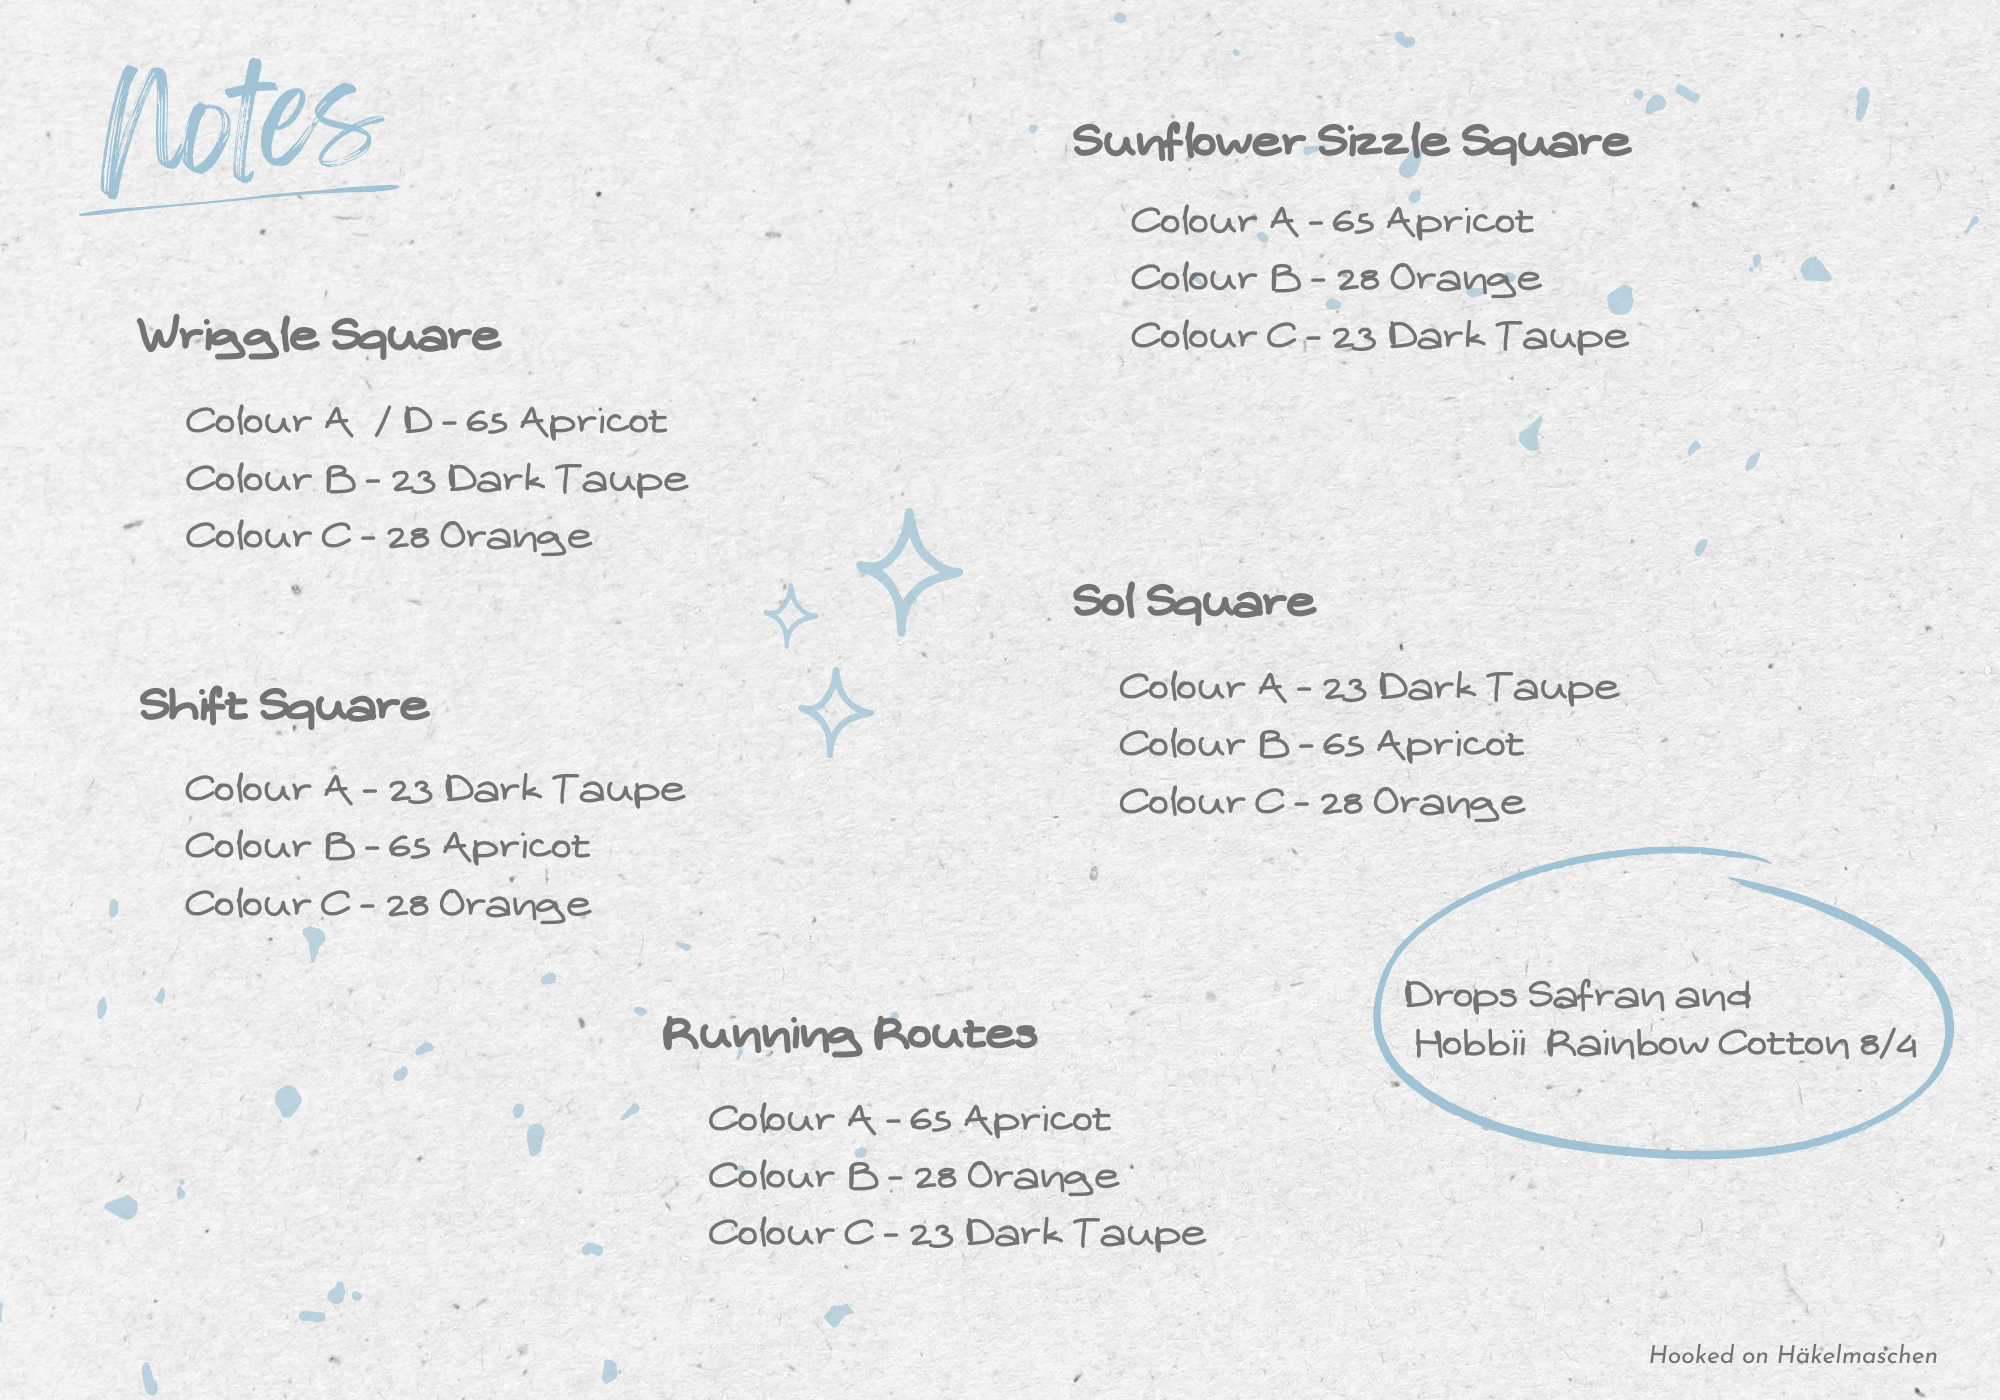
As said before Pam designed five squares for this book: Shift, Sunflower Sizzle, Wriggle, Running Routes and Sol. I had the opportunity to test these designs back in 2023.
Even though the squares are actually designed for a Double Knit yarn, I used a different yarn for my tests. Two to be precise: Drops Safran and Hobbii Rainbow Cotton 8/4. Both are sport weight (#2) yarns in 100 % Cotton and have a yardage of 160 m / 50 g. Unfortunately I had not noted the hook size I was using. I assume it was a 2.75 mm hook, I’m not sure though. Due to the thinner yarn my squares turned out about 4.5 inches, which is about 11.5 cm.
For all 5 designs I used the same three colours: Dark Taupe and Orange from Drops Safran and Apricot from Hobbii Rainbow Cotton. A bit 70s style but I still like them!
And here the colour details …
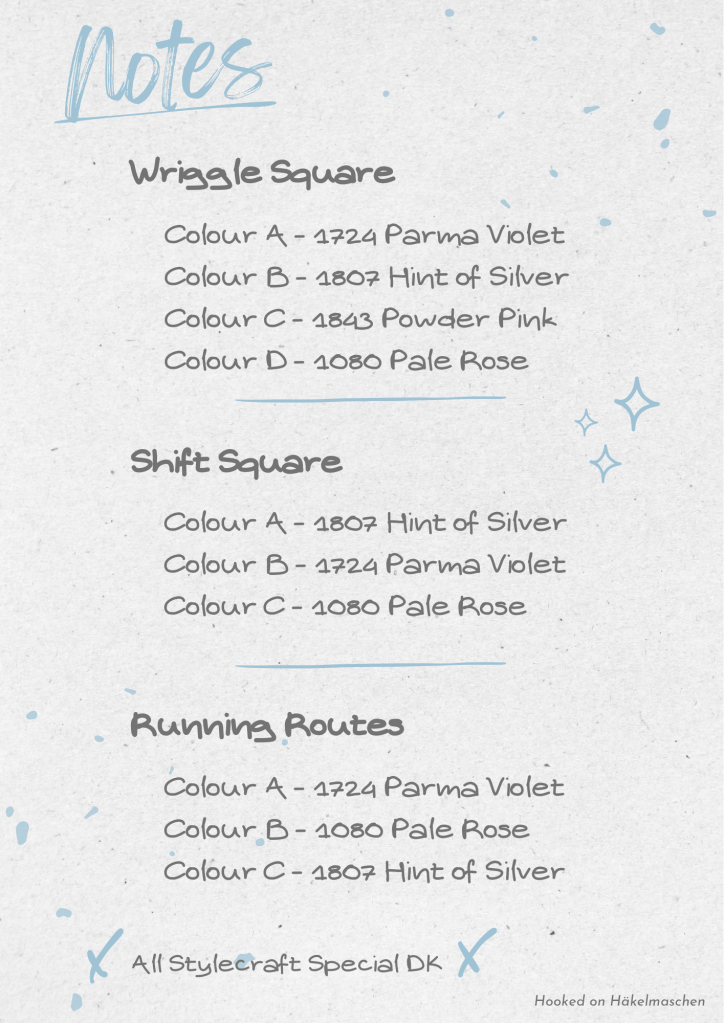
My new versions of Running Routes, Wriggle and Shift
I lately reworked three of the squares with a different yarn. Just to see how the squares will look in 6 inch / 15 cm and – to be honest – first of all to try a new colour combination.
I used Stylecraft Special DK and a 3.75 mm hook for the new versions. They became pretty much exactly 6 inch / 15 cm tall. The colours are completely different though – using pink and grey tones instead of brown and orange.
Here my new colour combo in Hint of Silver, Pale Rose, Parma Violet and Powder Pink:
Lovely aren’t they? I especially love the combination of Pale Rose and Parma Violet. What do you think?
To catch up completely I will now hop over to Ravelry to add my versions to the projects. I just saw that the book is also presented there. Some designers have already added their designs.
By the way Ravelry: if you take a look at Pam’s designs there you will probably notice that these 6 inch squares combine really well with her 12 inch squares. Perhaps this will lead to ideas for a new project? I’ve had something in mind for a while, but unfortunately haven’t found the time to realise it yet. Hope to manage it soon! I will let you know!
It is already mid January and I hope you had a great start in the new year! Hubby and I got off to a very cosy start. However, right at the beginning of January, we started renovating another room in our house – very much in keeping with the theme of “new beginnings”. And a never ending story …
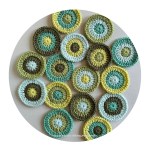
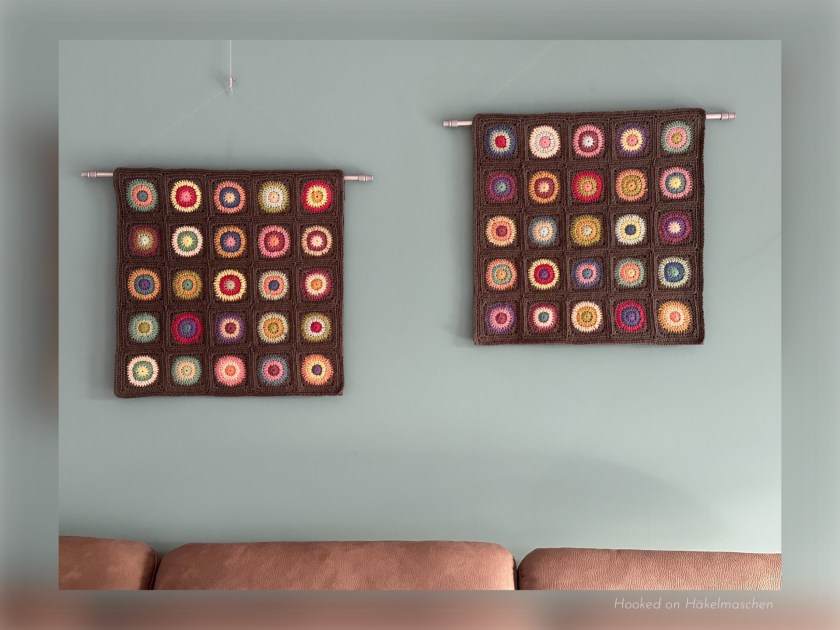
Yet, within all the renovation stuff, we have a new wall decoration in our living room! But these are not the result of our renovation work but of my colour experiments last year.
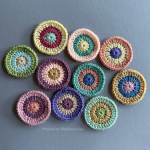
My colour experiment in 2024
You may remember that last year I experimented a little with random colour placement. This project really opened my eyes to new ways of combining colours.
I started by selecting yarn in 15 different shades from my Stylecraft Special DK stash. Mostly leftovers from other projects.
But instead of manually compiling all possible colour combinations in a table, I tried an online random generator, Random.org . They offer a lot of free services, including a list randomizer. It works wonderfully for generating random colour combinations. I described in detail how this works in an earlier post. You can read all about it here
To try out the random colour combinations, I started crocheting little circles. Each with 3 rounds. In doing so, I have strictly adhered to the results that the random colour generator had given me. I only replaced a colour if it would otherwise have appeared twice in a circle. In the end, this resulted in 25 colourful circles, which I then turned into small squares. I joined them in a 5 x 5 layout. The arrangement of the squares was also generated by using the random generator.
Details on my colour placement and layout can be found in this post
After adding a small border my finished panel was about 52 x 52 cm.
At first I had thought of making a cushion cover out of it. But then I decided to use it as a wall decoration.
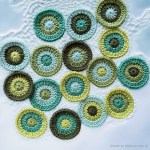
My second Panel
Overall, I was so thrilled with the result that I have since made a second panel.
I used the same colours and the same process as with the first panel. The colour combinations are completely different, but it looks just as great.
Here the results:
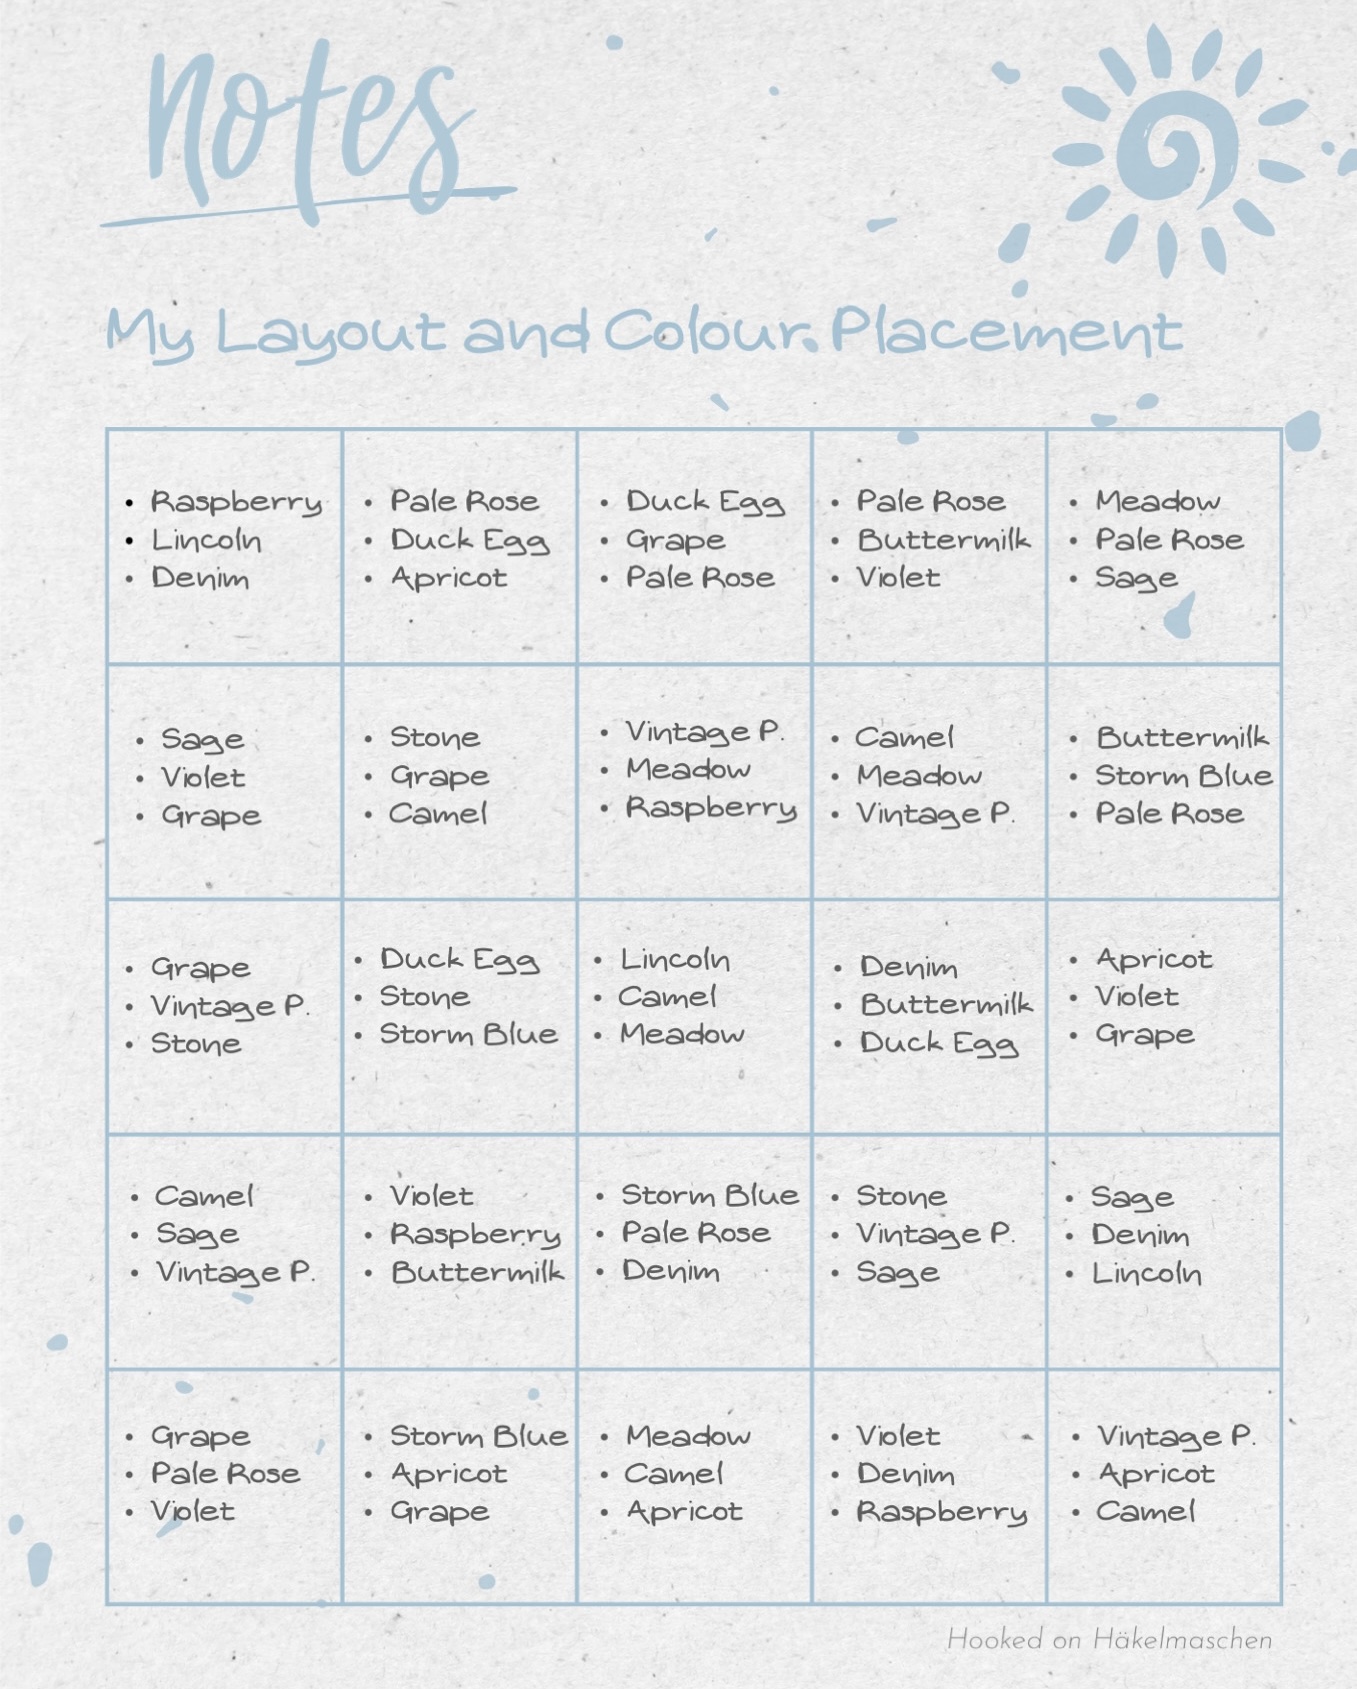
The table below shows the colour combinations that I have used for my second panel. The colours are listed for each circle in the order of rounds 1, 2 and 3. As for my first panel each circle was squared with two more rounds in the colour Graphite. At the same time, the table shows the layout in which I have arranged the squares.
I had already listed the pattern for the squares, joining, and border in a separate post. If you are interested you can find it here
But in addition, I have now written down the pattern again and summarised it in a pdf file. Besides the actual pattern, this document contains the colour combinations and layouts for both panels. So you can also download the complete file here.
Please note: Some left over yarns and 1 ball of Stylecraft Special DK for squaring and joining are sufficient for one panel.