Magic Winter – My finished blanket

You probably have seen my previous post about my test of Ana’s Magic Winter Cal when I was still working on the border. Well…

… after 840 slipstitches, 2.616 double crochets, 5.208 single crochets and another 888 slipstitches and 12 single crochets (chains not counted) the border is finished. YAY!

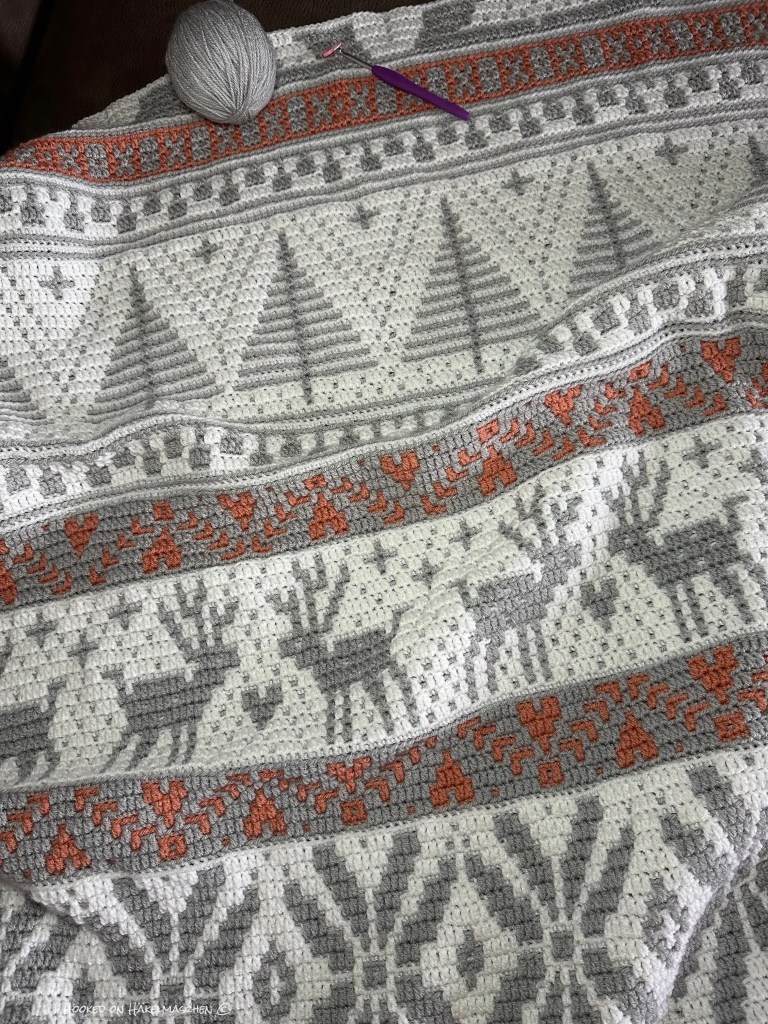
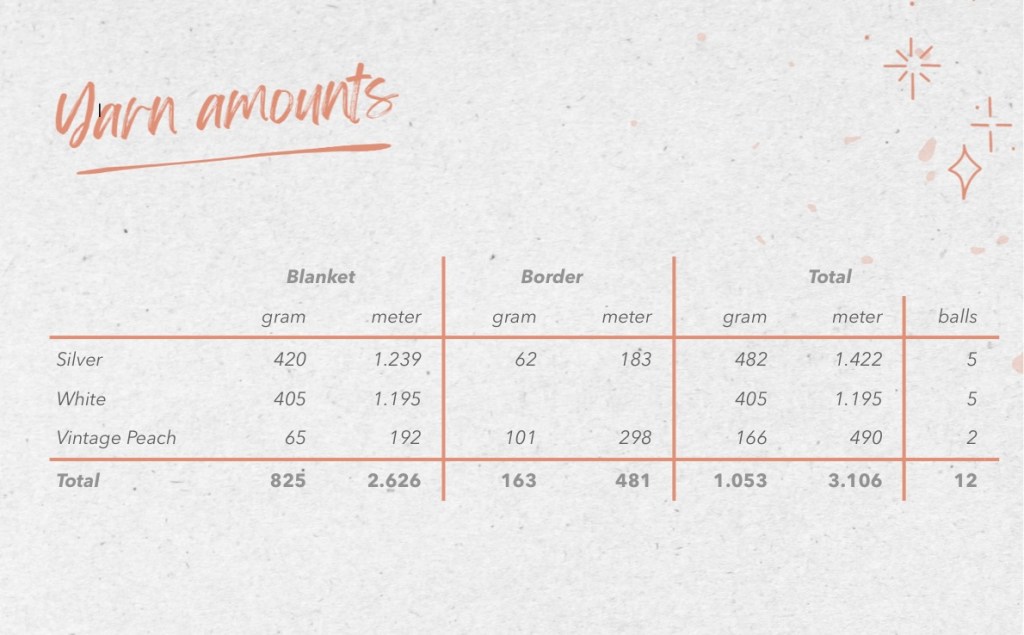
I opted for a two-coloured double border – all in Vintage Peach for the back layer and a combination of Silver and Vintage Peach for the front side.

In total I needed 12 balls of Stylecraft Special DK – you’ll find the detailed yarn amounts below. Made with a 4 mm hook my blanket measures about 121 x 146 cm (48 x 57 inch).

In the end, my color placement turned out to be slightly different from what I originally had in mind. But I think I got the Sunrise-on-a-frozen-winter-morning look I wanted. And – I know, I already said that last week – I am totally happy with the result!

As promised, here some detailed information about my yarn amounts.

And, if you are interested, you can download a row-by-row guide of my colour placement here.

The Magic Winter CAL started last Friday and will continue until 15th December. So, there is still time to join in.
I found that most parts of the pattern worked up quite quickly. Only the tapestry parts took me a little longer. Tapestry in Overlay Mosaic needs a bit of practice. You will have to get the hang of how to carry the yarn, especially with the double crochets. However, you only need it in a few rows. In addition, you can of course also decide to omit the tapestry technique and only work the normal overlay mosaic. All up to you!

The pattern is available on Ravelry.

Personally, I’m going to snuggle up under my new Magic Winter Blanket for now.

Have a lovely time 💕

Magic Winter – My Start

Have you seen Ana‘s new Cal? Magic Winter will start on Friday, 17. November 2023. The Introduction File with all relevant information is already available on Ravelry.

I had the pleasure of testing this wonderful pattern and also do the translations into German.

The Magic Winter blanket is made in Overlay Mosaic technique and also has a small section of Tapestry Mosaic. Of course, the pattern explains how to do both.

When Ana showed me her new design for the first time, I immediately thought about a clear, cold and frozen winter morning when the sun rises with a rosy shine. On these days, my grandma used to say: ›look, the angels are baking biscuits in heaven‹. So I immediately knew how I wanted my blanket to look like: a cold and clear winter morning with a beautiful sunrise …

I used Stylecraft Special DK in White, Silver and Vintage Peach and I am very happy with the result. At the moment I‘m still working on the border and can‘t show you a finished blanket. But I can give you some impressions.

If you are interested in my colour placements, I have already listed them here for part 1 of the Cal. The rest, including my yarn amounts, will follow next week when I am hopefully finished with the blanket.

That‘s all for today. Have a lovely time 💕

Progress with my Legacy Blanket

YAY! It took a while because of all my doubts about the colours and the colour placements … But finally … all 12 squares are done! All tails worked away and all squares are blocked.

These are the three that have been missing in my collection so far.

Lauren Rose

Brood of Angels

Macey Ann

I have just prepared the first squares for joining and spent some time on the layout.

After some arranging and rearranging of the squares, I decided in favour of the layout shown on the left. I hope it will look nice!

The Zipper Join

In the Justyce Destany Border pattern for the Legacy Blanket Pam recommends to use the Zipper Join for joining the squares.

I have to admit, I am not a professional when it comes to joining squares. I once used the “Join as you go-method” for joining some granny squares – but I think that was it. So I had my first attempt on the zipper join when testing the Justyce Destany border.
The pattern contains a helpful link to a video tutorial that shows how to do this join. But, if you prefer written tutorials like I do: I also found a very clear and helpful one from Raffaella from Raffamusa Designs.
Nevertheless, the beginning is a bit fiddly – at least I think so … But I am slowly getting the hang of it.
I initially experimented a little with the hook size and finally decided on 5.0 mm hook. The squares are made with a 4 mm hook but with the larger hook size I find it easier to make the stitches even and not too tight. So far I am pleased with the result. It’s a very nice and flat join. Now on to the next ones!

Have a lovely time 💕