Last weekend I made the last stitches on my Winter’s Love blanket. YAY – it is finished!
I really enjoyed working on it!
Here is a Short Summary
Winter‘s Love is the current Cal (Crochet-a-long) by Ana Morais Soares from One Skein of Love. The Cal already started on 22. November 2024. It is divided into 4 parts and part 4 – the last one – will already be published on Friday (13. December 2024). Time flies …
But it is never too late to get the pattern. It’s perhaps a little late to get the blanket ready for Christmas. But starting it at Christmas and finishing it for next year is certainly a very nice idea too.
In case you are interested, the pattern is available here.
During the last weeks I had the pleasure of testing this lovely pattern. I had a late start though. Due to our holidays I was only able to start working on it in the second half of October. Besides my normal life (and some health issues) it took me about 7 weeks to finish it. Late for the test – but nevertheless, 7 weeks are not too bad for finishing a blanket, I think. I am not a fast crocheter anyway!
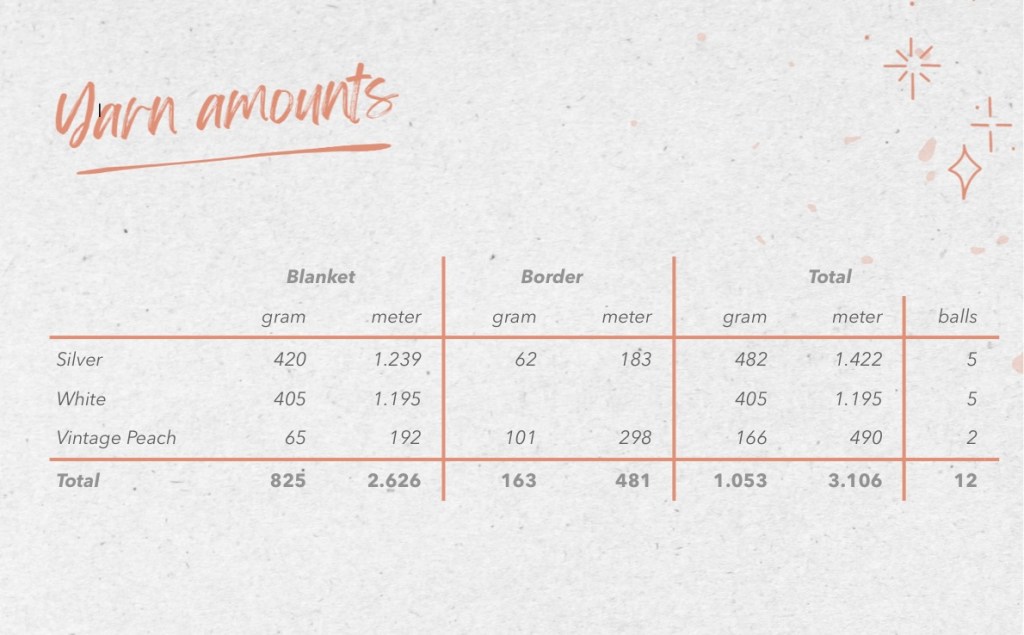
My yarn and yarn amounts
It is the first time I have used Yarnsmiths Create DK. Yarnsmiths is an own brand from Wool Warehouse in the UK.
Create DK is an 100 % Acrylic yarn. It comes in 100 g balls and has a yardage of 290 m / 100g. It is currently available in 120 colours.
I decided to go with Claret Red (3090) and Off White (3045) for my blanket.

In total I needed
4 balls Off-White
6 balls Claret Red
I really like the quality of Create DK. It has a consistent thickness and is soft and smooth. It was absolutely fun to work with! I will have to get some more colours.
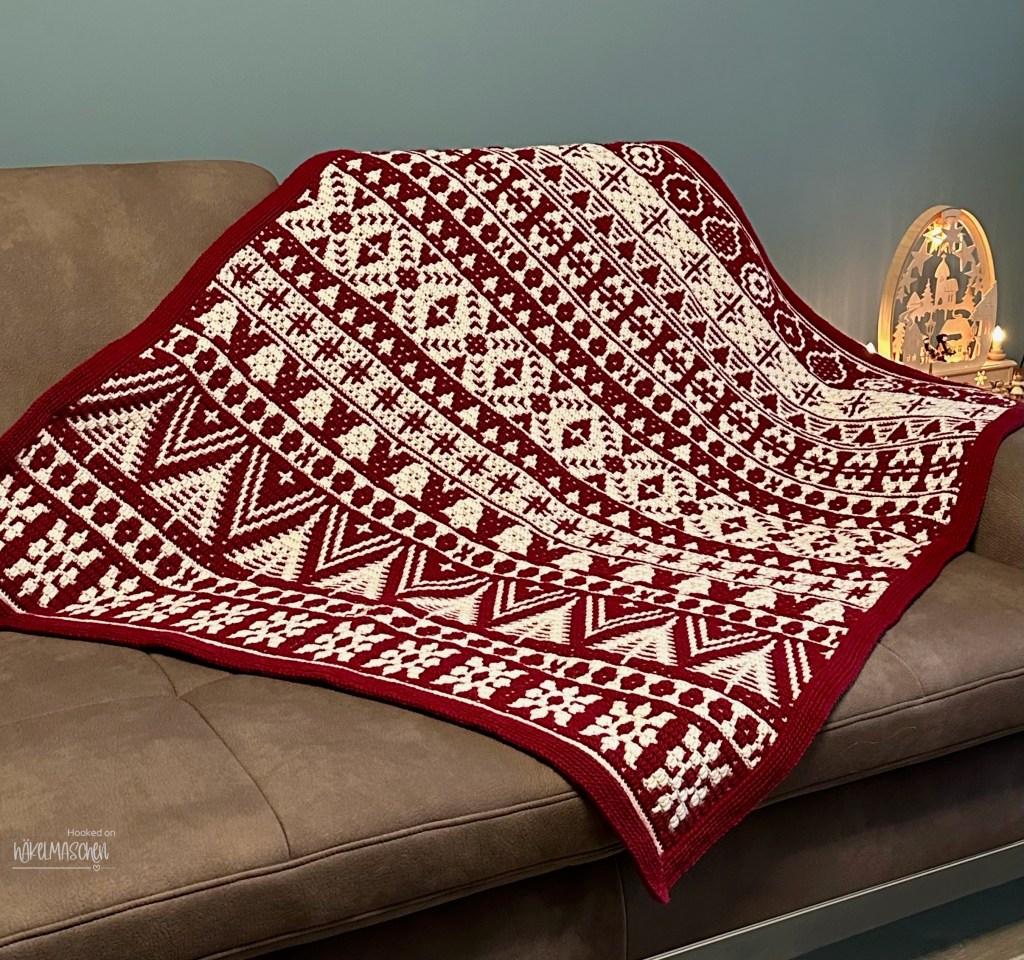
Finished Size of my blanket
My finished blanket is about 120 x 150 cm. That’s about 47 x 59 inch. I worked with a 4 mm hook.
My colour placement

After a first try (in the photo the strip on top), I decided to start my blanket with a dark background, having the motifs in white.
That means I started the foundation row in Off White (C1) and used Claret Red as C2.
I kept this scheme for the first 8 patterns of the blanket. For the last 3 patterns, however, I decided to swap the colours.
I have already written about the reasons for this in my previous post. There you will also find detailed information about what exactly I did to swap the colours. Besides there is also an overview of my detailed colour placement for all patterns of the blanket. Only the colours of the border are not listed there. Now, the slip-stitch round, front- and back layer and the joining round were all worked in Claret Red. That‘s it.
But, to make it easier, I have now also summarised my entire colour placement in a pdf file. So, if you are interested you can download it here


Well, that’s the end of another big crochet project. After that, I always have the feeling of falling into a kind of big hole. Do you know that?
I still have no idea what I’m going to do next. Unfortunately, I’m having problems with one of my eyes at the moment (and a few appointments at the eye doctor). So I think it’s going to be something small. Maybe some Granny Squares? Or something small for Christmas? Hm, let’s see!
Wish you a lovely time 💕

My previous posts about Winter‘s Love