Last updated on March 3, 2026
Do you know filet crochet?
Filet crochet is a classic crochet technique in which the patterns are created from open and filled squares. The designs are usually worked from a grid chart and translated into double crochet (US terms) and chain stitches.
At first glance, filet crochet looks simple — but many beginners find the stitch counting confusing. I remember feeling exactly the same when I first tried it years ago. The charts were clear, yet the explanations didn’t quite make sense.
In this tutorial, you’ll learn how to read a filet crochet chart, how to calculate your stitch count, and why the same grid can be counted in two different ways.
Once you understand the logic behind the squares, filet crochet becomes surprisingly straightforward — and a wonderful technique for shawls, table runners, garments, and many other projects.
- Filet designs and patterns
- How to read a filet crochet chart
- Two ways to think about filet crochet construction
- The two classic filet crochet types
- Type I – Filet crochet worked over 3 stitches / 3-stitch construction
- Type II – Filet crochet worked over 2 stitches / 2-stitch construction
- A word about the stitches
- Yarn and hooks
- Finishing
- My Little Boxes Shawl
Filet designs and patterns
Filet crochet includes several variations. Besides the two structural types discussed here, there are decorative forms such as lacet (fancy filet), shell filet, or bouclé filet. In addition, shapes can be created by increasing or decreasing stitches, which further expands the design possibilities.
In this article, however, I will focus on the two basic structural types, as they are the most widely used.
To distinguish them clearly, I refer to them as Type I filet crochet and Type II filet crochet.
US terminology is used throughout.
Filet crochet designs
Classic filet crochet designs are created through filled and open sections, also known as filled (solid) and open mesh. The closed sections typically represent the pattern’s motif or design and are made with double crochet stitches. Chain stitches form the open, net-like structures.
Filet crochet charts
Unlike standard crochet patterns, filet patterns are usually presented as grid charts rather than written instructions.
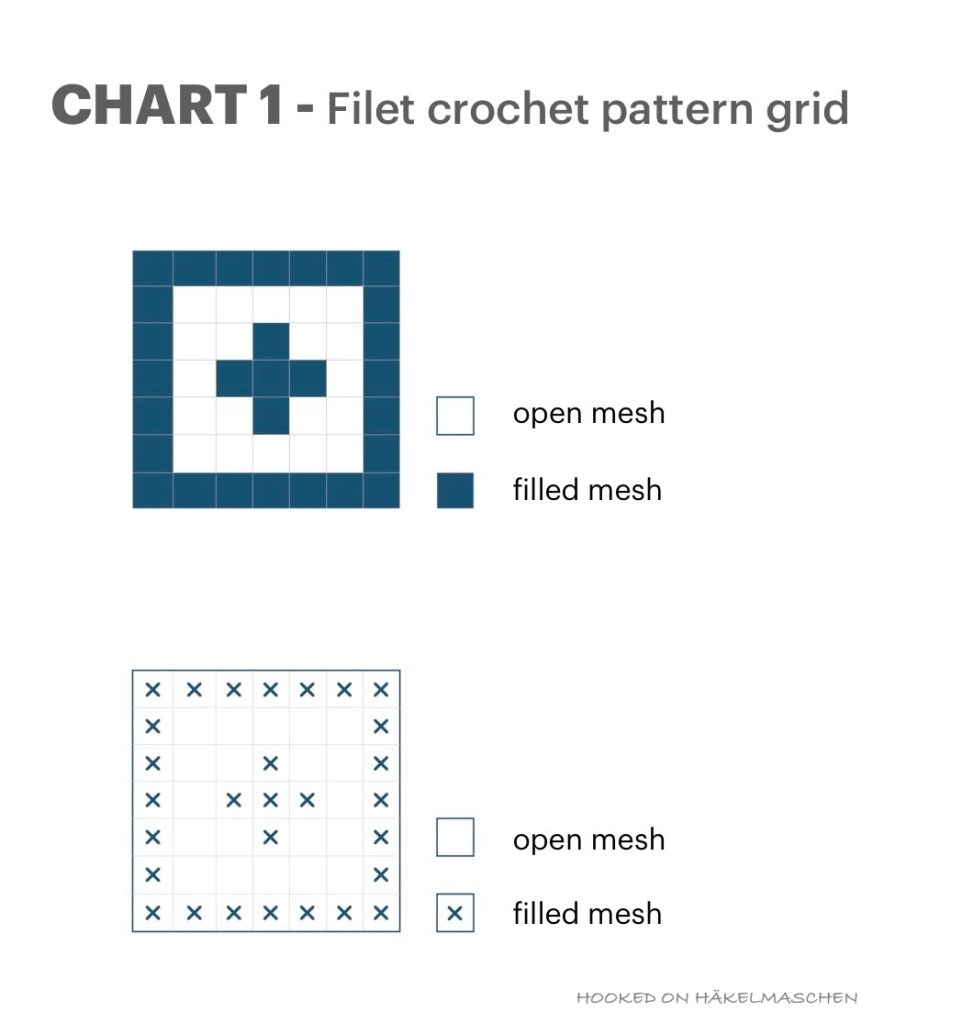
As shown in Chart 1, filet charts consist of a simple grid of filled and open squares, without using different symbols for individual stitches.
The filled spaces are either coloured or marked with a symbol such as an X or cross. They form the motifs that later appear as solid areas in the finished fabric.
How to read a filet crochet chart
Reading directions
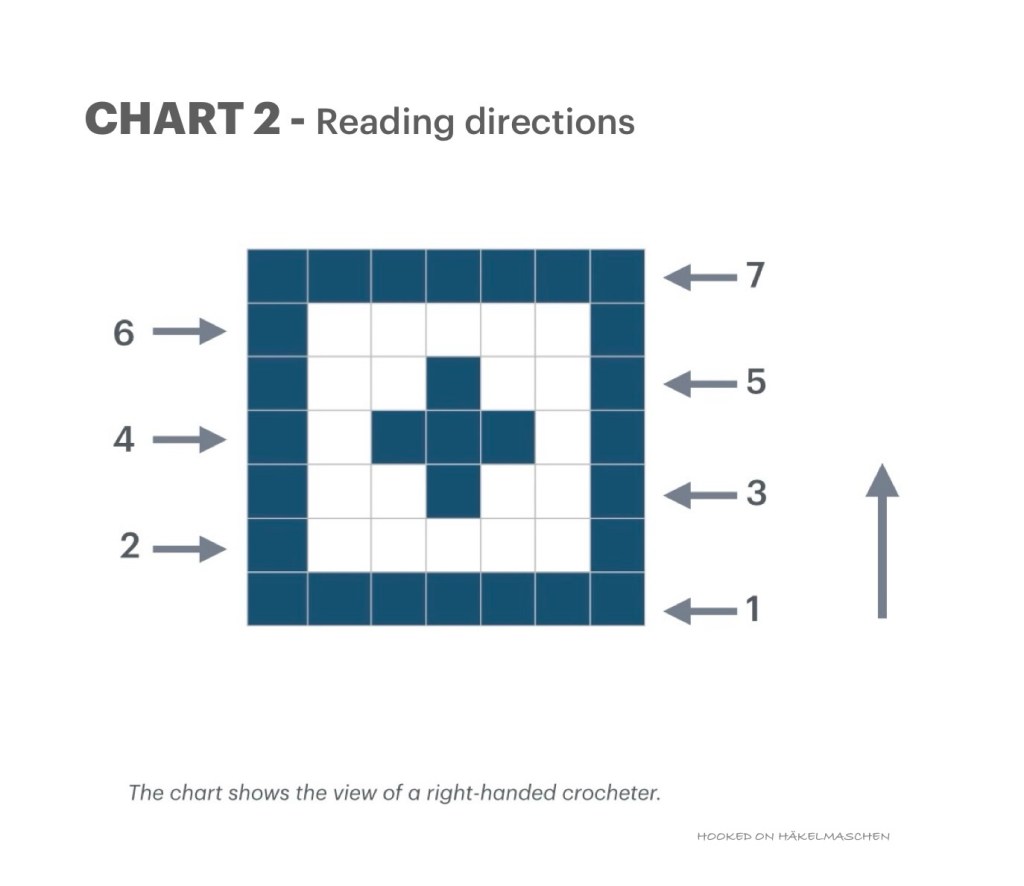
One row of the pattern grid stands for one row in the workpiece
Unless otherwise specified in the pattern, the chart is read
- from bottom to top.
- As filet crochet is worked back and forth in rows, a right-handed crocheter should start in the lower right corner and read
- odd rows from right to left and
- even rows from left to right.
- A left-handed crocheter follows the chart in reverse. In case the design is not symmetrical, it can be mirrored first.
Reading the charts
The precise translation of a filet crochet chart depends largely on the filet type specified in the pattern. But it always follows the same basic principles:
- Each square in the pattern grid stands for a certain number of stitches.
- The exact number of stitches per square depends on the filet type used, but remains constant throughout the entire pattern.
- Filled squares stand for double crochet stitches.
- Open squares (often easier to think of as “empty” squares when looking at a chart) stand for a double crochet stitch and a specific number of chains.
Two ways to think about filet crochet construction
There are two different ways to think about the construction of a filet crochet grid.
When it comes to filet crochet, you will probably often come across the terms 4-dc mesh and 3-dc mesh as basic variants. Both variants are based on a counting method that I personally find illogical. I therefore favour a different approach to translate a filet crochet grid into stitches. The only difference is the way of looking at the grid and the resulting way of counting the stitches. The technique itself and the end result are absolutely identical. I therefore differ between Type I and Type II filet crochet.
Type I — Filet crochet worked over 3 stitches (3-stitch construction) corresponds to 4-dc mesh and
Type II — Filet crochet worked over 2 stitches (2-stitch construction) corresponds to 3-dc mesh.
Chart 3 shows the two approaches side-by-side, based on Type l filet crochet.
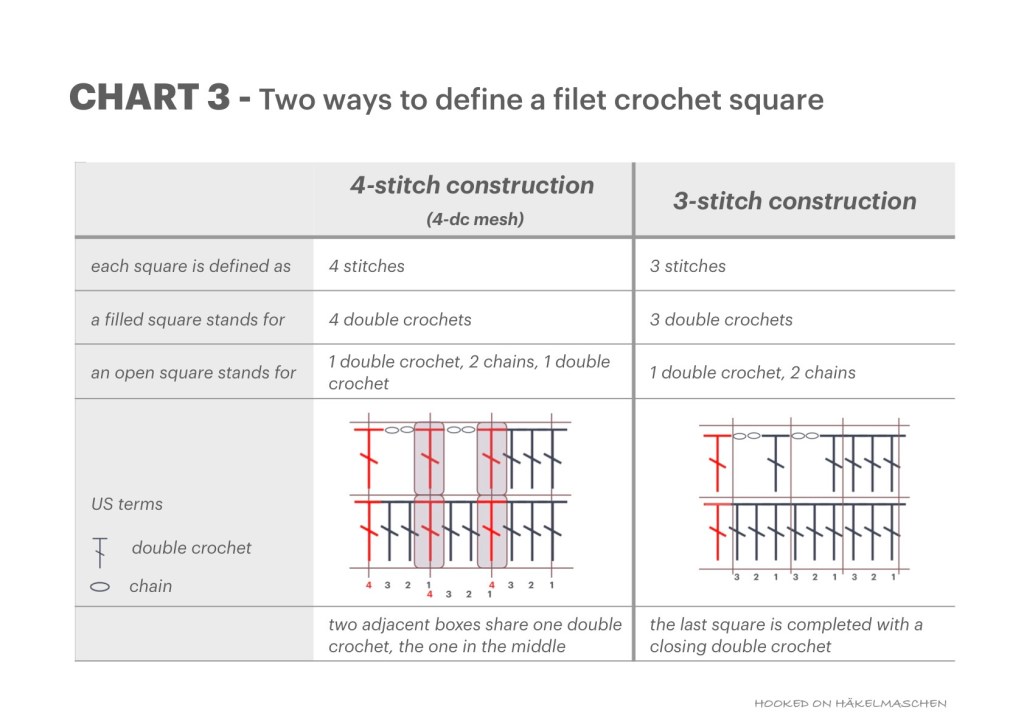
The traditional 4-dc mesh explanation defines each square by four double crochets, where adjacent squares share one stitch. Each square is therefore regarded as a ‘closed unit’.
Whereas the 3-stitch construction I use in this article is defined as three stitches per square. Each square is regarded as an ‘open unit’, and completed with a closing double crochet at the end of the row.
The closing double crochet completes the last square of the row and ensures that all squares have the same width. Without it, the edge of your work would not line up correctly.
The different ways of counting the stitches are shown in Chart 4.
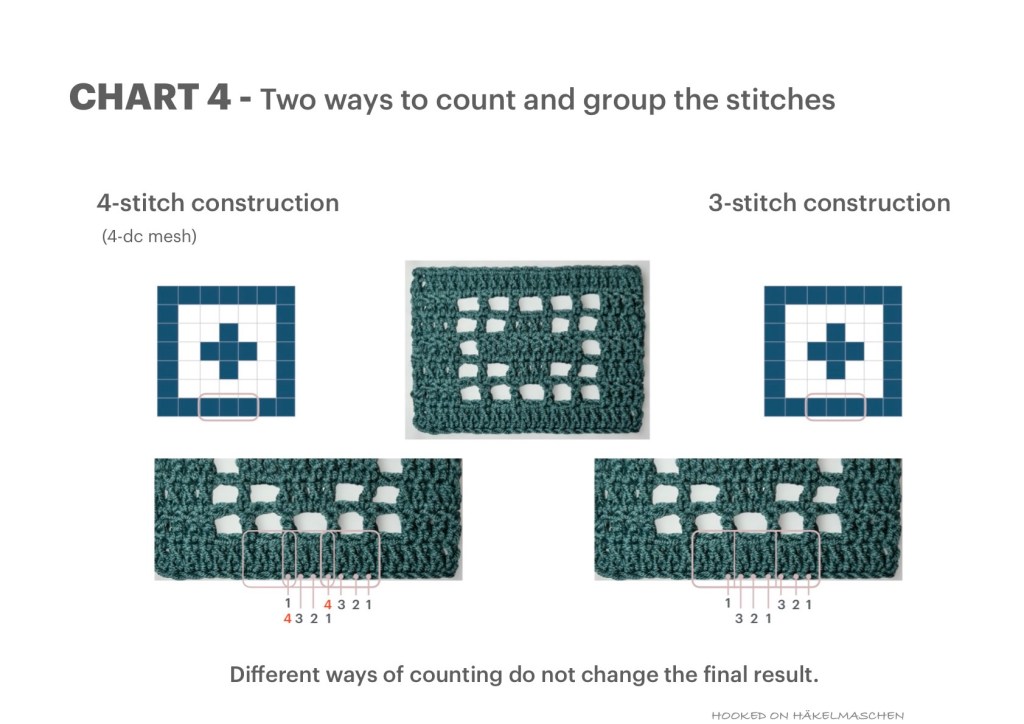
Both ways produce an identical result and require exactly the same number of stitches, calculated by:
number of squares in the grid x 3 + 1 stitch
The same applies to Type II filet crochet:
In the 3-dc mesh explanation, one square equals three stitches and shares one stitch with adjacent squares. Filet crochet worked over 2 stitches (2-stitch construction) equals a square with two stitches and has a closing stitch at the end of the row.
For both, the number of stitches are calculated by:
number of squares in the grid x 2 + 1 stitch
The two classic filet crochet types
Both versions of classic filet crochet, Type I and Type II, follow the same basic principles:
- The design is worked in turned rows using double crochets and chains.
- Each row begins and ends with a double crochet.
- The first double crochet of a row is replaced by chains.
- Double crochets are worked in the stitches of the previous row.
- When working into chain spaces, double crochets can be placed either around or into the chains.
As long as you are following a pattern, it will normally tell you which type of filet crochet is used and how to translate the chart into stitches.
Here are two examples to illustrate the technique.
Type I – Filet crochet worked over 3 stitches / 3-stitch construction
This variant is probably the most commonly used. As already mentioned, it is also known as 4-dc mesh — just remember the different ways of counting.
Characteristics of the 3-stitch construction
The characteristics of this construction are:
- Basics
- A filled square in the pattern grid is equal to 3 double crochets.
- An open square in the pattern grid is equal to 1 double crochet and 2 chains
- Each row ends with a closing double crochet.
- The stitch count is a multiple of 3 stitches per square plus 1 closing stitch.
- Calculating the base chain
- The required number of base chains is calculated by:
- number of squares × 3 stitches per square + 1 stitch + turning chains
- The required number of base chains is calculated by:
- Calculating the turning chains
- At the beginning of each row, the first double crochet is replaced by turning chains:
- If the row begins with a filled square, chain 3 to replace the first double crochet.
- If the row begins with an open square, chain 5 to replace the first double crochet and the next open space.
- At the beginning of each row, the first double crochet is replaced by turning chains:
Example of a 3-stitch construction
The filet pattern grid shown on Chart 5 has
- 7 squares in width
- the stitch count is 7 x 3 +1 = 22 stitches
- 7 squares in height
- the pattern is worked over 7 rows
- Since the first square in row 1 of the pattern grid is filled, the base chain needs 22 chains plus 3 more to replace the first double crochet.
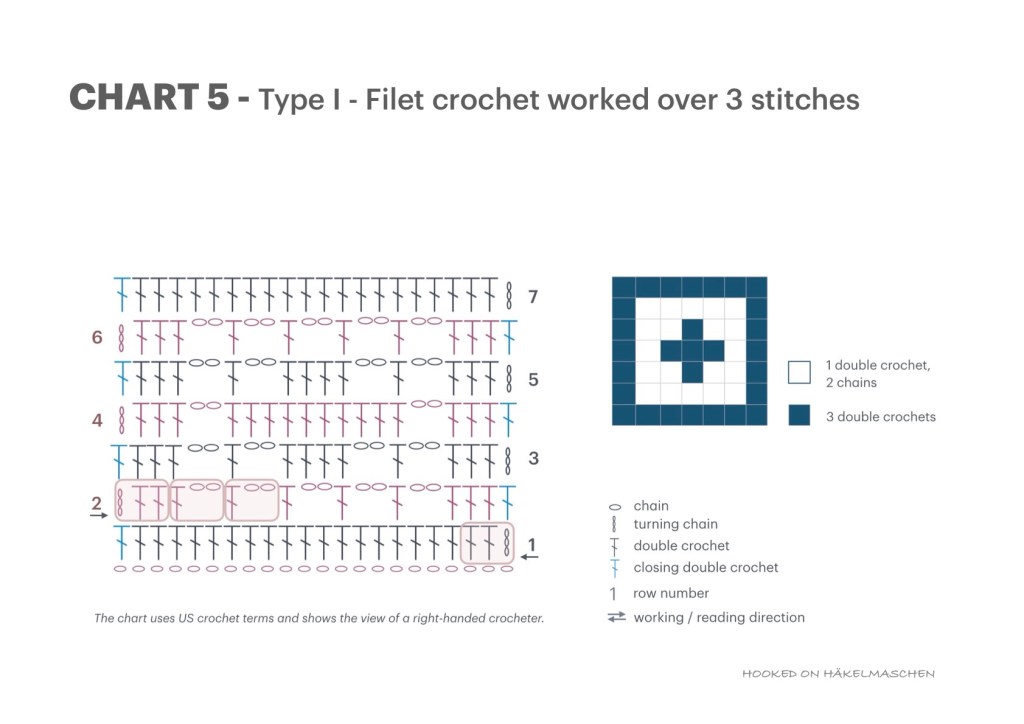
In addition to the standard filet pattern grid, Chart 5 also shows the pattern displayed in classic crochet symbols. For better visualisation, the first filled square in row 1 is outlined in the diagram. Additionally, the first three squares in row 2 are outlined: one filled and two open squares.
How the sample in 3-stitch construction would read as written pattern
Abbreviations
- Abbreviations
- dc — double crochet
- ch(s) — chain((s)
- st(s) — stitch(es)
- sp(s) — space(s)
- ( ) — repeat as many times as instructed
- Row 1
- chain 22
- chain another 3 (to replace the first dc) and dc in 5th chain from hook
- dc in next chain [3 dc are worked – this is equal to the first square in row 1, outlined in the diagram on Chart 5]
- (1 dc in each of the next 3 chains) 6 times [3 dc for each of the remaining 6 squares in the grid]
- dc in last chain[the closing stitch]
- turn
- Stich count: 22 dc
Click here to continue with the written pattern
- Row 2
- chain 3 (as first dc), dc in next 2 sts; [this is the first filled square of row 2, outlined in the diagram on Chart 5]
- (dc in next st, ch2, skip 2 sts) 5 times [5 open squares in row 2]
- dc in next 3 sts [the last filled square of row 2]
- dc in last st (top of the starting ch 3) [the closing stitch]
- turn
- Sticht count: 12 dc, 5 ch2-sps
- Row 3
- chain 3 (as first dc),
- dc in next 2 sts [first filled square]
- (dc in next st, ch2, skip 2 sts) 2 times [two open squares]
- dc in next st, 2 dc in ch2-sp; [one filled square]
- (dc in next st, ch2, skip 2 sts) 2 times [two open squares]
- 1 dc in each of the next 3 sts [last filled square];dc in last st [closing stitch]
- turn
- Stitch count: 14 dc, 4 ch2-sps
- Row 4
- chain 3 (as first dc)
- dc in next 2 sts [first filled square]
- dc in next st, ch2, skip 2 sts [one open square]
- (dc in next 3 sts) 3 times [three filled squares]
- dc in next st, ch2, skip 2 sts [one open square]
- dc in next 3 sts [one filled square]
- dc in last st [closing stitch]; turn
- Stitch count: 18 dc; 2 ch2-sps
- Row 5
- repeat row 3
- Row 6
- repeat row 2
- Row 7
- chain 3 (as first dc)
- dc in next 2 sts [first filled square]
- (dc in next 3 sts) 6 times [six filled squares]
- dc in last stitch [closing stitch]
- fasten off
- Stitch count: 22 dc
Type II – Filet crochet worked over 2 stitches / 2-stitch construction
This type of filet crochet follows the same basics as the Type I variant, worked over 3 stitches. You will also find it described as 3-dc mesh. Again, please remember the different counting with 3-dc mesh.
The filet crochet grid on Chart 6, is exactly the same as the one on Chart 5. The only difference to Type I filet crochet is that each square of the grid pattern represents only 2 stitches.
Characteristics of the 2-stitch construction
- Basics
- A filled square in the pattern grid is equal to 2 double crochets.
- An open square in the pattern grid is equal to 1 double crochet and 1 chain.
- Each row ends with a closing double crochet.
- The stitch count is a multiple of 2 stitches per square in the grid plus 1 closing stitch.
- Calculating the foundation chain
- The required number of base chains is calculated by:
- number of squares × 2 stitches per square + 1 stitch + turning chains
- The required number of base chains is calculated by:
- Calculating the turning chains
- At the beginning of each row, the first double crochet is replaced by turning chains:
- If the row begins with a filled square, chain 3 to replace the first double crochet.
- If the row begins with an open square, chain 4 to replace the first double crochet and the next open space.
- At the beginning of each row, the first double crochet is replaced by turning chains:
Example of a 2-stitch construction
The filet pattern grid shown on Chart 6 has
- 7 squares in width
- the stitch count is 7 x 2 +1 = 15 stitches
- 7 squares in height
- the pattern is worked over 7 rows
- As the first square in row 1 is a closed square, the base chain requires 15 chains plus 3 chains to replace the first double crochet.
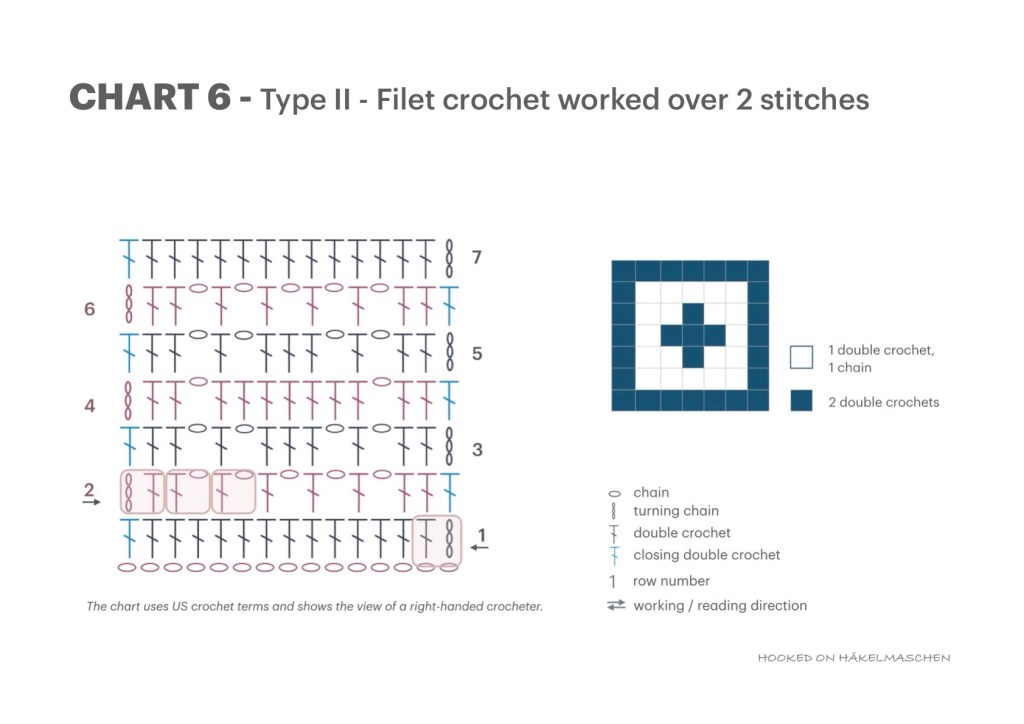
Again, the pattern on Chart 6 is also displayed in classic crochet symbols, and the first filled square in row 1 and the first 3 squares in row 2 are outlined.
How the sample in 2-stitch construction would read as written pattern
The pattern grid translates as follows in written instructions
Abbreviations
- Abbreviations
- dc — double crochet
- ch(s) — chain((s)
- st(s) — stitch(es)
- sp(s) — space(s)
- ( ) — repeat as many times as instructed
- Row 1
- chain 15
- chain another 3 [to replace the first dc]
- dc in 5th chain from the hook [the first 2 dc are worked – this is equal to the first square in row 1, outlined in the diagram on Chart 6]
- (1 dc in each of the next 2 chains) 6 times [2 dc for each of the remaining 6 grid squares]
- dc in last chain [the closing dc]
- turn
- Stitch count: 15 dc
continue with the written pattern
- Row 2
- chain 3, (as first dc), dc in next st [the first filled square of row 2, outlined in the diagram on Chart 6]
- (dc in next st, ch1, skip 1 st) 5 times [5 open squares in row 2]
- dc in next 2 sts [the last filled square of row 2]
- dc in last st (top of the starting ch 3) [the closing stitch]
- turn
- Sticht count: 10 dc, 5 ch1-sps
- Row 3
- chain 3 (as first dc), dc in next st [first filled square]
- (dc in next st, ch1, skip 1 st) 2 times [two open squares]
- dc in next st, 1 dc in ch1-sp [one filled square]
- (dc in next st, ch1, skip 1 st) 2 times [two open squares]
- 1 dc in each of the next 2 sts [last filled square]
- dc in last st [closing stitch]
- turn
- Stitch count: 11 dc, 4 ch1-sps
- Row 4
- chain 3 (as first dc), dc in next st [first filled square]
- dc in next st, ch1, skip 1 st [one open square]
- (dc in next 2 sts) 3 times [three filled squares]
- dc in next st, ch1, skip 1 st [one open square]
- dc in next 2 sts [one filled square]
- dc in last st [closing stitch]
- turn
- Stitch count: 13 dc, 2 ch1-sps
- Row 5
- repeat row 3
- Row 6
- repeat row 2
- Row 7
- chain 3 (as first dc), dc in next st [first filled square]
- (dc in next 2 sts) 6 times [six filled squares]
- dc in last stitch [closing stitch]
- fasten off
- Stitch count: 15 dc
A word about the stitches
Regardless of the type of filet crochet you use, your crocheted squares should appear square. This means your squares should be as tall as they are wide. It is always helpful to make a small swatch first. If your double crochets are too narrow, your squares will look rectangular rather than square and the motifs may appear distorted. To fix this, try lifting your stitches slightly to make them taller. Alternatively, you can replace the double crochets with an extended double crochet or treble. If you’re unfamiliar with these stitches, you can find an explanation here.
Yarn and hooks
Best suited for filet crochet is a fine, smooth yarn. Mercerised cotton is ideal.
Items like doilies or table runners are often made with cotton thread using a very small hook size. But also thicker yarns, such as sport weight (#2) yarn, for example, work quite well.
Filet crochet looks great in a solid colour. This really shows off the pattern to its best. A colour-changing yarn with long changes also works. I would not advise using a variegated or sprinkled yarn. This might distort the pattern.
Finishing
Once you have finished your filet crochet project, I recommend blocking it. This will open up the stitches and spaces and will give your work an even and defined look.
I hope you found this page helpful. In case you have any questions don’t hesitate to contact me. Have fun!
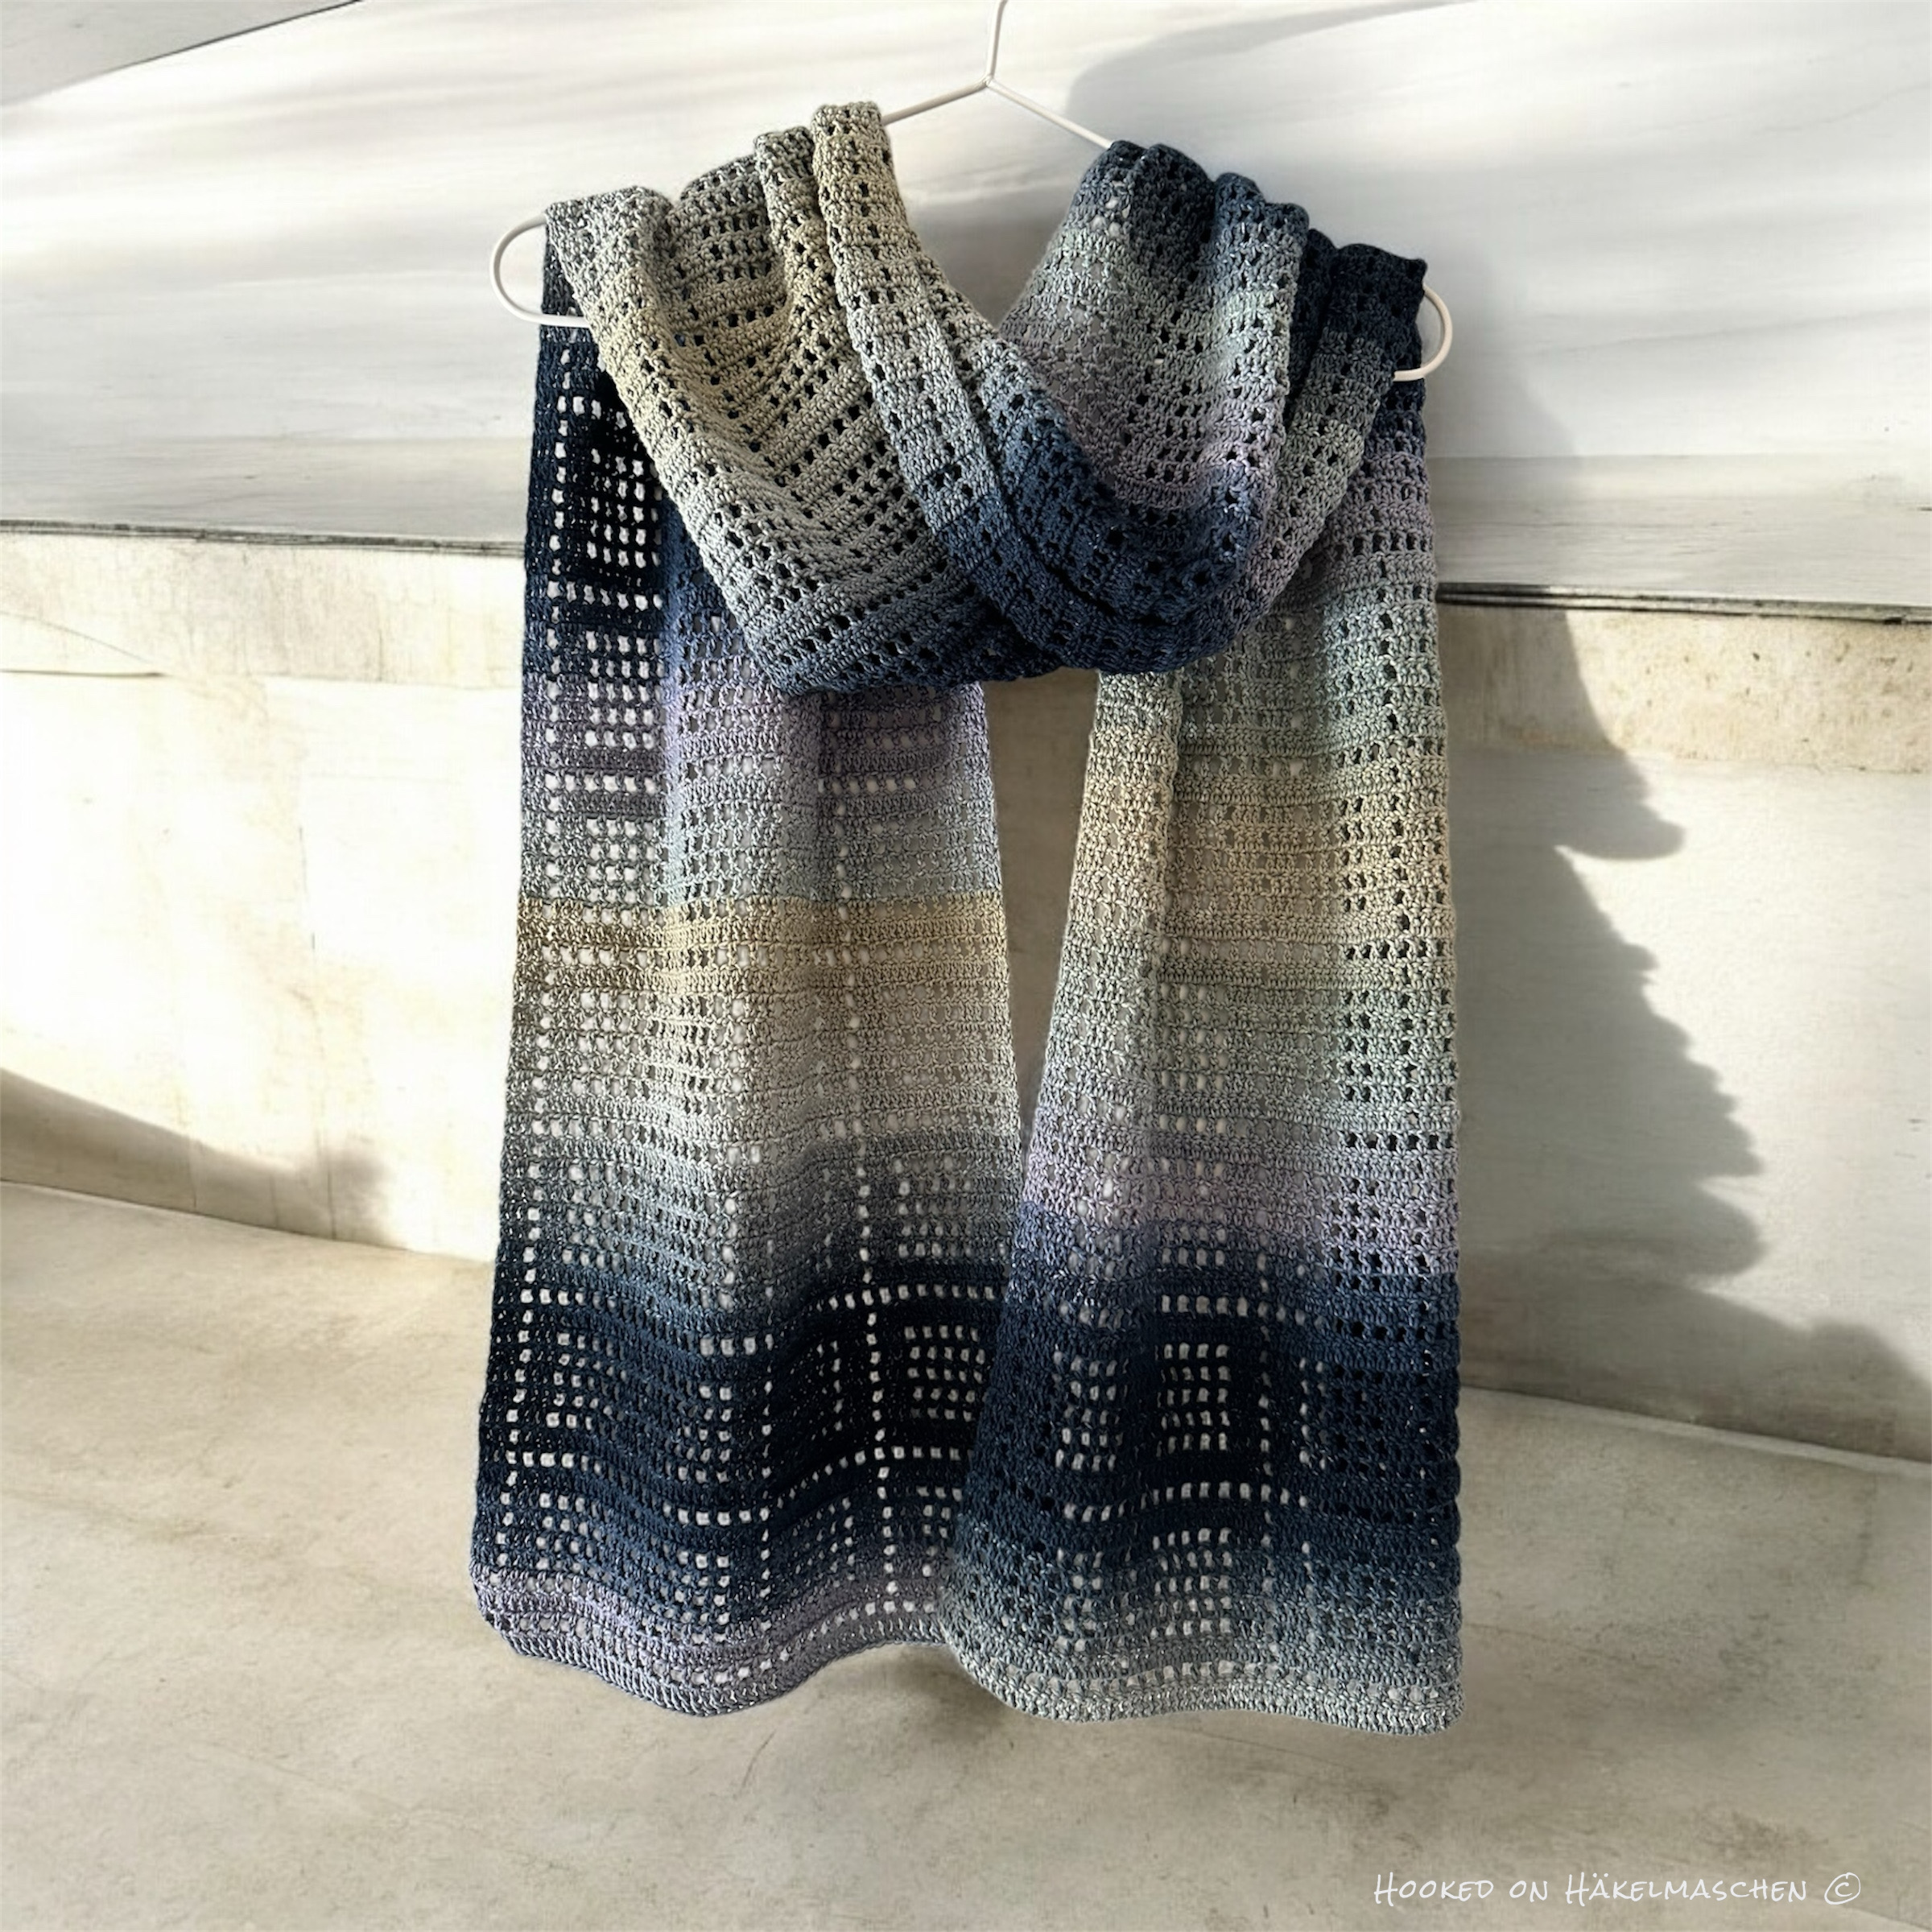
As inspiration: